Page 646 of 717
765
Maintenance
If the headlights or other electrical
components do not work and the
fuses are OK, check the fuse block in
the engine compartment. If a fuse is
blown, it must be replaced.Fuse switch
Always, put the Fuse switch at the
ON position.
If you move the switch to the OFF
position, some items such as audio
and digital clock must be reset and
transmitter (or smart key) may not
work properly.
Engine compartment panel fuse
replacement
1. Turn the ignition switch and all
other switches off.
2. Remove the fuse box cover by
pressing the tap and pulling up.
ODM072019
CAUTION
Always place the fuse switch in
the ON position while driving
the vehicle.
ODM072027
ODM072028
Diesel only
Page 649 of 717

Maintenance
68 7
DescriptionSymbol Fuse ratingProtected Component
A/BAG IND10AInstrument Cluster
A/BAG15ASRS Control Module, A/C Control Module
MODULE 57.5ARain Sensor, Sunroof, Smart Key Control Module, BCM, Parking Guide System, AC,
Inverter Module, Rear Blower Relay, Rear Seat Warmer LH/RH, Driver/Passenger
Climate Control Seat Control Module, Driver/Passenger Seat Warmer Module
MODULE 17.5ASport Mode Switch, Key Solenoid, Console Switch LH/RH, Front Console Switch,
Rear Power Window Switch LH/RH, RR_BLOWER SW
REAR FOG LAMP10AICM Relay Box (Rear Fog Lamp Relay)
MEMORY 210ABCM, Tire Pressure Monitoring Module, Driver IMS Module, Driver/Passenger Door
Module, Auto Light & Photo Sensor, Data Link Connector, A/C Control Module,
Instrument Cluster
SMART KEY 27.5ASmart Key Control Module, Immobilizer Module
MODULE 310A
BCM, Instrument Cluster, Tire Pressure Monitoring Module, AMP, Smart Parking Assist
Control Module, Electro Chromic Mirror, Lane Departure Warning Module, Steering
Angle Sensor, Audio, A/C Control Module, A/V & Navigation Head Unit, 4WD ECM
ATM Shift Lever Indicator, Rear Parking Assist Sensor LH/RH, Rear Seat Warmer
LH/RH, Driver/Passenger Climate Control Seat Control Module, Driver/Passenger Seat
Warmer Module, Driver IMS Module, Console Switch LH/RH, Rear Console Switch,
Rear Parking Assist Sensor (Center) LH/RH, Driver/Passenger Door Module, Electric
Parking Brake Module
SMART KEY 410AStart/Stop Button Switch, Immobilizer Module
Page 650 of 717
769
Maintenance
DescriptionSymbol Fuse ratingProtected Component
INTERIOR LAMP15ACargo Lamp, Vanity Lamp LH/RH, Overhead Console Lamp Center Room Lamp,
Personal Lamp LH/RH
MULTI MEDIAMULTI MEDIA15AAudio, A/V & Navigation Head Unit, Digital Clock
MDPS7.5AMDPS Unit
HANDLE HTD15ASteering Wheel Switch
MEMORY 110ARF Receiver, Ignition Key Ill. & Door Warning Switch
START7.5AW/O IMMO. & Smart Key : ICM Relay Box (Burglar Alarm Relay)
With IMMO./Smart Key : ECM/PCM, Transaxle Range Switch,
Smart Key Control Module, E/R Fuse & Relay Box (RLY. 2)
MODULE 210A
Adaptive Front Lighting Module, Crash Pad Switch, Glow Relay Unit (DSL),
Multipurpose Check Connector, Head Lamp LH/RH, Head Lamp Leveling Device
Actuator LH/RH, Auto Head Lamp Leveling Device Module, Stop Lamp Switch, Diesel
Box (RLY. 1)(DSL)
SUNROOF 220ASunroof
S/HEATER RR15ARear Seat Warmer LH/RH
IGN20AE/R Fuse & Relay Box (Fuse - F36, F37, F38)
Page 651 of 717
Maintenance
70 7
DescriptionSymbol Fuse ratingProtected Component
A/CON 17.5AE/R Fuse & Relay Box (RLY. 4/14), A/C Control Module
Cluster Ionizer, Diesel Box (RLY. 3/4)
WIPER RR15ARear Wiper Relay, Rear Wiper Motor, Multifunction Switch
SMART KEY 125ASmart Key Control Module
S/HEATER FRT20ADriver/Passenger Climate Control Seat Control Module
Driver/Passenger Seat Warmer Module
A/CON 27.5AA/C Control Module
C/LIGHTER20AFront Power Outlet & Cigarette Lighter, Luggage Power Outlet
WIPER FRT15AMultifunction Switch, E/R Fuse & Relay Box (RLY. 9/11)
RR BLOWER20AICM Relay Box (Rear Blower Relay)
P/WDW RH25APassenger Safety Power Window Module Passenger Door Module,
Rear Power Window Switch RH Rear Safety Power Window Module RH
RR DEFOGGER10AA/C Control Module
BRAKE SWITCH7.5ASmart Key Control Module, Stop Lamp Switch
SUNROOF 120ASunroof
Page 661 of 717

Maintenance
80 7
LIGHT BULBS
Use only the bulbs of the specified
wattage.
✽NOTICE
After heavy, driving rain or wash-
ing, headlight and taillight lenses
could appear frosty. This condition
is caused by the temperature differ-
ence between the lamp inside and
outside. This is similar to the con-
densation on your windows inside
your vehicle during the rain and
doesn’t indicate a problem with
your vehicle. If the water leaks into
the lamp bulb circuitry, we recom-
mend that the system be checked by
an authorized HYUNDAI dealer.WARNING - Working on
the lights
Prior to working on the light,
firmly apply the parking brake,
ensure that the ignition switch
is turned to the “LOCK” position
and turn off the lights to avoid
sudden movement of the vehi-
cle and burning your fingers or
receiving an electric shock.
CAUTION
Be sure to replace the burned-
out bulb with one of the same
wattage rating. Otherwise, it
may cause damage to the fuse
or electric wiring system.
CAUTION
If you don’t have necessary
tools, the correct bulbs and the
expertise, consult an authorized
HYUNDAI dealer. In many cases,
it is difficult to replace vehicle
light bulbs because other parts
of the vehicle must be removed
before you can get to the bulb.
This is especially true if you
have to remove the headlight
assembly to get to the bulb(s).
Removing/installing the head-
light assembly can result in
damage to the vehicle.
Page 663 of 717

Maintenance
82 7
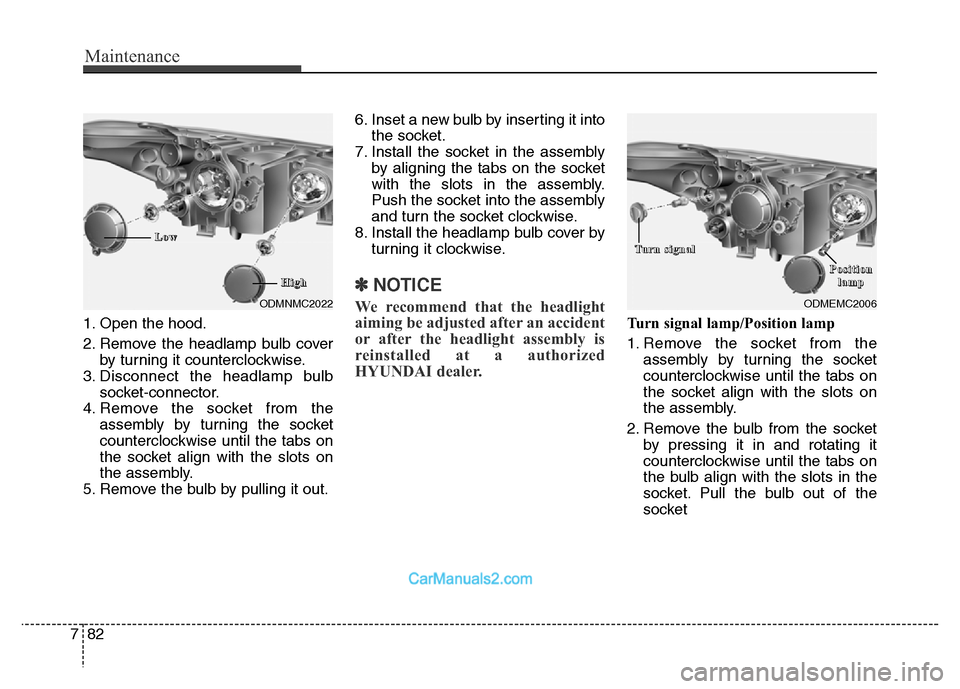
1. Open the hood.
2. Remove the headlamp bulb cover
by turning it counterclockwise.
3. Disconnect the headlamp bulb
socket-connector.
4. Remove the socket from the
assembly by turning the socket
counterclockwise until the tabs on
the socket align with the slots on
the assembly.
5. Remove the bulb by pulling it out.6. Inset a new bulb by inserting it into
the socket.
7. Install the socket in the assembly
by aligning the tabs on the socket
with the slots in the assembly.
Push the socket into the assembly
and turn the socket clockwise.
8. Install the headlamp bulb cover by
turning it clockwise.
✽NOTICE
We recommend that the headlight
aiming be adjusted after an accident
or after the headlight assembly is
reinstalled at a authorized
HYUNDAI dealer.
Turn signal lamp/Position lamp
1. Remove the socket from the
assembly by turning the socket
counterclockwise until the tabs on
the socket align with the slots on
the assembly.
2. Remove the bulb from the socket
by pressing it in and rotating it
counterclockwise until the tabs on
the bulb align with the slots in the
socket. Pull the bulb out of the
socket
ODMNMC2022
L L
o o
w w
H H
i i
g g
h h
ODMEMC2006
T T
u u
r r
n n
s s
i i
g g
n n
a a
l l
P P
o o
s s
i i
t t
i i
o o
n n
l l
a a
m m
p p
Page 665 of 717

Maintenance
84 7
Headlamp (HID type), position
(LED) lamp, daytime running
lamp replacement
If the light bulb does not operate, we
recommend that the system be
checked by an authorized HYUNDAI
dealer.
✽NOTICE
HID lamps have superior perform-
ance vs. halogen bulbs. HID lamps
are estimated by the manufacturer
to last twice as long or longer than
halogen bulbs depending on their
frequency of use. They will probably
require replacement at some point
in the life of the vehicle. Cycling the
headlamps on and off more than
typical use will shorten HID lamps
life. HID lamps do not fail in the
same manner as halogen incandes-
cent lamps. If a headlamp goes out
after a period of operation but will
immediately relight when the head-
lamp switch is cycled it is likely the
HID lamp needs to be replaced. HID
lighting components are more com-
plex than conventional halogen
bulbs thus have higher replacement
cost.
Headlight and front fog light
aiming (for Europe)
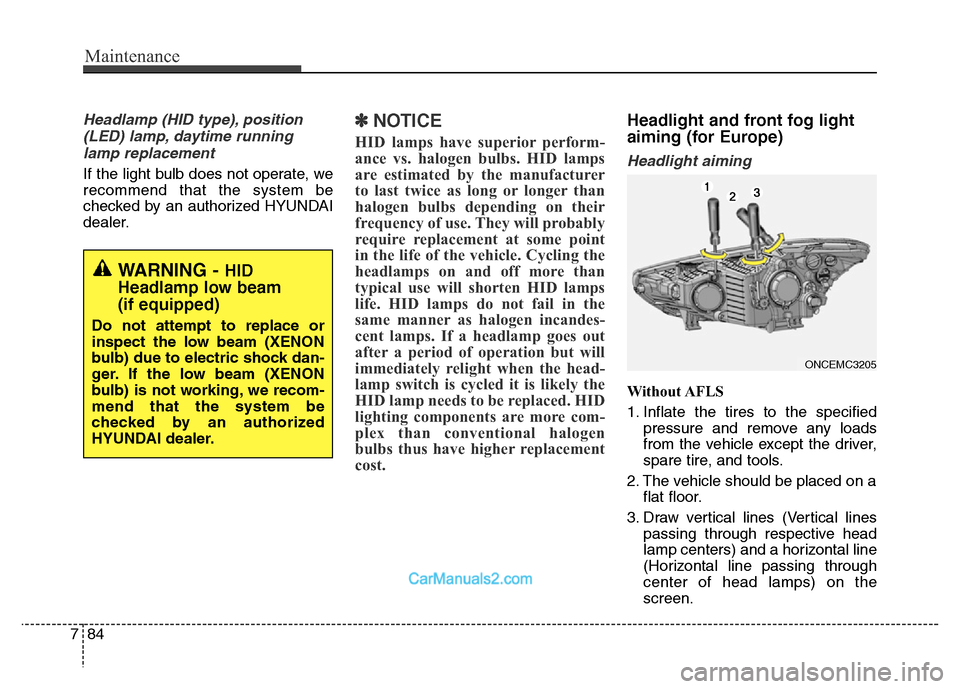
Headlight aiming
Without AFLS
1. Inflate the tires to the specified
pressure and remove any loads
from the vehicle except the driver,
spare tire, and tools.
2. The vehicle should be placed on a
flat floor.
3. Draw vertical lines (Vertical lines
passing through respective head
lamp centers) and a horizontal line
(Horizontal line passing through
center of head lamps) on the
screen.
WARNING - HID
Headlamp low beam
(if equipped)
Do not attempt to replace or
inspect the low beam (XENON
bulb) due to electric shock dan-
ger. If the low beam (XENON
bulb) is not working, we recom-
mend that the system be
checked by an authorized
HYUNDAI dealer.
ONCEMC3205
Page 666 of 717

785
Maintenance
4. With the head lamp and battery in
normal condition, aim the head
lamps so the brightest portion falls
on the horizontal and vertical
lines.
5. To aim the low/high beam left or
right, turn the driver clockwise or
counterclockwise. To aim the
low/high beam up or down, turn
the driver clockwise or counter-
clockwise.With AFLS
1. Turn off the engine
2. Turn the light switch to the low
beam position.
3. Position the tires straight ahead
with the steering wheel.
4. Turn on the engine.
5. Inflate the tires to the specified
pressure and remove any loads
from the vehicle except the driver,
spare tire, and tools.
6. The vehicle should be placed on a
flat floor.
7. Draw vertical lines (Vertical lines
passing through respective head
lamp centers) and a horizontal line
(Horizontal line passing through
center of head lamps) on the
screen.
8. With the head lamp and battery in
normal condition, aim the head
lamps so the brightest portion falls
on the horizontal and vertical lines
after 20 seconds for AFLS system
initialization.9. To aim the low beam left or right,
turn the driver clockwise or coun-
terclockwise. To aim the low beam
up or down, turn the driver clock-
wise or counterclockwise. To aim
the high beam up or down, turn
the driver clockwise or counter-
clockwise.