2016 Hyundai Grand Santa Fe light
[x] Cancel search: lightPage 628 of 717
747
Maintenance
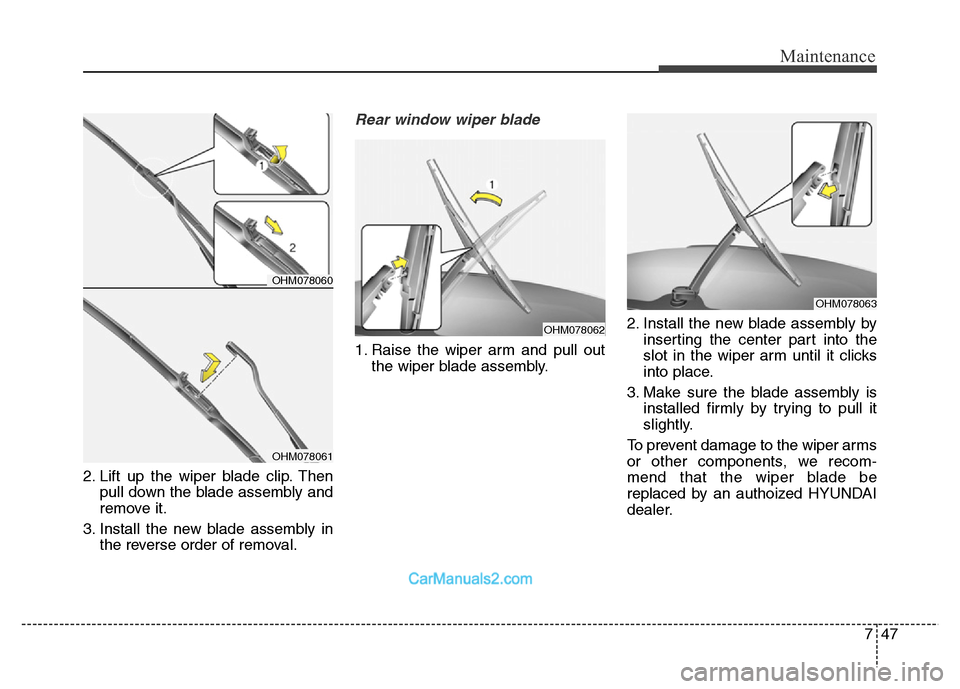
2. Lift up the wiper blade clip. Then
pull down the blade assembly and
remove it.
3. Install the new blade assembly in
the reverse order of removal.
Rear window wiper blade
1. Raise the wiper arm and pull out
the wiper blade assembly.2. Install the new blade assembly by
inserting the center part into the
slot in the wiper arm until it clicks
into place.
3. Make sure the blade assembly is
installed firmly by trying to pull it
slightly.
To prevent damage to the wiper arms
or other components, we recom-
mend that the wiper blade be
replaced by an authoized HYUNDAI
dealer.
OHM078062
OHM078063
OHM078060
OHM078061
Page 629 of 717
Maintenance
48 7
BATTERY
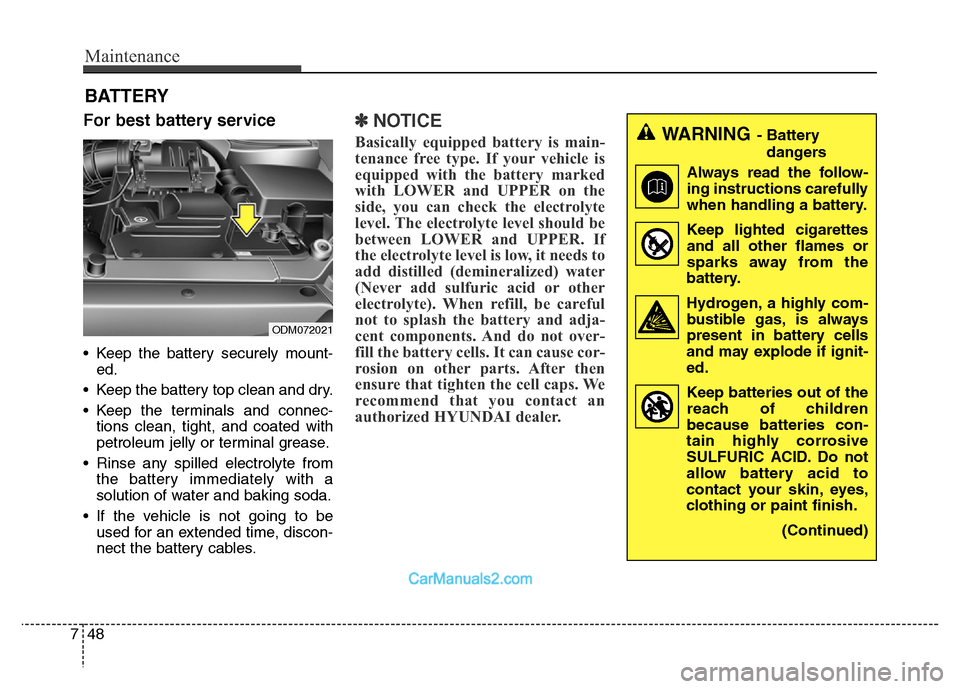
For best battery service
• Keep the battery securely mount-
ed.
• Keep the battery top clean and dry.
• Keep the terminals and connec-
tions clean, tight, and coated with
petroleum jelly or terminal grease.
• Rinse any spilled electrolyte from
the battery immediately with a
solution of water and baking soda.
• If the vehicle is not going to be
used for an extended time, discon-
nect the battery cables.
✽NOTICE
Basically equipped battery is main-
tenance free type. If your vehicle is
equipped with the battery marked
with LOWER and UPPER on the
side, you can check the electrolyte
level. The electrolyte level should be
between LOWER and UPPER. If
the electrolyte level is low, it needs to
add distilled (demineralized) water
(Never add sulfuric acid or other
electrolyte). When refill, be careful
not to splash the battery and adja-
cent components. And do not over-
fill the battery cells. It can cause cor-
rosion on other parts. After then
ensure that tighten the cell caps. We
recommend that you contact an
authorized HYUNDAI dealer.WARNING- Battery
dangers
Always read the follow-
ing instructions carefully
when handling a battery.
Keep lighted cigarettes
and all other flames or
sparks away from the
battery.
Hydrogen, a highly com-
bustible gas, is always
present in battery cells
and may explode if ignit-
ed.
Keep batteries out of the
reach of children
because batteries con-
tain highly corrosive
SULFURIC ACID. Do not
allow battery acid to
contact your skin, eyes,
clothing or paint finish.
(Continued)
ODM072021
Page 631 of 717
Maintenance
50 7
Battery recharging
Your vehicle has a maintenance-free,
calcium-based battery.
• If the battery becomes discharged
in a short time (because, for exam-
ple, the headlights or interior lights
were left on while the vehicle was
not in use), recharge it by slow
charging (trickle) for 10 hours.
• If the battery gradually discharges
because of high electric load while
the vehicle is being used, recharge
it at 20-30A for two hours.
Reset items
Items should be reset after the bat-
tery has been discharged or the bat-
tery has been disconnected.
• Auto up/down window
(See section 4)
• Sunroof (See section 4)
• Trip computer (See section 4)
• Climate control system
(See section 4)
• Clock (See section 4)
• Audio (See section 4)(Continued)
• Watch the battery during charg-
ing, and stop or reduce the
charging rate if the battery cells
begin gassing (boiling) violently
or if the temperature of the elec-
trolyte of any cell exceeds 49°C
(120°F).
• Wear eye protection when check-
ing the battery during charging.
• Disconnect the battery charger
in the following order.
1. Turn off the battery charger
main switch.
2. Unhook the negative clamp
from the negative battery ter-
minal.
3. Unhook the positive clamp
from the positive battery termi-
nal.
• Before performing maintenance
or recharging the battery, turn off
all accessories and stop the
engine.
• The negative battery cable must
be removed first and installed
last when the battery is discon-
nected.
WARNING- Recharging
battery
When recharging the battery,
observe the following precau-
tions:
• The battery must be removed
from the vehicle and placed in
an area with good ventilation.
• Do not allow cigarettes,
sparks, or flame near the bat-
tery.
(Continued)
Page 637 of 717
Maintenance
56 7
Compact spare tire replacement
(if equipped)
A compact spare tire has a shorter
tread life than a regular size tire.
Replace it when you can see the
tread wear indicator bars on the tire.
The replacement compact spare tire
should be the same size and design
tire as the one provided with your
new vehicle and should be mounted
on the same compact spare tire
wheel. The compact spare tire is not
designed to be mounted on a regular
size wheel, and the compact spare
tire wheel is not designed for mount-
ing a regular size tire.
Wheel replacement
When replacing the metal wheels for
any reason, make sure the new
wheels are equivalent to the original
factory units in diameter, rim width
and offset.(Continued)
• The use of any other tire size
or type may seriously affect
ride, handling, ground clear-
ance, stopping distance, body
to tire clearance, snow tire
clearance, and speedometer
reliability.
• It is best to replace all four
tires at the same time. If that
is not possible, or necessary,
then replace the two front or
two rear tires as a pair.
Replacing just one tire can
seriously affect your vehicle’s
handling.
• The ABS works by comparing
the speed of the wheels. Tire
size can affect wheel speed.
When replacing tires, all 4
tires must use the same size
originally supplied with the
vehicle. Using tires of a differ-
ent size can cause the ABS
(Anti-lock Brake System) and
ESC (Electronic Stability
Control) (if equipped) to work
irregularly.
WARNING
A wheel that is not the correct
size may adversely affect wheel
and bearing life, braking and
stopping abilities, handling
characteristics, ground clear-
ance, body-to-tire clearance,
snow chain clearance,
speedometer and odometer cal-
ibration, headlight aim and
bumper height.
Page 639 of 717
Maintenance
58 7
(P)235/60R18 102H
P - Applicable vehicle type (tires
marked with the prefix “P’’ are
intended for use on passenger
vehicles or light trucks; however,
not all tires have this marking).
(if equipped)
235 - Tire width in millimeters.
60 - Aspect ratio. The tire’s section
height as a percentage of its
width.
R - Tire construction code (Radial).
18 - Rim diameter in inches.
102 - Load Index, a numerical code
associated with the maximum
load the tire can carry.
H - Speed Rating Symbol. See the
speed rating chart in this section
for additional information.Wheel size designation
Wheels are also marked with impor-
tant information that you need if you
ever have to replace one. The follow-
ing explains what the letters and
numbers in the wheel size designa-
tion mean.
Example wheel size designation:
7.5JX18
7.5 - Rim width in inches.
J - Rim contour designation.
18 - Rim diameter in inches.Tire speed ratings
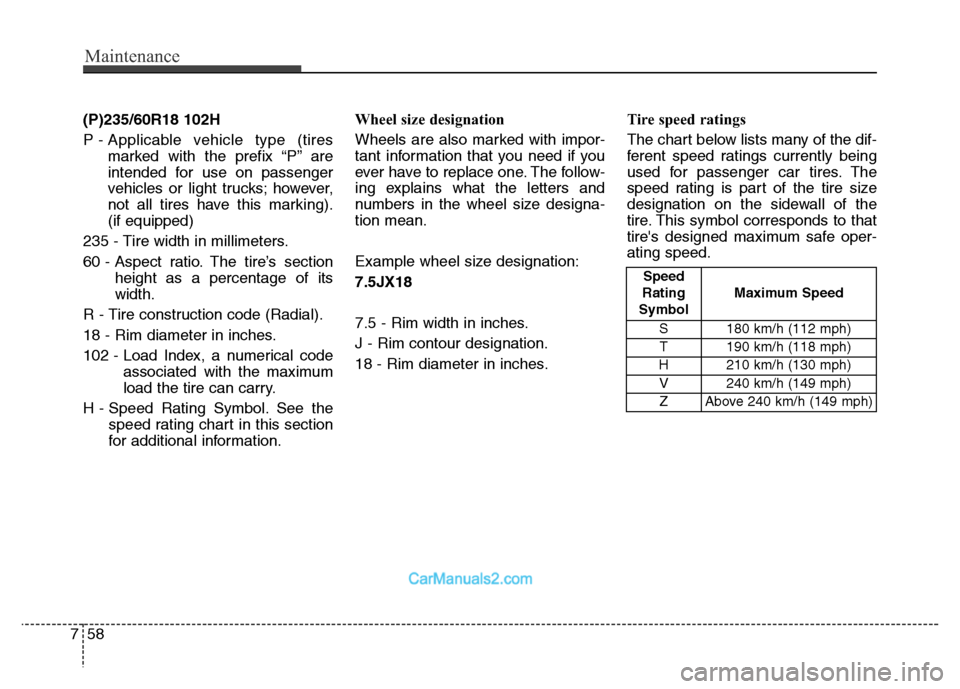
The chart below lists many of the dif-
ferent speed ratings currently being
used for passenger car tires. The
speed rating is part of the tire size
designation on the sidewall of the
tire. This symbol corresponds to that
tire's designed maximum safe oper-
ating speed.
Speed
Rating
SymbolMaximum Speed
S 180 km/h (112 mph)
T 190 km/h (118 mph)
H 210 km/h (130 mph)
V 240 km/h (149 mph)
Z Above 240 km/h (149 mph)
Page 643 of 717
Maintenance
62 7
CAUTION
Because the sidewall of the low
aspect ratio tire is shorter than
the normal, the wheel and tire of
the low aspect ratio tire is easi-
er to be damaged. So, follow the
instructions below.
- When driving on a rough road
or off road, drive cautiously
because tires and wheels may
be damaged. And after driving,
inspect tires and wheels.
- When passing over a pothole,
speed bump, manhole, or curb
stone, drive slowly so that the
tires and wheels are not dam-
aged.
- If the tire is impacted, we rec-
ommend that you inspect the
tire condition or contact an
authorized HYUNDAI dealer.
- To prevent damage to the tire,
inspect the tire condition and
pressure every 3,000km.
CAUTION
• It is not easy to recognize the
tire damage with your own
eyes. But if there is the slight-
est hint of tire damage, even
though you cannot see the tire
damage with your own eyes,
have the tire checked or
replaced because the tire
damage may cause air leak-
age from the tire.
• If the tire is damaged by driv-
ing on a rough road, off road,
pothole, manhole, or curb
stone, it will not be covered by
the warranty.
• You can find out the tire infor-
mation on the tire sidewall.
Page 644 of 717
763
Maintenance
FUSES
A vehicle’s electrical system is pro-
tected from electrical overload dam-
age by fuses.
This vehicle has 2 (or 3) fuse panels,
one located in the driver’s side panel
bolster, the other in the engine com-
partment near the battery.
If any of your vehicle’s lights, acces-
sories, or controls do not work, check
the appropriate circuit fuse. If a fuse
has blown, the element inside the
fuse will be melted.
If the electrical system does not
work, first check the driver’s side
fuse panel.
Before replacing a blown fuse, dis-
connect the negative battery cable.
Always replace a blown fuse with
one of the same rating.
If the replacement fuse blows, this
indicates an electrical problem. Avoid
using the system involved and imme-
diately consult an authorized
HYUNDAI dealer.
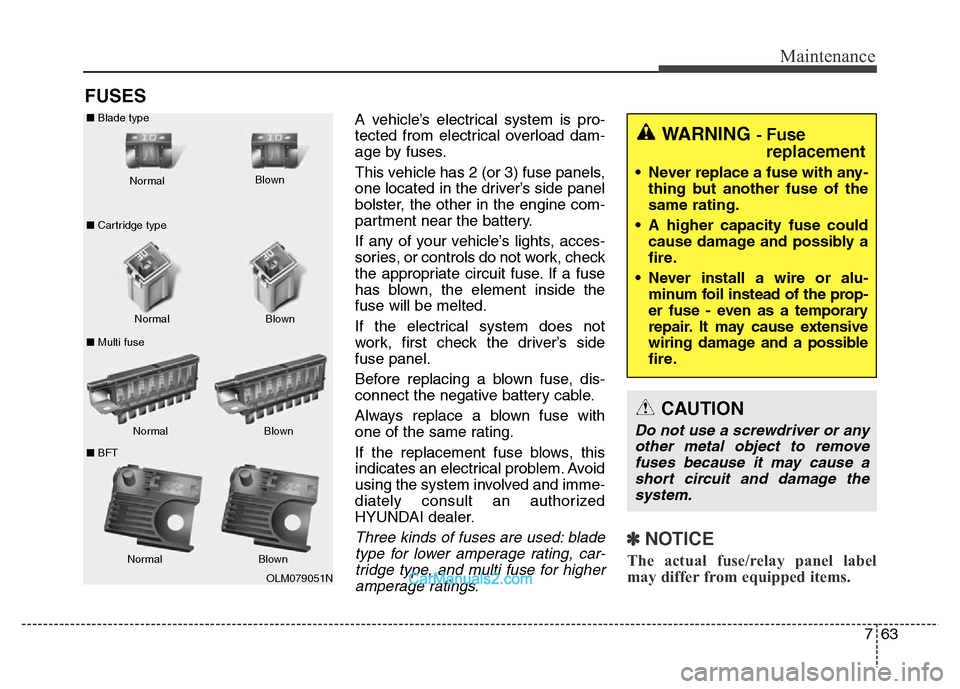
Three kinds of fuses are used: blade
type for lower amperage rating, car-
tridge type, and multi fuse for higher
amperage ratings.✽NOTICE
The actual fuse/relay panel label
may differ from equipped items.
WARNING - Fuse
replacement
• Never replace a fuse with any-
thing but another fuse of the
same rating.
• A higher capacity fuse could
cause damage and possibly a
fire.
• Never install a wire or alu-
minum foil instead of the prop-
er fuse - even as a temporary
repair. It may cause extensive
wiring damage and a possible
fire.
CAUTION
Do not use a screwdriver or any
other metal object to remove
fuses because it may cause a
short circuit and damage the
system.
OLM079051N Normal Normal ■Blade type
■Cartridge type
■Multi fuseBlown
Blown
Normal Blown
Normal Blown ■BFT
Page 645 of 717
Maintenance
64 7
Inner panel fuse replacement
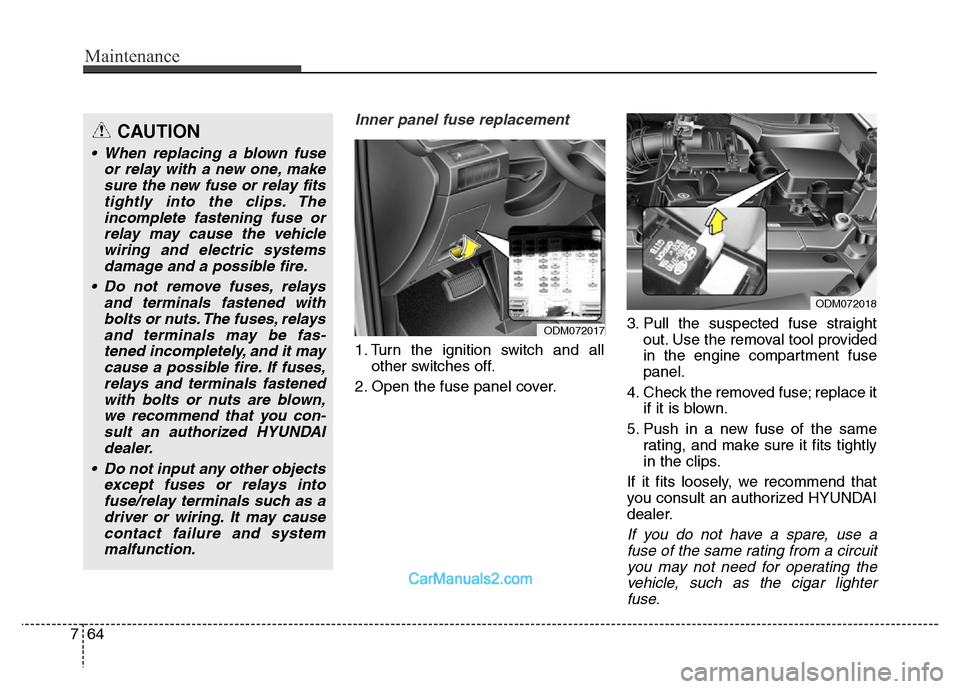
1. Turn the ignition switch and all
other switches off.
2. Open the fuse panel cover.3. Pull the suspected fuse straight
out. Use the removal tool provided
in the engine compartment fuse
panel.
4. Check the removed fuse; replace it
if it is blown.
5. Push in a new fuse of the same
rating, and make sure it fits tightly
in the clips.
If it fits loosely, we recommend that
you consult an authorized HYUNDAI
dealer.
If you do not have a spare, use a
fuse of the same rating from a circuit
you may not need for operating the
vehicle, such as the cigar lighter
fuse.
ODM072017
ODM072018
CAUTION
• When replacing a blown fuse
or relay with a new one, make
sure the new fuse or relay fits
tightly into the clips. The
incomplete fastening fuse or
relay may cause the vehicle
wiring and electric systems
damage and a possible fire.
• Do not remove fuses, relays
and terminals fastened with
bolts or nuts. The fuses, relays
and terminals may be fas-
tened incompletely, and it may
cause a possible fire. If fuses,
relays and terminals fastened
with bolts or nuts are blown,
we recommend that you con-
sult an authorized HYUNDAI
dealer.
• Do not input any other objects
except fuses or relays into
fuse/relay terminals such as a
driver or wiring. It may cause
contact failure and system
malfunction.