2016 Hyundai Grand Santa Fe display
[x] Cancel search: displayPage 18 of 717
Your vehicle at a glance
6 2
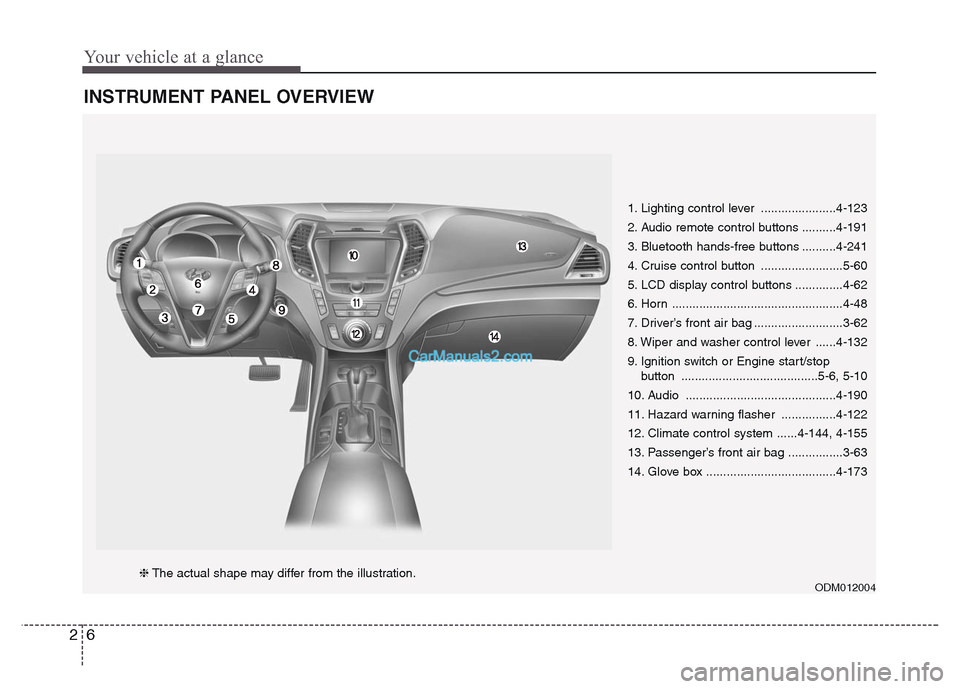
INSTRUMENT PANEL OVERVIEW
1. Lighting control lever ......................4-123
2. Audio remote control buttons ..........4-191
3. Bluetooth hands-free buttons ..........4-241
4. Cruise control button ........................5-60
5. LCD display control buttons ..............4-62
6. Horn ..................................................4-48
7. Driver’s front air bag ..........................3-62
8. Wiper and washer control lever ......4-132
9. Ignition switch or Engine start/stop
button ........................................5-6, 5-10
10. Audio ............................................4-190
11. Hazard warning flasher ................4-122
12. Climate control system ......4-144, 4-155
13. Passenger’s front air bag ................3-63
14. Glove box ......................................4-173
ODM012004❈The actual shape may differ from the illustration.
Page 99 of 717
Instrument cluster . . . . . . . . . . . . . . . . . . . . . . . . . 4-63
• Instrument cluster control . . . . . . . . . . . . . . . . . . . . . 4-65
• LCD display control . . . . . . . . . . . . . . . . . . . . . . . . . . 4-65
• Gauges . . . . . . . . . . . . . . . . . . . . . . . . . . . . . . . . . . . . . 4-66
• Transaxle shift indicator . . . . . . . . . . . . . . . . . . . . . . . 4-71
LCD display . . . . . . . . . . . . . . . . . . . . . . . . . . . . . . 4-72
• LCD modes. . . . . . . . . . . . . . . . . . . . . . . . . . . . . . . . . . 4-72
• Service mode . . . . . . . . . . . . . . . . . . . . . . . . . . . . . . . . 4-73
• User settings mode. . . . . . . . . . . . . . . . . . . . . . . . . . . . 4-74
• A/V mode . . . . . . . . . . . . . . . . . . . . . . . . . . . . . . . . . . . 4-77
• Turn by turn mode . . . . . . . . . . . . . . . . . . . . . . . . . . . 4-77
• Warning messages . . . . . . . . . . . . . . . . . . . . . . . . . . . . 4-78
Trip computer . . . . . . . . . . . . . . . . . . . . . . . . . . . . . 4-84
• Overview. . . . . . . . . . . . . . . . . . . . . . . . . . . . . . . . . . . . 4-84
• Trip A/B . . . . . . . . . . . . . . . . . . . . . . . . . . . . . . . . . . . . 4-85
• Fuel economy . . . . . . . . . . . . . . . . . . . . . . . . . . . . . . . . 4-86
Warning and indicator lights . . . . . . . . . . . . . . . . 4-89
• Warning lights . . . . . . . . . . . . . . . . . . . . . . . . . . . . . . . 4-89
• Indicator lights. . . . . . . . . . . . . . . . . . . . . . . . . . . . . . . 4-99
Rear parking assist system . . . . . . . . . . . . . . . . . 4-104
• Operation . . . . . . . . . . . . . . . . . . . . . . . . . . . . . . . . . . 4-104
• Non-operational conditions . . . . . . . . . . . . . . . . . . . 4-105
• Rear parking assist system precautions . . . . . . . . . 4-106
• Self-diagnosis . . . . . . . . . . . . . . . . . . . . . . . . . . . . . . . 4-107
Parking assist system . . . . . . . . . . . . . . . . . . . . . . 4-108
• Operation . . . . . . . . . . . . . . . . . . . . . . . . . . . . . . . . . . 4-109
• Non-operational conditions . . . . . . . . . . . . . . . . . . . 4-111
• Self-diagnosis . . . . . . . . . . . . . . . . . . . . . . . . . . . . . . . 4-112
Smart parking assist system (SPAS) . . . . . . . . . 4-113
• Operating condition . . . . . . . . . . . . . . . . . . . . . . . . . 4-114
• Non-operating condition . . . . . . . . . . . . . . . . . . . . . . 4-114
• How the system works . . . . . . . . . . . . . . . . . . . . . . . 4-117
• Additional instructions (messages) . . . . . . . . . . . . . 4-123
• System malfunction . . . . . . . . . . . . . . . . . . . . . . . . . . 4-124
Rearview camera . . . . . . . . . . . . . . . . . . . . . . . . . 4-125
Hazard warning flasher . . . . . . . . . . . . . . . . . . . . 4-126
Lighting . . . . . . . . . . . . . . . . . . . . . . . . . . . . . . . . . 4-127
• Battery saver function. . . . . . . . . . . . . . . . . . . . . . . . 4-127
• Headlight (Headlamp) escort function . . . . . . . . . . 4-127
• Lighting control . . . . . . . . . . . . . . . . . . . . . . . . . . . . . 4-127
• Traffic change . . . . . . . . . . . . . . . . . . . . . . . . . . . . . . 4-129
• High - beam operation . . . . . . . . . . . . . . . . . . . . . . . 4-131
• Turn signals and lane change signals . . . . . . . . . . . 4-132
• Front fog light . . . . . . . . . . . . . . . . . . . . . . . . . . . . . . 4-132
• Rear fog light . . . . . . . . . . . . . . . . . . . . . . . . . . . . . . . 4-133
• Daytime running light . . . . . . . . . . . . . . . . . . . . . . . . 4-134
• Headlight leveling device . . . . . . . . . . . . . . . . . . . . . 4-134
• Adaptive front lighting system (AFLS) . . . . . . . . . . 4-135
4
Page 127 of 717
Features of your vehicle
30 4
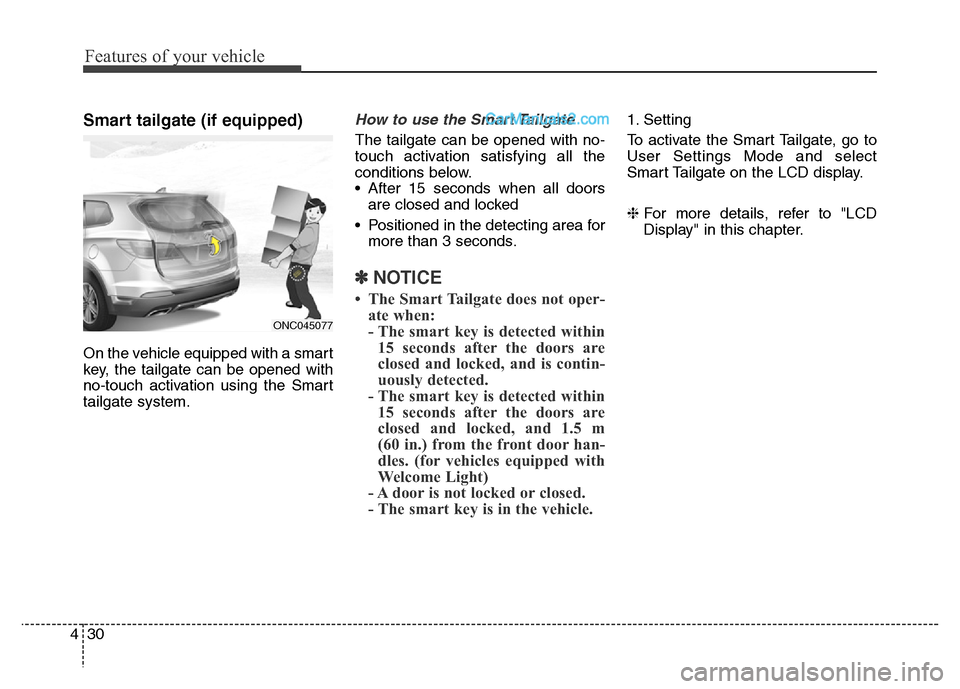
Smart tailgate (if equipped)
On the vehicle equipped with a smart
key, the tailgate can be opened with
no-touch activation using the Smart
tailgate system.
How to use the Smart Tailgate
The tailgate can be opened with no-
touch activation satisfying all the
conditions below.
• After 15 seconds when all doors
are closed and locked
• Positioned in the detecting area for
more than 3 seconds.
✽NOTICE
• The Smart Tailgate does not oper-
ate when:
- The smart key is detected within
15 seconds after the doors are
closed and locked, and is contin-
uously detected.
- The smart key is detected within
15 seconds after the doors are
closed and locked, and 1.5 m
(60 in.) from the front door han-
dles. (for vehicles equipped with
Welcome Light)
- A door is not locked or closed.
- The smart key is in the vehicle.
1. Setting
To activate the Smart Tailgate, go to
User Settings Mode and select
Smart Tailgate on the LCD display.
❈For more details, refer to "LCD
Display" in this chapter.
ONC045077
Page 141 of 717
Features of your vehicle
44 4
If your vehicle is equipped with a
sunroof, you can slide or tilt your
sunroof with the sunroof control lever
located on the overhead console.
Ty p e A
The sunroof can only be opened,
closed, or tilted when the ignition
switch is in the ON position.
Ty p e B
The sunroof can be operated for
approximately 30 seconds after the
ignition key is removed or turned to
the ACC or LOCK position. However,
if the front doors are opened, the
sunroof cannot be opened even with-
in the 30 seconds period.• In cold and wet climates, the sun-
roof may not work properly due to
freezing conditions.
• After the vehicle is washed or in a
rainstorm, be sure to wipe off any
water that is on the sunroof before
operating it.
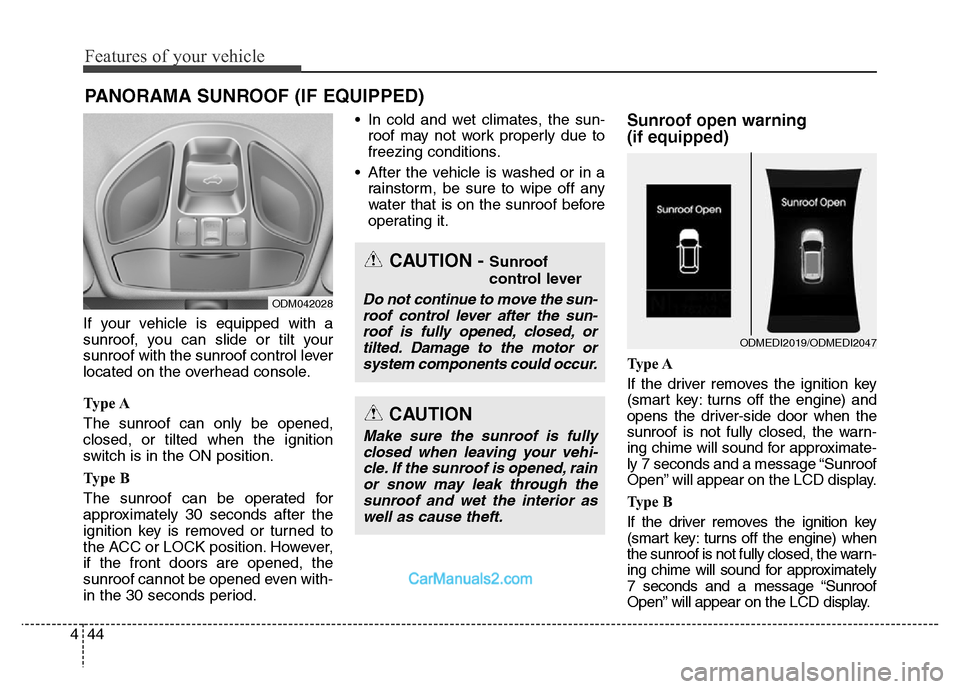
Sunroof open warning
(if equipped)
Ty p e A
If the driver removes the ignition key
(smart key: turns off the engine) and
opens the driver-side door when the
sunroof is not fully closed, the warn-
ing chime will sound for approximate-
ly 7 seconds and a message “Sunroof
Open” will appear on the LCD display.
Ty p e B
If the driver removes the ignition key
(smart key: turns off the engine) when
the sunroof is not fully closed, the warn-
ing chime will sound for approximately
7 seconds and a message “Sunroof
Open” will appear on the LCD display.
PANORAMA SUNROOF (IF EQUIPPED)
ODM042028
CAUTION - Sunroof
control lever
Do not continue to move the sun-
roof control lever after the sun-
roof is fully opened, closed, or
tilted. Damage to the motor or
system components could occur.
CAUTION
Make sure the sunroof is fully
closed when leaving your vehi-
cle. If the sunroof is opened, rain
or snow may leak through the
sunroof and wet the interior as
well as cause theft.
ODMEDI2019/ODMEDI2047
Page 147 of 717
Features of your vehicle
50 4
Tilt steering
A tilt steering wheel allows you to
adjust the steering wheel before you
drive. You can also raise it to give
your legs more room when you exit
and enter the vehicle.
The steering wheel should be posi-
tioned so that it is comfortable for
you to drive, while permitting you to
see the instrument panel warning
lights and gauges.
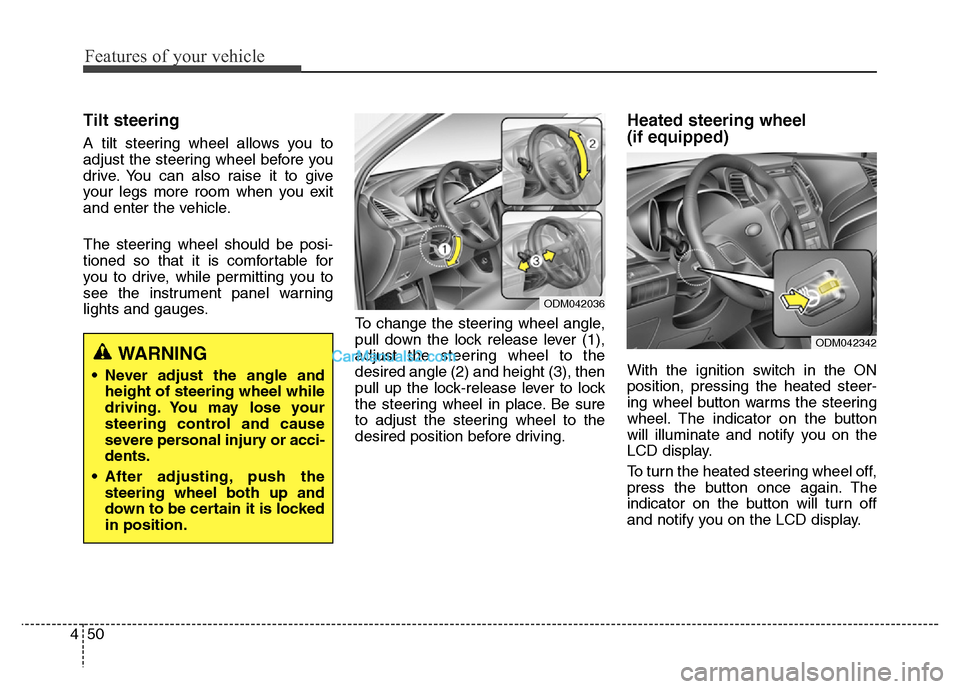
To change the steering wheel angle,
pull down the lock release lever (1),
adjust the steering wheel to the
desired angle (2) and height (3), then
pull up the lock-release lever to lock
the steering wheel in place. Be sure
to adjust the steering wheel to the
desired position before driving.
Heated steering wheel
(if equipped)
With the ignition switch in the ON
position, pressing the heated steer-
ing wheel button warms the steering
wheel. The indicator on the button
will illuminate and notify you on the
LCD display.
To turn the heated steering wheel off,
press the button once again. The
indicator on the button will turn off
and notify you on the LCD display.WARNING
• Never adjust the angle and
height of steering wheel while
driving. You may lose your
steering control and cause
severe personal injury or acci-
dents.
• After adjusting, push the
steering wheel both up and
down to be certain it is locked
in position.
ODM042036
ODM042342
Page 149 of 717
Features of your vehicle
52 4
Flex steering wheel
(if equipped)
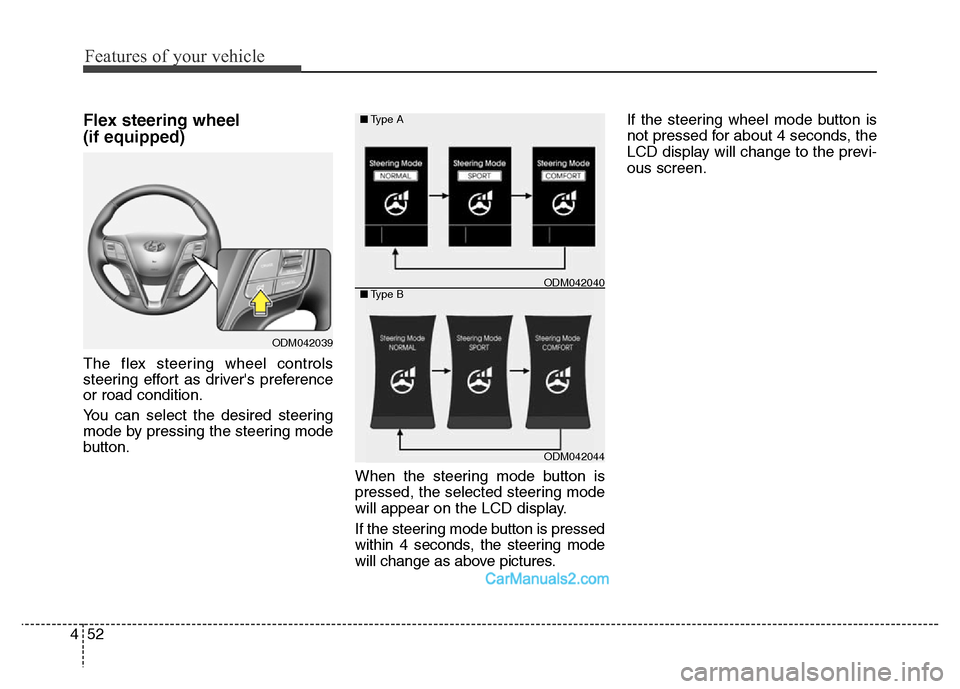
The flex steering wheel controls
steering effort as driver's preference
or road condition.
You can select the desired steering
mode by pressing the steering mode
button.
When the steering mode button is
pressed, the selected steering mode
will appear on the LCD display.
If the steering mode button is pressed
within 4 seconds, the steering mode
will change as above pictures.If the steering wheel mode button is
not pressed for about 4 seconds, the
LCD display will change to the previ-
ous screen.
ODM042039
ODM042044 ■Type A
■Type B
ODM042040
Page 151 of 717
Features of your vehicle
54 4
CAUTION
• For your safety, if you press
the steering mode button
while operating the steering
wheel, the LCD display will
change, but the steering effort
will not change immediately.
After operating the steering
wheel, the steering effort will
change automatically to the
selected mode.
• Be careful when changing the
steering mode while driving.
• When the electronic power
steering is not working prop-
erly, the flex steering wheel
will not work.
Page 153 of 717
Features of your vehicle
56 4
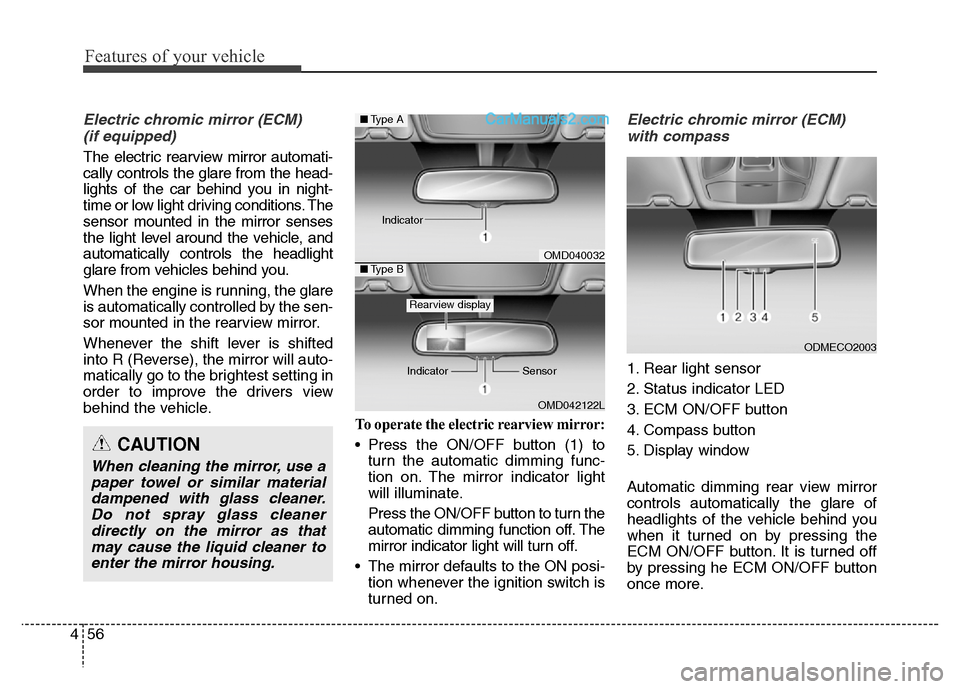
Electric chromic mirror (ECM)
(if equipped)
The electric rearview mirror automati-
cally controls the glare from the head-
lights of the car behind you in night-
time or low light driving conditions. The
sensor mounted in the mirror senses
the light level around the vehicle, and
automatically controls the headlight
glare from vehicles behind you.
When the engine is running, the glare
is automatically controlled by the sen-
sor mounted in the rearview mirror.
Whenever the shift lever is shifted
into R (Reverse), the mirror will auto-
matically go to the brightest setting in
order to improve the drivers view
behind the vehicle.
To operate the electric rearview mirror:
• Press the ON/OFF button (1) to
turn the automatic dimming func-
tion on. The mirror indicator light
will illuminate.
Press the ON/OFF button to turn the
automatic dimming function off. The
mirror indicator light will turn off.
• The mirror defaults to the ON posi-
tion whenever the ignition switch is
turned on.
Electric chromic mirror (ECM)
with compass
1. Rear light sensor
2. Status indicator LED
3. ECM ON/OFF button
4. Compass button
5. Display window
Automatic dimming rear view mirror
controls automatically the glare of
headlights of the vehicle behind you
when it turned on by pressing the
ECM ON/OFF button. It is turned off
by pressing he ECM ON/OFF button
once more.
ODMECO2003
OMD040032
OMD042122L
■Type A
■Type B
Rearview display
Indicator Sensor Indicator
CAUTION
When cleaning the mirror, use a
paper towel or similar material
dampened with glass cleaner.
Do not spray glass cleaner
directly on the mirror as that
may cause the liquid cleaner to
enter the mirror housing.