Page 289 of 502

5-16
Driving your vehicle
Shift-lock system
For your safety, the automatic trans-
mission has a shift-lock system
which prevents shifting the transmis-
sion from P (Park) into R (Reverse)
unless the brake pedal is depressed.
To shift the transmission from P
(Park) into R (Reverse):
1.Depress and hold the brake pedal.
2.Start the engine or place the
Engine Start/Stop button in the ON
position.
3.Move the shift lever.
Shift-lock release
If the shift lever cannot be moved
from the P (Park) position into R
(Reverse) position with the brake
pedal depressed, continue depress-
ing the brake, and then do the follow-
ing:1.Place the Engine Start/Stop button
in the OFF position.
2.Apply the parking brake.
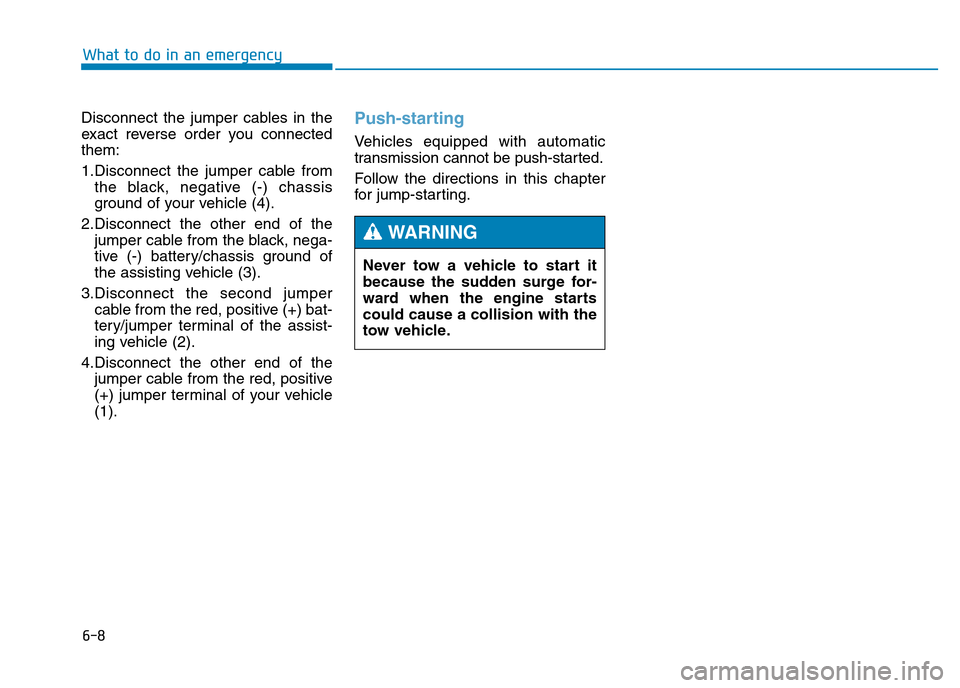
3.Push the shift-lock release button
(1).
4.Move the shift lever whilst pushing
the shift-lock release button.
5.Stop pushing the shift-lock release
button.
6.Depress the brake pedal, and then
restart the engine.
If you need to use the shift-lock
release, we recommend that the sys-
tem be inspected by a HYUNDAI
authorised repairer immediately.
ODH054014R
Page 317 of 502

5-44
Driving your vehicle
When Active ECO is activated:
• The acceleration response may be
slightly reduced as the accelerator
pedal is depressed moderately.
• The air conditioning performance
may be limited.
• The shift pattern of the automatic
transmission may change.
• The engine noise may become
louder.
The above situations are normal
conditions when the Active ECO sys-
tem is activated to improve fuel effi-
ciency.Limitation of Active ECO opera-
tion:
If the following conditions occur
whilst Active ECO is operating, the
system operation is limited even
though there is no change in the
ECO indicator.
• When the coolant temperature is
low:
The system will be limited until
engine performance becomes nor-
mal.
• When driving up a hill:
The system will be limited to gain
power when driving uphill because
engine torque is restricted.
• When using the automatic trans-
mission Sports mode:
The system will be limited accord-
ing to the shift location.
SPORT mode
SPORT mode focuses on
dynamic driving by auto-
matically adjusting the
steering wheel, engine
and transmission system.
• When the DRIVE MODE button is
pressed and the SPORT mode is
selected, the SPORT indicator
(yellow) will illuminate.
• When the SPORT mode is activat-
ed, and the engine is turned off
and on it will change to NORMAL
mode. To turn on the SPORT
mode, press the DRIVE MODE
button again.
• If the system is activated:
- After accelerating and releasing
the accelerator pedal, the gear and
engine speed RPM may not drop
as soon as in NORMAL mode.
- Up-shifting is delayed.
✽NOTICE
In SPORT mode, the fuel efficiency
may decrease.
SPORT
Page 364 of 502
5-91
Driving your vehicle
5
Hazardous driving conditions
When hazardous driving conditions
are encountered such as water,
snow, ice, mud or sand:
Drive cautiously and allow extra dis-
tance for braking.
Avoid sudden movements in braking
or steering.
If stuck in snow, mud, or sand, use
second gear. Accelerate slowly to
avoid spinning the drive wheels.
Use sand, rock salt, or other non-slip
material under the drive wheels to
provide traction when stuck in ice,
snow, or mud.
Rocking the vehicle
If it is necessary to rock the vehicle
to free it from snow, sand, or mud,
first turn the steering wheel right and
left to clear the area around your
front wheels. Then, shift back and
forth between R (Reverse) and a for-
ward gear.
Try to avoid spinning the wheels, and
do not race the engine.
To prevent transmission wear, wait
until the wheels stop spinning before
shifting gears. Release the accelera-
tor pedal whilst shifting, and press
lightly on the accelerator pedal whilst
the transmission is in gear. Slowly
spinning the wheels in forward and
reverse directions causes a rocking
motion that may free the vehicle.
SPECIAL DRIVING CONDITIONS
Downshifting with an automatic
transmission whilst driving on
slippery surfaces can cause an
accident. The sudden change in
tyre speed could cause the
tyres to skid. Be careful when
downshifting on slippery sur-
faces.
WARNING
If the tyres spin at high speed
the tyres can explode, and you
or others may be injured. Do not
attempt this procedure if people
or objects are anywhere near the
vehicle.
The vehicle can overheat caus-
ing an engine compartment fire
or other damage. Spin the
wheels as little as possible and
avoid spinning the wheels at
speeds over 35 mph (56 km/h) as
indicated on the speedometer.
WARNING
Page 376 of 502

6-3
What to do in an emergency
If the engine stalls whilst
driving
• Reduce your speed gradually,
keeping a straight line. Move cau-
tiously off the road to a safe place.
• Turn on your hazard warning flash-
er.
• Try to start the engine again. If your
vehicle will not start, we recom-
mend that you contact a HYUNDAI
authorised repairer.
If the engine stalls at a cross-
road or crossing
If the engine stalls at a crossroad or
crossing, if safe to do so, move the
shift lever to the N (Neutral) position
and then push the vehicle to a safe
location.
If you have a flat tyre whilst
driving
If a tyre goes flat whilst you are driv-
ing:
• Take your foot off the accelerator
pedal and let the vehicle slow
down whilst driving straight ahead.
Do not apply the brakes immedi-
ately or attempt to pull off the road
as this may cause loss of vehicle
control resulting in an accident.
When the vehicle has slowed to
such a speed that it is safe to do
so, brake carefully and pull off the
road. Drive off the road as far as
possible and park on firm, level
ground. If you are on a divided
highway, do not park in the median
area between the two traffic lanes.• When the vehicle is stopped, press
the hazard warning flasher button,
move the shift lever into P (Park,
for automatic transmission vehi-
cle), apply the parking brake, and
place the Engine Start/Stop button
in the OFF position.
• Have all passengers get out of the
vehicle. Be sure they all get out on
the side of the vehicle that is away
from traffic.
• When changing a flat tyre, follow
the instructions provided later in
this chapter.
IN CASE OF AN EMERGENCY WHILST DRIVING
6
Page 379 of 502
6-6
What to do in an emergency
✽NOTICE
An inappropriately disposed
battery can be harmful to
the environment and human
health. Dispose the battery
according to your local
law(s) or regulations.
Jump starting procedure
✽NOTICE
Your vehicle has a battery in the
boot room, but when you jump start
your vehicle, use the jumper termi-
nal in the engine room.
1.Position the vehicles close enough
that the jumper cables will reach,
but do not allow the vehicles to
touch.
2.Avoid fans or any moving parts in
the engine compartment at all
times, even when the vehicles are
turned off.
3.Turn off all electrical devices such
as radios, lights, air conditioning,
etc. Put the vehicles in P (Park, for
automatic transmission vehicle)
and set the parking brakes. Turn
both vehicles OFF.
(Continued)
•NEVER attempt to recharge
the battery when the vehicle’s
battery cables are connected
to the battery.
•The electrical ignition system
works with high voltage.
NEVER touch these compo-
nents with the engine running
or when the Engine Start/Stop
button is in the ON position.
•Do not allow the (+) and (-)
jumper cables to touch. It may
cause sparks.
•The battery may rupture or
explode when you jump start
with a low or frozen battery.
To prevent damage to your vehi-
cle:
•Only use a 12-volt power sup-
ply (battery or jumper system)
to jump start your vehicle.
•Do not attempt to jump start
your vehicle by push-starting.
CAUTION
Pb
Page 381 of 502
6-8
Disconnect the jumper cables in the
exact reverse order you connected
them:
1.Disconnect the jumper cable from
the black, negative (-) chassis
ground of your vehicle (4).
2.Disconnect the other end of the
jumper cable from the black, nega-
tive (-) battery/chassis ground of
the assisting vehicle (3).
3.Disconnect the second jumper
cable from the red, positive (+) bat-
tery/jumper terminal of the assist-
ing vehicle (2).
4.Disconnect the other end of the
jumper cable from the red, positive
(+) jumper terminal of your vehicle
(1).Push-starting
Vehicles equipped with automatic
transmission cannot be push-started.
Follow the directions in this chapter
for jump-starting.
What to do in an emergency
Never tow a vehicle to start it
because the sudden surge for-
ward when the engine starts
could cause a collision with the
tow vehicle.
WARNING
Page 382 of 502

6-9
What to do in an emergency
6
If your temperature gauge indicates
overheating, you experience a loss
of power, or hear loud pinging or
knocking, the engine may be over-
heating. If this happens, you should:
1.Pull off the road and stop as soon
as it is safe to do so.
2.Place the shift lever in P (Park, for
automatic transmission vehicle)
and set the parking brake. If the air
conditioning is ON, turn it OFF.3.If engine coolant is running out
under the vehicle or steam is com-
ing out from the bonnet, stop the
engine. Do not open the bonnet
until the coolant has stopped run-
ning or the steaming has stopped.
If there is no visible loss of engine
coolant and no steam, leave the
engine running and check to be
sure the engine cooling fan is oper-
ating. If the fan is not running, turn
the engine off.
4.Check for coolant leaking from the
radiator, hoses or under the vehi-
cle. (If the air conditioning had
been in use, it is normal for cold
water to be draining from it when
you stop.)
5.If engine coolant is leaking out,
stop the engine immediately and
we recommend that you call a
HYUNDAI authorised repairer for
assistance.
IF THE ENGINE OVERHEATS
Whilst the engine is
running, keep hands,
clothing and tools
away from the mov-
ing parts such as the
cooling fan and drive
belt to prevent seri-
ous injury.
WARNING
ODH063006
Page 398 of 502
6-25
What to do in an emergency
6
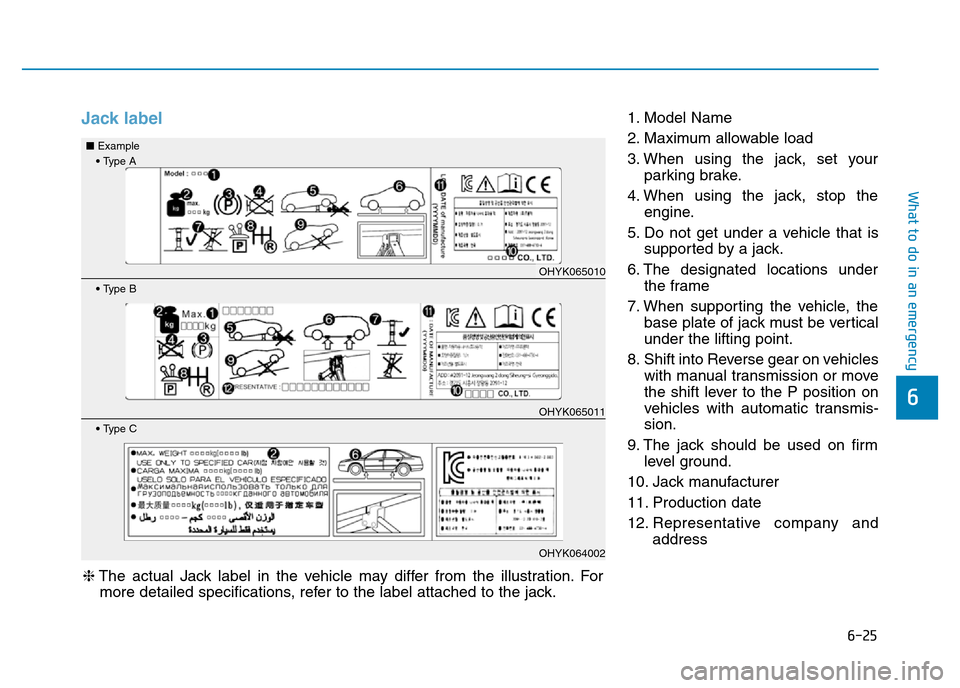
Jack label1. Model Name
2. Maximum allowable load
3. When using the jack, set your
parking brake.
4. When using the jack, stop the
engine.
5. Do not get under a vehicle that is
supported by a jack.
6. The designated locations under
the frame
7. When supporting the vehicle, the
base plate of jack must be vertical
under the lifting point.
8. Shift into Reverse gear on vehicles
with manual transmission or move
the shift lever to the P position on
vehicles with automatic transmis-
sion.
9. The jack should be used on firm
level ground.
10. Jack manufacturer
11. Production date
12. Representative company and
address
❈The actual Jack label in the vehicle may differ from the illustration. For
more detailed specifications, refer to the label attached to the jack.
• Type A ■Example
• Type B
• Type C
OHYK065010
OHYK065011
OHYK064002