Page 252 of 498

Features of your vehicle
172 4
Searching Radio Frequencies
Using Seek
Press the key to play the
previous/next frequency.
Using TUNE
Turn the TUNE knob to select the
desired frequency.
• FM : Increases/decreased by 100kHz
• AM : Increases/decreased by 9kHz
Using Radio Mode
Selecting/Saving Presets
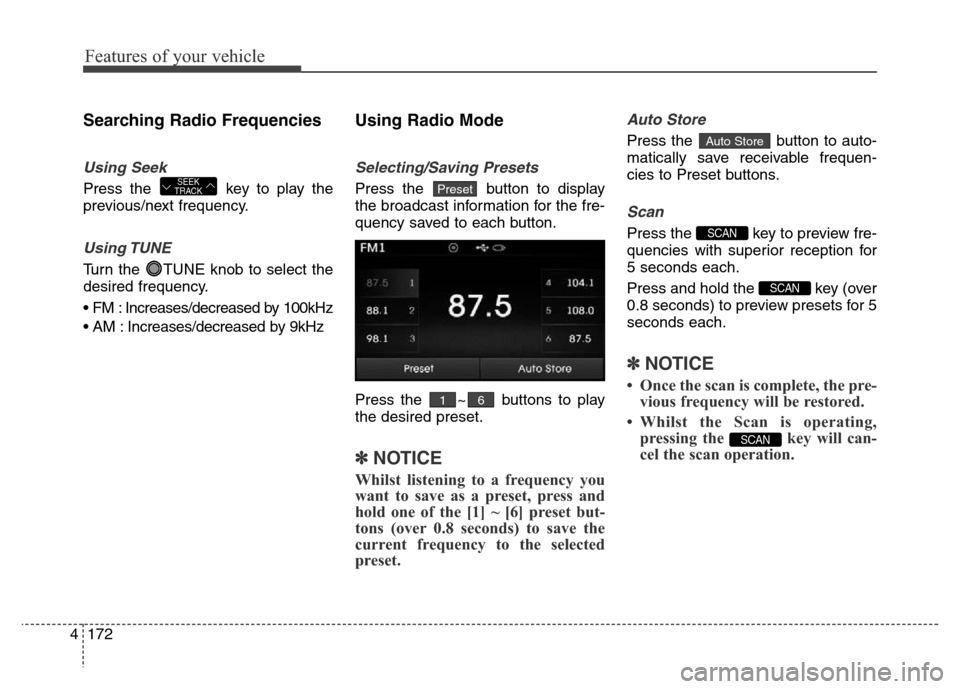
Press the button to display
the broadcast information for the fre-
quency saved to each button.
Press the ~ buttons to play
the desired preset.
✽NOTICE
Whilst listening to a frequency you
want to save as a preset, press and
hold one of the [1] ~ [6] preset but-
tons (over 0.8 seconds) to save the
current frequency to the selected
preset.
Auto Store
Press the button to auto-
matically save receivable frequen-
cies to Preset buttons.
Scan
Press the key to preview fre-
quencies with superior reception for
5 seconds each.
Press and hold the key (over
0.8 seconds) to preview presets for 5
seconds each.
✽NOTICE
• Once the scan is complete, the pre-
vious frequency will be restored.
• Whilst the Scan is operating,
pressing the key will can-
cel the scan operation.
SCAN
SCAN
SCAN
Auto Store
61
PresetSEEK
TRACK
Page 274 of 498
Features of your vehicle
194 4
(Continued)
• If the iPod
®malfunctions due to
an iPod®device defect, reset the
iPod®and try again. To learn
more, refer to your iPod®manual.
• Some iPods may not sync with the
System depending on its version.
If the Media is removed before the
Media is recognised, then the sys-
tem may not properly restore the
previously operated mode.
•iPod
® charging is not supported.
Page 297 of 498

4217
Features of your vehicle
SETUP
(for
Bluetooth®Wireless
Technologyequipped model)
- AM910MDMG, AM911MDMG,
AM910MDMN, AM910MDEE,
AM911MDMN, AM910MDXN
Starting Mode
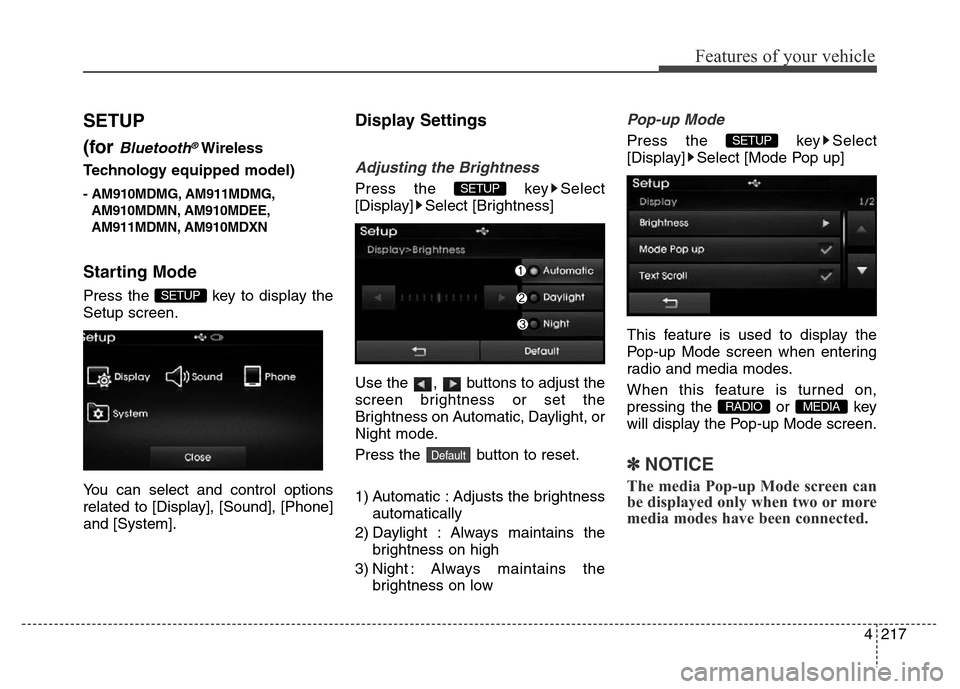
Press the key to display the
Setup screen.
You can select and control options
related to [Display], [Sound], [Phone]
and [System].
Display Settings
Adjusting the Brightness
Press the key Select
[Display] Select [Brightness]
Use the , buttons to adjust the
screen brightness or set the
Brightness on Automatic, Daylight, or
Night mode.
Press the button to reset.
1) Automatic : Adjusts the brightness
automatically
2) Daylight : Always maintains the
brightness on high
3) Night : Always maintains the
brightness on low
Pop-up Mode
Press the key Select
[Display] Select [Mode Pop up]
This feature is used to display the
Pop-up Mode screen when entering
radio and media modes.
When this feature is turned on,
pressing the or key
will display the Pop-up Mode screen.
✽NOTICE
The media Pop-up Mode screen can
be displayed only when two or more
media modes have been connected.
MEDIA RADIO
SETUP
Default
SETUP
SETUP
Page 298 of 498
Features of your vehicle
218 4
Text Scroll
Press the key Select
[Display] Select [Text Scroll]
This feature is used to scroll text dis-
played on the screen when it is too
long to be displayed at once.
When turned on, the text is repeat-
edly scrolled. When turned off, the
text is scrolled just once.
MP3 Information Display
Press the key Select
[Display] Select [Media Display]
This feature is used to change the
information displayed within USB
and MP3 CD modes.
1) Folder File : Displays file name
and folder name
2) Album Artist Song : Displays
album name/artist name/song
Sound Settings
Sound Settings
Press the key Select
[Sound] Select [Sound Setting]
Use the , , , buttons to
adjust the Fader/Balance settings.
Use the , buttons to adjust the
Bass/Middle/Treble settings.
Press the button to reset.
Default
SETUP
SETUP SETUP
Page 304 of 498
Features of your vehicle
224 4
APPENDIX
Name Description
12hr 12 Hour
24hr 24 Hour
AST(A.Store) Automatically selects and saves
channels
AMA AM Radio (Auto store)
AUX External Audio mode
Bass Deep sound
Treble High sound
BT AudioBluetooth®Wireless Technology
Audio
FMA FM Radio (Auto store)
Power Bass This is a sound system feature
that provides live bass.
Power Treble This is a sound system feature
that provides live treble.
Preset Saved radio frequency
Page 357 of 498

553
Driving your vehicle
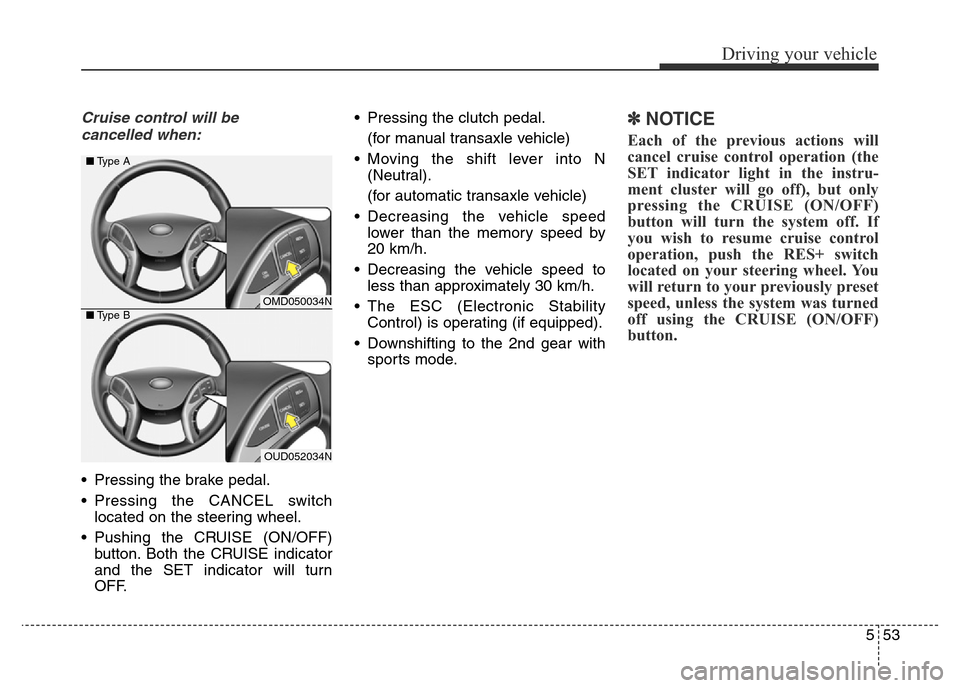
Cruise control will be
cancelled when:
• Pressing the brake pedal.
• Pressing the CANCEL switch
located on the steering wheel.
• Pushing the CRUISE (ON/OFF)
button. Both the CRUISE indicator
and the SET indicator will turn
OFF.• Pressing the clutch pedal.
(for manual transaxle vehicle)
• Moving the shift lever into N
(Neutral).
(for automatic transaxle vehicle)
• Decreasing the vehicle speed
lower than the memory speed by
20 km/h.
• Decreasing the vehicle speed to
less than approximately 30 km/h.
• The ESC (Electronic Stability
Control) is operating (if equipped).
• Downshifting to the 2nd gear with
sports mode.
✽NOTICE
Each of the previous actions will
cancel cruise control operation (the
SET indicator light in the instru-
ment cluster will go off), but only
pressing the CRUISE (ON/OFF)
button will turn the system off. If
you wish to resume cruise control
operation, push the RES+ switch
located on your steering wheel. You
will return to your previously preset
speed, unless the system was turned
off using the CRUISE (ON/OFF)
button.
OMD050034N
OUD052034N ■Type A
■Type B
Page 358 of 498
Driving your vehicle
54 5
To resume preset cruising speed
Push the RES+ switch. If the vehicle
speed is over 30 km/h, the vehicle
will resume the preset speed.
To turn cruise control off
• Push the CRUISE (ON/OFF) but-
ton (the CRUISE indicator light will
go off).
• Turn the engine OFF.
OMD050035N
OUD052035N ■Type A
■Type B
OMD050033N
OUD052033N ■Type A
■Type B
Page 396 of 498

Maintenance
Engine compartment . . . . . . . . . . . . . . . . . . . . . . . . 7-3
Maintenance services . . . . . . . . . . . . . . . . . . . . . . . . 7-4
• Owner’s responsibility . . . . . . . . . . . . . . . . . . . . . . . . . 7-4
• Owner maintenance precautions . . . . . . . . . . . . . . . . 7-4
Owner maintenance . . . . . . . . . . . . . . . . . . . . . . . . 7-7
• Owner maintenance schedule . . . . . . . . . . . . . . . . . . . 7-7
Scheduled maintenance service . . . . . . . . . . . . . . 7-9
Explanation of scheduled maintenance items . . . 7-19
Engine oil. . . . . . . . . . . . . . . . . . . . . . . . . . . . . . . . . 7-23
• Checking the engine oil level . . . . . . . . . . . . . . . . . . 7-23
• Changing the engine oil and filter . . . . . . . . . . . . . . . 7-24
Engine coolant . . . . . . . . . . . . . . . . . . . . . . . . . . . . 7-26
• Checking the coolant level . . . . . . . . . . . . . . . . . . . . . 7-26
• Changing the coolant . . . . . . . . . . . . . . . . . . . . . . . . . 7-28
Brake/clutch fluid . . . . . . . . . . . . . . . . . . . . . . . . . . 7-29
• Checking the brake/clutch fluid level . . . . . . . . . . . 7-29
Washer fluid . . . . . . . . . . . . . . . . . . . . . . . . . . . . . . 7-30
• Checking the washer fluid level . . . . . . . . . . . . . . . . 7-30
Parking brake . . . . . . . . . . . . . . . . . . . . . . . . . . . . . 7-30
• Checking the parking brake . . . . . . . . . . . . . . . . . . 7-30
Air cleaner. . . . . . . . . . . . . . . . . . . . . . . . . . . . . . . . 7-31
• Filter replacement . . . . . . . . . . . . . . . . . . . . . . . . . . . 7-31
Climate control air filter . . . . . . . . . . . . . . . . . . . . 7-32
• Filter inspection . . . . . . . . . . . . . . . . . . . . . . . . . . . . . . 7-32• Filter replacement . . . . . . . . . . . . . . . . . . . . . . . . . . . . 7-32
Wiper blades . . . . . . . . . . . . . . . . . . . . . . . . . . . . . . 7-34
• Blade inspection . . . . . . . . . . . . . . . . . . . . . . . . . . . . . . 7-34
• Blade replacement . . . . . . . . . . . . . . . . . . . . . . . . . . . . 7-34
Battery . . . . . . . . . . . . . . . . . . . . . . . . . . . . . . . . . . . 7-37
• For best battery service . . . . . . . . . . . . . . . . . . . . . . . 7-37
• Battery capacity label . . . . . . . . . . . . . . . . . . . . . . . . . 7-38
• Battery recharging . . . . . . . . . . . . . . . . . . . . . . . . . . . 7-39
• Reset items . . . . . . . . . . . . . . . . . . . . . . . . . . . . . . . . . . 7-40
Tyres and wheels . . . . . . . . . . . . . . . . . . . . . . . . . . 7-41
• Tyre care. . . . . . . . . . . . . . . . . . . . . . . . . . . . . . . . . . . . 7-41
• Recommended cold tyre inflation pressures . . . . . . . 7-41
• Checking tyre inflation pressure . . . . . . . . . . . . . . . . 7-43
• Tyre rotation . . . . . . . . . . . . . . . . . . . . . . . . . . . . . . . . 7-44
• Wheel alignment and tyre balance . . . . . . . . . . . . . . 7-45
• Tyre replacement . . . . . . . . . . . . . . . . . . . . . . . . . . . . . 7-45
• Wheel replacement . . . . . . . . . . . . . . . . . . . . . . . . . . . 7-47
• Tyre traction . . . . . . . . . . . . . . . . . . . . . . . . . . . . . . . . 7-47
• Tyre maintenance . . . . . . . . . . . . . . . . . . . . . . . . . . . . 7-47
• Tyre sidewall labeling . . . . . . . . . . . . . . . . . . . . . . . . . 7-47
• Low aspect ratio tyre . . . . . . . . . . . . . . . . . . . . . . . . . 7-52
Fuses . . . . . . . . . . . . . . . . . . . . . . . . . . . . . . . . . . . . 7-53
• Instrument panel fuse replacement . . . . . . . . . . . . . . 7-54
• Engine compartment panel fuse replacement . . . . . 7-55
7