Page 121 of 498
441
Features of your vehicle
Inside rearview mirror
Before you start driving, adjust the
rearview mirror to the centre on the
view through the rear window.
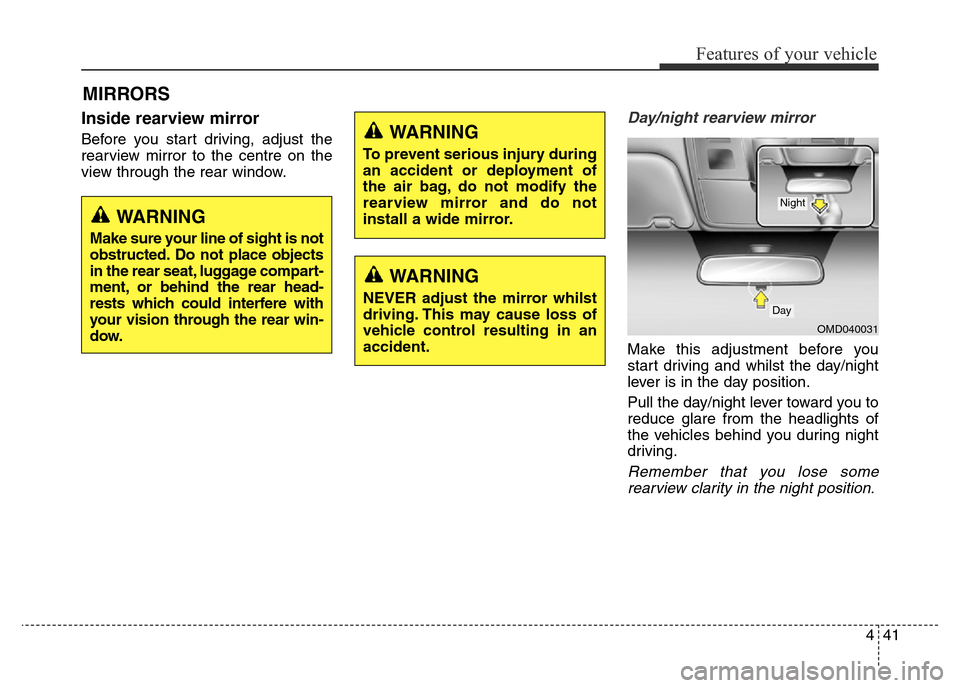
Day/night rearview mirror
Make this adjustment before you
start driving and whilst the day/night
lever is in the day position.
Pull the day/night lever toward you to
reduce glare from the headlights of
the vehicles behind you during night
driving.
Remember that you lose some
rearview clarity in the night position.
MIRRORS
WARNING
Make sure your line of sight is not
obstructed. Do not place objects
in the rear seat, luggage compart-
ment, or behind the rear head-
rests which could interfere with
your vision through the rear win-
dow.
WARNING
To prevent serious injury during
an accident or deployment of
the air bag, do not modify the
rearview mirror and do not
install a wide mirror.
WARNING
NEVER adjust the mirror whilst
driving. This may cause loss of
vehicle control resulting in an
accident.
OMD040031
Day
Night
Page 159 of 498
479
Features of your vehicle
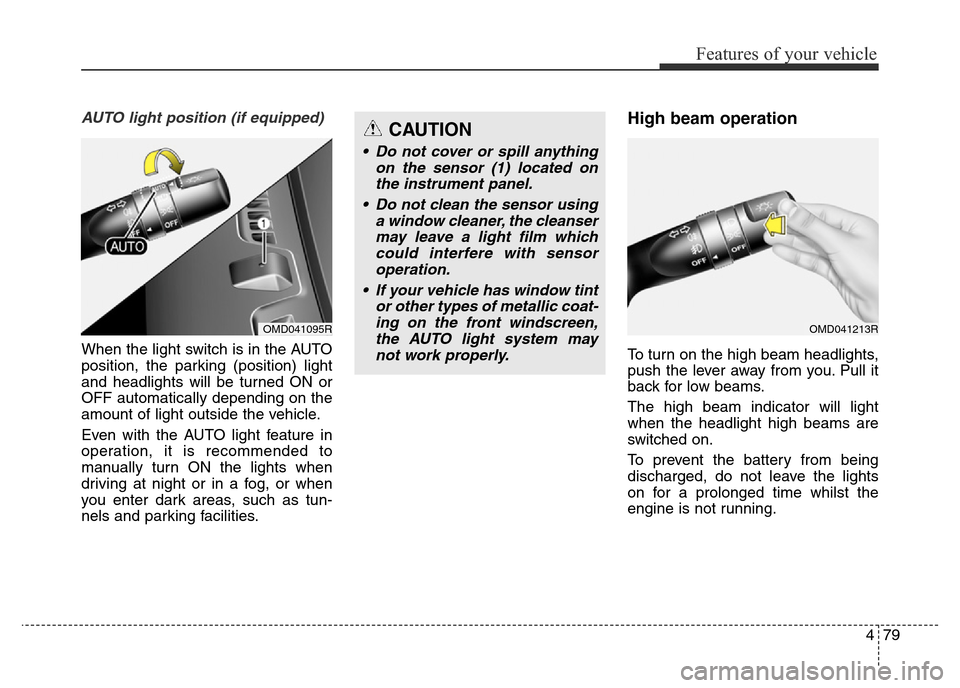
AUTO light position (if equipped)
When the light switch is in the AUTO
position, the parking (position) light
and headlights will be turned ON or
OFF automatically depending on the
amount of light outside the vehicle.
Even with the AUTO light feature in
operation, it is recommended to
manually turn ON the lights when
driving at night or in a fog, or when
you enter dark areas, such as tun-
nels and parking facilities.
High beam operation
To turn on the high beam headlights,
push the lever away from you. Pull it
back for low beams.
The high beam indicator will light
when the headlight high beams are
switched on.
To prevent the battery from being
discharged, do not leave the lights
on for a prolonged time whilst the
engine is not running.
CAUTION
• Do not cover or spill anything
on the sensor (1) located on
the instrument panel.
• Do not clean the sensor using
a window cleaner, the cleanser
may leave a light film which
could interfere with sensor
operation.
• If your vehicle has window tint
or other types of metallic coat-
ing on the front windscreen,
the AUTO light system may
not work properly.
OMD041095ROMD041213R
Page 171 of 498
491
Features of your vehicle
✽NOTICE
If you want to defrost and defog the
front windscreen, refer to
“Windscreen defrosting and defog-
ging” in this section.
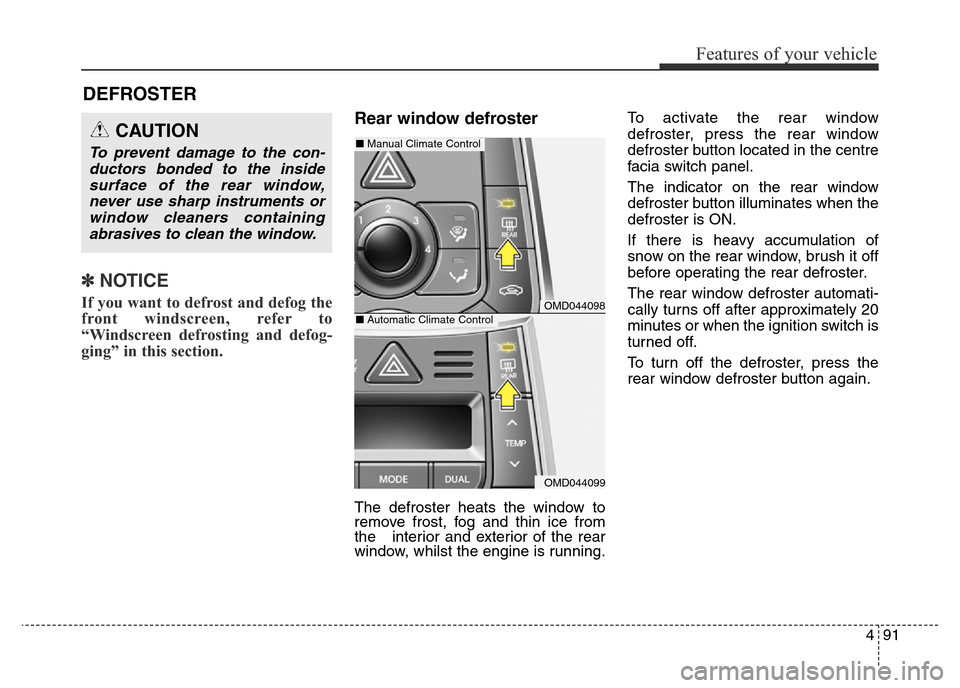
Rear window defroster
The defroster heats the window to
remove frost, fog and thin ice from
the interior and exterior of the rear
window, whilst the engine is running.To activate the rear window
defroster, press the rear window
defroster button located in the centre
facia switch panel.
The indicator on the rear window
defroster button illuminates when the
defroster is ON.
If there is heavy accumulation of
snow on the rear window, brush it off
before operating the rear defroster.
The rear window defroster automati-
cally turns off after approximately 20
minutes or when the ignition switch is
turned off.
To turn off the defroster, press the
rear window defroster button again.
DEFROSTER
CAUTION
To prevent damage to the con-
ductors bonded to the inside
surface of the rear window,
never use sharp instruments or
window cleaners containing
abrasives to clean the window.
OMD044098
OMD044099
■Manual Climate Control
■Automatic Climate Control
Page 172 of 498
Features of your vehicle
92 4
Outside mirror defroster
(if equipped)
If your vehicle is equipped with out-
side mirror defrosters, they will oper-
ate when you turn on the rear win-
dow defroster.
Front wiper deicer (if equipped)
If your vehicle is equipped with a
front wiper deicer, it will operate
when you turn on the rear window
defroster.
Page 173 of 498
493
Features of your vehicle
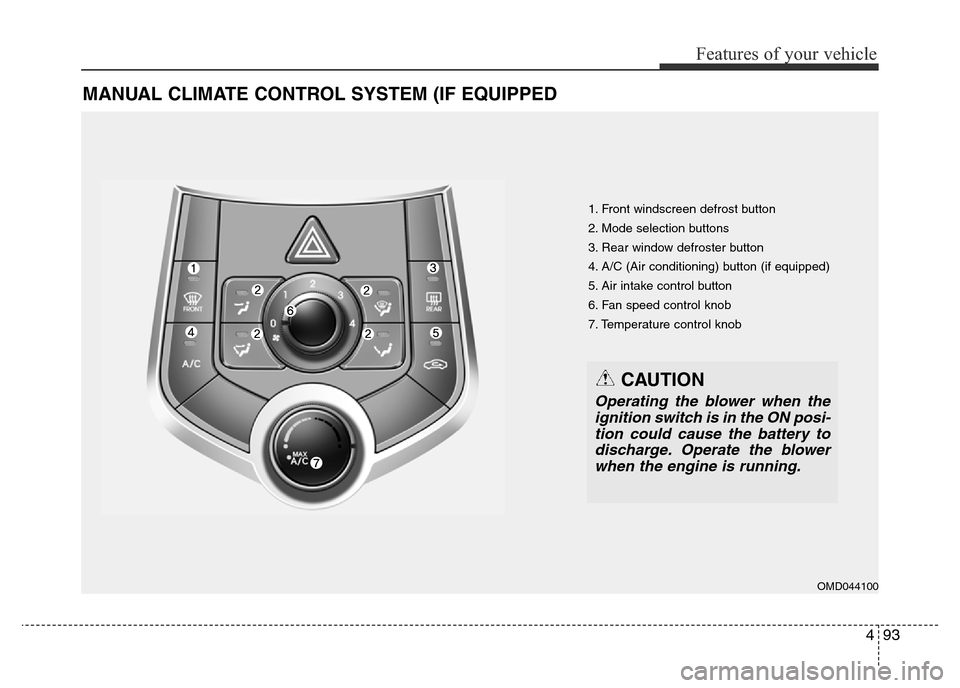
MANUAL CLIMATE CONTROL SYSTEM (IF EQUIPPED
1. Front windscreen defrost button
2. Mode selection buttons
3. Rear window defroster button
4. A/C (Air conditioning) button (if equipped)
5. Air intake control button
6. Fan speed control knob
7. Temperature control knob
OMD044100
CAUTION
Operating the blower when the
ignition switch is in the ON posi-
tion could cause the battery to
discharge. Operate the blower
when the engine is running.
Page 175 of 498
495
Features of your vehicle
Mode selection
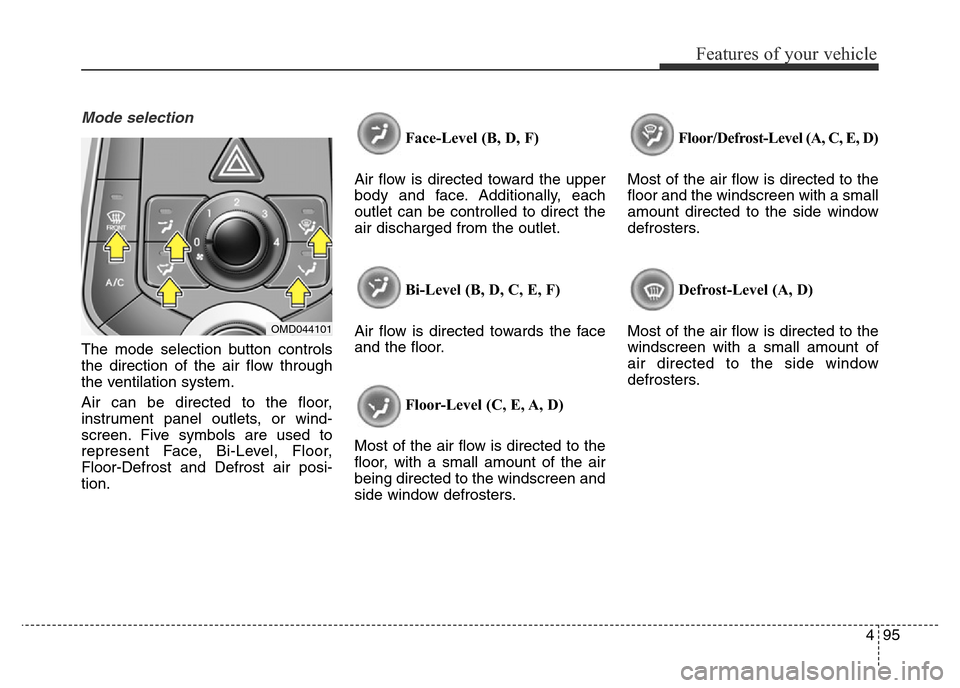
The mode selection button controls
the direction of the air flow through
the ventilation system.
Air can be directed to the floor,
instrument panel outlets, or wind-
screen. Five symbols are used to
represent Face, Bi-Level, Floor,
Floor-Defrost and Defrost air posi-
tion.Face-Level (B, D, F)
Air flow is directed toward the upper
body and face. Additionally, each
outlet can be controlled to direct the
air discharged from the outlet.
Bi-Level (B, D, C, E, F)
Air flow is directed towards the face
and the floor.
Floor-Level (C, E, A, D)
Most of the air flow is directed to the
floor, with a small amount of the air
being directed to the windscreen and
side window defrosters.Floor/Defrost-Level (A, C, E, D)
Most of the air flow is directed to the
floor and the windscreen with a small
amount directed to the side window
defrosters.
Defrost-Level (A, D)
Most of the air flow is directed to the
windscreen with a small amount of
air directed to the side window
defrosters.
OMD044101
Page 177 of 498
497
Features of your vehicle
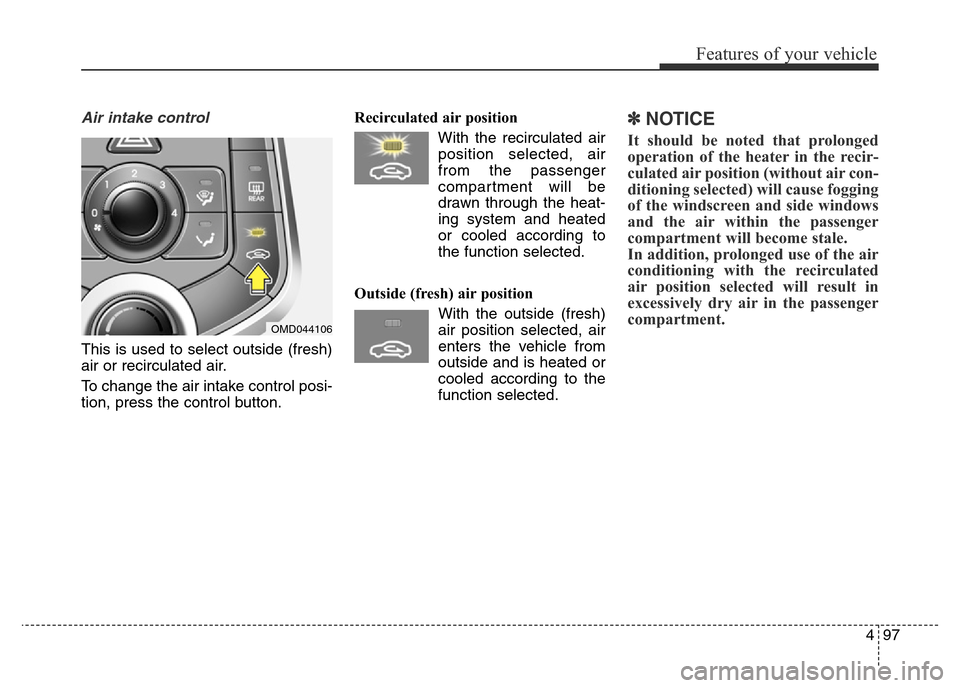
Air intake control
This is used to select outside (fresh)
air or recirculated air.
To change the air intake control posi-
tion, press the control button.Recirculated air position
With the recirculated air
position selected, air
from the passenger
compartment will be
drawn through the heat-
ing system and heated
or cooled according to
the function selected.
Outside (fresh) air position
With the outside (fresh)
air position selected, air
enters the vehicle from
outside and is heated or
cooled according to the
function selected.
✽NOTICE
It should be noted that prolonged
operation of the heater in the recir-
culated air position (without air con-
ditioning selected) will cause fogging
of the windscreen and side windows
and the air within the passenger
compartment will become stale.
In addition, prolonged use of the air
conditioning with the recirculated
air position selected will result in
excessively dry air in the passenger
compartment.
OMD044106
Page 180 of 498
Features of your vehicle
100 4
Air conditioning (if equipped)
HYUNDAI Air Conditioning Systems
are filled with environmentally friendly
refrigerant.
1. Start the engine. Push the air con-
ditioning button.
2. Set the mode to the position.
3. Set the air intake control to the
outside air or recirculated air posi-
tion.
4. Adjust the fan speed control and
temperature control to maintain
maximum comfort.
Your vehicle is filled with R-134a or
R-1234yf according to the regula-
tions at the time of production. You
can find out which air conditioning
refrigerant is applied to your vehicle
on the label under the bonnet. Refer
to section 8 for the location of the air
conditioning refrigerant label.
✽NOTICE
• When using the air conditioning
system, monitor the temperature
gauge closely whilst driving up
hills or in heavy traffic, when out-
side temperatures are high. Air
conditioning system operation
may cause engine overheating.
Continue to use the blower fan but
turn the air conditioning system
off if the temperature gauge indi-
cates engine overheating.
• When opening the windows in
humid weather air conditioning
may create water droplets inside
the vehicle. Since excessive water
droplets may cause damage to
electrical equipment, air condi-
tioning should only be used with
the windows closed.
Air conditioning system operation tips
• If the vehicle has been parked in
direct sunlight during hot weather,
open the windows for a short time
to let the hot air inside the vehicle
escape.
• To help reduce moisture inside of
the windows on rainy or humid
days, decrease the humidity inside
the vehicle by operating the air
conditioning system.
• During air conditioning system
operation, you may occasionally
notice a slight change in engine
speed as the air conditioning com-
pressor cycles. This is a normal
system operation characteristic.
• Use the air conditioning system
every month only for a few minutes
to ensure maximum system per-
formance.
• When using the air conditioning
system, you may notice clear water
dripping (or even puddling) on the
ground under the vehicle. This is a
normal system operation charac-
teristic.