2016 Hyundai Elantra fuel
[x] Cancel search: fuelPage 81 of 498

Features of your vehicle
Accessing your vehicle . . . . . . . . . . . . . . . . . . . . . . . 4-3
• Remote key . . . . . . . . . . . . . . . . . . . . . . . . . . . . . . . . . . . 4-3
• Smart key . . . . . . . . . . . . . . . . . . . . . . . . . . . . . . . . . . . . 4-7
• Immobiliser system . . . . . . . . . . . . . . . . . . . . . . . . . . . 4-12
Door locks . . . . . . . . . . . . . . . . . . . . . . . . . . . . . . . . 4-13
• Outside the vehicle . . . . . . . . . . . . . . . . . . . . . . . . . . . 4-13
• Inside the vehicle . . . . . . . . . . . . . . . . . . . . . . . . . . . . . 4-14
• Auto door lock/unlock features . . . . . . . . . . . . . . . . . 4-17
• Child-protector rear door locks . . . . . . . . . . . . . . . . . 4-17
Theft-alarm system . . . . . . . . . . . . . . . . . . . . . . . . 4-19
Boot . . . . . . . . . . . . . . . . . . . . . . . . . . . . . . . . . . . . . 4-20
Windows . . . . . . . . . . . . . . . . . . . . . . . . . . . . . . . . . 4-22
• Power windows . . . . . . . . . . . . . . . . . . . . . . . . . . . . . . 4-22
• Manual windows . . . . . . . . . . . . . . . . . . . . . . . . . . . . . 4-26
Bonnet.. . . . . . . . . . . . . . . . . . . . . . . . . . . . . . . . . . . 4-27
Fuel filler door . . . . . . . . . . . . . . . . . . . . . . . . . . . . 4-29
Sunroof . . . . . . . . . . . . . . . . . . . . . . . . . . . . . . . . . . 4-32
• Sunroof opening and closing . . . . . . . . . . . . . . . . . . . 4-32
• Sliding the sunroof . . . . . . . . . . . . . . . . . . . . . . . . . . . 4-32
• Tilting the sunroof . . . . . . . . . . . . . . . . . . . . . . . . . . . . 4-33
• Sunshade . . . . . . . . . . . . . . . . . . . . . . . . . . . . . . . . . . . 4-34
• Resetting the sunroof . . . . . . . . . . . . . . . . . . . . . . . . . 4-34
Steering wheel . . . . . . . . . . . . . . . . . . . . . . . . . . . . . 4-36
• Electric power steering (EPS) . . . . . . . . . . . . . . . . . . 4-36• Tilt steering / Telescope steering . . . . . . . . . . . . . . . . 4-37
• Heated steering wheel . . . . . . . . . . . . . . . . . . . . . . . . . 4-37
• Flex steering wheel . . . . . . . . . . . . . . . . . . . . . . . . . . . 4-38
• Horn . . . . . . . . . . . . . . . . . . . . . . . . . . . . . . . . . . . . . . . 4-40
Mirrors . . . . . . . . . . . . . . . . . . . . . . . . . . . . . . . . . . 4-40
• Inside rearview mirror . . . . . . . . . . . . . . . . . . . . . . . . 4-40
• Outside rearview mirror . . . . . . . . . . . . . . . . . . . . . . . 4-43
Instrument cluster . . . . . . . . . . . . . . . . . . . . . . . . . 4-46
• Instrument cluster control . . . . . . . . . . . . . . . . . . . . . 4-47
• Gauges . . . . . . . . . . . . . . . . . . . . . . . . . . . . . . . . . . . . . 4-48
• Transaxle shift indicator . . . . . . . . . . . . . . . . . . . . . . . 4-52
• Trip computer . . . . . . . . . . . . . . . . . . . . . . . . . . . . . . . 4-53
• User settings mode. . . . . . . . . . . . . . . . . . . . . . . . . . . . 4-57
• Warning messages . . . . . . . . . . . . . . . . . . . . . . . . . . . . 4-60
• Warning and indicator lights . . . . . . . . . . . . . . . . . . . 4-66
Light. . . . . . . . . . . . . . . . . . . . . . . . . . . . . . . . . . . . . 4-78
• Exterior lights . . . . . . . . . . . . . . . . . . . . . . . . . . . . . . . 4-78
• Interior lights . . . . . . . . . . . . . . . . . . . . . . . . . . . . . . . . 4-83
Wipers and washers . . . . . . . . . . . . . . . . . . . . . . . . 4-87
• Windscreen wipers . . . . . . . . . . . . . . . . . . . . . . . . . . . 4-87
• Windscreen washers . . . . . . . . . . . . . . . . . . . . . . . . . . 4-89
Defroster . . . . . . . . . . . . . . . . . . . . . . . . . . . . . . . . . 4-91
• Rear window defroster . . . . . . . . . . . . . . . . . . . . . . . . 4-91
Manual climate control system . . . . . . . . . . . . . . . 4-93
• Heating and air conditioning . . . . . . . . . . . . . . . . . . . 4-94
4
Page 92 of 498
Features of your vehicle
12 4
If you suspect your smart key might
have sustained some damage, or
you feel your smart key is not work-
ing correctly, it is recommanded that
you contact an authorised HYUNDAI
dealer.
✽NOTICE
An inappropriately disposed
battery can be harmful to
the environment and human
health. Dispose the battery
according to your local
law(s) and regulation.
Immobiliser System
The immobiliser system protects your
vehicle from theft. If an improperly
coded key (or other device) is used,
the engine’s fuel system is disabled.
When the ignition switch is placed in
the ON position, the immobiliser sys-
tem indicator should come on briefly,
then go off. If the indicator starts to
blink, the system does not recognise
the coding of the key.
Place the ignition switch to the
LOCK/OFF position, then place the
ignition switch to the ON position
again.
The system may not recognise your
key’s coding if another immobiliser
key or other metal object (i.e., key
chain) is near the key. The engine
may not start because the metal may
interrupt the transponder signal from
transmitting normally.
If the system repeatedly does not
recognise the coding of the key, it is
recommended that you contact your
HYUNDAI dealer.Do not attempt to alter this system or
add other devices to it. Electrical
problems could result that may make
your vehicle inoperable.
WARNING
In order to prevent theft of your
vehicle, do not leave spare keys
anywhere in your vehicle.
CAUTION
The transponder in your key is
an important part of the immo-
biliser system. It is designed to
give years of trouble-free serv-
ice, however you should avoid
exposure to moisture, static
electricity and rough handling.
Immobiliser system malfunction
could occur.
Page 109 of 498
429
Features of your vehicle
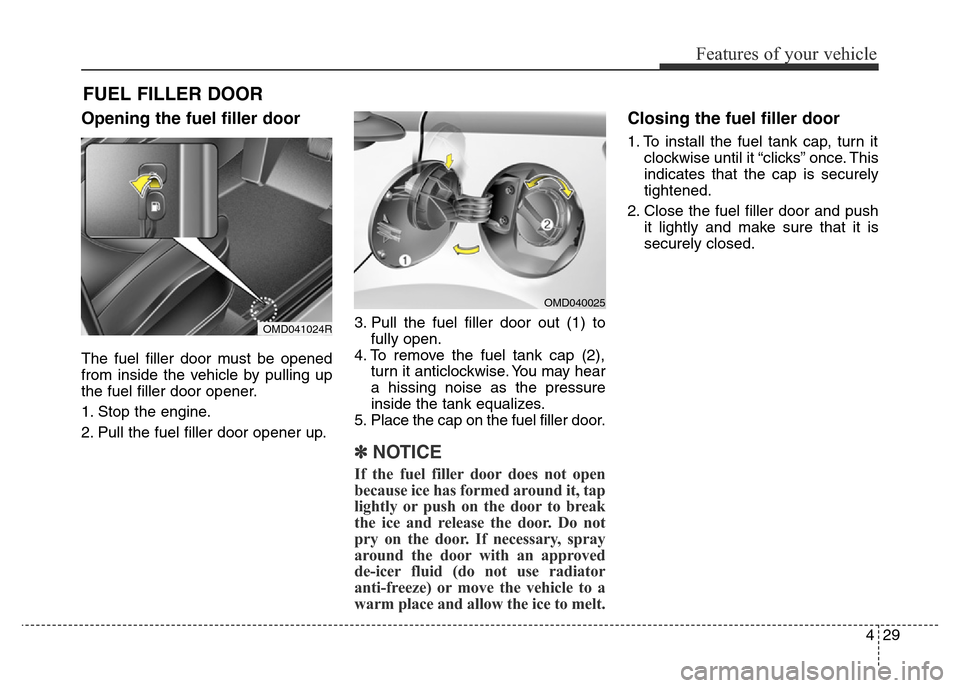
Opening the fuel filler door
The fuel filler door must be opened
from inside the vehicle by pulling up
the fuel filler door opener.
1. Stop the engine.
2. Pull the fuel filler door opener up.3. Pull the fuel filler door out (1) to
fully open.
4. To remove the fuel tank cap (2),
turn it anticlockwise. You may hear
a hissing noise as the pressure
inside the tank equalizes.
5. Place the cap on the fuel filler door.
✽NOTICE
If the fuel filler door does not open
because ice has formed around it, tap
lightly or push on the door to break
the ice and release the door. Do not
pry on the door. If necessary, spray
around the door with an approved
de-icer fluid (do not use radiator
anti-freeze) or move the vehicle to a
warm place and allow the ice to melt.
Closing the fuel filler door
1. To install the fuel tank cap, turn it
clockwise until it “clicks” once. This
indicates that the cap is securely
tightened.
2. Close the fuel filler door and push
it lightly and make sure that it is
securely closed.
FUEL FILLER DOOR
OMD040025
OMD041024R
Page 110 of 498
Features of your vehicle
30 4
(Continued)
• Do not use mobile phones
whilst refuelling. Electric cur-
rent and/or electronic interfer-
ence from mobile phones can
potentially ignite fuel vapours
and cause a fire.
• Do not get back into a vehicle
once you have begun refu-
elling. You can generate a
build-up of static electricity by
touching, rubbing or sliding
against any item or fabric capa-
ble of producing static electric-
ity. Static electricity discharge
can ignite fuel vapourscaus-
ing a fire. If you must re-enter
the vehicle, you should once
again eliminate potentially dan-
gerous static electricity dis-
charge by touching a metal
part of the vehicle, away from
the fuel filler neck, nozzle or
other petrol source, with your
bare hand.
(Continued)WARNING
Petrol is highly flammable and
explosive. Failure to follow
these guidelines may result in
SERIOUS INJURY or DEATH:
• Read and follow all warnings
posted at the service station.
• Before refuelling, note the
location of the Emergency
Petrol Shut-Off, if available, at
the service station.
• Before touching the fuel noz-
zle, you should eliminate the
potential build-up of static
electricity by touching a metal
part of the vehicle, a safe dis-
tance away from the fuel filler
neck, nozzle, or other petrol
source, with your bare hand.
(Continued)
(Continued)
• When using an approved
portable fuel container, be
sure to place the container on
the ground prior to refuelling.
Static electricity discharge
from the container can ignite
fuel vapours causing a fire.
Once refuelling has begun,
contact between your bare
hand and the vehicle should
be maintained until the filling
is complete.
• Use only approved portable
plastic fuel containers
designed to carry and store
petrol.
(Continued)
Page 111 of 498
431
Features of your vehicle
✽NOTICE
• Make sure to refuel your
vehicle according to the "Fuel
Requirements" suggested in chap-
ter 1.
• Do not spill fuel on the exterior
surfaces of the vehicle. Any type of
fuel spilled on painted surfaces
may damage the paint.(Continued)
• When refuelling, always move
the shift lever to the P (Park)
position (for automatic
transaxle) or first gear or R
(Reverse, for manual transaxle),
set the parking brake, and
place the ignition switch to the
LOCK/OFF position. Sparks
produced by electrical compo-
nents related to the engine can
ignite fuel vapourscausing a
fire.
• Do not use matches or a
lighter and do not smoke or
leave a lit cigarette in your
vehicle whilst at a service sta-
tion, especially during refu-
elling.
• Do not over-fill or top-off your
vehicle tank, which can cause
petrol spillage.
(Continued)(Continued)
• If a fire breaks out during refu-
elling, leave the vicinity of the
vehicle, and immediately con-
tact the manager of the serv-
ice station and then contact
the local fire department.
Follow any safety instructions
they provide.
• If pressurised fuel sprays out,
it can cover your clothes or
skin and thus subject you to
the risk of fire and burns.
Always remove the fuel cap
carefully and slowly. If the cap
is venting fuel or if you hear a
hissing sound, wait until the
condition stops before com-
pletely removing the cap.
• Always check that the fuel cap
is installed securely to pre-
vent fuel spillage in the event
of an accident.
CAUTION
If the fuel filler cap requires
replacement, use only a genuine
HYUNDAI cap or the equivalent
specified for your vehicle. An
incorrect fuel filler cap can
result in a serious malfunction
of the fuel system or emission
control system.
Page 126 of 498
Features of your vehicle
46 4
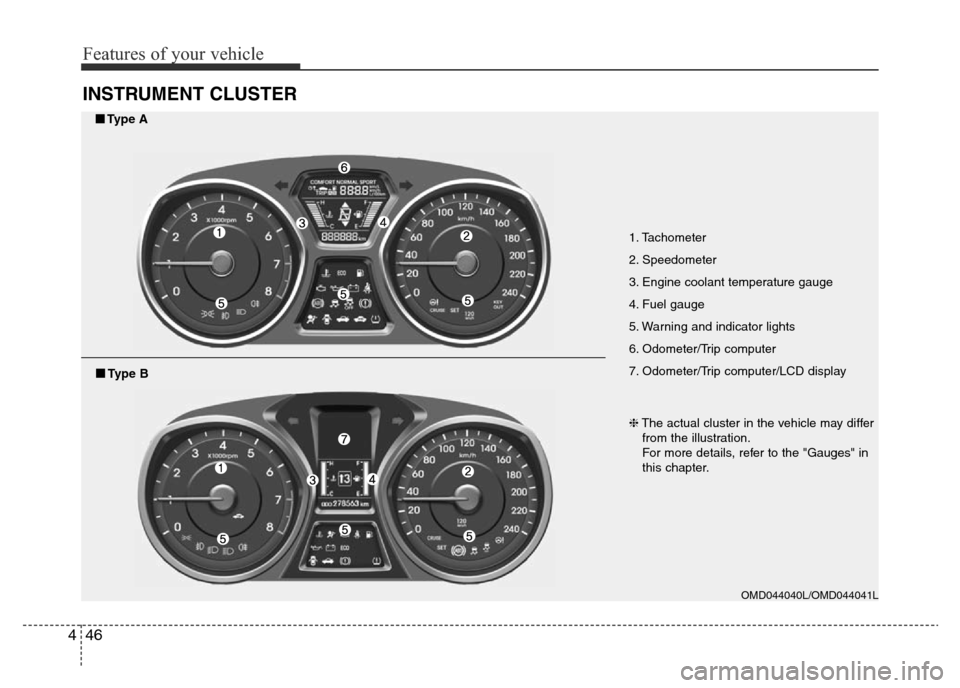
INSTRUMENT CLUSTER
1. Tachometer
2. Speedometer
3. Engine coolant temperature gauge
4. Fuel gauge
5. Warning and indicator lights
6. Odometer/Trip computer
7. Odometer/Trip computer/LCD display
OMD044040L/OMD044041L
■Type A
❈The actual cluster in the vehicle may differ
from the illustration.
For more details, refer to the "Gauges" in
this chapter.
■Type B
Page 129 of 498
449
Features of your vehicle
Engine Coolant Temperature
Gauge
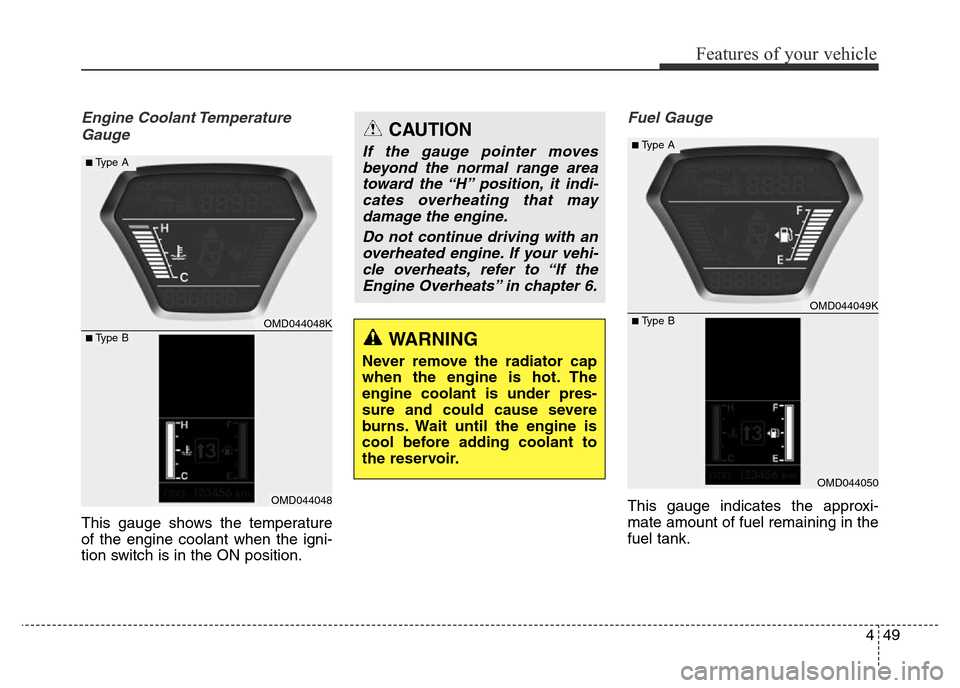
This gauge shows the temperature
of the engine coolant when the igni-
tion switch is in the ON position.
Fuel Gauge
This gauge indicates the approxi-
mate amount of fuel remaining in the
fuel tank.
OMD044048K
OMD044048
■Type A
■Type BWARNING
Never remove the radiator cap
when the engine is hot. The
engine coolant is under pres-
sure and could cause severe
burns. Wait until the engine is
cool before adding coolant to
the reservoir.
CAUTION
If the gauge pointer moves
beyond the normal range area
toward the “H” position, it indi-
cates overheating that may
damage the engine.
Do not continue driving with an
overheated engine. If your vehi-
cle overheats, refer to “If the
Engine Overheats” in chapter 6.
OMD044049K
OMD044050
■Type A
■Type B
Page 130 of 498
Features of your vehicle
50 4
✽NOTICE
• The fuel tank capacity is given in
chapter 8.
• The fuel gauge is supplemented by
a low fuel warning light, which
will illuminate when the fuel tank
is nearly empty.
• On inclines or corners, the fuel
gauge pointer may fluctuate or the
low fuel warning light may come
on earlier than usual due to the
movement of fuel in the tank.
Odometer
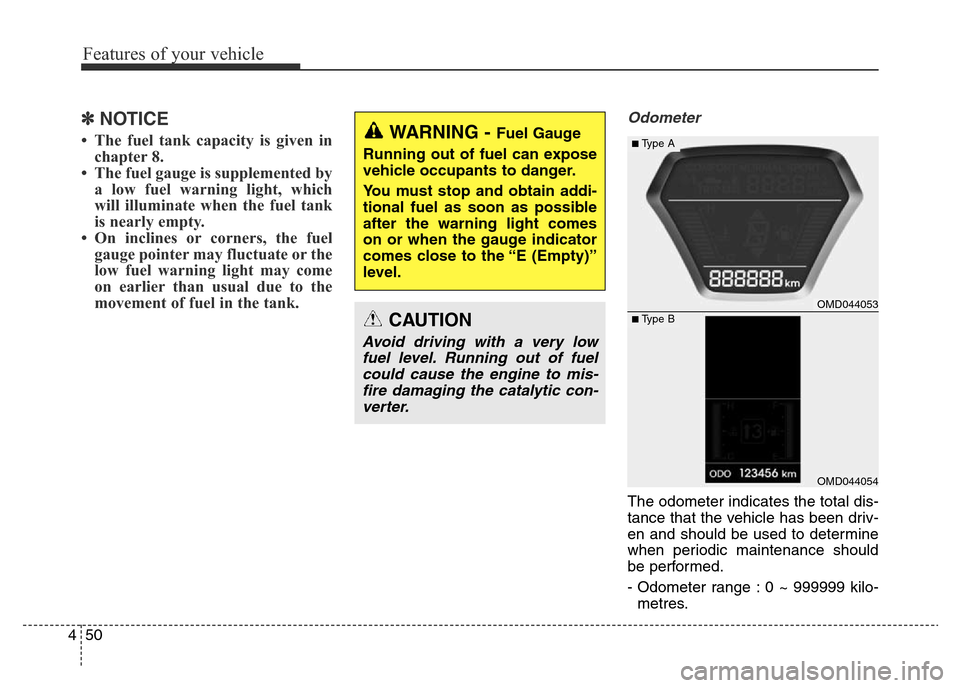
The odometer indicates the total dis-
tance that the vehicle has been driv-
en and should be used to determine
when periodic maintenance should
be performed.
- Odometer range : 0 ~ 999999 kilo-
metres.
WARNING - Fuel Gauge
Running out of fuel can expose
vehicle occupants to danger.
You must stop and obtain addi-
tional fuel as soon as possible
after the warning light comes
on or when the gauge indicator
comes close to the “E (Empty)”
level.
CAUTION
Avoid driving with a very low
fuel level. Running out of fuel
could cause the engine to mis-
fire damaging the catalytic con-
verter.
OMD044053
OMD044054
■Type A
■Type B