2016 Hyundai Elantra ESP
[x] Cancel search: ESPPage 58 of 498
Safety features of your vehicle
40 3
For installation, CRS ISOFIX con-
necters have to engage with the
vehicles ISOFIX anchorages (listen
for a CLICK, check potential visual
indicators on the CRS and cross-
check by pulling).
CRS with universal approval to rele-
vant regulations need to be fixed
additionally with a top tether strap
connected to the corresponding top
tether anchorage point in the back
rest.
The installing and the use of a child-
seat has to be done according to the
installing-manual, which is provided
with the ISOFIX-seat.To secure the child restraint seat:
1. To engage the child restraint seat
to the ISOFIX lower anchor, insert
the child restraint seat latch into
the ISOFIX anchor. Listen for the
audible “click” sound.
2. Connect the tether strap hook to
the child restraint hook holder and
tighten to secure the seat. (Refer
to the previous page.)
WARNING
• When using the vehicle's
"ISOFIX" system to install a
child restraint system in the
rear seat, all unused vehicle
rear seat belt metal latch
plates or tabs must be latched
securely in their seat belt
buckles and the seat belt
must be retracted behind the
child restraint to prevent the
child from reaching and tak-
ing hold of unretracted seat
belts. Unlatched metal latch
plates or tabs may allow the
child to reach the unretracted
seat belts which may result in
strangulation and a serious
injury or death to the child in
the child restraint.
• Do not place anything around
the ISOFIX anchors. Also
make sure that the seat belt is
not caught in the ISOFIX
anchors.
CAUTION
Do not allow the rear seat belt to
get scratched or pinched by the
ISOFIX-seat latch and ISOFIX
anchor during the installation.
Page 61 of 498
343
Safety features of your vehicle
How does the air bag system
operate?
• Air bags are activated (able to
inflate if necessary) only when the
ignition switch is turned to the ON
or START position.
• Air bags inflate instantly in the
event of a serious frontal or side
collision in order to help protect the
occupants from serious physical
injury.
• There is no single speed at which
the air bags will inflate.
Generally, air bags are designed to
inflate based upon the severity of a
collision and its direction. These
two factors determine whether the
sensors produce an electronic
deployment/inflation signal.
• Air bag deployment depends on a
number of factors including vehicle
speed, angles of impact and the
density and stiffness of the vehi-
cles or objects which your vehicle
hits in the collision. The determin-
ing, factors are not limited to those
mentioned above.• The front air bags will completely
inflate and deflate in an instant.
It is virtually impossible for you to
see the air bags inflate during an
accident.
It is much more likely that you will
simply see the deflated air bags
hanging out of their storage com-
partments after the collision.
• In order to help provide protection
in a severe collision, the air bags
must inflate rapidly. The speed of
air bag inflation is a consequence
of an extremely short time in which
a collision occurs and the need to
get the air bag between the occu-
pant and the vehicle structures
before the occupant impacts those
structures. This speed of inflation
reduces the risk of serious or life-
threatening injuries in a severe col-
lision and is thus a necessary part
of air bag design.
However, air bag inflation can also
cause injuries which can include
facial abrasions, bruises and bro-
ken bones because the inflation
speed also causes the air bags to
expand with a great deal of force.• There are even circumstances
under which contact with the
steering wheel air bag can cause
fatal injuries, especially if the
occupant is positioned exces-
sively close to the steering wheel.
WARNING
• To avoid severe personal
injury or death caused by
deploying air bags in a colli-
sion, the driver should sit as
far back from the steering
wheel air bag as possible (at
least 250 mm away). The front
passenger should always
move their seat as far back as
possible and sit back in their
seat.
• Air bags inflate instantly in
the event of a collision.
Passengers may be injured by
the air bag expansion force if
they are not seated properly.
• Air bag inflation may cause
injuries including facial or
bodily abrasions, injuries
from broken glasses or burns.
Page 85 of 498

45
Features of your vehicle
Ty p e C
To unfold the key, press the release
button then the key will unfold auto-
matically.
To fold the key, fold the key manually
whilst pressing the release button.Remote key precautions
The remote key will not work if any of
the following occur:
• The key is in the ignition switch.
• You exceed the operating distance
limit (about 30 m [90 feet]).
• The remote key battery is weak.
• Other vehicles or objects may be
blocking the signal.
• The weather is extremely cold.
• The remote key is close to a radio
transmitter such as a radio station
or an airport which can interfere
with normal operation of the
remote key.
When the remote key does not work
correctly, open and close the door
with the mechanical key. If you have
a problem with the remote key, it is
recommanded that you contact an
authorised HYUNDAI dealer.
(Continued)(Continued)
If the remote key is in close proximi-
ty to your mobile phone, the signal
could be blocked by your mobile
phones normal operational signals.
This is especially important when the
phone is active such as making and
receiving calls, text messaging,
and/or sending/receiving emails.
Avoid placing the remote key and
your mobile phone in the same loca-
tions and always try to maintain an
adequate distance between the two
devices.
CAUTION
Do not fold the key without
pressing the release button.
This may damage the key.
Page 86 of 498

Features of your vehicle
6 4
✽NOTICE
Changes or modifications not
expressly approved by the party
responsible for compliance could void
the user’s authority to operate the
equipment. If the keyless entry sys-
tem is inoperative due to changes or
modifications not expressly approved
by the party responsible for compli-
ance, it will not be covered by your
manufacturer’s vehicle warranty.
Battery replacement
If the remote key is not working prop-
erly, try replacing the battery with a
new one.
Battery Type: CR2032
To replace the battery:
1. Insert a slim tool into the slot and
gently pry open the cover.
2. Remove the old battery and insert
the new battery. Make sure the
battery position is correct.
3. Reinstall the rear cover of the
remote key.If you suspect your remote key might
have sustained some damage, or
you feel your remote key is not work-
ing correctly, it is recommanded that
you contact an authorised HYUNDAI
dealer.
✽NOTICE
An inappropriately disposed
battery can be harmful to
the environment and human
health. Dispose the battery
according to your local
law(s) and regulation.
OVF041213
CAUTION
Keep the remote key away from
electromagnetic materials that
blocks electromagnetic waves
to the key surface.
Page 90 of 498
Features of your vehicle
10 4
Loss of a smart key
A maximum of two smart keys can be
registered to a single vehicle. If you
happen to lose your smart key, it is
recommanded that you should imme-
diately take the vehicle and remaining
key to your authorised HYUNDAI
dealer or tow the vehicle, if necessary.
Smart key precautions
The smart key will not work if any of
the following occur:
• The smart key is close to a radio
transmitter such as a radio station
or an airport which can interfere
with normal operation of the trans-
mitter.
• The smart key is near a mobile two
way radio system or a mobile
phone.
• Another vehicle’s smart key is being
operated close to your vehicle.
When the smart key does not work
correctly, open and close the door
with the mechanical key. If you have
a problem with the smart key, it is
recommended that you contact an
authorised HYUNDAI dealer.
(Continue)(Continue)
If the smart key is in close proximity
to your mobile phone, the signal
could be blocked by your mobile
phones normal operational signals.
This is especially important when the
phone is active such as making and
receiving calls, text messaging,
and/or sending/receiving emails.
Avoid placing the smart key and your
mobile phone in the same location
and always try to maintain an ade-
quate distance between the two
devices.
Page 91 of 498
411
Features of your vehicle
✽NOTICE
Changes or modifications not
expressly approved by the party
responsible for compliance could void
the user’s authority to operate the
equipment. If the keyless entry sys-
tem is inoperative due to changes or
modifications not expressly approved
by the party responsible for compli-
ance, it will not be covered by your
manufacturer’s vehicle warranty.
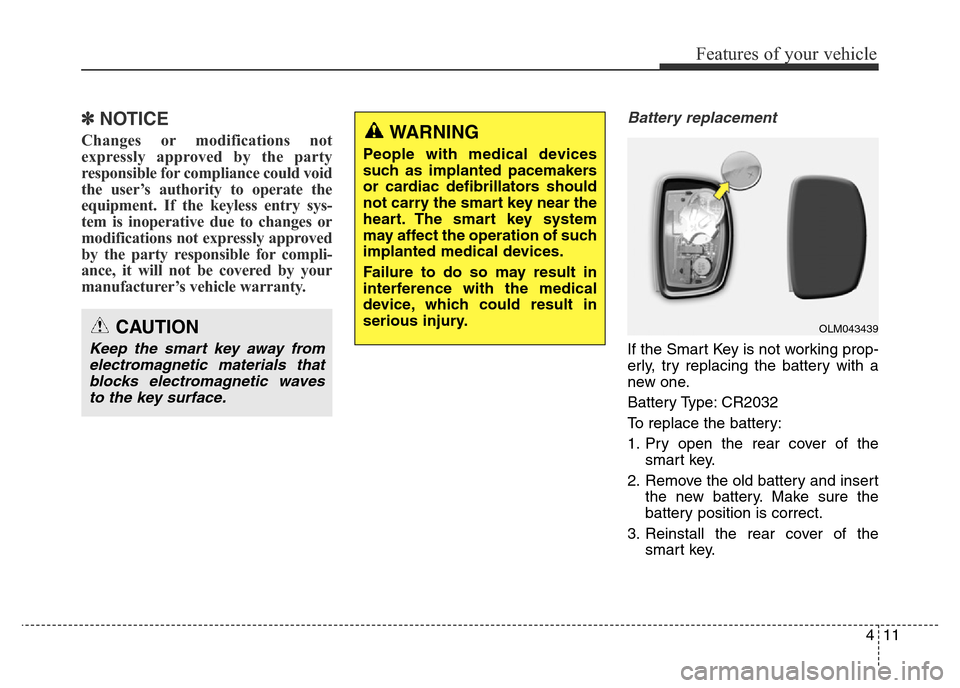
Battery replacement
If the Smart Key is not working prop-
erly, try replacing the battery with a
new one.
Battery Type: CR2032
To replace the battery:
1. Pry open the rear cover of the
smart key.
2. Remove the old battery and insert
the new battery. Make sure the
battery position is correct.
3. Reinstall the rear cover of the
smart key.
OLM043439CAUTION
Keep the smart key away from
electromagnetic materials that
blocks electromagnetic waves
to the key surface.
WARNING
People with medical devices
such as implanted pacemakers
or cardiac defibrillators should
not carry the smart key near the
heart. The smart key system
may affect the operation of such
implanted medical devices.
Failure to do so may result in
interference with the medical
device, which could result in
serious injury.
Page 103 of 498
423
Features of your vehicle
The ignition switch must be in the ON
position to be able to raise or lower
the windows. Each door has a Power
Window switch to control that door's
window. The driver has a Power
Window Lock switch which can block
the operation of passenger windows.
The power windows will operate for
approximately 30 seconds after the
ignition switch is placed in the ACC
or LOCK/OFF position. However, if
the front doors are opened, the
Power Windows cannot be operated
even within the 30 second period.✽NOTICE
• In cold and wet climates, power
windows may not work properly
due to freezing conditions.
• Whilst driving with the rear win-
dows down or with the sunroof (if
equipped) opened (or partially
opened), your vehicle may demon-
strate a wind buffeting or pulsation
noise. This noise is normal and can
be reduced or eliminated by taking
the following actions. If the noise
occurs with one or both of the rear
windows down, partially lower
both front windows approximately
2.5 cm. If you experience the noise
with the sunroof open, slightly close
the sunroof.
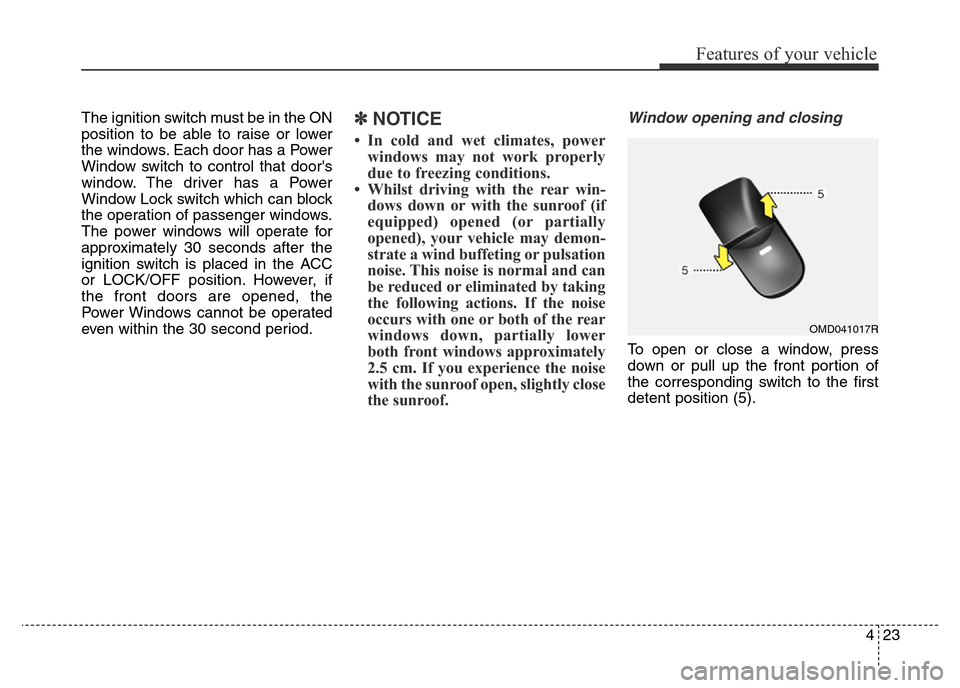
Window opening and closing
To open or close a window, press
down or pull up the front portion of
the corresponding switch to the first
detent position (5).
OMD041017R
Page 111 of 498
431
Features of your vehicle
✽NOTICE
• Make sure to refuel your
vehicle according to the "Fuel
Requirements" suggested in chap-
ter 1.
• Do not spill fuel on the exterior
surfaces of the vehicle. Any type of
fuel spilled on painted surfaces
may damage the paint.(Continued)
• When refuelling, always move
the shift lever to the P (Park)
position (for automatic
transaxle) or first gear or R
(Reverse, for manual transaxle),
set the parking brake, and
place the ignition switch to the
LOCK/OFF position. Sparks
produced by electrical compo-
nents related to the engine can
ignite fuel vapourscausing a
fire.
• Do not use matches or a
lighter and do not smoke or
leave a lit cigarette in your
vehicle whilst at a service sta-
tion, especially during refu-
elling.
• Do not over-fill or top-off your
vehicle tank, which can cause
petrol spillage.
(Continued)(Continued)
• If a fire breaks out during refu-
elling, leave the vicinity of the
vehicle, and immediately con-
tact the manager of the serv-
ice station and then contact
the local fire department.
Follow any safety instructions
they provide.
• If pressurised fuel sprays out,
it can cover your clothes or
skin and thus subject you to
the risk of fire and burns.
Always remove the fuel cap
carefully and slowly. If the cap
is venting fuel or if you hear a
hissing sound, wait until the
condition stops before com-
pletely removing the cap.
• Always check that the fuel cap
is installed securely to pre-
vent fuel spillage in the event
of an accident.
CAUTION
If the fuel filler cap requires
replacement, use only a genuine
HYUNDAI cap or the equivalent
specified for your vehicle. An
incorrect fuel filler cap can
result in a serious malfunction
of the fuel system or emission
control system.