Page 161 of 498
481
Features of your vehicle
One-touch lane change function
(if equipped)
To activate a one-touch lane change
function, move the turn signal lever
slightly and then release it. The lane
change signals will blink 3 times.
✽NOTICE
If the turn signal indicator stays on
and does not flash, or if it flashes
abnormally, a bulb may be burned
out or have a poor electrical connec-
tion in the circuit. The bulb may
require replacement.
Front fog light (if equipped)
Fog lights are used to provide
improved visibility when visibility is
poor due to fog, rain or snow, etc.
Use the switch next to the headlight
switch to turn the fog lights ON and
OFF. The fog lights will turn on when
fog light switch (1) is turned to ON
after the parking lights are turned on.
To turn off the fog lights, turn the
switch to the OFF position.
CAUTION
When in operation, the fog
lights consume large amounts
of vehicle electrical power. Only
use the fog lights when visibility
is poor.
OMD041216R
Page 397 of 498

Light bulbs . . . . . . . . . . . . . . . . . . . . . . . . . . . . . . . 7-66
• Headlight, position light, turn signal light,
front fog light bulb replacement . . . . . . . . . . . . . . . 7-67
• Headlight and front fog light aiming . . . . . . . . . . . . . 7-72
• Side repeater light bulb replacement . . . . . . . . . . . . 7-77
• Rear combination light bulb replacement . . . . . . . . 7-77
• High mounted stop light replacement . . . . . . . . . . . 7-81
• Licence plate light bulb replacement . . . . . . . . . . . . 7-82
• Interior light bulb replacement . . . . . . . . . . . . . . . . . 7-83
Appearance care . . . . . . . . . . . . . . . . . . . . . . . . . . . 7-84
• Exterior care . . . . . . . . . . . . . . . . . . . . . . . . . . . . . . . . 7-84
• Interior care . . . . . . . . . . . . . . . . . . . . . . . . . . . . . . . . . 7-89
Emission control system . . . . . . . . . . . . . . . . . . . . 7-91
• Crankcase emission control system . . . . . . . . . . . . . . 7-91
• Evaporative emission control system. . . . . . . . . . . . . 7-92
• Exhaust emission control system . . . . . . . . . . . . . . . . 7-92
7
Page 462 of 498
767
Maintenance
✽NOTICE
After heavy, driving rain or washing,
headlight and taillight lenses could
appear frosty. This condition is
caused by the temperature difference
between the lamp inside and outside.
This is similar to the condensation on
your windows inside your vehicle
when it is raining and doesn’t indi-
cate a problem with your vehicle. If
the water leaks into the lamp bulb
circuitry, we recommend that the
system be checked by an authorised
HYUNDAI dealer.
Headlight, position light, turn
signal light, front fog light bulb
replacement
(1) Headlight (High) / Position light
(2) Headlight (Low)
(3) Front turn signal light
(4) Daytime running light (DRL)
(if equipped)
(5) Front fog light (if equipped)
OMD074101 ■Type A
OMD074102 ■Type B
OMD074026E ■Type C
Page 466 of 498
771
Maintenance
Front turn signal bulb
Follow steps 1 to 4 from the previous
page.
5. Remove the socket from the
assembly by turning the socket
anticlockwise until the tabs on the
socket align with the slots on the
assembly.
6. Remove the bulb from the socket
by pressing it in and rotating it
anticlockwise until the tabs on the
bulb align with the slots in the
socket. Pull the bulb out of the
socket.7. Insert a new bulb by inserting it
into the socket and rotating it until
it locks into place.
8. Install the socket in the assembly
by aligning the tabs on the socket
with the slots in the assembly.
Push the socket into the assembly
and turn the socket clockwise.
9. Reinstall the light assembly to the
body of the vehicle.
Front fog light and Dedicated
light (if equipped)
1. Disconnect the negative battery
cable.
2. Remove the screws under the
front bumper.
3. Disconnect the power connector
from the socket.
OMD074104
OMD074029 Turn signal
Page 467 of 498

Maintenance
72 7
Front fog light (if equipped)
4. Remove the bulb-socket from the
housing by turning the socket anti-
clockwise until the tabs on the
socket align with the slots on the
housing.
5. Install the new bulb-socket into the
housing by aligning the tabs on
the socket with the slots in the
housing. Push the socket into the
housing and turn the socket clock-
wise.
6. Connect the power connector to
the socket.Dedicated light (if equipped)
Follow steps 1 to 3 from the previous
page.
4. Remove the socket from the
assembly by turning the socket
anticlockwise until the tabs on the
socket align with the slots on the
assembly.
5. Remove the bulb by pulling it out.
6. Insert a new bulb by inserting it
into the socket.
7. Install the socket in the assembly
by aligning the tabs on the socket
with the slots in the assembly.
Push the socket into the assembly
and turn the socket clockwise.Headlight and front fog light
aiming
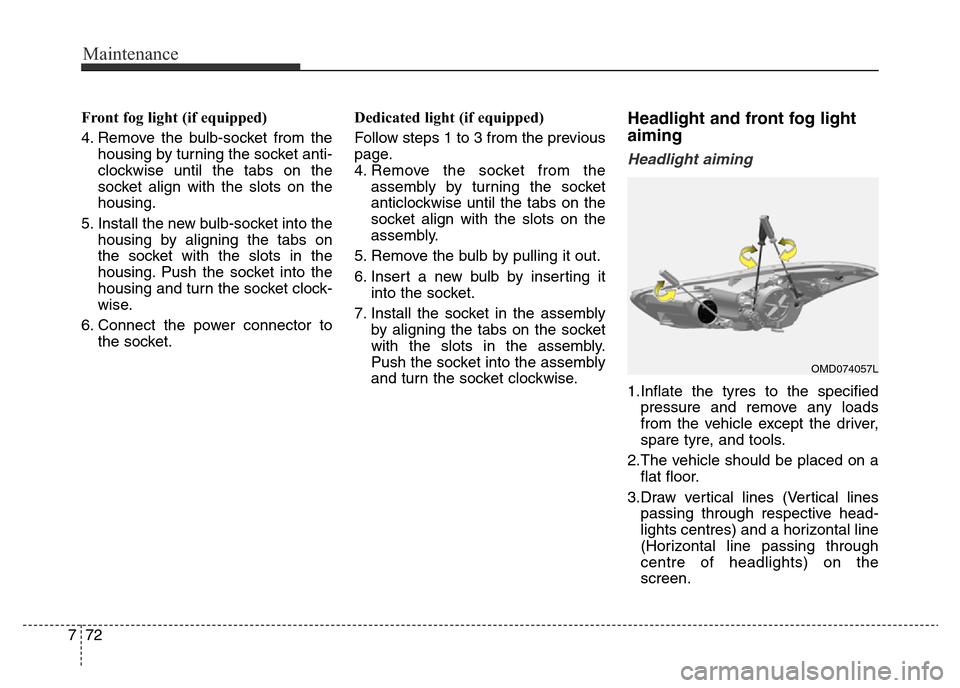
Headlight aiming
1.Inflate the tyres to the specified
pressure and remove any loads
from the vehicle except the driver,
spare tyre, and tools.
2.The vehicle should be placed on a
flat floor.
3.Draw vertical lines (Vertical lines
passing through respective head-
lights centres) and a horizontal line
(Horizontal line passing through
centre of headlights) on the
screen.
OMD074057L
Page 469 of 498
Maintenance
74 7
Vehicle
ConditionH1 H2H3
W1 W2W3
With DRL*Without
DRL*With DRL*Without
DRL*
Without driverMFR 706 (27.8) 659 (25.9)
396 (15.6)
404 (15.9)1,318 (51.9)
1,076 (42.4)1480 (58.3) 1480 (58.3) PROJ. 703 (27.7) 660 (26) 1,314 (51.7)
HID 703 (27.7) 660 (26) 1,314 (51.7)
With driverMFR 699 (27.5) 652 (25.7)
389 (15.3)
397 (15.6)1,318 (51.9)
1480 (58.3) 1480 (58.3) PROJ. 699 (27.5) 653 (25.7) 1,314 (51.7)
HID 699 (27.5) 653 (25.7) 1,314 (51.7)
DRL : Daytime Running LightUnit: mm (in)
Aiming point
H1 : Height between the headlight bulb centre and ground (Low beam)
H2 : Height between the headlight bulb centre and ground (High beam)
H3 : Height between the fog light bulb centre and ground
W1 : Distance between the two headlight bulbs centres (Low beam)
W2 : Distance between the two headlight bulbs centres (High beam)
W3 : Distance between the two fog light bulbs centres
Page 472 of 498
777
Maintenance
Side repeater light bulb
replacement (if equipped)
If the light bulb does not operate, we
recommend that the system be
checked by an authorised HYUNDAI
dealer.
Rear combination light bulb
replacement
(1) Reverse light
(2) Tail light/Rear fog light
(If euqipped)
(3) Rear turn signal light
(4) Stop/Tail light
Outboard light
1. Open the boot lid.
2. Remove the service cover by
pulling it out.OMD070030/HOMD074071
OMD070032
Page 475 of 498
Maintenance
80 7
3.Disconnect the connector and then
remove the nuts by turning the nuts
anticlockwise.
Reverse light
To remove the Rear combination
light assembly, see Outboard Light
previously in this section.
1. Take the light assembly out.
2. Remove the socket from the
assembly by turning the socket anti-
clockwise until the tabs on the sock-
et align with the slots on the assem-
bly.
3. Remove the bulb by pulling it out.
4. Insert a new bulb by inserting it
into the socket.
OMD074040
OMD074108 (If equipped with rear fog)