2016 Hyundai Elantra open bonnet
[x] Cancel search: open bonnetPage 16 of 498
Your vehicle at a glance
4 2
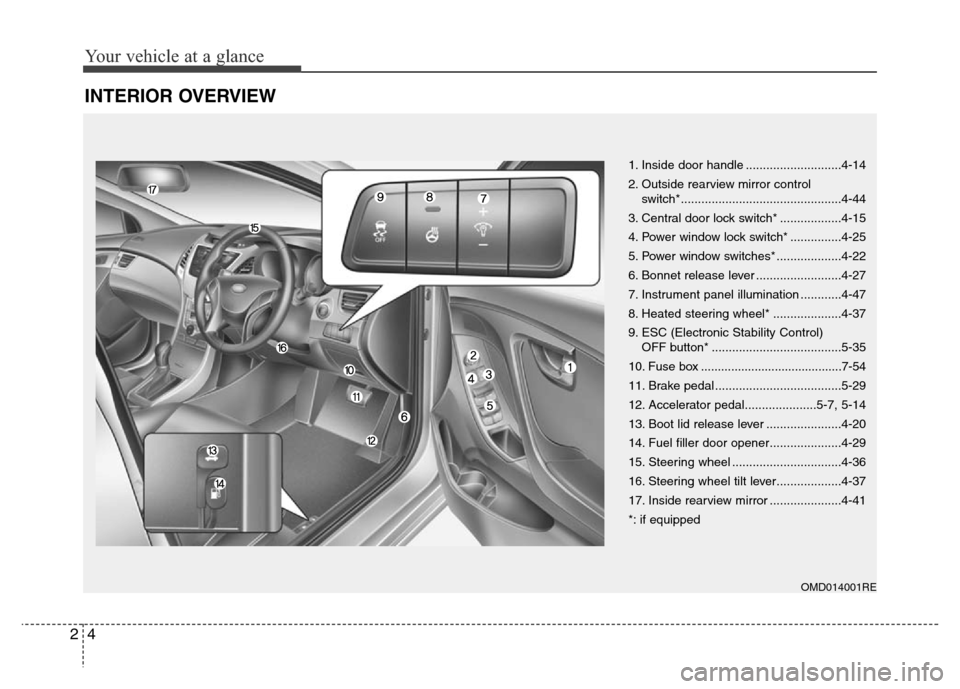
INTERIOR OVERVIEW
OMD014001RE
1. Inside door handle ............................4-14
2. Outside rearview mirror control
switch*...............................................4-44
3. Central door lock switch* ..................4-15
4. Power window lock switch* ...............4-25
5. Power window switches* ...................4-22
6. Bonnet release lever .........................4-27
7. Instrument panel illumination ............4-47
8. Heated steering wheel* ....................4-37
9. ESC (Electronic Stability Control)
OFF button* ......................................5-35
10. Fuse box ..........................................7-54
11. Brake pedal .....................................5-29
12. Accelerator pedal.....................5-7, 5-14
13. Boot lid release lever ......................4-20
14. Fuel filler door opener.....................4-29
15. Steering wheel ................................4-36
16. Steering wheel tilt lever...................4-37
17. Inside rearview mirror .....................4-41
*: if equipped
Page 81 of 498

Features of your vehicle
Accessing your vehicle . . . . . . . . . . . . . . . . . . . . . . . 4-3
• Remote key . . . . . . . . . . . . . . . . . . . . . . . . . . . . . . . . . . . 4-3
• Smart key . . . . . . . . . . . . . . . . . . . . . . . . . . . . . . . . . . . . 4-7
• Immobiliser system . . . . . . . . . . . . . . . . . . . . . . . . . . . 4-12
Door locks . . . . . . . . . . . . . . . . . . . . . . . . . . . . . . . . 4-13
• Outside the vehicle . . . . . . . . . . . . . . . . . . . . . . . . . . . 4-13
• Inside the vehicle . . . . . . . . . . . . . . . . . . . . . . . . . . . . . 4-14
• Auto door lock/unlock features . . . . . . . . . . . . . . . . . 4-17
• Child-protector rear door locks . . . . . . . . . . . . . . . . . 4-17
Theft-alarm system . . . . . . . . . . . . . . . . . . . . . . . . 4-19
Boot . . . . . . . . . . . . . . . . . . . . . . . . . . . . . . . . . . . . . 4-20
Windows . . . . . . . . . . . . . . . . . . . . . . . . . . . . . . . . . 4-22
• Power windows . . . . . . . . . . . . . . . . . . . . . . . . . . . . . . 4-22
• Manual windows . . . . . . . . . . . . . . . . . . . . . . . . . . . . . 4-26
Bonnet.. . . . . . . . . . . . . . . . . . . . . . . . . . . . . . . . . . . 4-27
Fuel filler door . . . . . . . . . . . . . . . . . . . . . . . . . . . . 4-29
Sunroof . . . . . . . . . . . . . . . . . . . . . . . . . . . . . . . . . . 4-32
• Sunroof opening and closing . . . . . . . . . . . . . . . . . . . 4-32
• Sliding the sunroof . . . . . . . . . . . . . . . . . . . . . . . . . . . 4-32
• Tilting the sunroof . . . . . . . . . . . . . . . . . . . . . . . . . . . . 4-33
• Sunshade . . . . . . . . . . . . . . . . . . . . . . . . . . . . . . . . . . . 4-34
• Resetting the sunroof . . . . . . . . . . . . . . . . . . . . . . . . . 4-34
Steering wheel . . . . . . . . . . . . . . . . . . . . . . . . . . . . . 4-36
• Electric power steering (EPS) . . . . . . . . . . . . . . . . . . 4-36• Tilt steering / Telescope steering . . . . . . . . . . . . . . . . 4-37
• Heated steering wheel . . . . . . . . . . . . . . . . . . . . . . . . . 4-37
• Flex steering wheel . . . . . . . . . . . . . . . . . . . . . . . . . . . 4-38
• Horn . . . . . . . . . . . . . . . . . . . . . . . . . . . . . . . . . . . . . . . 4-40
Mirrors . . . . . . . . . . . . . . . . . . . . . . . . . . . . . . . . . . 4-40
• Inside rearview mirror . . . . . . . . . . . . . . . . . . . . . . . . 4-40
• Outside rearview mirror . . . . . . . . . . . . . . . . . . . . . . . 4-43
Instrument cluster . . . . . . . . . . . . . . . . . . . . . . . . . 4-46
• Instrument cluster control . . . . . . . . . . . . . . . . . . . . . 4-47
• Gauges . . . . . . . . . . . . . . . . . . . . . . . . . . . . . . . . . . . . . 4-48
• Transaxle shift indicator . . . . . . . . . . . . . . . . . . . . . . . 4-52
• Trip computer . . . . . . . . . . . . . . . . . . . . . . . . . . . . . . . 4-53
• User settings mode. . . . . . . . . . . . . . . . . . . . . . . . . . . . 4-57
• Warning messages . . . . . . . . . . . . . . . . . . . . . . . . . . . . 4-60
• Warning and indicator lights . . . . . . . . . . . . . . . . . . . 4-66
Light. . . . . . . . . . . . . . . . . . . . . . . . . . . . . . . . . . . . . 4-78
• Exterior lights . . . . . . . . . . . . . . . . . . . . . . . . . . . . . . . 4-78
• Interior lights . . . . . . . . . . . . . . . . . . . . . . . . . . . . . . . . 4-83
Wipers and washers . . . . . . . . . . . . . . . . . . . . . . . . 4-87
• Windscreen wipers . . . . . . . . . . . . . . . . . . . . . . . . . . . 4-87
• Windscreen washers . . . . . . . . . . . . . . . . . . . . . . . . . . 4-89
Defroster . . . . . . . . . . . . . . . . . . . . . . . . . . . . . . . . . 4-91
• Rear window defroster . . . . . . . . . . . . . . . . . . . . . . . . 4-91
Manual climate control system . . . . . . . . . . . . . . . 4-93
• Heating and air conditioning . . . . . . . . . . . . . . . . . . . 4-94
4
Page 83 of 498

43
Features of your vehicle
Remote key
Your HYUNDAI uses a remote key,
which you can use to lock or unlock
a door (and boot) and even start the
engine.
1. Door Lock
2. Door Unlock
3. Boot Unlock
Locking
To lock :
1. Close all doors, bonnet and boot.
2. Press the Door Lock button (1) on
the remote key.
3. The doors will lock. The hazard
warning lights will blink.
4. Make sure the doors are locked by
checking the position of the door
lock button inside the vehicle.
Unlocking
To unlock:
1. Press the Door Unlock button (2)
on the remote key.
2. The doors will unlock. The hazard
warning lights will blink two times.
✽NOTICE
After unlocking the doors, the doors
will lock automatically after 30 sec-
onds unless a door is opened.
ACCESSING YOUR VEHICLE
OHG040006LWARNING
Do not leave the keys in your
vehicle with unsupervised chil-
dren. Unattended children
could place the key in the igni-
tion switch and may operate
power windows or other con-
trols, or even make the vehicle
move, which could result in
serious injury or death.
Page 99 of 498
419
Features of your vehicle
This system helps to protect your
vehicle and valuables. The horn will
sound and the hazard warning lights
will blink continuously if any of the
following occurs:
- A door is opened without using the
remote key or smart key.
- The boot is opened without using
the remote key or smart key.
- The engine bonnet is opened.
The alarm continues for 30 seconds,
then the system resets. To turn off
the alarm, unlock the doors with the
remote key or smart key.
The Theft Alarm System automati-
cally sets 30 seconds after you lock
the doors and the boot. For the sys-
tem to activate, you must lock the
doors and the boot from outside the
vehicle with the remote key or smart
key or by pressing the button on the
outside of the door handles with the
smart key in your possession.
The hazard warning lights will blink
and the chime will sound once to
indicate the system is armed.Once the security system is set, open-
ing any door, the boot, or the bonnet
without using the remote key or smart
key will cause the alarm to activate.
The Theft Alarm System will not set if
the bonnet, the boot, or any door is
not fully closed. If the system will not
set, check the bonnet, the boot, or
the doors are fully closed.
Do not attempt to alter this system or
add other devices to it.
✽NOTICE
• Do not lock the doors until all pas-
sengers have left the vehicle. If the
remaining passenger leaves the
vehicle when the system is armed,
the alarm will be activated.
• If the vehicle is not disarmed with
the remote key or smart key, open
the doors by using the mechanical
key and place the ignition switch
in the ON position (for remote
key) or start the engine (for smart
key) and wait for 30 seconds.
• When the system is disarmed but a
door or boot is not opened within
30 seconds, the system will be
rearmed.
✽NOTICE
Vehicles equipped with a theft alarm
system will have a label attached to
the vehicle with the following words:
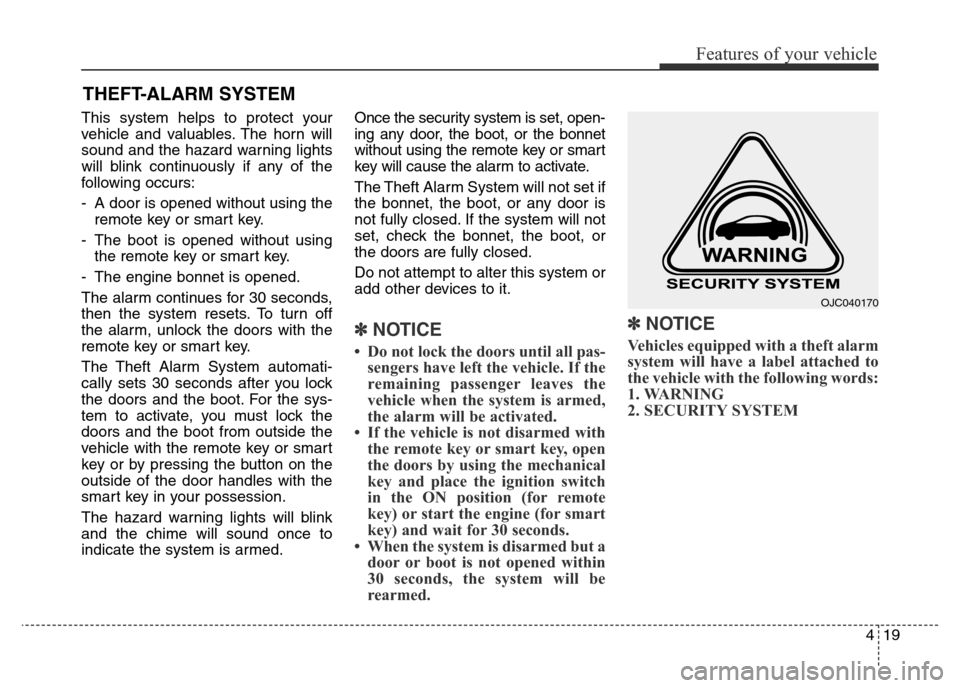
1. WARNING
2. SECURITY SYSTEM
THEFT-ALARM SYSTEM
OJC040170
Page 107 of 498
427
Features of your vehicle
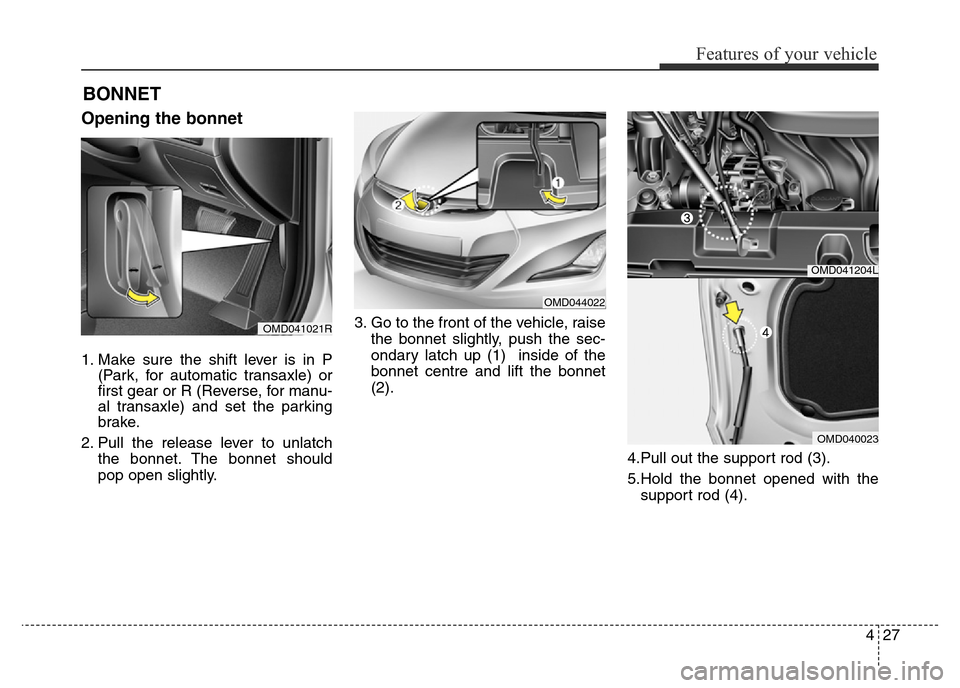
Opening the bonnet
1. Make sure the shift lever is in P
(Park, for automatic transaxle) or
first gear or R (Reverse, for manu-
al transaxle) and set the parking
brake.
2. Pull the release lever to unlatch
the bonnet. The bonnet should
pop open slightly.3. Go to the front of the vehicle, raise
the bonnet slightly, push the sec-
ondary latch up (1) inside of the
bonnet centre and lift the bonnet
(2).
4.Pull out the support rod (3).
5.Hold the bonnet opened with the
support rod (4).
BONNET
OMD041204L
OMD040023
OMD044022
OMD041021R
Page 108 of 498
Features of your vehicle
28 4
Closing the bonnet
1. Before closing the bonnet, check
the following:
• All filler caps in the engine com-
partment must be correctly
installed.
• Gloves, rags or any other com-
bustible material must be removed
from the engine compartment.
2. Return the support rod to its clip to
prevent it from rattling.
3. Lower the bonnet halfway and let it
drop. Make sure that it locks into
place.
WARNING
• Before closing the bonnet,
ensure that all obstructions
are removed from the bonnet
opening. Closing the bonnet
with an obstruction present in
the bonnet opening may
result in property damage or
severe personal injury.
• Do not leave gloves, rags or
any other combustible materi-
al in the engine compartment.
Doing so may cause a heat-
induced fire.
• Always double check to be
sure that the bonnet is firmly
latched before driving away. If
it is not latched, the bonnet
could open whilst the vehicle
is being driven, causing a
total loss of visibility, which
might result in an accident.
• Do not move the vehicle with
the bonnet raised. The view
will be blocked and the bon-
net could fall or be damaged.
WARNING - Support rod
• Grasp the support rod in the
area wrapped in rubber. The
rubber will help prevent you
from being burned by hot
metal when the engine is hot.
• The support rod must be
inserted completely into the
hole provided whenever you
inspect the engine compart-
ment. This will prevent the
bonnet from falling and possi-
bly injuring you.
Page 180 of 498
Features of your vehicle
100 4
Air conditioning (if equipped)
HYUNDAI Air Conditioning Systems
are filled with environmentally friendly
refrigerant.
1. Start the engine. Push the air con-
ditioning button.
2. Set the mode to the position.
3. Set the air intake control to the
outside air or recirculated air posi-
tion.
4. Adjust the fan speed control and
temperature control to maintain
maximum comfort.
Your vehicle is filled with R-134a or
R-1234yf according to the regula-
tions at the time of production. You
can find out which air conditioning
refrigerant is applied to your vehicle
on the label under the bonnet. Refer
to section 8 for the location of the air
conditioning refrigerant label.
✽NOTICE
• When using the air conditioning
system, monitor the temperature
gauge closely whilst driving up
hills or in heavy traffic, when out-
side temperatures are high. Air
conditioning system operation
may cause engine overheating.
Continue to use the blower fan but
turn the air conditioning system
off if the temperature gauge indi-
cates engine overheating.
• When opening the windows in
humid weather air conditioning
may create water droplets inside
the vehicle. Since excessive water
droplets may cause damage to
electrical equipment, air condi-
tioning should only be used with
the windows closed.
Air conditioning system operation tips
• If the vehicle has been parked in
direct sunlight during hot weather,
open the windows for a short time
to let the hot air inside the vehicle
escape.
• To help reduce moisture inside of
the windows on rainy or humid
days, decrease the humidity inside
the vehicle by operating the air
conditioning system.
• During air conditioning system
operation, you may occasionally
notice a slight change in engine
speed as the air conditioning com-
pressor cycles. This is a normal
system operation characteristic.
• Use the air conditioning system
every month only for a few minutes
to ensure maximum system per-
formance.
• When using the air conditioning
system, you may notice clear water
dripping (or even puddling) on the
ground under the vehicle. This is a
normal system operation charac-
teristic.
Page 384 of 498
If your temperature gauge indicates
overheating, you experience a loss
of power, or hear loud pinging or
knocking, the engine may be over-
heating. If this happens, you should:
1.Pull off the road and stop as soon
as it is safe to do so.
2.Place the shift lever in P (Park, for
automatic transaxle vehicle) or
neutral (for manual transaxle vehi-
cle) and set the parking brake. If
the air conditioning is ON, turn it
OFF.
3.If engine coolant is running out
under the vehicle or steam is com-
ing out from the bonnet, stop the
engine. Do not open the bonnet
until the coolant has stopped run-
ning or the steaming has stopped.
If there is no visible loss of engine
coolant and no steam, leave the
engine running and check to be
sure the engine cooling fan is oper-
ating. If the fan is not running, turn
the engine off.4.Check for coolant leaking from the
radiator, hoses or under the vehi-
cle. (If the air conditioning had
been in use, it is normal for cold
water to be draining from it when
you stop.)
5.If engine coolant is leaking out,
stop the engine immediately and
we recommend that you call an
authorised HYUNDAI dealer for
assistance.
IF THE ENGINE OVERHEATS
What to do in an emergency
8 6
WARNING
Whilst the engine is
running, keep hands,
clothing and tools
away from the moving
parts such as the
cooling fan and drive
belt to prevent seri-
ous injury.
WARNING
NEVER remove the
radiator cap or the
drain plug whilst the
engine and radiator
are hot. Hot coolant
and steam may blow out under
pressure, causing serious
injury.
Turn the engine off and wait
until the engine cools down.
Use extreme care when remov-
ing the radiator cap. Wrap a
thick towel around it, and turn it
anticlockwise slowly to the first
stop. Step back whilst the pres-
sure is released from the cool-
ing system. When you are sure
all the pressure has been
released, press down on the
cap, using a thick towel, and
continue turning anticlockwise
to remove it.