Page 445 of 521

Maintenance
28
7
WASHER FLUID
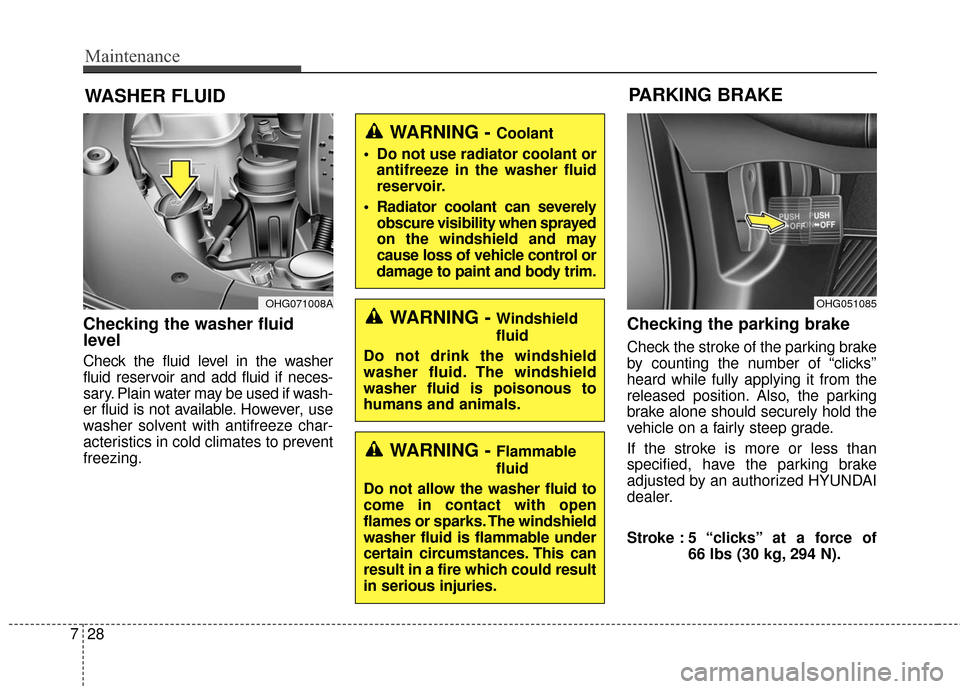
Checking the washer fluid
level
Check the fluid level in the washer
fluid reservoir and add fluid if neces-
sary. Plain water may be used if wash-
er fluid is not available. However, use
washer solvent with antifreeze char-
acteristics in cold climates to prevent
freezing.
Checking the parking brake
Check the stroke of the parking brake
by counting the number of “clicks’’
heard while fully applying it from the
released position. Also, the parking
brake alone should securely hold the
vehicle on a fairly steep grade.
If the stroke is more or less than
specified, have the parking brake
adjusted by an authorized HYUNDAI
dealer.
Stroke : 5 “clicks’’ at a force of
66 lbs (30 kg, 294 N).
OHG071008AOHG051085
PARKING BRAKE
WARNING - Windshield
fluid
Do not drink the windshield
washer fluid. The windshield
washer fluid is poisonous to
humans and animals.
WARNING - Coolant
Do not use radiator coolant or antifreeze in the washer fluid
reservoir.
Radiator coolant can severely obscure visibility when sprayed
on the windshield and may
cause loss of vehicle control or
damage to paint and body trim.
WARNING - Flammable
fluid
Do not allow the washer fluid to
come in contact with open
flames or sparks. The windshield
washer fluid is flammable under
certain circumstances. This can
result in a fire which could result
in serious injuries.
Page 451 of 521

Maintenance
34
7
For best battery service
Keep the battery securely mounted.
Keep the battery top clean and dry.
Keep the terminals and connec-
tions clean, tight, and coated with
petroleum jelly or terminal grease.
Rinse any spilled electrolyte from the battery immediately with a
solution of water and baking soda.
If the vehicle is not going to be used for an extended time, discon-
nect the battery cables.
BATTERY
OHG070015
WARNING - Battery
dangers
Always read the follow- ing instructions carefully
when handling a battery.
Keep lighted cigarettes and all other flames or
sparks away from the
battery.
The battery contains hydrogen - a highly com-
bustible gas, which will
explode if it comes in con-
tact with a flame or spark.
Keep batteries out of the reach of children
because batteries con-
tain highly corrosive
SULFURIC ACID and
electrolytes. Do not
allow battery acid to
contact your skin, eyes,
clothing or paint finish.
(Continued)(Continued)If any electrolyte gets intoyour eyes, flush your eyes
with clean water for at
least 15 minutes and get
immediate medical atten-
tion. If electrolyte gets on
your skin, thoroughly
wash the contacted area.
If you feel a pain or a burn-
ing sensation, get medical
attention immediately.
Wear eye protection whencharging or working near
a battery. Always provide
ventilation when working
in an enclosed space.
An inappropriately dis- posed battery can be
harmful to the environ-
ment and human health.
Dispose the battery
according to your local
law(s) or regulation.
(Continued)
Page 471 of 521
Maintenance
54
7
Main fuse
If the main fuse is blown, it must be
removed as follows:
1. Turn off the engine.
2. Disconnect the negative battery
cable.
3. Remove the nuts shown in the pic- ture above.
4. Replace the fuse with a new one of the same rating.
5. Reinstall in the reverse order of removal.
Multi fuse
If the multi fuse is blown, it must be
removed as follows:
1. Turn off the engine.
2. Disconnect the negative batterycable.
3. Remove the fuse panel in the engine compartment.
4. Remove the nuts shown in the pic- ture above.
5. Replace the fuse with a new one of the same rating.
6. Reinstall in the reverse order of removal.
If the multi fuse is blown, consult an
authorized HYUNDAI dealer.
OHG070021OVG079023L
CAUTION - Fuse panel
covers
After checking the fuse panel in the engine compartment, secure-ly install the fuse panel cover toprevent electrical failures whichmay occur from water contact.
Page 474 of 521

757
Maintenance
No.Fuse ratingSymbol Protected component
117.5AMODULE 3Smart Key Control Module, Rear Seat Warmer LH/RH
127.5AA/CONA/C Control Module, E/R Junction Block (Blower Relay), Driver/Passenger Seat Warmer Module,
Active Incar Sensor, Driver/Passenger CCS Control Module
1315AIG1 2Steering Wheel Heater
1420AIG1 1E/R Junction Block (ECU 5 10A, ECU 4 10A)
1510AMEMORY 1Driver Power Seat Switch, Data Link Connector, A/C Control Module, Driver/Passenger Door Module,
Instrument Cluster, Tire Pressure Monitoring Module, Auto Light & Photo Sensor
1610AINTERIOR LAMP
Rear Door Lamp LH/RH, MAP Lamp, Garnish Lamp LH/RH, Driver/Passenger Door Mood Lamp,
Driver/Passenger Door Lamp, Driver/Passenger Foot Lamp, Driver/Passenger Door Scuff Lamp,
Rear Door Mood Lamp LH/RH, Vanity Lamp Switch LH/RH, Rear Door Scuff Lamp LH/RH,
Trunk Room Lamp, Rear Personal Lamp Center/LH/RH
1725AWIPERWiper Motor, E/R Junction Block (Washer Relay, Wiper (LO) Relay, Wiper (HI) Relay)
1810ASTOP LAMPSmart Key Control Module, Stop Lamp Switch, Start Stop Button Switch
197.5AMEMORY 2RF Receiver
2010AMULTI MEDIAFront Monitor (Audio/Navigation), A/V & Navigation Head Unit, Telematics Unit, Audio
217.5ASTARTTransaxle Range Switch, PCM
Page 477 of 521
Maintenance
60
7
No.Fuse ratingSymbol Protected component
MULTI
FUSE
160AB+2Smart Junction Box (P/HANDLE 15A, SUNROOF 20A, DRV P/SEAT 10A, PASS P/SEAT 25A,
IPS 2, ARISU-LT 1)
260AB+3Smart Junction Box (P/WDW 25A, P/WDW RH 25A, S/HEATER FRT 10A, TRUNK 10A,
P/OUTLET 1 20A)
340AIG1PDM 1 (ACC) Relay, PDM 2 (IG1) Relay
440AESC1ESC Module
540ARR HTDRR HTD Relay
640ABLOWERBlower Relay
760AB+4Smart Junction Block (STOP LAMP 10A, S/HEATER RR 20A, IPS 3/4, ARISU-LT 2, AMP 25A,
P/OUTLET 2 20A)
880AMDPSMDPS Unit
FUSE
910AA/CONA/C Control Module
1010AB/UP LAMPRear Combination Lamp (IN) LH/RH, Electro Chromic Mirror, Audio, Front Monitor
1110AECU 4PCM, IDB(Injector Driver Box)
Engine compartment main fuse panel
Page 478 of 521
761
Maintenance
No.Fuse ratingSymbol Protected component
FUSE
1210AECU 5Multipurpose Check Connector
1330AEPB 2Electronic Parking Brake Module
1440AIG 2Start Relay, PDM 3 (IG2) Relay
1530AEPB 1Electronic Parking Brake Module
1640AB+5EMS Block (ECU 3 15A, ECU 1 30A, F/PUMP 20A, HORN 15A)
1740AESC 2ESC Module
1850AC/FANC/Fan Relay
1920ADIAGNOSISMultipurpose Check Connector
2010AAMSBattery Sensor
2110ACRUISESmart Cruise Control Radar
2215ASTOP LAMPStop Signal Electronic Module
Page 479 of 521
Maintenance
62
7
No.Fuse ratingSymbol Protected component
FUSE
2320ADEICERDeicer Relay
2430ADRV P/SEATDriver Lumbar Support Limit Switch, Driver IMS Module,
Power Seat Relay Box LH, Driver Reclining Limit Switch
2540AB+1Smart Junction Box (DR LOCK 20A, SMART KEY 1 25A,
Leak Current Autocut Device (Leak Current Autocut Relay,
Leak Current Autocut Switch, IPS 5))
2620AIGN COILIgnition Coil #1~#6, Condenser #1/#2
2710ASENSOR 2IDB (Injector Driver Box), PCM, Purge Control Solenoid Valve,
Oil Control Valve #1 ~ #4, Variable Intake Solenoid Valve #1, #2, Canister Close Valve,
E/R Junction (C/FAN Relay)
2810AECU 2IDB (Injector Driver Box)
2910AINJECTORPCM, EMS Box (F/Pump Relay)
3015ASENSOR 1PCM, Oxygen Sensor #1~#4
3115AECU 3PCM, IDB (Injector Driver Box)
3220AF/PUMPEMS Block (F/Pump Relay)
3315AHORNEMS Block (Horn Relay), ICM Relay Box(Burglar Horn Relay)
3430AECU 1EMS Block (Engine Control Relay)
Page 486 of 521

769
Maintenance
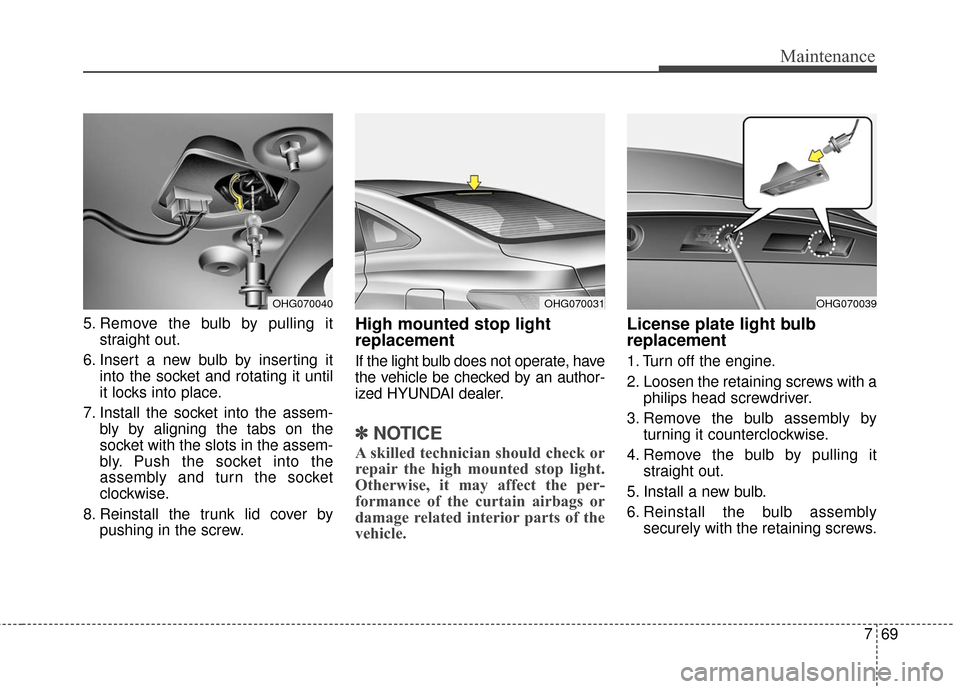
5. Remove the bulb by pulling itstraight out.
6. Insert a new bulb by inserting it into the socket and rotating it until
it locks into place.
7. Install the socket into the assem- bly by aligning the tabs on the
socket with the slots in the assem-
bly. Push the socket into the
assembly and turn the socket
clockwise.
8. Reinstall the trunk lid cover by pushing in the screw.High mounted stop light
replacement
If the light bulb does not operate, have
the vehicle be checked by an author-
ized HYUNDAI dealer.
✽ ✽NOTICE
A skilled technician should check or
repair the high mounted stop light.
Otherwise, it may affect the per-
formance of the curtain airbags or
damage related interior parts of the
vehicle.
License plate light bulb
replacement
1. Turn off the engine.
2. Loosen the retaining screws with a
philips head screwdriver.
3. Remove the bulb assembly by turning it counterclockwise.
4. Remove the bulb by pulling it straight out.
5. Install a new bulb.
6. Reinstall the bulb assembly securely with the retaining screws.
OHG070040OHG070031OHG070039