Page 150 of 565
149
uuOperating the Switches Around the Steering Wheel uLight Switches
Controls
The headlights automatically come on when the wipers are used several times within
a certain intervals with the headlight switch in AUTO.
The headlights automatically go off a few mi nutes later if the wipers are stopped.
The headlights, all other exterior lights, and the instrument panel lights turn off 15
seconds after you remove the key or set the power mode to VEHICLE OFF (LOCK),
take the remote with you, and close the driver's door.
u You can change the headlight auto off timer setting.
2Customized Features P. 99, 295
If you turn the igniti on switch to LOCK (0*1 with the headlight switch on, but do
not open the door, the lights turn off afte r 10 minutes (three minutes, if the switch
is in the AUTO position).
The lights turn on again when you unlock or open the driver's door. If you unlock
the door, but do not open it within 15 seconds, the lights go off. If you open the
driver's door, you will hear a lights on reminder chime.
*1: Models with the smart entry system have an ENGINE START/STOP button instead of an
ignition switch.
■Headlight Integration with Wiper*
■Automatic Lighting Off Feature
1 Headlight Integration with Wiper*
This feature activates during the headlights are off in
AUTO .
The instrument panel br ightness does not change
when the headlights come on.
At dark ambient light leve ls, the automatic lighting
control feature turns on the headlights, regardless of
the number of wiper sweeps.
* Not available on all models
16 US ODYSSEY-31TK86500.book 149 ページ 2015年6月24日 水曜日 午後3時0分
Page 152 of 565
151
uuOperating the Switches Around the Steering Wheel uWipers and Washers
Continued
Controls
Wipers and Washers
The windshield wipers and washers can be
used when the ignition switch is in ON
(w*1.
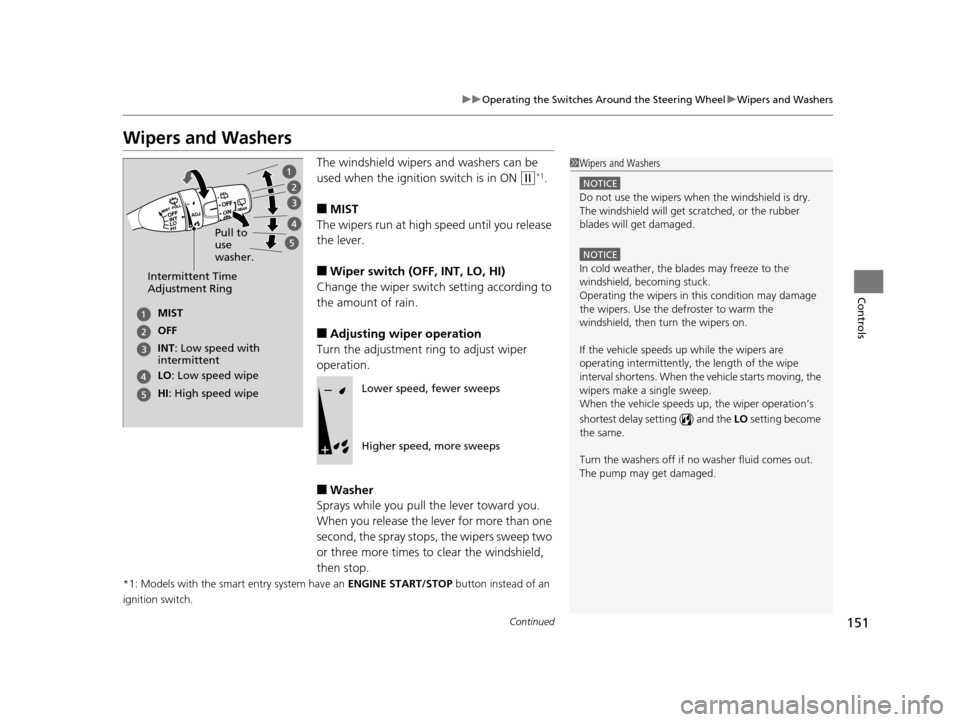
■MIST
The wipers run at high speed until you release
the lever.
■Wiper switch (OFF, INT, LO, HI)
Change the wiper switch setting according to
the amount of rain.
■Adjusting wiper operation
Turn the adjustment ring to adjust wiper
operation.
■Washer
Sprays while you pull the lever toward you.
When you release the le ver for more than one
second, the spray stops, the wipers sweep two
or three more times to clear the windshield,
then stop.
*1: Models with the smart entry system have an ENGINE START/STOP button instead of an
ignition switch.
1 Wipers and Washers
NOTICE
Do not use the wipers when the windshield is dry.
The windshield will get sc ratched, or the rubber
blades will get damaged.
NOTICE
In cold weather, the blades may freeze to the
windshield, becoming stuck.
Operating the wipers in this condition may damage
the wipers. Use the defroster to warm the
windshield, then turn the wipers on.
If the vehicle speeds up while the wipers are
operating intermittently, the length of the wipe
interval shortens. When the vehicle starts moving, the
wipers make a single sweep.
When the vehicle speeds up, the wiper operation’s
shortest delay setting ( ) and the LO setting become
the same.
Turn the washers off if no washer fluid comes out.
The pump may get damaged.Intermittent Time
Adjustment Ring
MIST
INT: Low speed with
intermittent OFF
LO : Low speed wipe
HI: High speed wipe Pull to
use
washer.
Lower speed, fewer sweeps
Higher speed, more sweeps
16 US ODYSSEY-31TK86500.book 151 ページ 2015年6月24日 水曜日 午後3時0分
Page 154 of 565
153
uuOperating the Switches Around the Steering Wheel uBrightness Control
Controls
Brightness Control
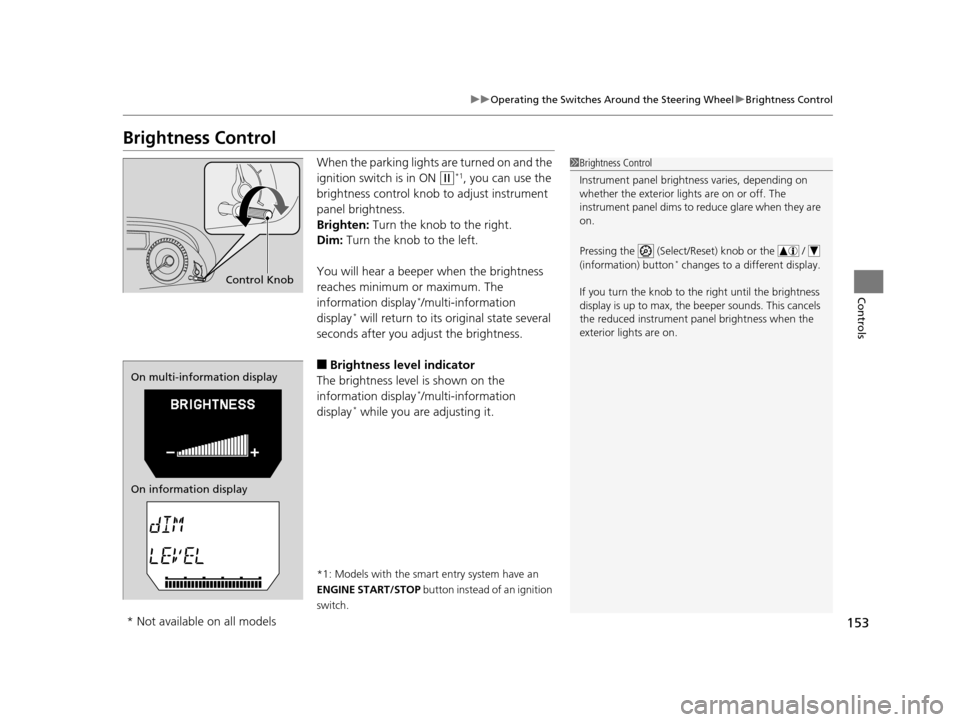
When the parking lights are turned on and the
ignition switch is in ON
(w*1, you can use the
brightness control knob to adjust instrument
panel brightness.
Brighten: Turn the knob to the right.
Dim: Turn the knob to the left.
You will hear a beeper when the brightness
reaches minimum or maximum. The
information display
*/multi-information
display* will return to its original state several
seconds after you adjust the brightness.
■Brightness level indicator
The brightness level is shown on the
information display
*/multi-information
display* while you are adjusting it.
*1: Models with the smart entry system have an
ENGINE START/STOP button instead of an ignition
switch.
1 Brightness Control
Instrument panel brightne ss varies, depending on
whether the exterior lights are on or off. The
instrument panel dims to reduce glare when they are
on.
Pressing the (Select/Reset) knob or the /
(information) button
* changes to a different display.
If you turn the knob to the right until the brightness
display is up to max, the beeper sounds. This cancels
the reduced instrument panel brightness when the
exterior lights are on.
Control Knob
On multi-information display
On information display
* Not available on all models
16 US ODYSSEY-31TK86500.book 153 ページ 2015年6月24日 水曜日 午後3時0分
Page 157 of 565
uuOperating the Switches Around the Steering Wheel uDriving Position Memory System*
156
Controls
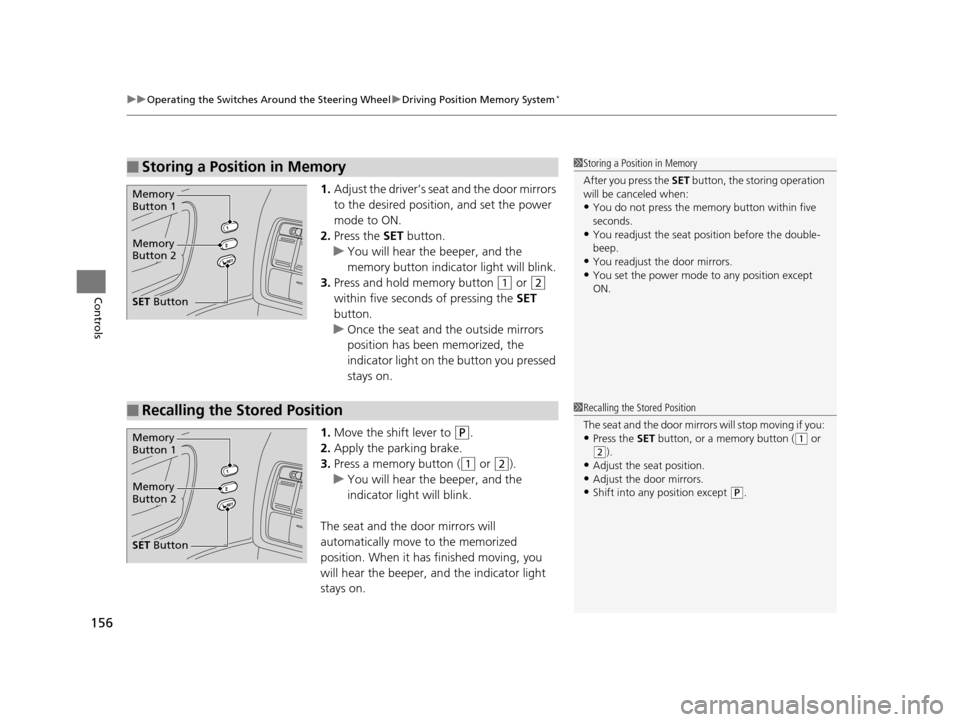
1. Adjust the driver’s seat and the door mirrors
to the desired positi on, and set the power
mode to ON.
2. Press the SET button.
u You will hear the beeper, and the
memory button indicator light will blink.
3. Press and hold memory button
(1 or (2
within five seconds of pressing the SET
button.
u Once the seat and the outside mirrors
position has been memorized, the
indicator light on the button you pressed
stays on.
1. Move the shift lever to
(P.
2. Apply the parking brake.
3. Press a memory button (
(1 or (2).
u You will hear the beeper, and the
indicator light will blink.
The seat and the door mirrors will
automatically move to the memorized
position. When it has finished moving, you
will hear the beeper, an d the indicator light
stays on.
■Storing a Position in Memory1 Storing a Position in Memory
After you press the SET button, the storing operation
will be canceled when:
•You do not press the memory button within five
seconds.
•You readjust the seat position before the double-
beep.
•You readjust the door mirrors.
•You set the power mode to any position except
ON.
Memory
Button 1
Memory
Button 2
SET Button
■Recalling the Stored Position1Recalling the Stored Position
The seat and the door mirror s will stop moving if you:
•Press the SET button, or a memory button ((1 or (2).
•Adjust the seat position.
•Adjust the door mirrors.•Shift into any position except ( P.
Memory
Button 1
Memory
Button 2
SET Button
16 US ODYSSEY-31TK86500.book 156 ページ 2015年6月24日 水曜日 午後3時0分
Page 162 of 565
161Continued
Controls
Adjusting the Seats
Adjusting the Seat Positions
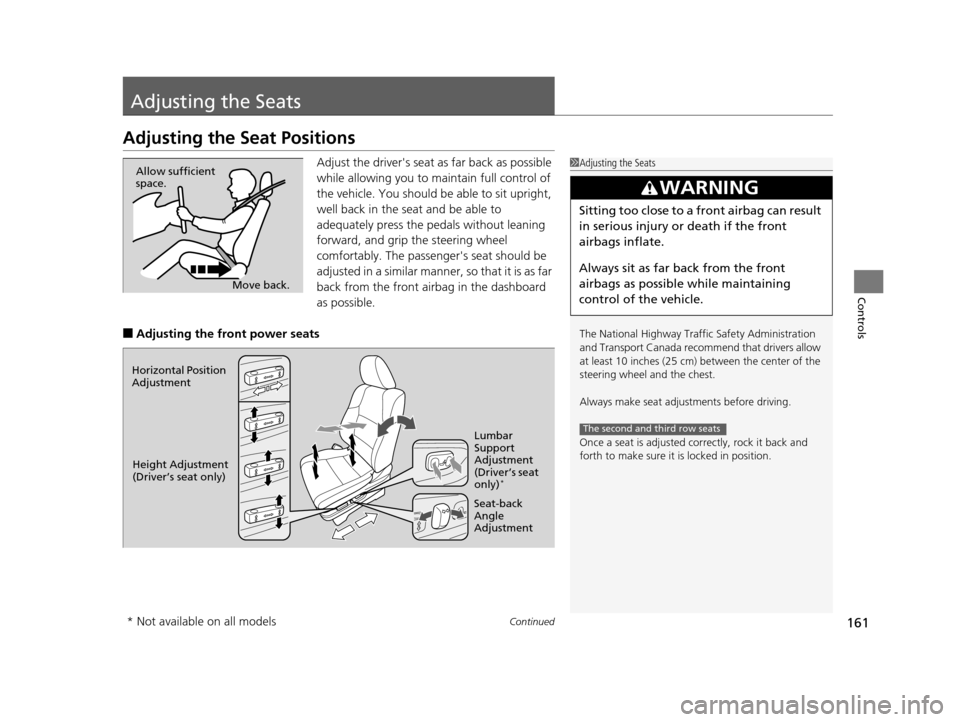
Adjust the driver's seat as far back as possible
while allowing you to ma intain full control of
the vehicle. You should be able to sit upright,
well back in the seat and be able to
adequately press the pedals without leaning
forward, and grip the steering wheel
comfortably. The passenger's seat should be
adjusted in a similar manner, so that it is as far
back from the front airbag in the dashboard
as possible.
■Adjusting the fro nt power seats
1Adjusting the Seats
The National Highway Traffic Safety Administration
and Transport Cana da recommend that drivers allow
at least 10 inches (25 cm) between the center of the
steering wheel and the chest.
Always make seat adjustments before driving.
Once a seat is adjusted co rrectly, rock it back and
forth to make sure it is locked in position.
3WARNING
Sitting too close to a front airbag can result
in serious injury or death if the front
airbags inflate.
Always sit as far back from the front
airbags as possible while maintaining
control of the vehicle.
The second and third row seats
Move back.
Allow sufficient
space.
Horizontal Position
Adjustment
Height Adjustment
(Driver’s seat only) Seat-back
Angle
AdjustmentLumbar
Support
Adjustment
(Driver’s seat
only)
*
* Not available on all models
16 US ODYSSEY-31TK86500.book 161 ページ 2015年6月24日 水曜日 午後3時0分
Page 163 of 565
162
uuAdjusting the Seats uAdjusting the Seat Positions
Controls
■Adjusting the passenger’s manual seats
Seat-back Angle
Adjustment
Pull up the lever to
change the angle.
Seat-back Angle
Adjustment*
Pull the strap to change
the angle.
Seat-back Angle
Adjustment
Pull up strap on the
right to change the
angle of the right halves
of the seat-back, and
left for the left halves.
Second row seat
Horizontal Position
Adjustment
Pull up the bar to move
the seat, then release
the bar.
Third row seat
* Not available on all models
16 US ODYSSEY-31TK86500.book 162 ページ 2015年6月24日 水曜日 午後3時0分
Page 167 of 565
uuAdjusting the Seats uAdjusting the Seat Positions
166
Controls
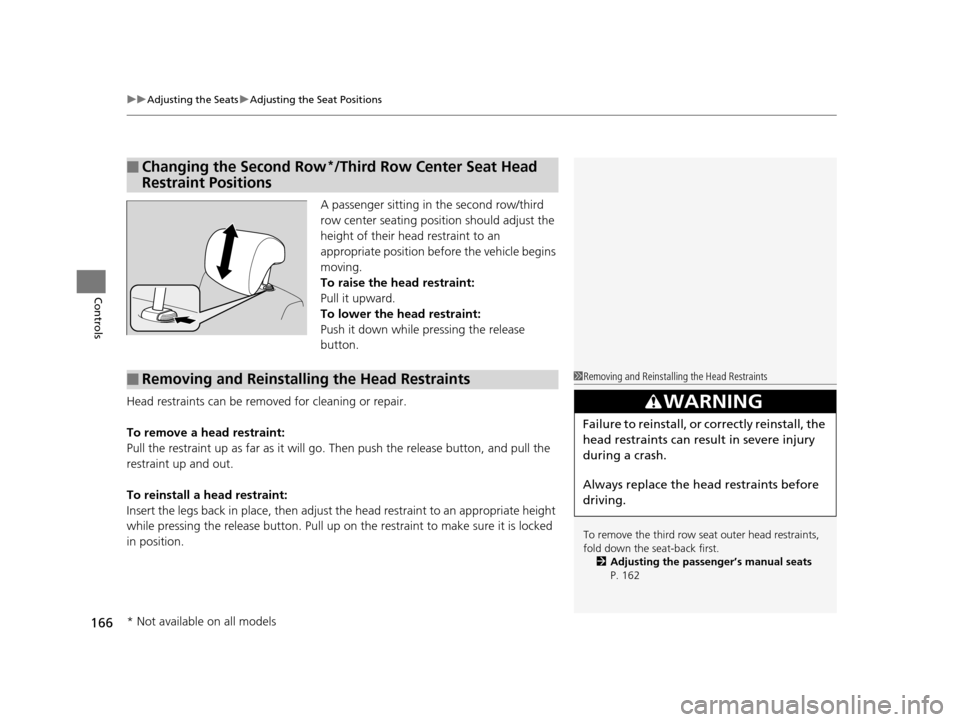
A passenger sitting in the second row/third
row center seating position should adjust the
height of their head restraint to an
appropriate position befo re the vehicle begins
moving.
To raise the head restraint:
Pull it upward.
To lower the head restraint:
Push it down while pressing the release
button.
Head restraints can be removed for cleaning or repair.
To remove a head restraint:
Pull the restraint up as far as it will go. Then push the release button, and pull the
restraint up and out.
To reinstall a head restraint:
Insert the legs back in place, then adjust the head restraint to an appropriate height
while pressing the release button. Pull up on the restraint to make sure it is locked
in position.
■Changing the Second Row*/Third Row Center Seat Head
Restraint Positions
■Removing and Reinstalling the Head Restraints1 Removing and Reinstalling the Head Restraints
To remove the third row seat outer head restraints,
fold down the seat-back first.
2 Adjusting the passenger’s manual seats
P. 162
3WARNING
Failure to reinstall, or correctly reinstall, the
head restraints can result in severe injury
during a crash.
Always replace the he ad restraints before
driving.
* Not available on all models
16 US ODYSSEY-31TK86500.book 166 ページ 2015年6月24日 水曜日 午後3時0分
Page 173 of 565
uuAdjusting the Seats uRear Seats
172
Controls
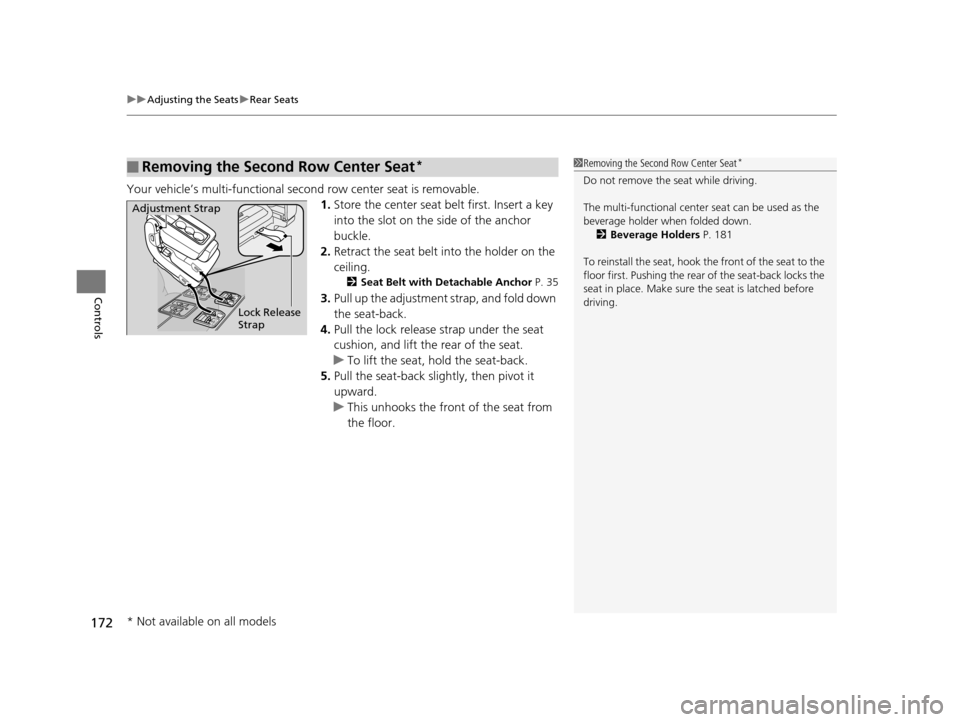
Your vehicle’s multi-functional second row center seat is removable.
1.Store the center seat belt first. Insert a key
into the slot on the side of the anchor
buckle.
2. Retract the seat belt into the holder on the
ceiling.
2 Seat Belt with Detachable Anchor P. 35
3.Pull up the adjustment strap, and fold down
the seat-back.
4. Pull the lock release strap under the seat
cushion, and lift the rear of the seat.
u To lift the seat, hold the seat-back.
5. Pull the seat-back slig htly, then pivot it
upward.
u This unhooks the front of the seat from
the floor.
■Removing the Second Row Center Seat*1Removing the Second Row Center Seat*
Do not remove the seat while driving.
The multi-functional center seat can be used as the
beverage holder when folded down. 2 Beverage Holders P. 181
To reinstall the seat, hook the front of the seat to the
floor first. Pushing the rear of the seat-back locks the
seat in place. Make sure the seat is latched before
driving.
Adjustment Strap
Lock Release
Strap
* Not available on all models
16 US ODYSSEY-31TK86500.book 172 ページ 2015年6月24日 水曜日 午後3時0分