2016 HONDA ODYSSEY dashboard
[x] Cancel search: dashboardPage 68 of 565
67
Safe Driving
Safety Labels
Label Locations
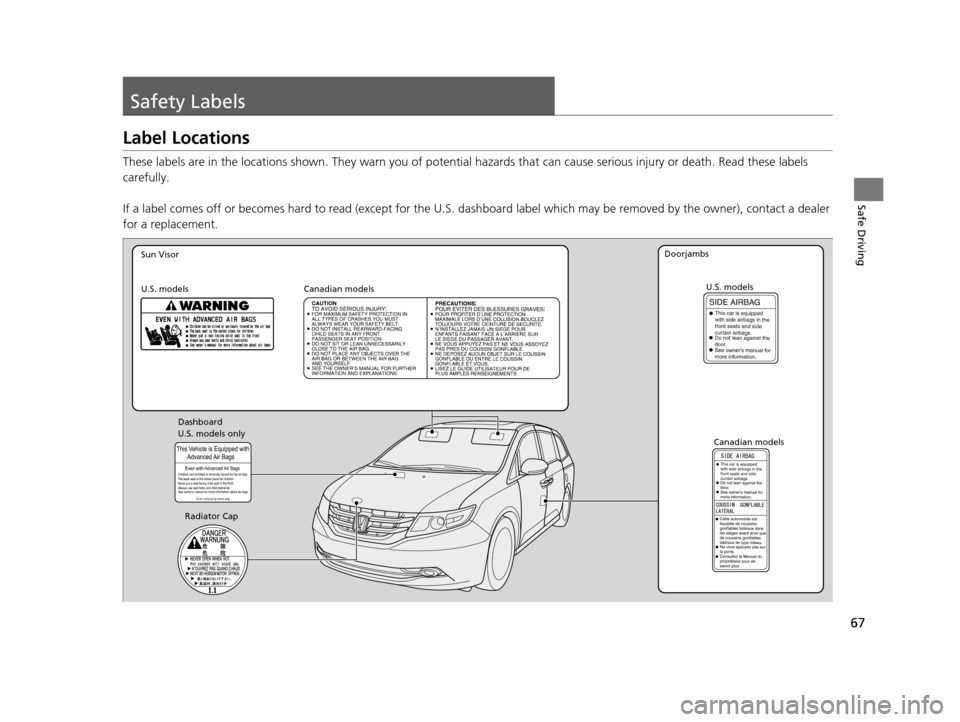
These labels are in the locations shown. They warn you of potential hazards that can cause serious injury or death. Read these labels
carefully.
If a label comes off or becomes hard to read (except for the U. S. dashboard label which may be removed by the owner), contact a dealer
for a replacement.
Sun Visor
U.S. models Canadian models
Radiator Cap U.S. models
U.S. models only Dashboard
Canadian models
Doorjambs
16 US ODYSSEY-31TK86500.book 67 ページ 2015年6月24日 水曜日 午後3時0分
Page 130 of 565
129
uuOpening and Closing the Sliding Doors uOpening/Closing the Power Sliding Doors*
Continued
Controls
Opening/Closing the Power Sliding Doors*
The power sliding doors can be operated by pressing the power sliding door button
on the smart entry remote, pressing the power sliding door switches on the
dashboard or door pillars, or using the door handle.
The power sliding doors can be operated when:
•The sliding door main switch is in the ON position.
• The power sliding door is unlocked.
• The fuel fill door is closed (on the driver side sliding door only).
• The power mode is in VEHICLE OFF (LOC K) when using the smart entry remote.
• The shift lever is in
(P, the brake pedal is depressed, or the parking brake is
applied (with the power mode in ON) when using the power sliding door switches
on the dashboard.
1 Opening/Closing the Power Sliding Doors*
If you move the shift lever out of (P, and release the
brake pedal and the parking brake:
While opening – The sliding door stops and is left
ajar.
While closing – The beeper sounds until the door
closes.
Check that passengers, es pecially children, do not
have their hands on the sliding doors or on the door
pillars before its operation. If someone is caught in
the opening or closing sliding door, it can cause
serious injury.
Before replacing a rear tire, turn the power sliding
door main switch to OFF.
Operate the power slidi ng doors only when the
vehicle is at a complete stop. Make sure you apply the
brake when rear passengers are boarding or exiting.
* Not available on all models
16 US ODYSSEY-31TK86500.book 129 ページ 2015年6月24日 水曜日 午後3時0分
Page 137 of 565
uuSecurity System uSecurity System Alarm*
136
Controls
■Setting the security system alarm
The security system alarm automatically sets when the following conditions have
been met:
• The ignition switch is in LOCK
(0*1, and the key has been removed from the
ignition switch.
• The hood is closed.
• All doors and the tailgate are locked with the key, the remote transmitter or smart
entry system.
■When the security system alarm sets
The security system alarm indicator in the instrument panel blinks. When the
blinking interval changes after about 15 seconds, the security system alarm is set.
■To cancel the security system alarm
The security system alarm is canceled wh en the vehicle is unlocked using the key,
remote transmitter, or smart entry system, or the ignition switch is turned to ON
(w*1. The security system alarm indicator goes off at the same time.
*1: Models with the smart entry system have an ENGINE START/STOP button instead of an
ignition switch.
1 Security System Alarm*
Do not set the security system alarm when someone
is in the vehicle or a window is open. The system can
accidentally activate when:
•Unlocking the door with the lock tab.
•Opening the tailgate with the power tailgate
button on the dashboard.
If the battery goes dead after you have set the
security system alarm, the security alarm may go off
once the battery is re charged or replaced.
If this occurs, deactivate the security system alarm by
unlocking a door using the ke y or remote transmitter.
Do not attempt to alter th is system or add another
device to it.
Models with power tailgate
* Not available on all models
16 US ODYSSEY-31TK86500.book 136 ページ 2015年6月24日 水曜日 午後3時0分
Page 146 of 565
145
uuOperating the Switches Around the Steering Wheel uENGINE START/STOP Button*
Controls
If you open the driver’s door when the power mode is set to ACCESSORY, a warning
buzzer sounds.
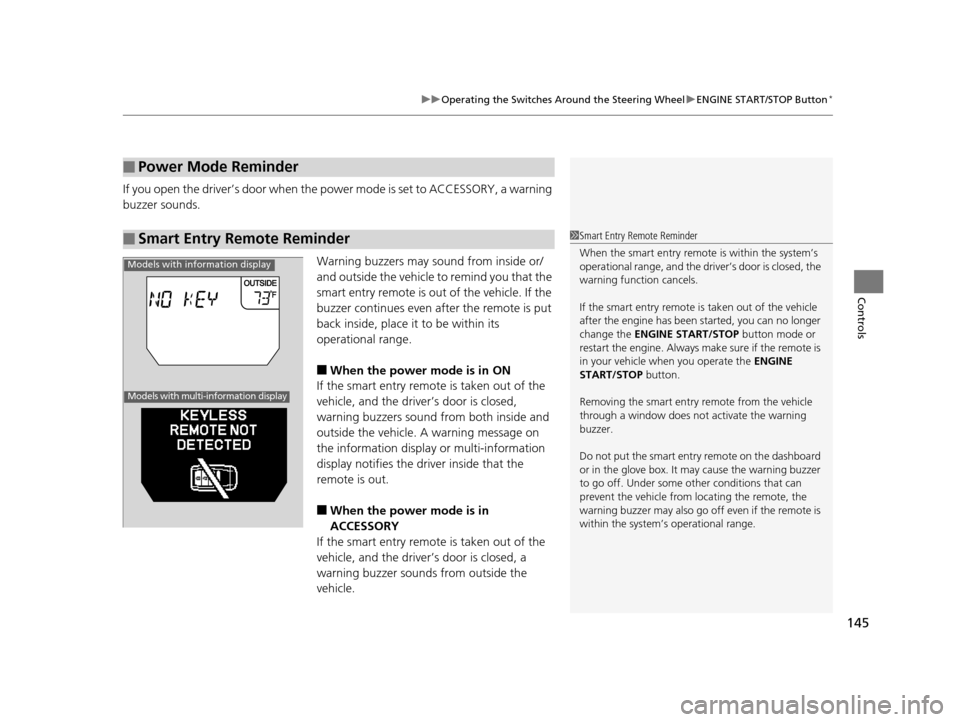
Warning buzzers may sound from inside or/
and outside the vehicle to remind you that the
smart entry remote is out of the vehicle. If the
buzzer continues even after the remote is put
back inside, place it to be within its
operational range.
■When the power mode is in ON
If the smart entry remote is taken out of the
vehicle, and the driver’s door is closed,
warning buzzers sound from both inside and
outside the vehicle. A warning message on
the information display or multi-information
display notifies the driver inside that the
remote is out.
■When the power mode is in
ACCESSORY
If the smart entry remote is taken out of the
vehicle, and the driver’s door is closed, a
warning buzzer sounds from outside the
vehicle.
■Power Mode Reminder
■Smart Entry Remote Reminder1 Smart Entry Remote Reminder
When the smart entry remote is within the system’s
operational range, and the driv er’s door is closed, the
warning function cancels.
If the smart entry remote is taken out of the vehicle
after the engine has been started, you can no longer
change the ENGINE START/STOP button mode or
restart the engine. Always make sure if the remote is
in your vehicle when you operate the ENGINE
START/STOP button.
Removing the smart entry remote from the vehicle
through a window does not activate the warning
buzzer.
Do not put the smart entr y remote on the dashboard
or in the glove box. It may cause the warning buzzer
to go off. Under some other conditions that can
prevent the vehicle from locating the remote, the
warning buzzer may al so go off even if the remote is
within the system’s operational range.
Models with information display
Models with multi-information display
16 US ODYSSEY-31TK86500.book 145 ページ 2015年6月24日 水曜日 午後3時0分
Page 162 of 565
161Continued
Controls
Adjusting the Seats
Adjusting the Seat Positions
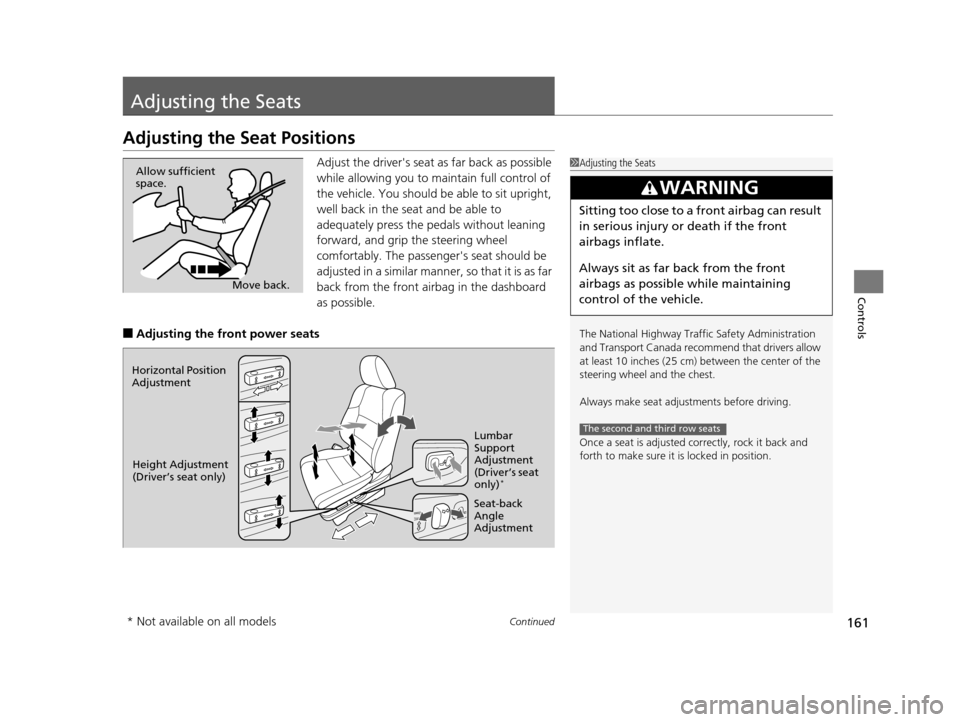
Adjust the driver's seat as far back as possible
while allowing you to ma intain full control of
the vehicle. You should be able to sit upright,
well back in the seat and be able to
adequately press the pedals without leaning
forward, and grip the steering wheel
comfortably. The passenger's seat should be
adjusted in a similar manner, so that it is as far
back from the front airbag in the dashboard
as possible.
■Adjusting the fro nt power seats
1Adjusting the Seats
The National Highway Traffic Safety Administration
and Transport Cana da recommend that drivers allow
at least 10 inches (25 cm) between the center of the
steering wheel and the chest.
Always make seat adjustments before driving.
Once a seat is adjusted co rrectly, rock it back and
forth to make sure it is locked in position.
3WARNING
Sitting too close to a front airbag can result
in serious injury or death if the front
airbags inflate.
Always sit as far back from the front
airbags as possible while maintaining
control of the vehicle.
The second and third row seats
Move back.
Allow sufficient
space.
Horizontal Position
Adjustment
Height Adjustment
(Driver’s seat only) Seat-back
Angle
AdjustmentLumbar
Support
Adjustment
(Driver’s seat
only)
*
* Not available on all models
16 US ODYSSEY-31TK86500.book 161 ページ 2015年6月24日 水曜日 午後3時0分
Page 195 of 565
194
Controls
Heating and Cooling*
Using Vents, Heating and A/C
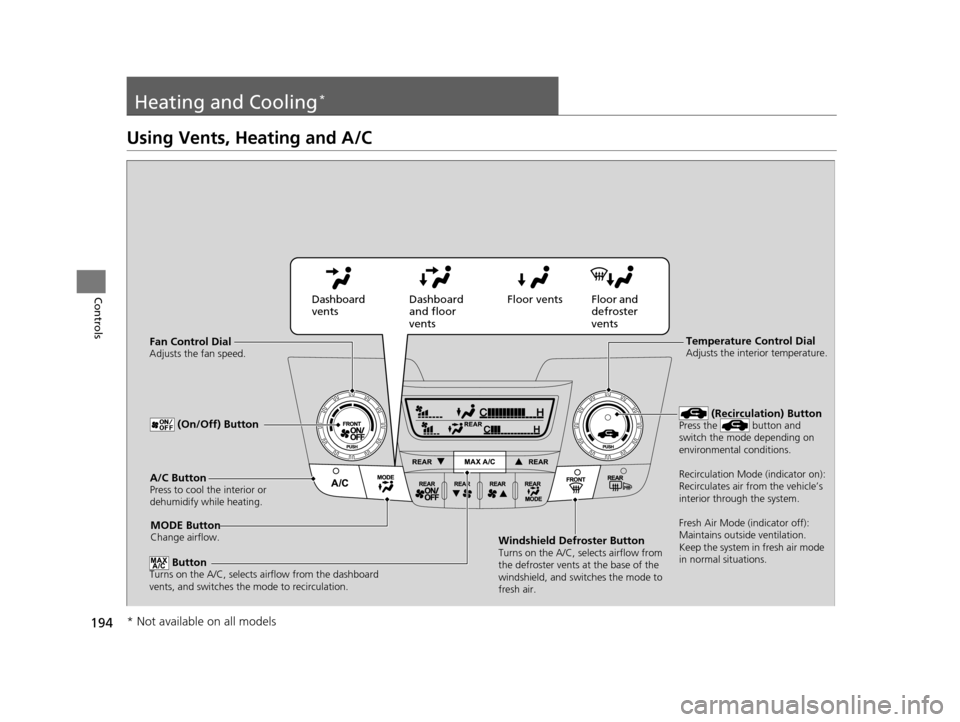
MODE ButtonChange airflow.
Floor and
defroster
vents
Floor vents
Dashboard
and floor
vents
Dashboard
vents
Fan Control Dial
Adjusts the fan speed.
ButtonTurns on the A/C, selects airflow from the dashboard
vents, and switches the mode to recirculation.
A/C ButtonPress to cool the interior or
dehumidify while heating.
Windshield Defroster ButtonTurns on the A/C, selects airflow from
the defroster vents at the base of the
windshield, and switches the mode to
fresh air.
Temperature Control DialAdjusts the interior temperature.
(Recirculation) ButtonPress the button and
switch the mode depending on
environmental conditions.
Recirculation Mode (indicator on):
Recirculates air from the vehicle’s
interior through the system.
Fresh Air Mode (indicator off):
Maintains outside ventilation.
Keep the system in fresh air mode
in normal situations. (On/Off) Button
* Not available on all models
16 US ODYSSEY-31TK86500.book 194 ページ 2015年6月24日 水曜日 午後3時0分
Page 199 of 565
198
Controls
Climate Control System*
Using Automatic Climate Control
The automatic climate control system maintains the interior temperature you select.
The system also selects the proper mix of heated or cooled air that raises or lowers
the interior temperature to your preference as quickly as possible.
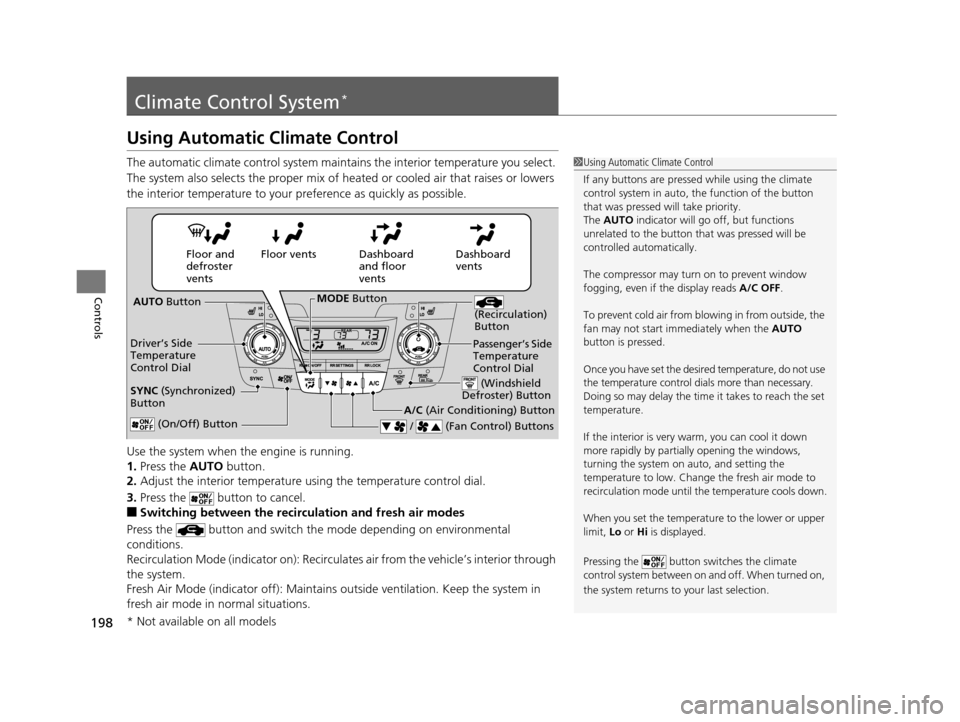
Use the system when the engine is running.
1. Press the AUTO button.
2. Adjust the interior temperature us ing the temperature control dial.
3. Press the button to cancel.
■Switching between the recirculation and fresh air modes
Press the button and switch the mode depending on environmental
conditions.
Recirculation Mode (indicator on): Recirculates air from the vehicle’s interior through
the system.
Fresh Air Mode (indicator off): Maintains outside ventilation. Keep the system in
fresh air mode in normal situations.
1 Using Automatic Climate Control
If any buttons are presse d while using the climate
control system in auto, the function of the button
that was pressed will take priority.
The AUTO indicator will go off, but functions
unrelated to the button th at was pressed will be
controlled automatically.
The compressor may turn on to prevent window
fogging, even if the display reads A/C OFF.
To prevent cold air from bl owing in from outside, the
fan may not start i mmediately when the AUTO
button is pressed.
Once you have set the desi red temperature, do not use
the temperature control di als more than necessary.
Doing so may delay the time it takes to reach the set
temperature.
If the interior is very warm, you can cool it down
more rapidly by partial ly opening the windows,
turning the system on auto, and setting the
temperature to low. Change the fresh air mode to
recirculation mode until the temperature cools down.
When you set the temperat ure to the lower or upper
limit, Lo or Hi is displayed.
Pressing the button switches the climate
control system between on and off. When turned on,
the system returns to your last selection.
Dashboard
vents
Dashboard
and floor
vents
Floor vents
Floor and
defroster
vents
AUTO Button
Driver’s Side
Temperature
Control Dial
A/C (Air Conditioning) Button
/ (Fan Control) Buttons
(Recirculation)
Button
(On/Off) Button
SYNC (Synchronized)
Button
Passenger’s Side
Temperature
Control Dial
(Windshield
Defroster) Button
MODE Button
* Not available on all models
16 US ODYSSEY-31TK86500.book 198 ページ 2015年6月24日 水曜日 午後3時0分
Page 448 of 565
Continued447
uuRefueling uHow to Refuel
Driving
Qualifying gasoline retailers will, in most cases, identify their gasoline as having met
“TOP TIER Detergent Gasoline” standards at the retail location. This fuel is
guaranteed to contain the proper level of de tergent additives and be free of metallic
additives. The proper level of detergent additives, and absence of harmful metallic
additives in gasoline, help avoid build-up of deposits in your engine and emission
control system.
For further important fuel-related informati on for your vehicle, or on information on
gasoline that does not contain MMT, visit www.hondacars.com. In Canada, visit
www.honda.ca for additional information on gaso line. For more information on top
tier gasoline, visit www.toptiergas.com .
■Fuel tank capacity: 21 US gal (79.5 liters)
How to Refuel
1.Stop your vehicle with the service station
pump on the left side of the vehicle in the
rear.
2. Turn off the engine.
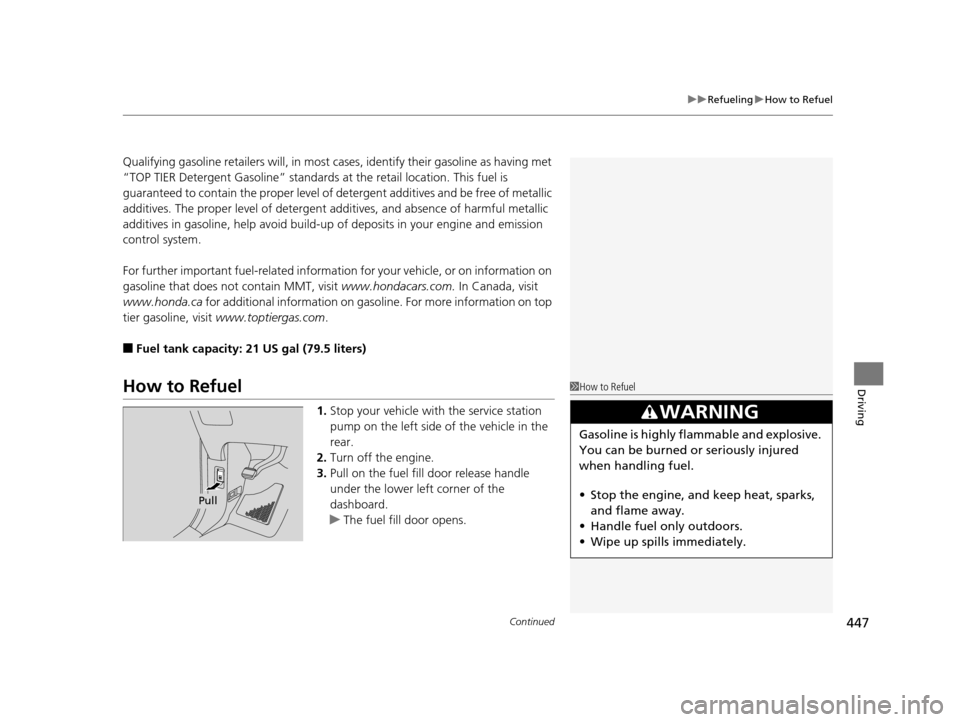
3. Pull on the fuel fill door release handle
under the lower left corner of the
dashboard.
u The fuel fill door opens.
1How to Refuel
3WARNING
Gasoline is highly flammable and explosive.
You can be burned or seriously injured
when handling fuel.
• Stop the engine, and keep heat, sparks,
and flame away.
• Handle fuel only outdoors.
• Wipe up spills immediately.
Pull
16 US ODYSSEY-31TK86500.book 447 ページ 2015年6月24日 水曜日 午後3時0分