Page 57 of 84

106 || 107
DRIVINGDRIVING
Eco Assist System
Can‚ÄÇhelp‚ÄÇimprove‚ÄÇfuel‚ÄÇeconomy‚ÄÇby‚ÄÇadjusting‚ÄÇthe‚ÄÇperformance‚ÄÇof‚ÄÇthe‚ÄÇengine,‚ÄÇ
transmission, climate control system, and cruise control.
ECON Button
Press‚ÄÇthe‚ÄÇECON‚ÄÇbutton‚ÄÇto‚ÄÇturn‚ÄÇthe‚ÄÇsystem‚ÄÇon‚ÄÇor‚ÄÇoff.‚ÄÇ
The eCoN Mode indicator and a message in the
multi-information‚ÄÇdisplay*‚ÄÇappear‚ÄÇwhen‚ÄÇthe‚ÄÇsystem‚ÄÇ
is turned on.
Ambient Meter
Color-coded‚ÄÇbars‚ÄÇchange‚ÄÇbased‚ÄÇon‚ÄÇyour‚ÄÇdriving‚ÄÇ
style‚ÄÇand‚ÄÇbrake‚ÄÇor‚ÄÇaccelerator‚ÄÇpedal‚ÄÇoperation.
Green: Fuel-efficient driving
Light green:‚ÄÇModerate‚ÄÇacceleration/deceleration
White:‚ÄÇAggressive‚ÄÇacceleration/deceleration
Ambient meter
Vehicle Stability Assist (VSA®), aka Electronic Stability Control
(ESC) System
Helps‚ÄÇto‚ÄÇstabilize‚ÄÇthe‚ÄÇvehicle‚ÄÇduring‚ÄÇcornering‚ÄÇif‚ÄÇthe‚ÄÇvehicle‚ÄÇturns‚ÄÇmore‚ÄÇor‚ÄÇless‚ÄÇ
than‚ÄÇwhat‚ÄÇwas‚ÄÇintended.‚ÄÇIt‚ÄÇassists‚ÄÇin‚ÄÇmaintaining‚ÄÇtraction‚ÄÇon‚ÄÇslippery‚ÄÇsurfaces‚ÄÇby‚ÄÇ
regulating‚ÄÇengine‚ÄÇoutput‚ÄÇand‚ÄÇselectively‚ÄÇapplying‚ÄÇthe‚ÄÇbrakes.
Turning VSA On or Off
vSA is turned on every time you start the engine,
even‚ÄÇif‚ÄÇyou‚ÄÇpreviously‚ÄÇturned‚ÄÇit‚ÄÇoff.‚ÄÇIf‚ÄÇyou‚ÄÇturn‚ÄÇVSA‚ÄÇ
off,‚ÄÇyour‚ÄÇvehicle‚ÄÇhas‚ÄÇnormal‚ÄÇbraking‚ÄÇand‚ÄÇcornering‚ÄÇ
ability,‚ÄÇbut‚ÄÇVSA‚ÄÇtraction‚ÄÇand‚ÄÇstability‚ÄÇenhancement‚ÄÇ
become‚ÄÇless‚ÄÇeffective.
Press‚ÄÇand‚ÄÇhold‚ÄÇthe‚ÄÇVSA‚ÄÇOFF‚ÄÇbutton‚ÄÇuntil‚ÄÇyou‚ÄÇhear‚ÄÇa‚ÄÇ
beep‚ÄÇto‚ÄÇturn‚ÄÇVSA‚ÄÇon‚ÄÇor‚ÄÇoff.‚ÄÇThe‚ÄÇVSA‚ÄÇOFF‚ÄÇindicator‚ÄÇ
appears when the system is off.
Traction‚ÄÇcontrol‚ÄÇbecomes‚ÄÇless‚ÄÇeffective,‚ÄÇwhich‚ÄÇmay‚ÄÇmake‚ÄÇit‚ÄÇeasier‚ÄÇwhen‚ÄÇtrying‚ÄÇto‚ÄÇ
free your vehicle if it is stuck in mud or snow.
VSA OFF indicator
*if‚ÄÇequipped
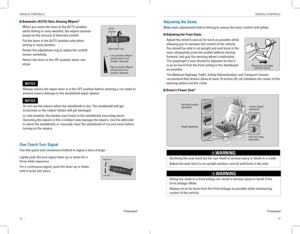
Cruise Control*
Maintain a constant vehicle speed without having to keep your foot on th\
e
accelerator pedal. Use cruise control on freeways or open roads where yo\
u can
travel at a constant speed with little acceleration or deceleration.
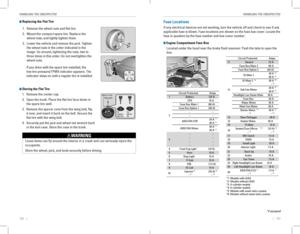
Activating and Setting the Vehicle Speed
1. Press‚ÄÇthe‚ÄÇCRUISE‚ÄÇbutton.‚ÄÇThe‚ÄÇCRUISE‚ÄÇMAIN‚ÄÇindicator‚ÄÇ
appears.
2. Accelerate‚ÄÇto‚ÄÇthe‚ÄÇdesired‚ÄÇspeed‚ÄÇ(above‚ÄÇ25‚ÄÇmph/
40‚ÄÇkm/h).‚ÄÇTake‚ÄÇyour‚ÄÇfoot‚ÄÇoff‚ÄÇthe‚ÄÇpedal‚ÄÇand‚ÄÇpress‚ÄÇthe‚ÄÇ-/
SET‚ÄÇbutton‚ÄÇto‚ÄÇset‚ÄÇthe‚ÄÇspeed.‚ÄÇThe‚ÄÇCRUISE‚ÄÇCONTROL‚ÄÇ
indicator appears.
Adjusting the Vehicle Speed
Press‚ÄÇthe‚ÄÇRES/+‚ÄÇbutton‚ÄÇto‚ÄÇincrease‚ÄÇspeed,‚ÄÇor‚ÄÇthe‚ÄÇ-/SET‚ÄÇ
button‚ÄÇto‚ÄÇdecrease‚ÄÇspeed.
Each‚ÄÇtime‚ÄÇyou‚ÄÇpress‚ÄÇthe‚ÄÇbutton,‚ÄÇthe‚ÄÇvehicle‚ÄÇspeed‚ÄÇis‚ÄÇ
increased‚ÄÇor‚ÄÇdecreased‚ÄÇby‚ÄÇabout‚ÄÇ1‚ÄÇmph‚ÄÇ(1.6‚ÄÇkm/h).‚ÄÇIf‚ÄÇyou‚ÄÇ
keep‚ÄÇthe‚ÄÇbutton‚ÄÇpressed,‚ÄÇthe‚ÄÇvehicle‚ÄÇspeed‚ÄÇincreases‚ÄÇor‚ÄÇ
decreases until you release it.
Canceling Cruise Control
Press‚ÄÇthe‚ÄÇCANCEL‚ÄÇbutton‚ÄÇor‚ÄÇthe‚ÄÇbrake‚ÄÇpedal.‚ÄÇThe‚ÄÇCRUISE‚ÄÇ
CoNTroL indicator goes off.
After‚ÄÇcruise‚ÄÇcontrol‚ÄÇhas‚ÄÇbeen‚ÄÇcanceled,‚ÄÇyou‚ÄÇcan‚ÄÇstill‚ÄÇ
resume‚ÄÇthe‚ÄÇprior‚ÄÇset‚ÄÇspeed‚ÄÇby‚ÄÇpressing‚ÄÇthe‚ÄÇRES/+‚ÄÇbutton‚ÄÇ
while‚ÄÇdriving‚ÄÇat‚ÄÇa‚ÄÇspeed‚ÄÇof‚ÄÇat‚ÄÇleast‚ÄÇ25‚ÄÇmph‚ÄÇ(40‚ÄÇkm/h).
Press‚ÄÇthe‚ÄÇCRUISE‚ÄÇbutton‚ÄÇto‚ÄÇturn‚ÄÇthe‚ÄÇsystem‚ÄÇoff.
*if‚ÄÇequipped
Improper‚ÄÇuse‚ÄÇof‚ÄÇcruise‚ÄÇcontrol‚ÄÇcan‚ÄÇlead‚ÄÇto‚ÄÇa‚ÄÇcrash.
Use cruise control only when traveling on open highways in good weather.
WARNING
CRUISE‚ÄÇbutton
RES/+‚ÄÇbutton
-/SET‚ÄÇbutton
CANCEL‚ÄÇbutton
Page 58 of 84
*
Helps‚ÄÇmaintain‚ÄÇa‚ÄÇconstant‚ÄÇvehicle‚ÄÇspeed‚ÄÇand‚ÄÇa‚ÄÇset‚ÄÇfollowing‚ÄÇinterval‚ÄÇbehind‚ÄÇa‚ÄÇ
vehicle de")
108 || 109
DRIVINGDRIVING
*if‚ÄÇequipped
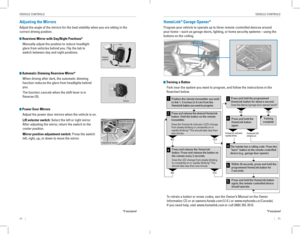
Adaptive Cruise Control (ACC)*
Helps‚ÄÇmaintain‚ÄÇa‚ÄÇconstant‚ÄÇvehicle‚ÄÇspeed‚ÄÇand‚ÄÇa‚ÄÇset‚ÄÇfollowing‚ÄÇinterval‚ÄÇbehind‚ÄÇa‚ÄÇ
vehicle detected ahead of yours.
Activating and Setting the Vehicle Speed
1. Press‚ÄÇthe‚ÄÇMAIN‚ÄÇbutton.‚ÄÇThe‚ÄÇACC‚ÄÇindicator‚ÄÇappears‚ÄÇ
in the multi-information display.
2. Accelerate‚ÄÇto‚ÄÇthe‚ÄÇdesired‚ÄÇspeed‚ÄÇ(above‚ÄÇ25‚ÄÇmph/
40‚ÄÇkm/h).‚ÄÇTake‚ÄÇyour‚ÄÇfoot‚ÄÇoff‚ÄÇthe‚ÄÇpedal‚ÄÇand‚ÄÇpress‚ÄÇthe‚ÄÇ
-/SET‚ÄÇbutton‚ÄÇto‚ÄÇset‚ÄÇthe‚ÄÇspeed.‚ÄÇ
Adjusting the Vehicle Speed
Press‚ÄÇthe‚ÄÇRES/+‚ÄÇbutton‚ÄÇto‚ÄÇincrease‚ÄÇspeed‚ÄÇor‚ÄÇthe‚ÄÇ-/SET‚ÄÇ
button‚ÄÇto‚ÄÇdecrease‚ÄÇspeed.
Each‚ÄÇtime‚ÄÇyou‚ÄÇpress‚ÄÇthe‚ÄÇbutton,‚ÄÇthe‚ÄÇvehicle‚ÄÇspeed‚ÄÇis‚ÄÇ
increased‚ÄÇor‚ÄÇdecreased‚ÄÇby‚ÄÇabout‚ÄÇ1‚ÄÇmph‚ÄÇ(1.6‚ÄÇkm/h).‚ÄÇ
If‚ÄÇyou‚ÄÇkeep‚ÄÇthe‚ÄÇbutton‚ÄÇpressed,‚ÄÇthe‚ÄÇvehicle‚ÄÇspeed‚ÄÇ
increases‚ÄÇor‚ÄÇdecreases‚ÄÇby‚ÄÇ5‚ÄÇmph‚ÄÇor‚ÄÇ5‚ÄÇkm/h‚ÄÇuntil‚ÄÇyou‚ÄÇ
release it.
Adjusting the Vehicle Distance
Press‚ÄÇthe‚ÄÇDistance‚ÄÇbutton‚ÄÇto‚ÄÇchange‚ÄÇthe‚ÄÇfollowing‚ÄÇ
interval.‚ÄÇEach‚ÄÇtime‚ÄÇyou‚ÄÇpress‚ÄÇthe‚ÄÇbutton,‚ÄÇthe‚ÄÇsetting‚ÄÇ
cycles through short, middle, long, and extra long.
Switching to Standard Cruise Control
Press‚ÄÇand‚ÄÇhold‚ÄÇthe‚ÄÇDistance‚ÄÇbutton.‚ÄÇCruise‚ÄÇMode‚ÄÇappears‚ÄÇin‚ÄÇthe‚ÄÇmulti-information‚ÄÇ
display.‚ÄÇPress‚ÄÇand‚ÄÇhold‚ÄÇthe‚ÄÇbutton‚ÄÇagain‚ÄÇto‚ÄÇswitch‚ÄÇback‚ÄÇto‚ÄÇACC.
MAIN button
RES/+ button
CANCEL button
-/SET button
Distance button
During Operation
If‚ÄÇa‚ÄÇvehicle‚ÄÇis‚ÄÇdetected‚ÄÇahead‚ÄÇof‚ÄÇyou‚ÄÇwhen‚ÄÇACC‚ÄÇis‚ÄÇturned‚ÄÇon,‚ÄÇthe‚ÄÇsystem‚ÄÇmaintains,‚ÄÇ
accelerates, or decelerates your vehicle’s set speed to keep the vehicle’s set
following interval from the vehicle ahead.
You can temporarily increase the vehicle speed
when you press the accelerator pedal. ACC stays
on‚ÄÇunless‚ÄÇyou‚ÄÇcancel‚ÄÇit.‚ÄÇWhen‚ÄÇyou‚ÄÇrelease‚ÄÇthe‚ÄÇ
accelerator pedal, the system resumes the set
speed or a sufficient speed to maintain the following
interval.
If‚ÄÇa‚ÄÇvehicle‚ÄÇdetected‚ÄÇahead‚ÄÇof‚ÄÇyou‚ÄÇslows‚ÄÇdown‚ÄÇ
abruptly,‚ÄÇor‚ÄÇif‚ÄÇanother‚ÄÇvehicle‚ÄÇcuts‚ÄÇin‚ÄÇfront‚ÄÇof‚ÄÇyou,‚ÄÇ
a‚ÄÇbeep‚ÄÇsounds‚ÄÇand‚ÄÇBRAKE‚ÄÇappears‚ÄÇon‚ÄÇthe‚ÄÇmulti-
information display to alert you.
ACC‚ÄÇhas‚ÄÇlimited‚ÄÇbraking‚ÄÇcapability.‚ÄÇ
When‚ÄÇyour‚ÄÇvehicle‚ÄÇspeed‚ÄÇdrops‚ÄÇbelow‚ÄÇ22‚ÄÇmph‚ÄÇ(35‚ÄÇkm/h),‚ÄÇACC‚ÄÇwill‚ÄÇ
automatically cancel and no longer will apply your vehicle’s brakes. 
Always‚ÄÇbe‚ÄÇprepared‚ÄÇto‚ÄÇapply‚ÄÇthe‚ÄÇbrake‚ÄÇpedal‚ÄÇwhen‚ÄÇconditions‚ÄÇrequire.‚ÄÇ
WARNING
Canceling ACC
Press‚ÄÇthe‚ÄÇCANCEL‚ÄÇor‚ÄÇMAIN‚ÄÇbutton,‚ÄÇor‚ÄÇpress‚ÄÇthe‚ÄÇbrake‚ÄÇ
pedal. The ACC indicator goes off.
Certain conditions may cause ACC to cancel
automatically.‚ÄÇWhen‚ÄÇthis‚ÄÇhappens,‚ÄÇthe‚ÄÇamber‚ÄÇACC‚ÄÇ
indicator appears on the multi-information display
(see page 23).
After‚ÄÇadaptive‚ÄÇcruise‚ÄÇcontrol‚ÄÇhas‚ÄÇbeen‚ÄÇcanceled,‚ÄÇyou‚ÄÇ
can‚ÄÇstill‚ÄÇresume‚ÄÇthe‚ÄÇprior‚ÄÇset‚ÄÇspeed‚ÄÇby‚ÄÇpressing‚ÄÇRES/+‚ÄÇ
when‚ÄÇyour‚ÄÇvehicle‚ÄÇspeed‚ÄÇis‚ÄÇover‚ÄÇ25‚ÄÇmph‚ÄÇ(40‚ÄÇkm/h).‚ÄÇ
Improper‚ÄÇuse‚ÄÇof‚ÄÇACC‚ÄÇcan‚ÄÇlead‚ÄÇto‚ÄÇa‚ÄÇcrash.‚ÄÇ
Use ACC only when traveling on open highways in good weather.
WARNING
Beep
Page 59 of 84
*
Alerts‚ÄÇand‚ÄÇhelps‚ÄÇto‚ÄÇassist‚ÄÇyou‚ÄÇif‚ÄÇthe‚ÄÇsystem‚ÄÇdetermines‚ÄÇa‚ÄÇpossibility‚ÄÇof‚ÄÇyour‚ÄÇvehicle‚ÄÇ
unintention")
110 || 111
DRIVINGDRIVING
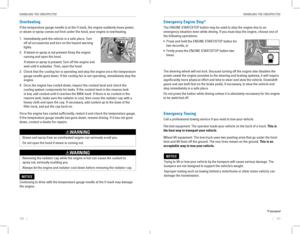
Road Departure Mitigation (RDM)*
Alerts‚ÄÇand‚ÄÇhelps‚ÄÇto‚ÄÇassist‚ÄÇyou‚ÄÇif‚ÄÇthe‚ÄÇsystem‚ÄÇdetermines‚ÄÇa‚ÄÇpossibility‚ÄÇof‚ÄÇyour‚ÄÇvehicle‚ÄÇ
unintentionally crossing over detected lane markings while driving between 45–90 
mph (72–145 km/h).
If‚ÄÇyour‚ÄÇvehicle‚ÄÇis‚ÄÇgetting‚ÄÇtoo‚ÄÇclose‚ÄÇto‚ÄÇdetected‚ÄÇlane‚ÄÇ
markings without a turn signal activated, a message
appears in the multi-information display. Steering
wheel‚ÄÇtorque‚ÄÇand‚ÄÇvibrations‚ÄÇare‚ÄÇapplied‚ÄÇto‚ÄÇhelp‚ÄÇyour‚ÄÇ
vehicle stay in the lane.
Braking‚ÄÇmay‚ÄÇalso‚ÄÇbe‚ÄÇapplied‚ÄÇif‚ÄÇthe‚ÄÇlane‚ÄÇlines‚ÄÇare‚ÄÇsolid‚ÄÇ
and continuous.
If‚ÄÇthe‚ÄÇsystem‚ÄÇoperates‚ÄÇseveral‚ÄÇtimes‚ÄÇwithout‚ÄÇdetecting‚ÄÇdriver‚ÄÇresponse,‚ÄÇthe‚ÄÇsystem‚ÄÇ
beeps‚ÄÇto‚ÄÇalert‚ÄÇyou.
Changing Settings
Determine‚ÄÇthe‚ÄÇwarning‚ÄÇtiming.‚ÄÇThe‚ÄÇvehicle‚ÄÇmust‚ÄÇbe‚ÄÇin‚ÄÇPark‚ÄÇ(P).
1.‚ÄÇModels‚ÄÇwith‚ÄÇone‚ÄÇdisplay:‚ÄÇPress‚ÄÇthe‚ÄÇSETTINGS‚ÄÇ
button.‚ÄÇSelect‚ÄÇVehicle‚ÄÇSettings.
Models‚ÄÇwith‚ÄÇtouchscreen: From the HoMe
screen, select Settings. Select vehicle.
2. Select Driver Assist System Setup.
3. Select road Departure Mitigation Setting.
4. Select from the options.
Normal‚ÄÇ(default): Steering control starts from inside the lane edge.
Wide: Steering control starts from outside the lane edge.
Warning‚ÄÇOnly:‚ÄÇThe‚ÄÇsystem‚ÄÇonly‚ÄÇprovides‚ÄÇa‚ÄÇBRAKE‚ÄÇmessage,‚ÄÇbut‚ÄÇdoes‚ÄÇnot‚ÄÇapply‚ÄÇ
steering‚ÄÇor‚ÄÇbraking.
5. Press BACK to exit the menu.
Important Safety Reminder
The‚ÄÇRDM‚ÄÇsystem‚ÄÇhas‚ÄÇlimitations.‚ÄÇOver-reliance‚ÄÇon‚ÄÇit‚ÄÇmay‚ÄÇresult‚ÄÇin‚ÄÇa‚ÄÇcollision.‚ÄÇIt‚ÄÇis‚ÄÇ
always‚ÄÇyour‚ÄÇresponsibility‚ÄÇto‚ÄÇkeep‚ÄÇyour‚ÄÇvehicle‚ÄÇwithin‚ÄÇthe‚ÄÇdriving‚ÄÇlane.
*if‚ÄÇequipped
Beep
Turning the System On or Off
Press‚ÄÇthe‚ÄÇRDM‚ÄÇbutton‚ÄÇto‚ÄÇturn‚ÄÇthe‚ÄÇsystem‚ÄÇon‚ÄÇor‚ÄÇoff.‚ÄÇ
A‚ÄÇgreen‚ÄÇindicator‚ÄÇappears‚ÄÇon‚ÄÇthe‚ÄÇbutton‚ÄÇwhen‚ÄÇthe‚ÄÇ
system is on.
RDM button
Indicator
Steering assistance
Lane Keeping Assist System (LKAS)*
Provides steering input to help keep the vehicle in the middle of a dete\
cted lane and
visual and tactile alerts if the vehicle is detected drifting out of its\
lane while driving
between 45–90 mph (72–145 km/h).
If‚ÄÇyour‚ÄÇvehicle‚ÄÇis‚ÄÇgetting‚ÄÇtoo‚ÄÇclose‚ÄÇto‚ÄÇdetected‚ÄÇleft‚ÄÇ
or right side lane markings without a turn signal
activated, the system provides visual and tactile
alerts.
A Lane Departure message appears on the multi-
information‚ÄÇdisplay,‚ÄÇand‚ÄÇthe‚ÄÇsteering‚ÄÇwheel‚ÄÇvibrates.‚ÄÇ
Steering‚ÄÇtorque‚ÄÇis‚ÄÇalso‚ÄÇapplied‚ÄÇto‚ÄÇhelp‚ÄÇkeep‚ÄÇyour‚ÄÇ
vehicle within your driving lane. Take appropriate
action to stay within your driving lane.
Turning the System On or Off
1. Press‚ÄÇthe‚ÄÇMAIN‚ÄÇbutton.‚ÄÇLKAS‚ÄÇappears‚ÄÇin‚ÄÇthe‚ÄÇ
multi-information display.
2. Press‚ÄÇthe‚ÄÇLKAS‚ÄÇbutton.‚ÄÇLane‚ÄÇoutlines‚ÄÇappear‚ÄÇin‚ÄÇ
the multi-information display. Dotted lane lines
turn solid when the system activates.
3. Press‚ÄÇthe‚ÄÇMAIN‚ÄÇbutton‚ÄÇor‚ÄÇthe‚ÄÇLKAS‚ÄÇbutton‚ÄÇto‚ÄÇturn‚ÄÇ
the system off.
Important Safety Reminder
LKAS‚ÄÇis‚ÄÇfor‚ÄÇyour‚ÄÇconvenience‚ÄÇonly.‚ÄÇIt‚ÄÇis‚ÄÇnot‚ÄÇa‚ÄÇsubstitute‚ÄÇfor‚ÄÇyour‚ÄÇvehicle‚ÄÇcontrol.‚ÄÇThe‚ÄÇ
system does not work if you take your hands off the steering wheel or fa\
il to steer
the vehicle.
Do‚ÄÇnot‚ÄÇplace‚ÄÇan‚ÄÇobject‚ÄÇon‚ÄÇthe‚ÄÇtop‚ÄÇof‚ÄÇthe‚ÄÇinstrument‚ÄÇpanel.‚ÄÇIt‚ÄÇmay‚ÄÇreflect‚ÄÇonto‚ÄÇthe‚ÄÇ
windshield and prevent the system from detecting lane lines properly.
MAIN button
*if‚ÄÇequipped
Steering assistance
LKAS button
Page 60 of 84

112 || 113
DRIVINGDRIVING
LaneWatch‚Ñ¢*
Check the passenger-side rear areas in the upper display when the right turn signal
is activated.
Activating LaneWatch
Activate‚ÄÇthe‚ÄÇright‚ÄÇturn‚ÄÇsignal.‚ÄÇThe‚ÄÇLaneWatch‚ÄÇdisplay‚ÄÇ
appears.‚ÄÇCheck‚ÄÇthe‚ÄÇdisplay‚ÄÇfor‚ÄÇblind‚ÄÇspots,‚ÄÇand‚ÄÇ
visually confirm that it is safe to change lanes.
You‚ÄÇcan‚ÄÇalso‚ÄÇpress‚ÄÇthe‚ÄÇLaneWatch‚ÄÇbutton‚ÄÇon‚ÄÇthe‚ÄÇend‚ÄÇ
of the turn signal switch to view a constant real-time
display. Press it again to turn the display off.
Changing Settings
Customize‚ÄÇthe‚ÄÇdisplay‚ÄÇand‚ÄÇhow‚ÄÇand‚ÄÇwhen‚ÄÇthe‚ÄÇdisplay‚ÄÇappears.
1. From the Home screen, select Settings.
2. Select Camera.
3. Select‚ÄÇLaneWatch.
4. Select an option and make the preferred changes.
5. Press BACK to exit the menu.
Important Safety Reminder
Like‚ÄÇall‚ÄÇassistance‚ÄÇsystems,‚ÄÇLaneWatch‚ÄÇhas‚ÄÇlimitations.‚ÄÇOver-reliance‚ÄÇon‚ÄÇthe‚ÄÇsystem‚ÄÇ
may result in a collision.
*if‚ÄÇequipped
LaneWatch display
Failure‚ÄÇto‚ÄÇvisually‚ÄÇconfirm‚ÄÇthat‚ÄÇit‚ÄÇis‚ÄÇsafe‚ÄÇto‚ÄÇchange‚ÄÇlanes‚ÄÇbefore‚ÄÇdoing‚ÄÇso‚ÄÇmay‚ÄÇ
result in a crash and serious injury or death.
Do‚ÄÇnot‚ÄÇrely‚ÄÇonly‚ÄÇon‚ÄÇLaneWatch‚ÄÇwhile‚ÄÇdriving.‚ÄÇAlways‚ÄÇlook‚ÄÇin‚ÄÇyour‚ÄÇmirrors,‚ÄÇto‚ÄÇ
either‚ÄÇside‚ÄÇof‚ÄÇyour‚ÄÇvehicle,‚ÄÇand‚ÄÇbehind‚ÄÇyou‚ÄÇfor‚ÄÇother‚ÄÇvehicles‚ÄÇbefore‚ÄÇchanging‚ÄÇ
lanes.
WARNING
Collision Mitigation Braking System‚Ñ¢ (CMBS‚Ñ¢)*
Can‚ÄÇassist‚ÄÇyou‚ÄÇwhen‚ÄÇthere‚ÄÇis‚ÄÇa‚ÄÇpossibility‚ÄÇof‚ÄÇyour‚ÄÇvehicle‚ÄÇcolliding‚ÄÇwith‚ÄÇa‚ÄÇvehicle‚ÄÇor‚ÄÇa‚ÄÇ
pedestrian detected in front of yours.
The‚ÄÇsystem‚ÄÇcan‚ÄÇgive‚ÄÇyou‚ÄÇvisual,‚ÄÇaudible,‚ÄÇand‚ÄÇtactile‚ÄÇalerts‚ÄÇwhen‚ÄÇa‚ÄÇpotential‚ÄÇcollision‚ÄÇ
is‚ÄÇdetermined,‚ÄÇand‚ÄÇreduce‚ÄÇyour‚ÄÇvehicle‚ÄÇspeed‚ÄÇto‚ÄÇhelp‚ÄÇminimize‚ÄÇcollision‚ÄÇseverity‚ÄÇ
when‚ÄÇa‚ÄÇcollision‚ÄÇis‚ÄÇdeemed‚ÄÇunavoidable.
When‚ÄÇa‚ÄÇpotential‚ÄÇcollision‚ÄÇwith‚ÄÇa‚ÄÇdetected‚ÄÇoncoming‚ÄÇvehicle‚ÄÇis‚ÄÇdetermined,‚ÄÇa‚ÄÇBRAKE‚ÄÇ
message appears in the multi-information display, the head-up warning lights flash,
a‚ÄÇbeep‚ÄÇsounds,‚ÄÇand‚ÄÇthe‚ÄÇsteering‚ÄÇwheel‚ÄÇvibrates.
The system activates when:
• The speed difference between your vehicle and a vehicle or pedestrian detected 
in‚ÄÇfront‚ÄÇof‚ÄÇyou‚ÄÇis‚ÄÇabout‚ÄÇ3‚ÄÇmph‚ÄÇ(5‚ÄÇkm/h)‚ÄÇand‚ÄÇover‚ÄÇwith‚ÄÇa‚ÄÇchance‚ÄÇof‚ÄÇa‚ÄÇcollision.
• Your vehicle speed is about 62 mph (100 km/h) or less and there is a chance of a 
collision with an oncoming detected vehicle or a pedestrian in front of \
you.
*if‚ÄÇequipped
Alert Stages
The‚ÄÇsystem‚ÄÇhas‚ÄÇthree‚ÄÇalert‚ÄÇstages‚ÄÇfor‚ÄÇa‚ÄÇpossible‚ÄÇcollision.‚ÄÇDepending‚ÄÇon ‚ÄÇthe‚ÄÇ
circumstances or CMBS settings, CMBS may not go through all of the stage\
s
before‚ÄÇinitiating‚ÄÇthe‚ÄÇlast‚ÄÇstage.
Stage 1:‚ÄÇVisual‚ÄÇand‚ÄÇaudible‚ÄÇwarning,‚ÄÇsteering‚ÄÇwheel‚ÄÇvibrations
Stage 2:‚ÄÇVisual‚ÄÇand‚ÄÇaudible‚ÄÇwarning,‚ÄÇlight‚ÄÇbrake‚ÄÇapplication
Stage 3:‚ÄÇVisual‚ÄÇand‚ÄÇaudible‚ÄÇwarning,‚ÄÇstrong‚ÄÇbrake‚ÄÇapplication
BeepHead-up
warning lights Steering‚ÄÇvibrations
Important Safety Reminder
CMBS‚ÄÇis‚ÄÇdesigned‚ÄÇto‚ÄÇreduce‚ÄÇthe‚ÄÇseverity‚ÄÇof‚ÄÇan‚ÄÇunavoidable‚ÄÇcollision.‚ÄÇIt‚ÄÇdoes ‚ÄÇnot‚ÄÇ
prevent‚ÄÇcollisions‚ÄÇnor‚ÄÇstop‚ÄÇthe‚ÄÇvehicle‚ÄÇautomatically.‚ÄÇIt‚ÄÇis‚ÄÇstill‚ÄÇyour‚ÄÇresponsibility‚ÄÇto‚ÄÇ
operate‚ÄÇthe‚ÄÇbrake‚ÄÇpedal‚ÄÇand‚ÄÇsteering‚ÄÇwheel‚ÄÇappropriately‚ÄÇaccording‚ÄÇto‚ÄÇthe‚ÄÇdriving‚ÄÇ
conditions.
Page 61 of 84

114 || 115
DRIVINGDRIVING
Turning CMBS On or Off
Press‚ÄÇand‚ÄÇhold‚ÄÇthe‚ÄÇCMBS‚ÄÇOFF‚ÄÇbutton.‚ÄÇA‚ÄÇbeep‚ÄÇsounds‚ÄÇ
and a message appears in the multi-information
display. The CMBS indicator appears when the
system is off.
CMBS oFF button
Changing Settings
Determine‚ÄÇthe‚ÄÇwarning‚ÄÇtiming.‚ÄÇThe‚ÄÇvehicle‚ÄÇmust‚ÄÇbe‚ÄÇin‚ÄÇPark‚ÄÇ(P).
1. From the HoMe screen, select Settings.
2. Select vehicle.
3. Select Driver Assist System Setup.
4. Select‚ÄÇForward‚ÄÇCollision‚ÄÇWarning‚ÄÇDistance.
5. Select Long, Normal, or Short.
6. Press BACK to exit the menu.
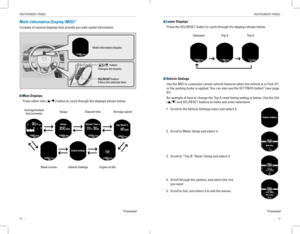
Parking Sensor System*
When‚ÄÇthe‚ÄÇsystem‚ÄÇsenses‚ÄÇan‚ÄÇobject‚ÄÇwhen‚ÄÇyou‚ÄÇare‚ÄÇparking‚ÄÇor‚ÄÇbacking‚ÄÇup,‚ÄÇindicators‚ÄÇ
appear‚ÄÇon‚ÄÇthe‚ÄÇupper‚ÄÇdisplay‚ÄÇand‚ÄÇa‚ÄÇseries‚ÄÇof‚ÄÇbeeps‚ÄÇwill‚ÄÇsound.
Turning the System On or Off
Press‚ÄÇthe‚ÄÇparking‚ÄÇsensor‚ÄÇbutton‚ÄÇto‚ÄÇturn‚ÄÇthe‚ÄÇsystem‚ÄÇ
on or off. A green indicator light appears on the
button‚ÄÇwhen‚ÄÇthe‚ÄÇsystem‚ÄÇis‚ÄÇon.
Screen indicators
*if‚ÄÇequipped
Multi-View Rear Camera
When‚ÄÇyou‚ÄÇshift‚ÄÇinto‚ÄÇReverse‚ÄÇ(R),‚ÄÇa‚ÄÇreal-time‚ÄÇimage‚ÄÇof‚ÄÇthe‚ÄÇarea‚ÄÇbehind‚ÄÇyour ‚ÄÇvehicle‚ÄÇis‚ÄÇ
shown in the upper display, along with helpful parking guidelines.
Changing Camera Settings
Turn the guidelines on or off.
1.‚ÄÇModels‚ÄÇwith‚ÄÇone‚ÄÇdisplay:‚ÄÇPress‚ÄÇthe‚ÄÇSETTINGS‚ÄÇbutton.
Models‚ÄÇwith‚ÄÇtouchscreen: From the HoMe screen, select Settings.
2. Select Camera.
3. Select rear Camera.
4. Select an option.
Fixed‚ÄÇGuidelines: Guidelines appear when you shift into reverse.
Dynamic‚ÄÇGuidelines: Guidelines move as you turn the steering wheel.
5. Select on or off.
6. Press BACK to exit the menu.
Wide view
Press‚ÄÇthe‚ÄÇselector‚ÄÇknob‚ÄÇor‚ÄÇtouch‚ÄÇicons‚ÄÇon‚ÄÇthe‚ÄÇscreen‚ÄÇto‚ÄÇchange‚ÄÇviews.
Normal viewTop down view
The‚ÄÇrear‚ÄÇcamera‚ÄÇview‚ÄÇis‚ÄÇrestricted.‚ÄÇYou‚ÄÇcannot‚ÄÇsee‚ÄÇthe‚ÄÇcorner‚ÄÇends‚ÄÇof‚ÄÇthe‚ÄÇbumper‚ÄÇor‚ÄÇwhat‚ÄÇis‚ÄÇunderneath‚ÄÇthe‚ÄÇbumper.‚ÄÇIts‚ÄÇunique‚ÄÇlens‚ÄÇalso‚ÄÇmakes‚ÄÇobjects‚ÄÇappear‚ÄÇcloser‚ÄÇor‚ÄÇfarther‚ÄÇthan‚ÄÇthey‚ÄÇactually‚ÄÇare.
Visually‚ÄÇconfirm‚ÄÇthat‚ÄÇit‚ÄÇis‚ÄÇsafe‚ÄÇto‚ÄÇdrive‚ÄÇbefore‚ÄÇbacking‚ÄÇup.‚ÄÇCertain‚ÄÇconditions‚ÄÇ(such‚ÄÇas‚ÄÇweather,‚ÄÇlighting,‚ÄÇand‚ÄÇhigh‚ÄÇtemperatures)‚ÄÇmay‚ÄÇalso‚ÄÇrestrict‚ÄÇthe‚ÄÇrear‚ÄÇview.‚ÄÇDo‚ÄÇnot‚ÄÇrely‚ÄÇon‚ÄÇthe‚ÄÇrearview‚ÄÇdisplay,‚ÄÇwhich‚ÄÇdoes‚ÄÇnot‚ÄÇgive‚ÄÇyou‚ÄÇall‚ÄÇinformation‚ÄÇabout‚ÄÇconditions‚ÄÇat‚ÄÇthe‚ÄÇrear‚ÄÇof‚ÄÇyour‚ÄÇvehicle.
Page 62 of 84

116 || 117
HANDLING THE UNEXPECTEDDRIVING
Refueling
Use‚ÄÇthe‚ÄÇproper‚ÄÇfuel‚ÄÇand‚ÄÇrefueling‚ÄÇprocedure‚ÄÇto‚ÄÇensure‚ÄÇthe‚ÄÇbest‚ÄÇperformance‚ÄÇand‚ÄÇ
safety of your vehicle.
Fuel Information
Use of unleaded gasoline of 87 octane or higher is recommended.
• Honda recommends TOP TIER Detergent Gasoline where available.
• Do NOT use gasoline containing more than 15% ethanol.
• Do NoT use gasoline containing methanol.
• Do NoT use gasoline containing MMT.
How to Refuel
1. The fuel fill door is located at the left rear of the
vehicle. Park next to the service pump that is
most‚ÄÇaccessible.
2. Turn off the engine.
3. Push the fuel fill door release handle near the
bottom of the driver’s seat. The fuel fill door 
opens.
4. Turn the fuel fill cap slowly to open. Place the fuel
fill cap in the holder.
5. Insert‚ÄÇthe‚ÄÇfiller‚ÄÇnozzle‚ÄÇfully.‚ÄÇWhen‚ÄÇthe‚ÄÇtank‚ÄÇis‚ÄÇfull,‚ÄÇ
the‚ÄÇfuel‚ÄÇnozzle‚ÄÇclicks‚ÄÇoff‚ÄÇautomatically.
6. replace the fuel fill cap. Tighten it until you hear
at least one click. Close the fuel fill door.
Push
Cap
Holder
Gasoline‚ÄÇis‚ÄÇhighly‚ÄÇflammable‚ÄÇand‚ÄÇexplosive.‚ÄÇYou‚ÄÇcan‚ÄÇbe‚ÄÇburned‚ÄÇor‚ÄÇseriously‚ÄÇ
injured when handling fuel.
• Stop the engine, and keep heat, sparks, and flame away.
• Handle fuel only outdoors.
• Wipe up spills immediately.
WARNING
We‚ÄÇrecommend‚ÄÇquality‚ÄÇgasoline‚ÄÇcontaining‚ÄÇdetergent‚ÄÇadditives‚ÄÇthat‚ÄÇhelp‚ÄÇ
prevent‚ÄÇfuel‚ÄÇsystem‚ÄÇand‚ÄÇengine‚ÄÇdeposits.‚ÄÇIn‚ÄÇaddition,‚ÄÇin‚ÄÇorder‚ÄÇto‚ÄÇmaintain‚ÄÇgood‚ÄÇ
performance, fuel economy, and emissions control, we strongly recommend the
use‚ÄÇof‚ÄÇgasoline‚ÄÇthat‚ÄÇdoes‚ÄÇNOT‚ÄÇcontain‚ÄÇharmful‚ÄÇmanganese-based‚ÄÇfuel‚ÄÇadditives‚ÄÇ
such‚ÄÇas‚ÄÇMMT,‚ÄÇif‚ÄÇsuch‚ÄÇgasoline‚ÄÇis‚ÄÇavailable.‚ÄÇ
NOTICE
HANDLING THE UNEXPECTED
Learn‚ÄÇabout‚ÄÇwhat‚ÄÇto‚ÄÇdo‚ÄÇin‚ÄÇcritical‚ÄÇor‚ÄÇemergency‚ÄÇsituations.
Smart Entry Remote Battery Strength*
If‚ÄÇthe‚ÄÇbattery‚ÄÇlife‚ÄÇin‚ÄÇyour‚ÄÇremote‚ÄÇtransmitter‚ÄÇis‚ÄÇweak,‚ÄÇa‚ÄÇbeep‚ÄÇsounds‚ÄÇand‚ÄÇthe‚ÄÇENGINE‚ÄÇ
START/STOP‚ÄÇbutton‚ÄÇindicator‚ÄÇflashes.‚ÄÇA‚ÄÇmessage‚ÄÇappears‚ÄÇin‚ÄÇthe‚ÄÇmulti-information‚ÄÇ
display‚ÄÇwith‚ÄÇinformation‚ÄÇon‚ÄÇhow‚ÄÇto‚ÄÇstart‚ÄÇthe‚ÄÇengine.*
1. Touch‚ÄÇthe‚ÄÇback‚ÄÇof‚ÄÇthe‚ÄÇremote‚ÄÇtransmitter‚ÄÇto‚ÄÇthe‚ÄÇ
ENGINE‚ÄÇSTART/STOP‚ÄÇbutton‚ÄÇwhile‚ÄÇthe‚ÄÇindicator‚ÄÇis‚ÄÇ
flashing.
2. With‚ÄÇthe‚ÄÇbrake‚ÄÇpedal‚ÄÇor‚ÄÇclutch‚ÄÇpedal‚ÄÇpressed,‚ÄÇ
press‚ÄÇthe‚ÄÇENGINE‚ÄÇSTART/STOP‚ÄÇbutton‚ÄÇwithin‚ÄÇ10‚ÄÇ
seconds.
Shift Lever Does Not Move*
Follow‚ÄÇthe‚ÄÇprocedure‚ÄÇbelow‚ÄÇif‚ÄÇyou‚ÄÇcannot‚ÄÇmove‚ÄÇthe‚ÄÇshift‚ÄÇlever‚ÄÇout‚ÄÇof‚ÄÇPark‚ÄÇ(P).
1. Set‚ÄÇthe‚ÄÇparking‚ÄÇbrake.
2. remove the key from the ignition, or remove the
built-in‚ÄÇkey‚ÄÇfrom‚ÄÇthe‚ÄÇremote‚ÄÇtransmitter.
3. Wrap‚ÄÇa‚ÄÇcloth‚ÄÇaround‚ÄÇthe‚ÄÇtip‚ÄÇof‚ÄÇa‚ÄÇsmall‚ÄÇflat-tip‚ÄÇ
screwdriver. Put it into the shift lock release slot as
shown in the image, and remove the cover.
4. Insert‚ÄÇthe‚ÄÇkey‚ÄÇinto‚ÄÇthe‚ÄÇshift‚ÄÇlock‚ÄÇrelease‚ÄÇslot.
5. While‚ÄÇpushing‚ÄÇthe‚ÄÇkey‚ÄÇdown,‚ÄÇpress‚ÄÇthe‚ÄÇshift‚ÄÇlever‚ÄÇ
release‚ÄÇbutton‚ÄÇand‚ÄÇplace‚ÄÇthe‚ÄÇshift‚ÄÇlever‚ÄÇinto‚ÄÇNeutral‚ÄÇ‚ÄÇ
(N). The lock is now released. Have the shift lever
checked‚ÄÇby‚ÄÇa‚ÄÇdealer‚ÄÇas‚ÄÇsoon‚ÄÇas‚ÄÇpossible.
*if‚ÄÇequipped
Slot
Cove r
Release button
Shift lock
release slo t
FPO
Page 63 of 84

118 || 119
HANDLING THE UNEXPECTEDHANDLING THE UNEXPECTED
Jump Starting
Turn off the power to electric devices, such as audio and lights. Turn off the engine,
then open the hood.
1. Connect the first jumper cable to your vehicle’s 
battery‚ÄÇ(+)‚ÄÇterminal.
2. Connect‚ÄÇthe‚ÄÇother‚ÄÇend‚ÄÇof‚ÄÇthe‚ÄÇfirst‚ÄÇjumper‚ÄÇcable‚ÄÇ
to‚ÄÇthe‚ÄÇbooster‚ÄÇbattery‚ÄÇ(+)‚ÄÇterminal.‚ÄÇUse‚ÄÇa‚ÄÇ12-volt‚ÄÇ
booster‚ÄÇbattery‚ÄÇonly.
3. Connect‚ÄÇthe‚ÄÇsecond‚ÄÇjumper‚ÄÇcable‚ÄÇto‚ÄÇthe‚ÄÇbooster‚ÄÇ
battery‚ÄÇ(-)‚ÄÇterminal.
4. Connect‚ÄÇthe‚ÄÇother‚ÄÇend‚ÄÇof‚ÄÇthe‚ÄÇsecond‚ÄÇjumper‚ÄÇcable‚ÄÇ
to‚ÄÇthe‚ÄÇengine‚ÄÇmounting‚ÄÇbolt‚ÄÇas‚ÄÇshown.‚ÄÇDo‚ÄÇnot‚ÄÇ
connect‚ÄÇthis‚ÄÇjumper‚ÄÇcable‚ÄÇto‚ÄÇany‚ÄÇother‚ÄÇpart.
5. If‚ÄÇyour‚ÄÇvehicle‚ÄÇis‚ÄÇconnected‚ÄÇto‚ÄÇanother‚ÄÇvehicle,‚ÄÇ
start the assisting vehicle’s engine and increase its
rpm slightly.
6. Attempt to start your vehicle’s engine. If it turns 
over‚ÄÇslowly,‚ÄÇmake‚ÄÇsure‚ÄÇthat‚ÄÇthe‚ÄÇjumper‚ÄÇcables‚ÄÇhave‚ÄÇ
good metal-to-metal contact.
WARNING: Battery posts, terminals, and related accessories contain lead and lead\
compounds. Wash your hands after handling.
Booster battery
4-cylinder models
6-cylinder models
Booster battery
4-cylinder models
6-cylinder models
A‚ÄÇbattery‚ÄÇcan‚ÄÇexplode‚ÄÇif‚ÄÇyou‚ÄÇdo‚ÄÇnot‚ÄÇfollow‚ÄÇthe‚ÄÇcorrect‚ÄÇprocedure,‚ÄÇseriously‚ÄÇ
injuring‚ÄÇanyone‚ÄÇnearby.
Keep‚ÄÇall‚ÄÇsparks,‚ÄÇopen‚ÄÇflames,‚ÄÇand‚ÄÇsmoking‚ÄÇmaterials‚ÄÇaway‚ÄÇfrom‚ÄÇthe‚ÄÇbattery.
WARNING
After the Engine Starts
Once your vehicle’s engine has started, remove the jumper cables in the following 
order:
1. Disconnect the jumper cable from your vehicle’s ground.
2. Disconnect the other end of the jumper cable from the booster battery’s (-) 
terminal.
3. Disconnect the jumper cable from your vehicle battery’s (+) terminal.
4. Disconnect the other end of the jumper cable from the booster battery’s (+) 
terminal.
5. Have‚ÄÇyour‚ÄÇvehicle‚ÄÇinspected‚ÄÇby‚ÄÇa‚ÄÇnearby‚ÄÇservice‚ÄÇstation‚ÄÇor‚ÄÇa‚ÄÇdealer.
Page 64 of 84

120 || 121
HANDLING THE UNEXPECTEDHANDLING THE UNEXPECTED
Overheating
If‚ÄÇthe‚ÄÇtemperature‚ÄÇgauge‚ÄÇneedle‚ÄÇis‚ÄÇat‚ÄÇthe‚ÄÇH‚ÄÇmark,‚ÄÇthe‚ÄÇengine‚ÄÇsuddenly‚ÄÇloses‚ÄÇpower,‚ÄÇ
or steam or spray comes out from under the hood, your engine is overheat\
ing.
1. Immediately‚ÄÇpark‚ÄÇthe‚ÄÇvehicle‚ÄÇin‚ÄÇa‚ÄÇsafe‚ÄÇplace.‚ÄÇTurn‚ÄÇ
off‚ÄÇall‚ÄÇaccessories‚ÄÇand‚ÄÇturn‚ÄÇon‚ÄÇthe‚ÄÇhazard‚ÄÇwarning‚ÄÇ
lights.
2. If‚ÄÇsteam‚ÄÇor‚ÄÇspray‚ÄÇis‚ÄÇnot‚ÄÇpresent: Keep the engine
running and open the hood.
‚ÄÇIf‚ÄÇsteam‚ÄÇor‚ÄÇspray‚ÄÇis‚ÄÇpresent: Turn off the engine and
wait‚ÄÇuntil‚ÄÇit‚ÄÇsubsides.‚ÄÇThen,‚ÄÇopen‚ÄÇthe‚ÄÇhood.
3. Check that the cooling fan is operating and stop the engine once the tem\
perature
gauge‚ÄÇneedle‚ÄÇgoes‚ÄÇdown.‚ÄÇIf‚ÄÇthe‚ÄÇcooling‚ÄÇfan‚ÄÇis‚ÄÇnot‚ÄÇoperating,‚ÄÇimmediately‚ÄÇstop‚ÄÇthe‚ÄÇ
engine.
4. once the engine has cooled down, inspect the coolant level and check the \
cooling‚ÄÇsystem‚ÄÇcomponents‚ÄÇfor‚ÄÇleaks.‚ÄÇIf‚ÄÇthe‚ÄÇcoolant‚ÄÇlevel‚ÄÇin‚ÄÇthe‚ÄÇreserve‚ÄÇtank‚ÄÇ
is‚ÄÇlow,‚ÄÇadd‚ÄÇcoolant‚ÄÇuntil‚ÄÇit‚ÄÇreaches‚ÄÇthe‚ÄÇMAX‚ÄÇmark.‚ÄÇIf‚ÄÇthere‚ÄÇis‚ÄÇno‚ÄÇcoolant‚ÄÇin‚ÄÇthe‚ÄÇ
reserve tank, make sure the radiator is cool, then cover the radiator ca\
p with a
heavy‚ÄÇcloth‚ÄÇand‚ÄÇopen‚ÄÇthe‚ÄÇcap.‚ÄÇIf‚ÄÇnecessary,‚ÄÇadd‚ÄÇcoolant‚ÄÇup‚ÄÇto‚ÄÇthe‚ÄÇbase‚ÄÇof‚ÄÇthe‚ÄÇ
filler‚ÄÇneck,‚ÄÇand‚ÄÇput‚ÄÇthe‚ÄÇcap‚ÄÇback‚ÄÇon.
once the engine has cooled sufficiently, restart it and check the temperature gauge.
If‚ÄÇthe‚ÄÇtemperature‚ÄÇgauge‚ÄÇneedle‚ÄÇhas‚ÄÇgone‚ÄÇdown,‚ÄÇresume‚ÄÇdriving.‚ÄÇIf‚ÄÇit‚ÄÇhas‚ÄÇnot‚ÄÇgone‚ÄÇ
down, contact a dealer for repairs.
MAX
Reserve tank
MIN
Steam and spray from an overheated engine can seriously scald you.
Do not open the hood if steam is coming out.
WARNING
removing the radiator cap while the engine is hot can cause the coolant t\
o
spray out, seriously scalding you.
Always‚ÄÇlet‚ÄÇthe‚ÄÇengine‚ÄÇand‚ÄÇradiator‚ÄÇcool‚ÄÇdown‚ÄÇbefore‚ÄÇremoving‚ÄÇthe‚ÄÇradiator‚ÄÇcap.
WARNING
Continuing to drive with the temperature gauge needle at the H mark may \
damage
the engine.
NOTICE
Emergency Engine Stop*
The‚ÄÇENGINE‚ÄÇSTART/STOP‚ÄÇbutton‚ÄÇmay‚ÄÇbe‚ÄÇused‚ÄÇto‚ÄÇstop‚ÄÇthe‚ÄÇengine‚ÄÇdue‚ÄÇto‚ÄÇan‚ÄÇ
emergency‚ÄÇsituation‚ÄÇeven‚ÄÇwhile‚ÄÇdriving.‚ÄÇIf‚ÄÇyou‚ÄÇmust‚ÄÇstop‚ÄÇthe‚ÄÇengine,‚ÄÇchoose‚ÄÇone‚ÄÇof‚ÄÇ
the following operations:
• Press and hold the ENGINE START/STOP button for 
two seconds, or
• Firmly press the ENGINE START/STOP button two 
times.
The‚ÄÇsteering‚ÄÇwheel‚ÄÇwill‚ÄÇnot‚ÄÇlock.‚ÄÇBecause‚ÄÇturning‚ÄÇoff‚ÄÇthe‚ÄÇengine‚ÄÇalso‚ÄÇdisables‚ÄÇthe‚ÄÇ
power‚ÄÇassist‚ÄÇthe‚ÄÇengine‚ÄÇprovides‚ÄÇto‚ÄÇthe‚ÄÇsteering‚ÄÇand‚ÄÇbraking‚ÄÇsystems,‚ÄÇit‚ÄÇwill‚ÄÇrequire‚ÄÇ
significantly more physical effort and time to steer and slow the vehi\
cle. Downshift
gears‚ÄÇand‚ÄÇuse‚ÄÇboth‚ÄÇfeet‚ÄÇon‚ÄÇthe‚ÄÇbrake‚ÄÇpedal,‚ÄÇif‚ÄÇnecessary,‚ÄÇto‚ÄÇslow‚ÄÇthe‚ÄÇvehicle‚ÄÇand‚ÄÇ
stop immediately in a safe place.
Do‚ÄÇnot‚ÄÇpress‚ÄÇthe‚ÄÇbutton‚ÄÇwhile‚ÄÇdriving‚ÄÇunless‚ÄÇit‚ÄÇis‚ÄÇabsolutely‚ÄÇnecessary‚ÄÇfor‚ÄÇthe‚ÄÇengine‚ÄÇ
to‚ÄÇbe‚ÄÇswitched‚ÄÇoff.
*if‚ÄÇequipped
Trying‚ÄÇto‚ÄÇlift‚ÄÇor‚ÄÇtow‚ÄÇyour‚ÄÇvehicle‚ÄÇby‚ÄÇthe‚ÄÇbumpers‚ÄÇwill‚ÄÇcause‚ÄÇserious‚ÄÇdamage.‚ÄÇThe‚ÄÇ
bumpers are not designed to support the vehicle’s weight.
Improper‚ÄÇtowing‚ÄÇsuch‚ÄÇas‚ÄÇtowing‚ÄÇbehind‚ÄÇa‚ÄÇmotorhome‚ÄÇor‚ÄÇother‚ÄÇmotor‚ÄÇvehicle‚ÄÇcan‚ÄÇ
damage the transmission.
NOTICE
Emergency Towing
Call a professional towing service if you need to tow your vehicle.
Flat‚ÄÇbed‚ÄÇequipment:‚ÄÇThe‚ÄÇoperator‚ÄÇloads‚ÄÇyour‚ÄÇvehicle‚ÄÇon‚ÄÇthe‚ÄÇback‚ÄÇof‚ÄÇa‚ÄÇtruck.‚ÄÇThis is
the best way to transport your vehicle.
Wheel‚ÄÇlift‚ÄÇequipment:‚ÄÇThe‚ÄÇtow‚ÄÇtruck‚ÄÇuses‚ÄÇtwo‚ÄÇpivoting‚ÄÇarms‚ÄÇthat‚ÄÇgo‚ÄÇunder‚ÄÇthe‚ÄÇfront‚ÄÇ
tires and lift them off the ground. The rear tires remain on the ground.\
This is an
acceptable way to tow your vehicle.