Page 306 of 609

305
uuCustomized Features u
Continued
Features
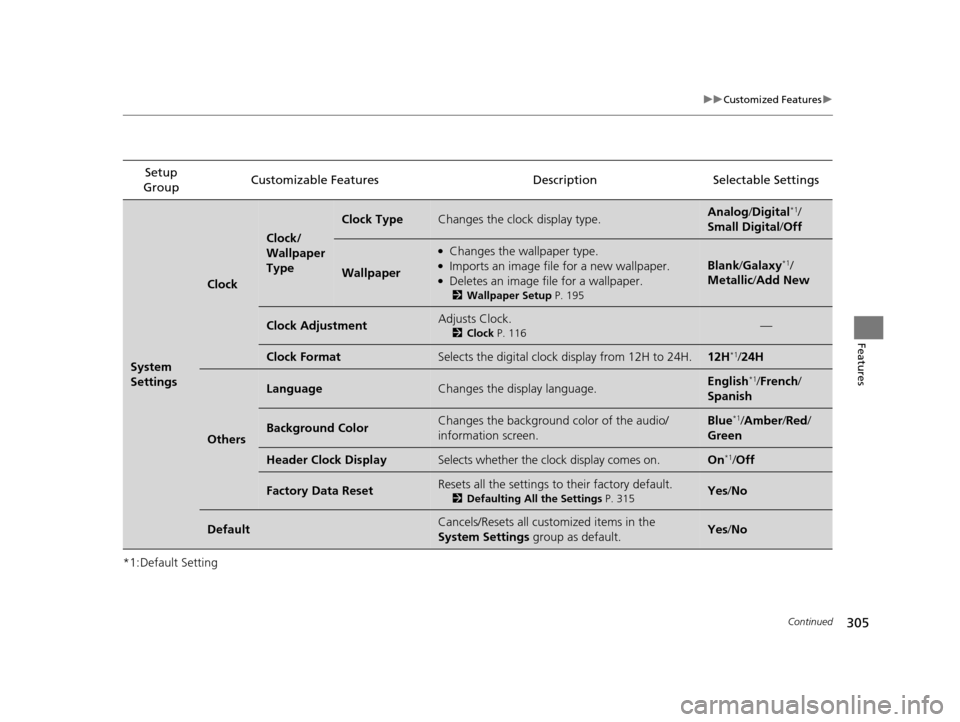
*1:Default SettingSetup
Group Customizable Features Description Selectable Settings
System
Settings
Clock
Clock/
Wallpaper
Type
Clock TypeChanges the clock display type.Analog
/Digital*1/
Small Digital/ Off
Wallpaper
●Changes the wallpaper type.●Imports an image file for a new wallpaper.●Deletes an image file for a wallpaper.
2Wallpaper Setup P. 195
Blank/Galaxy*1/
Metallic/ Add New
Clock AdjustmentAdjusts Clock.
2Clock P. 116—
Clock FormatSelects the digital clock display from 12H to 24H.12H*1/24H
Others
LanguageChanges the display language.English*1/ French /
Spanish
Background ColorChanges the background color of the audio/
information screen.Blue*1/ Amber /Red /
Green
Header Clock DisplaySelects whether the cl ock display comes on.On*1/Off
Factory Data ResetResets all the settings to their factory default.
2 Defaulting All the Settings P. 315Yes /No
DefaultCancels/Resets all customized items in the
System Settings group as default.Yes/No
16 US ACCORD 2D (KA KC KL)-31T3L6300.book 305 ページ 2015年7月23日 木曜日 午後4時11分
Page 312 of 609
311
uuCustomized Features u
Continued
Features
Setup
Group Customizable Features
DescriptionSelectable Settings
Info
Settings Clock/
Wall-
paper
type
Clock Type
See System Settings on P. 304 to P. 305
Wallpaper
Clock Adjustment
Clock Format
Default Cancels/Resets all customized items in the
Info
Settings group as default. Yes
/No
16 US ACCORD 2D (KA KC KL)-31T3L6300.book 311 ページ 2015年7月23日 木曜日 午後4時11分
Page 319 of 609
318
uuCustomized Features u
Features
Language
Default
System
Others
Clock/Wallpaper Type
Clock Adjustment*
ClockClock
Wallpaper
Manual Time Zone*
Auto Daylight
Clock Display
Touch Panel Sensitivity
Clock Format
Auto Time Zone*
Detail Information
Factory Data Reset
Clock Reset
* Not available on all models
16 US ACCORD 2D (KA KC KL)-31T3L6300.book 318 ページ 2015年7月23日 木曜日 午後4時11分
Page 323 of 609
322
uuCustomized Features u
Features
Clock/Wallpaper TypeClock
WallpaperClock Adjustment*
Clock Format
Auto Time Zone*
Manual Time Zone*
Auto Daylight
Clock Display
Clock Reset
OtherInfo Screen Preference
Default
Clock/Info
HondaLinkDiagnostic & Location Data
Clock
* Not available on all models
16 US ACCORD 2D (KA KC KL)-31T3L6300.book 322 ページ 2015年7月23日 木曜日 午後4時11分
Page 328 of 609

327
uuCustomized Features u
Continued
Features
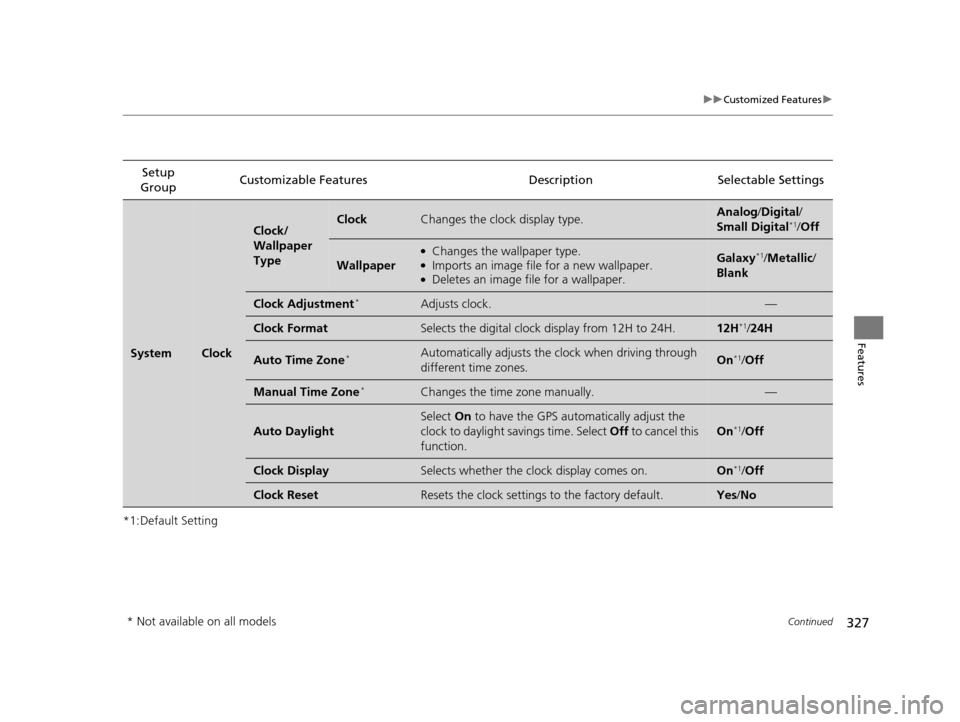
*1:Default SettingSetup
Group Customizable Features Descri
ption Selectable Settings
SystemClock
Clock/
Wallpaper
TypeClockChanges the clock display type.Analog/Digital /
Small Digital*1/ Off
Wallpaper
●Changes the wallpaper type.●Imports an image file for a new wallpaper.●Deletes an image file for a wallpaper.
Galaxy*1/Metallic /
Blank
Clock Adjustment*Adjusts clock.—
Clock FormatSelects the digital clock display from 12H to 24H.12H*1/ 24H
Auto Time Zone*Automatically adjusts the clock when driving through
different time zones.On*1/Off
Manual Time Zone*Changes the time zone manually.—
Auto Daylight
Select On to have the GPS automatically adjust the
clock to daylight savings time. Select Off to ca nc e l t hi s
function.
On*1/ Off
Clock DisplaySelects whether the clock display comes on.On*1/Off
Clock ResetResets the clock settings to the factory default.Yes /No
* Not available on all models
16 US ACCORD 2D (KA KC KL)-31T3L6300.book 327 ページ 2015年7月23日 木曜日 午後4時11分
Page 336 of 609
335
uuCustomized Features u
Continued
Features
*1:Default SettingSetup
Group Customizable Featur
es Description Sel ectable Settings
Clock/
Info
Clock
Clock/
Wallpaper
TypeClock
See System on P. 325
Wallpaper
Clock Adjustment*
Clock Format
Auto Time Zone*
Manual Time Zone*
Auto Daylight
Clock Display
Clock Reset
HondaLinkDiagnostic & Location
DataTurns HondaLink® on and off.On/Off
OtherInfo Screen
PreferenceChanges the information screen type.Info Top /Info
Menu/ Off*1
DefaultCancels/Resets all customized items in the Clock/Info
settings group as default.Yes /No
* Not available on all models
16 US ACCORD 2D (KA KC KL)-31T3L6300.book 335 ページ 2015年7月23日 木曜日 午後4時11分
Page 525 of 609

uuMaintenance Under the Hood uEngine Coolant
524
Maintenance
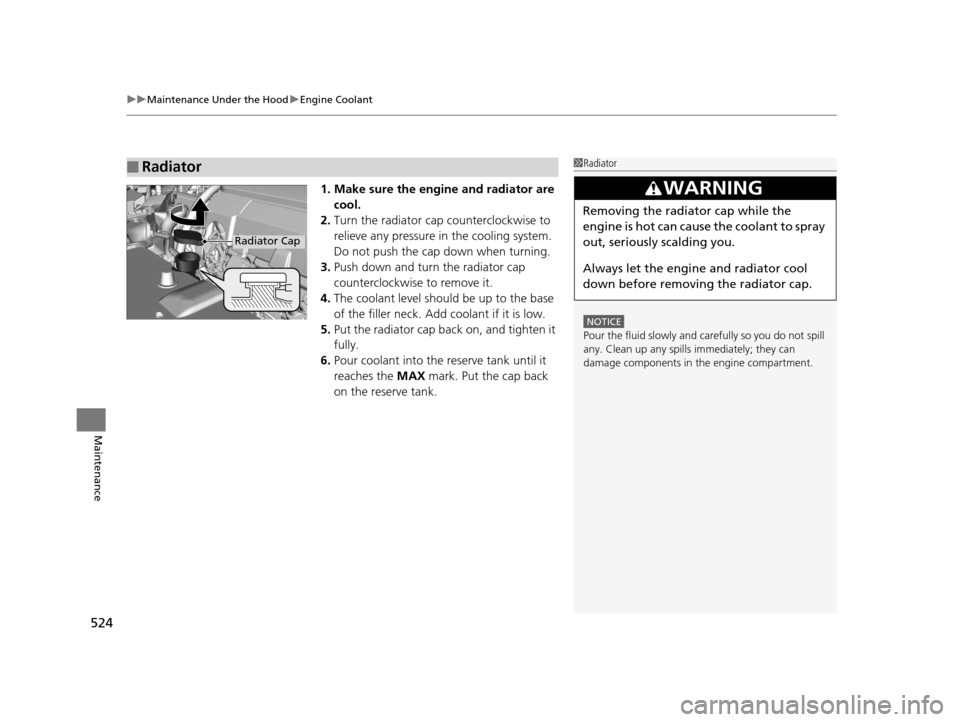
1. Make sure the engine and radiator are
cool.
2. Turn the radiator cap counterclockwise to
relieve any pressure in the cooling system.
Do not push the cap down when turning.
3. Push down and turn the radiator cap
counterclockwise to remove it.
4. The coolant level should be up to the base
of the filler neck. Add coolant if it is low.
5. Put the radiator cap back on, and tighten it
fully.
6. Pour coolant into the reserve tank until it
reaches the MAX mark. Put the cap back
on the reserve tank.
■Radiator1 Radiator
NOTICE
Pour the fluid slowly and ca refully so you do not spill
any. Clean up any spills immediately; they can
damage components in the engine compartment.
3WARNING
Removing the radiator cap while the
engine is hot can cause the coolant to spray
out, seriously scalding you.
Always let the engine and radiator cool
down before removing the radiator cap.
Radiator Cap
16 US ACCORD 2D (KA KC KL)-31T3L6300.book 524 ページ 2015年7月23日 木曜日 午後4時11分
Page 531 of 609

uuReplacing Light Bulbs uHeadlight Bulbs
530
Maintenance
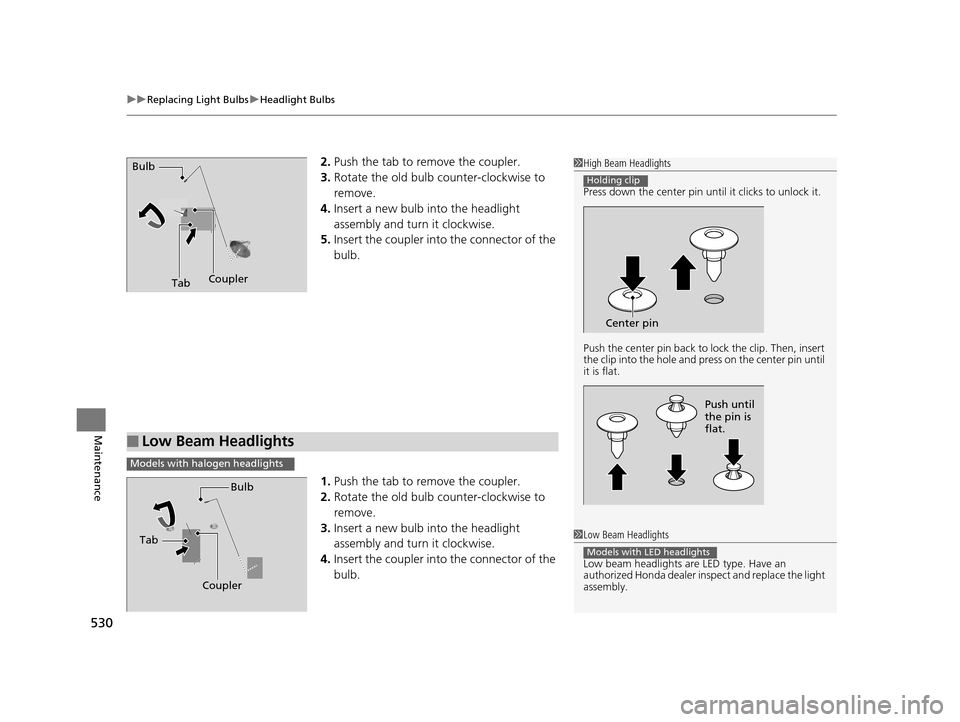
2. Push the tab to remove the coupler.
3. Rotate the old bulb counter-clockwise to
remove.
4. Insert a new bulb into the headlight
assembly and turn it clockwise.
5. Insert the coupler into the connector of the
bulb.
1. Push the tab to remove the coupler.
2. Rotate the old bulb counter-clockwise to
remove.
3. Insert a new bulb into the headlight
assembly and turn it clockwise.
4. Insert the coupler into the connector of the
bulb.1High Beam Headlights
Press down the center pin until it clicks to unlock it.
Push the center pin back to lock the clip. Then, insert
the clip into the hole and press on the center pin until
it is flat.
Holding clip
Center pin
Push until
the pin is
flat.
TabCoupler
Bulb
■Low Beam Headlights
1
Low Beam Headlights
Low beam headlights are LED type. Have an
authorized Honda dealer in spect and replace the light
assembly.
Models with LED headlights
Models with halogen headlights
Tab
Coupler Bulb
16 US ACCORD 2D (KA KC KL)-31T3L6300.book 530 ページ 2015年7月23日 木曜日 午後4時11分