2016 FORD TAURUS airbag off
[x] Cancel search: airbag offPage 13 of 424

This data can help provide a better
understanding of the circumstances in
which crashes and injuries occur.
Note:
Event data recorder data is
recorded by your vehicle only if a
non-trivial crash situation occurs; no data
is recorded by the event data recorder
under normal driving conditions and no
personal data or information (e.g., name,
gender, age, and crash location) is
recorded (see limitations regarding 911
Assist and Traffic, directions and
Information privacy below). However,
parties, such as law enforcement, could
combine the event data recorder data
with the type of personally identifying
data routinely acquired during a crash
investigation.
To read data recorded by an event data
recorder, special equipment is required,
and access to the vehicle or the event
data recorder is needed. In addition to
the vehicle manufacturer, other
parties, such as law enforcement, that
have such special equipment, can read
the information if they have access to
the vehicle or the event data recorder.
Ford Motor Company and Ford of
Canada do not access event data
recorder information without obtaining
consent, unless pursuant to court order
or where required by law enforcement,
other government authorities or other
third parties acting with lawful
authority. Other parties may seek to
access the information independently
of Ford Motor Company and Ford of
Canada. Note:
Including to the extent that any
law pertaining to Event Data Recorders
applies to SYNC or its features, please
note the following: Once 911 Assist (if
equipped) is enabled (set ON), 911 Assist
may, through any paired and connected
cell phone, disclose to emergency
services that the vehicle has been in a
crash involving the deployment of an
airbag or, in certain vehicles, the
activation of the fuel pump shut-off.
Certain versions or updates to 911 Assist
may also be capable of being used to
electronically or verbally provide to 911
operators the vehicle location (such as
latitude and longitude), and/or other
details about the vehicle or crash or
personal information about the
occupants to assist 911 operators to
provide the most appropriate emergency
services. If you do not want to disclose
this information, do not activate the 911
Assist feature. See SYNC™ (page 324).
Additionally, when you connect to
Traffic, Directions and Information (if
equipped, U.S. only), the service uses
GPS technology and advanced vehicle
sensors to collect the vehicle ’s current
location, travel direction, and speed
(“ vehicle travel information ”), only to
help provide you with the directions,
traffic reports, or business searches
that you request. If you do not want
Ford or its vendors to receive this
information, do not activate the
service. For more information, see
Traffic, Directions and Information,
Terms and Conditions. See
SYNC™
(page 324).
10
Taurus (CPH) Canada/United States of America, enUSA, First Printing Introduction
Page 14 of 424

CALIFORNIA PROPOSITION 65
WARNINGS
Some constituents of engine
exhaust, certain vehicle components,
certain fluids contained in vehicles
and certain products of component wear
contain or emit chemicals known to the
State of California to cause cancer and
birth defects or other reproductive harm. Battery posts, terminals and related
accessories contain lead and lead
compounds, chemicals known to the
State of California to cause cancer and
reproductive harm. Batteries also contain
other chemicals known to the State of
California to cause cancer. Wash your
hands after handling. PERCHLORATE
Certain components in your vehicle such
as airbag modules, safety belt
pretensioners and remote control batteries
may contain perchlorate material. Special
handling may apply for service or vehicle
end of life disposal.
For more information visit:
Web Address
www.dtsc.ca.gov/hazardouswaste/ perchlorate
FORD CREDIT
(U.S. Only)
Ford Credit offers a full range of financing
and lease plans to help you acquire your
vehicle. If you have financed or leased your
vehicle through Ford Credit, thank you for
your business. For your convenience we offer a number
of ways to contact us, as well as to help
manage your account.
Phone: 1-800-727-7000
For more information regarding Ford Credit,
as well as to access Account Manager,
please go to www.fordcredit.com.
REPLACEMENT PARTS
RECOMMENDATION
Your vehicle has been built to the highest
standards using quality parts. We
recommend that you demand the use of
genuine Ford and Motorcraft parts
whenever your vehicle requires scheduled
maintenance or repair. You can clearly
identify genuine Ford and Motorcraft parts
by looking for the Ford, FoMoCo or
Motorcraft branding on the parts or their
packaging.
Scheduled Maintenance and
Mechanical Repairs
One of the best ways for you to make sure
that your vehicle provides years of service
is to have it maintained in line with our
recommendations using parts that
conform to the specifications detailed in
this Owner
’s Manual. Genuine Ford and
Motorcraft parts meet or exceed these
specifications.
Collision Repairs
We hope that you never experience a
collision, but accidents do happen. Genuine
Ford replacement collision parts meet our
stringent requirements for fit, finish,
structural integrity, corrosion protection
and dent resistance. During vehicle
11
Taurus (CPH) Canada/United States of America, enUSA, First Printing Introduction
Page 37 of 424

The Personal Safety System provides an
improved overall level of frontal crash
protection to front seat occupants and is
designed to help further reduce the risk of
airbag-related injuries. The system is able
to analyze different occupant conditions
and crash severity before activating the
appropriate safety devices to help better
protect a range of occupants in a variety
of frontal crash situations.
The Vehicle Personal Safety System
consists of:
•
Driver and passenger dual-stage airbag
supplemental restraints.
• Front seat outboard safety belts with
pretensioners, energy management
retractors and safety belt usage
sensors.
• Driver seat position sensor.
• Front passenger sensing system.
• Passenger airbag off and on indicator
lamp.
• Front crash severity sensors.
• Restraints control module with impact
and safing sensors.
• Restraint system warning light and
backup tone.
• The electrical wiring for the airbags,
crash sensors, safety belt
pretensioners, front safety belt usage
sensors, driver seat position sensor,
front passenger sensing system and
indicator lights. How Does the Personal Safety
System Work?
The Personal Safety System can adapt the
deployment strategy of the safety devices
according to crash severity and occupant
conditions. A collection of crash and
occupant sensors provides information to
the restraints control module. During a
crash, the restraints control module may
deploy the safety belt pretensioners, one
or both stages of the dual-stage airbags
based on crash severity and occupant
conditions.
34
Taurus (CPH) Canada/United States of America, enUSA, First Printing Personal Safety System
™
Page 40 of 424

Children must always be properly
restrained. Accident statistics suggest that
children are safer when properly restrained
in the rear seating positions than in the
front seating position. Failure to follow
these instructions may increase the risk of
injury in a crash.
FRONT PASSENGER SENSING
SYSTEM
WARNINGS
Even with Advanced Restraints
Systems, children 12 and under
should be properly restrained in a
rear seating position. Failure to follow this
could seriously increase the risk of injury or
death. Sitting improperly out of position or
with the seatback reclined too far
can take off weight from the seat
cushion and affect the decision of the front
passenger sensing system, resulting in
serious injury or death in a crash. Always
sit upright against your seatback, with your
feet on the floor. Any alteration or modification to the
front passenger seat may affect the
performance of the front passenger
sensing system which could seriously
increase the risk of injury or death. This system works with sensors that are
part of the front passenger seat and safety
belt to detect the presence of a
properly-seated occupant and determine
if the front passenger frontal airbag should
be enabled (may inflate) or not.
The front passenger sensing system uses
a passenger airbag status indicator that
will illuminate indicating that the front
passenger frontal airbag is either ON
(enabled) or OFF (disabled).
The indicator lamp is located in the center
stack of the instrument panel.
Note:
The passenger airbag status indicator
OFF and ON indicator lamps will illuminate
for a short period of time when the ignition
is first turned on to confirm it is functional.
The front passenger sensing system is
designed to disable (will not inflate) the
front passenger frontal airbag when the
front passenger seat is unoccupied, or a
rear facing infant seat, a forward-facing
child restraint, or a booster seat is
detected. Even with this technology,
parents are strongly encouraged to
always properly restrain children in the rear
seat. The sensor also turns off the
passenger front airbag and seat-mounted
side airbag when the passenger seat is
empty.
37
Taurus (CPH) Canada/United States of America, enUSA, First Printing Supplementary Restraints SystemE142846 E151849
Page 41 of 424

•
When the front passenger sensing
system disables (will not inflate) the
front passenger frontal airbag, the
passenger airbag status indicator will
illuminate the OFF lamp and stay lit to
remind you that the front passenger
frontal airbag is disabled.
• If the child restraint has been installed
and the passenger airbag status
indicator illuminates the ON lamp, then
turn the vehicle off, remove the child
restraint from the vehicle and reinstall
the restraint following the child
restraint manufacturer's instructions.
The front passenger sensing system is
designed to enable (may inflate) the front
passenger frontal airbag anytime the
system senses that a person of adult size
is sitting properly in the front passenger
seat. •
When the front passenger sensing
system enables the front passenger
frontal airbag (may inflate), the
passenger airbag status indicator will
illuminate the ON lamp and remain
illuminated.
If a person of adult size is sitting in the front
passenger seat, but the airbag off indicator
lamp is lit, it is possible that the person is
not sitting properly in the seat. If this
happens:
• Turn the vehicle off and ask the person
to place the seatback in the full upright
position.
• Have the person sit upright in the seat,
centered on the seat cushion, with the
person ’s legs comfortably extended.
• Restart the vehicle and have the person
remain in this position for about two
minutes. This will allow the system to
detect that person and enable the
passenger ’s frontal airbag.
• If the indicator OFF lamp remains lit
even after this, the person should be
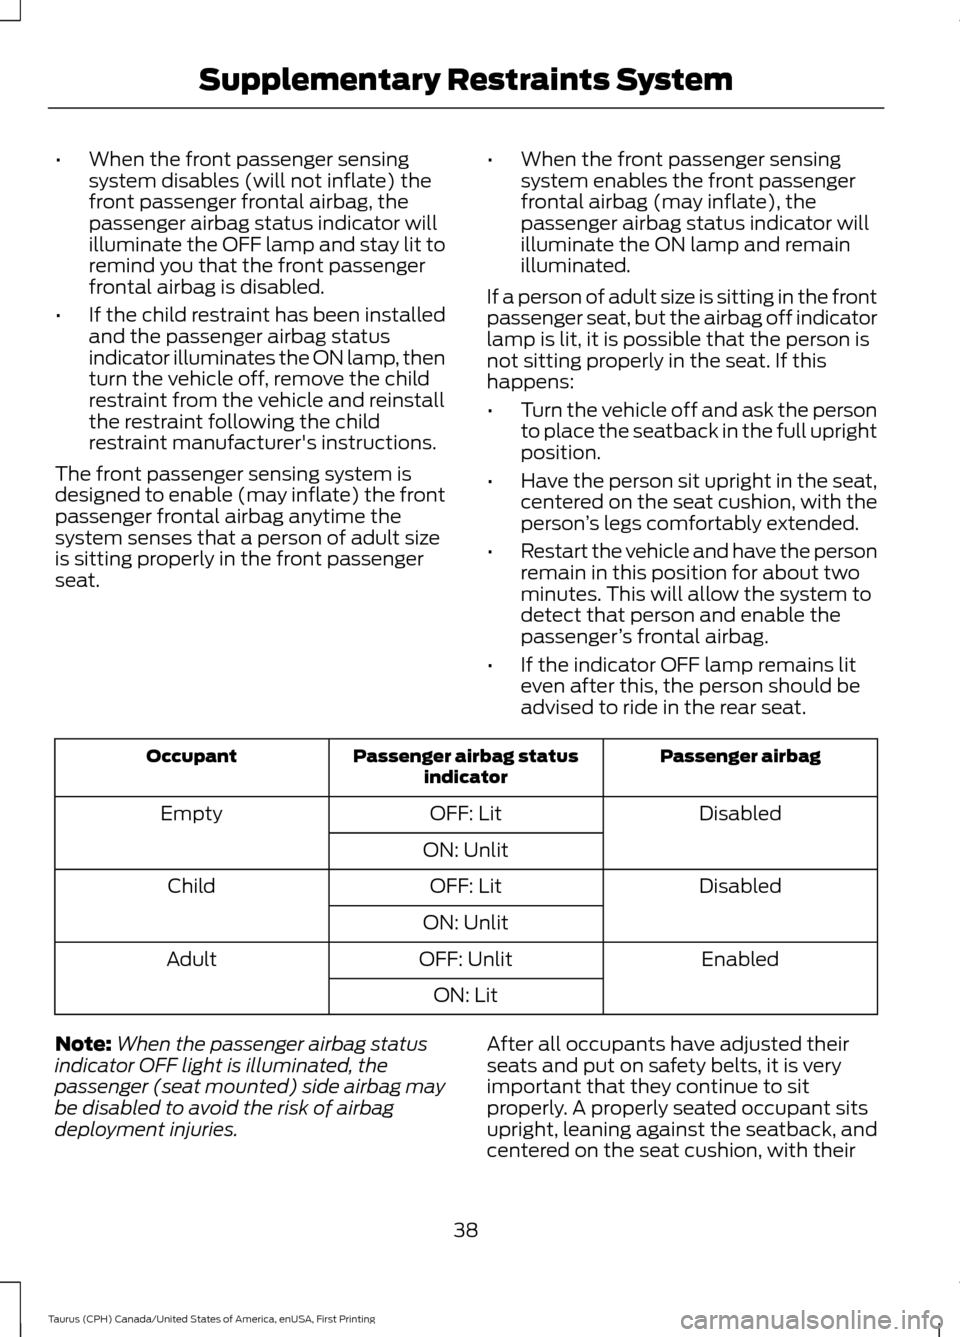
advised to ride in the rear seat. Passenger airbag
Passenger airbag status
indicator
Occupant
Disabled
OFF: Lit
Empty
ON: Unlit Disabled
OFF: Lit
Child
ON: Unlit Enabled
OFF: Unlit
Adult
ON: Lit
Note: When the passenger airbag status
indicator OFF light is illuminated, the
passenger (seat mounted) side airbag may
be disabled to avoid the risk of airbag
deployment injuries. After all occupants have adjusted their
seats and put on safety belts, it is very
important that they continue to sit
properly. A properly seated occupant sits
upright, leaning against the seatback, and
centered on the seat cushion, with their
38
Taurus (CPH) Canada/United States of America, enUSA, First Printing Supplementary Restraints System
Page 86 of 424

Brake System
It illuminates when you engage
the parking brake with the
ignition on.
If it illuminates when you are driving, check
that the parking brake is not engaged. If
the parking brake is not engaged, this
indicates low brake fluid level or a brake
system malfunction. Have the system
checked immediately by an authorized
dealer. WARNING
Driving your vehicle with the warning
lamp on is dangerous. A significant
decrease in braking performance
may occur. It will take you longer to stop
your vehicle. Have your vehicle checked by
your authorized dealer immediately. Driving
extended distances with the parking brake
engaged can cause brake failure and the
risk of personal injury. Cruise Control (If Equipped)
It illuminates when you switch
this feature on.
Direction Indicator Illuminates when you switch on
the left or right direction
indicator or the hazard warning
flasher. If the indicators stay on or flash
faster, check for a burned out bulb. See
Changing a Bulb
(page 253).
Door Ajar Displays when the ignition is on
and any door is not completely
closed. Engine Coolant Temperature Illuminates when the engine
coolant temperature is high.
Stop the vehicle as soon as
possible, switch off the engine and let cool.
See
Engine Oil Check (page 239).
Engine Oil If it illuminates with the engine
running or when you are driving,
this indicates a malfunction.
Stop your vehicle as soon as it is safe to
do so and switch the engine off. Check the
engine oil level. See
Engine Oil Check
(page 239).
Note: Do not resume your journey if it
illuminates despite the level being correct.
Have the system checked by an authorized
dealer immediately.
Fasten Seatbelt It illuminates and a chime
sounds to remind you to fasten
your seatbelt. See
Seatbelt
Reminder (page 31).
Front Airbag If it fails to illuminate when you
start your vehicle, continues to
flash or remains on, it indicates
a malfunction. Have the system checked
by an authorized dealer.
Front Fog Lamps
(If Equipped) Lights when you switch the front
fog lamps on.
83
Taurus (CPH) Canada/United States of America, enUSA, First Printing Instrument ClusterE144522 E71340
Page 119 of 424

SITTING IN THE CORRECT
POSITION
WARNINGS
Sitting improperly, out of position or
with the seatback reclined too far
can take weight off the seat cushion
and affect the decision of the passenger
sensing system, resulting in serious injury
or death in the event of a crash. Always sit
upright against your seat back, with your
feet on the floor. Do not recline the seatback as this
can cause the occupant to slide
under the safety belt, resulting in
serious injury in the event of a crash. Do not place objects higher than the
seatback to reduce the risk of serious
injury in the event of a crash or during
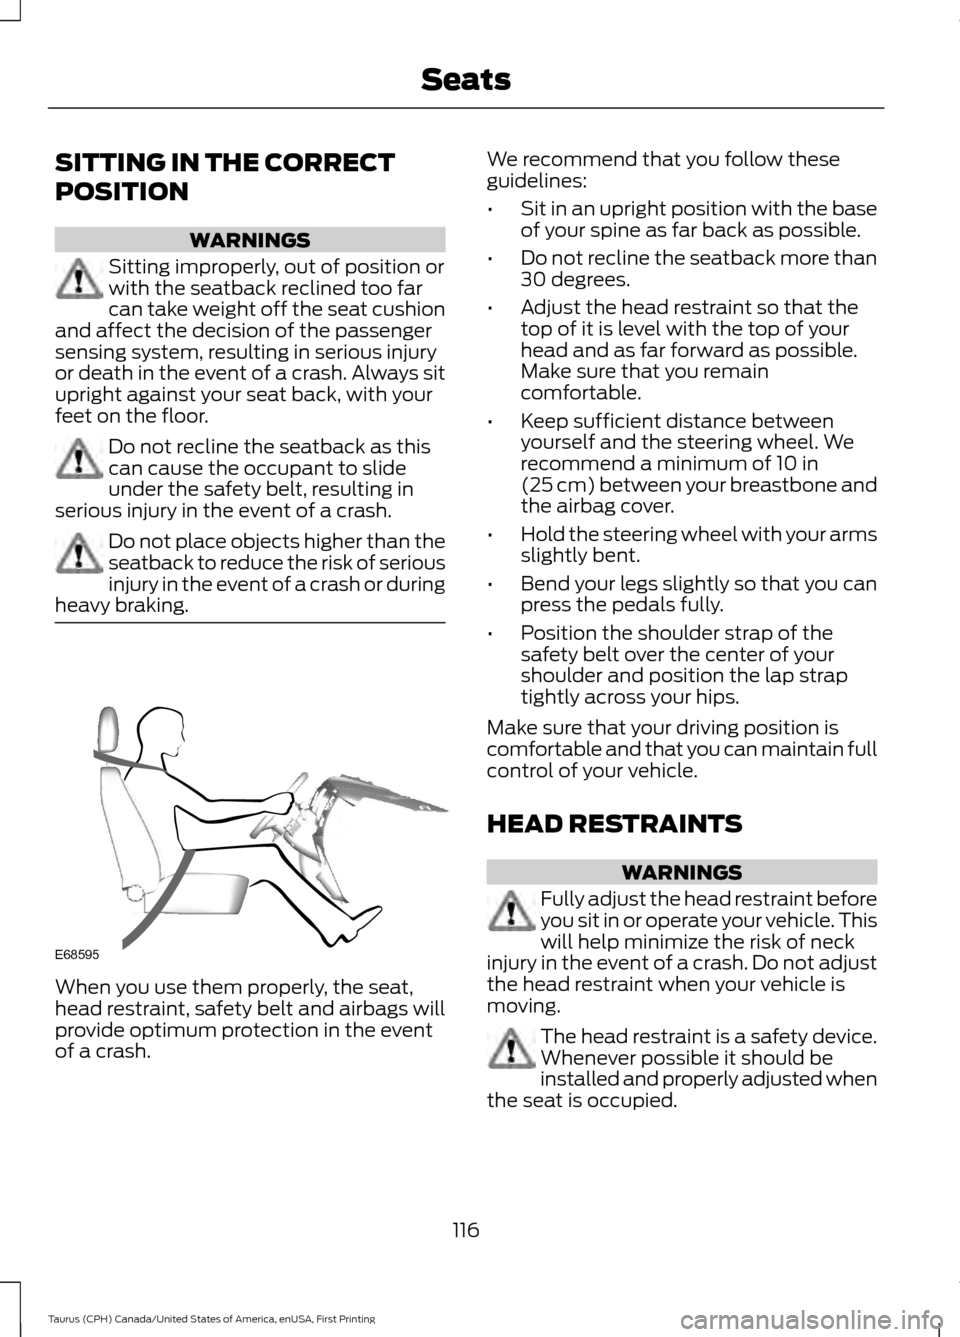
heavy braking. When you use them properly, the seat,
head restraint, safety belt and airbags will
provide optimum protection in the event
of a crash. We recommend that you follow these
guidelines:
•
Sit in an upright position with the base
of your spine as far back as possible.
• Do not recline the seatback more than
30 degrees.
• Adjust the head restraint so that the
top of it is level with the top of your
head and as far forward as possible.
Make sure that you remain
comfortable.
• Keep sufficient distance between
yourself and the steering wheel. We
recommend a minimum of 10 in
(25 cm) between your breastbone and
the airbag cover.
• Hold the steering wheel with your arms
slightly bent.
• Bend your legs slightly so that you can
press the pedals fully.
• Position the shoulder strap of the
safety belt over the center of your
shoulder and position the lap strap
tightly across your hips.
Make sure that your driving position is
comfortable and that you can maintain full
control of your vehicle.
HEAD RESTRAINTS WARNINGS
Fully adjust the head restraint before
you sit in or operate your vehicle. This
will help minimize the risk of neck
injury in the event of a crash. Do not adjust
the head restraint when your vehicle is
moving. The head restraint is a safety device.
Whenever possible it should be
installed and properly adjusted when
the seat is occupied.
116
Taurus (CPH) Canada/United States of America, enUSA, First Printing SeatsE68595
Page 219 of 424

2. Remove the jumper cable on the
negative (-) terminal of the booster
vehicle battery.
3. Remove the jumper cable from the positive (+) terminal of the booster
vehicle battery.
4. Remove the jumper cable from the positive (+) terminal of the disabled
vehicle battery.
5. Allow the engine to idle for at least one
minute.
POST-CRASH ALERT SYSTEM
The system flashes the direction indicators
and sounds the horn (intermittently) in the
event of a serious impact that deploys an
airbag (front, side, side curtain or Safety
Canopy) or the safety belt pretensioners.
The horn and indicators will turn off when:
• You press the hazard control button.
• You press the panic button on the
remote entry transmitter (if equipped).
• Your vehicle runs out of power.
216
Taurus (CPH) Canada/United States of America, enUSA, First Printing Roadside Emergencies