2016 FORD TAURUS ignition
[x] Cancel search: ignitionPage 184 of 424

DRIVER ALERT (If Equipped)
PRINCIPLE OF OPERATION WARNING
The driver alert system is designed
to aid you. It is not intended to
replace your attention and judgment.
You are still responsible to drive with due
care and attention. Note:
The system will store the on or off
setting in the information display menu
through ignition cycles.
Note: If enabled in the menu, the system
will be active at speeds above
40 mph
(64 km/h). When below the activation
speed, the information display will inform
the driver that the system is unavailable.
Note: The system works as long as one lane
marking can be detected by the camera.
Note: If the camera is blocked or if the
windshield is damaged, the system may not
function.
Note: The system may not be available in
poor weather or other low visibility
conditions.
The system automatically monitors your
driving behavior using various inputs
including the front camera sensor.
If the system detects that your driving
alertness is reduced below a certain
threshold, the system will alert you using
a chime and a message in the cluster
display.
USING DRIVER ALERT
Switching the System On and Off
Switch the system on or off using the
information display. See
General
Information (page 86). When activated, the system will monitor
your alertness level based upon your
driving behavior in relation to the lane
markings, and other factors.
System Warnings
Note:
The system will not issue warnings
below approximately
40 mph (64 km/h).
The warning system has two stages. At
first, the system issues a temporary
warning that you need to take a rest. This
message will only appear for a short time.
If the system detects further reduction in
driving alertness, it may issue another
warning that will remain in the information
display for a longer time. You can press OK
on the steering wheel control to clear the
warning.
System Display
When active the system will run
automatically in the background and only
issue a warning if required. You can view
the status at any time using the
information display.
See General
Information (page 86).
The alertness level is shown by six steps
in a colored bar. The current assessment of your alertness
is within a typical range.
181
Taurus (CPH) Canada/United States of America, enUSA, First Printing Driving AidsE131358
Page 185 of 424

The current assessment of your alertness
indicates that you should rest as soon as
safely possible.
The status bar will travel from left to right
as the calculated alertness level
decreases. As the rest icon is approached
the color turns from green to yellow to red.
The yellow position indicates the first
warning is active and the red position
indicates the second warning is active.
Note:
If you have recently received a
warning; you should consider resting, even
if the current assessment is within the
typical range.
Note: If the camera sensor cannot track the
road lane markings or if your vehicle speed
drops below approximately 40 mph
(64 km/h), the alertness level will change
to grey for a short time and the information
display will inform you that the system is
unavailable.
Resetting the System
You can reset the system by either:
• Switching the ignition off and on.
• Stopping the vehicle and then opening
and closing the driver ’s door.
LANE KEEPING SYSTEM
(If
Equipped) WARNINGS
The system does not relieve you of
your responsibility to drive with due
care and attention. WARNINGS
At all times you are responsible for
controlling your vehicle, supervising
the system and intervening if
required. The system is designed to aid the
driver. It is not intended to replace
the driver's attention and judgement.
The driver is still responsible to drive with
due care and attention. In cold and severe weather
conditions the system may not
function. Rain, snow, spray can all
limit sensor performance. Large contrasts in lighting can limit
sensor performance.
The system will not operate if the
sensor cannot track the road lane
markings.
The vehicle should be taken to an
authorized dealer for inspection if
damage occurs in the immediate
area surrounding the sensor. Note:
The system works above
40 mph
(64 km/h).
Note: The system works as long as the
camera can detect one lane marking.
Note: The system may not function if the
camera is blocked or there is damage to the
windshield.
Note: When Aid mode is on and the system
detects no steering activity for a short
period, the system will alert you to put your
hands on the steering wheel. The system
may detect a light grip or touch on the
steering wheel as hands off driving.
182
Taurus (CPH) Canada/United States of America, enUSA, First Printing Driving AidsE131359
Page 191 of 424

If the system detects a degraded
performance condition, a message warning
of a blocked sensor will appear in the
information display. Also the system alert
indicators will remain ON and the system
will no longer provide any vehicle warnings.
You can clear the information display
warning but the alert indicators will remain
illuminated.
A "blocked" condition can be cleared in
two ways:
•
After the blockage in front of the
sensors is removed or the
rainfall/snowfall rate decreases or
stops, drive for a few minutes in traffic
to allow the sensors to detect passing
vehicles.
• By cycling the ignition from ON to OFF
and then back ON.
Note: When towing a trailer, the sensors
may detect the trailer thus causing a false
alert. It may be desirable to turn the Blind
Spot Information System off if the false
alerts become annoying.
System Errors
If the system senses a problem with the
left or right sensor, the telltale will
illuminate and a message will appear in
the information display. See Information
Messages (page 95).
Switching the System Off and On
You can temporarily switch the Blind Spot
Information System off in the information
display. See
General Information (page
86). When the Blind Spot Information
System switches off, you will not receive
alerts and the information display shows
a system off message. The telltale in the
cluster also illuminates. When you switch
the Blind Spot Information System on or
off, the alert indicators flash twice. Note:
The system switches back on every
time you start your vehicle.
You can also have the Blind Spot
Information System switched off
permanently at an authorized dealer. Once
switched off permanently, the system can
only be switched back on at an authorized
dealer.
CROSS TRAFFIC ALERT WARNING
To help avoid personal injury, NEVER
use the Cross Traffic Alert system as
a replacement for using the interior
and exterior mirrors and looking over your
shoulder before backing out of a parking
space. Cross Traffic Alert is not a
replacement for careful driving. Cross Traffic Alert is designed to warn you
of vehicles approaching from the sides
when the transmission is in reverse (R).
Using the System
Cross Traffic Alert turns on when you start
the engine and you shift into reverse (R).
Once shifted out of reverse (R), Cross
Traffic Alert turns off.
Note:
Cross Traffic Alert only functions
while your transmission is in reverse (R).
Cross Traffic Alert is designed to alert the
driver of certain collision risks. Coverage
decreases when the sensors are partially,
mostly or fully obstructed. Reversing slowly
helps increase the coverage area and
effectiveness.
188
Taurus (CPH) Canada/United States of America, enUSA, First Printing Driving Aids
Page 194 of 424

The following are other situations that may
limit the Cross Traffic Alert performance:
•
Stationary or slow moving vehicles.
• Pedestrians or objects in the roadway.
• Oncoming vehicles in the same lame.
• Severe weather conditions.
• Debris build-up near or around the
sensor(s).
• Small distance to the vehicle ahead.
Certain conditions may reduce the visibility
of the warning lamp; therefore, it is
recommended to keep the audible warning
on.
If the front end of the vehicle is hit or
damaged, the radar sensing zone may be
altered causing missed or false collision
warnings. See your authorized dealer to
have your collision warning radar checked
for proper coverage and operation.
False Alerts
Note: When towing a trailer, the sensors
may detect the trailer thus causing a false
alert. It may be desirable to turn the Blind
Spot Information System off if the false
alerts become annoying.
There may be certain instances when there
is a false alert by the Cross Traffic Alert
system that illuminates the alert indicator
with no vehicle in the coverage zone. Some
amount of false alerts are normal; they are
temporary and self-correct.
System Errors
If Cross Traffic Alert senses a problem with
the left or right sensor a message will
appear in the information display. See
Information Messages (page 95). Switching the System Off and On
You can temporarily switch Cross Traffic
Alert off in the information display. See
Information Messages (page 95). When
you switch Cross Traffic Alert off, you will
not receive alerts and the information
display will display a system off message.
Note:
The Cross Traffic Alert switches on
whenever the ignition is switched on and
ready to provide appropriate alerts when
the transmission is in reverse (R). Cross
Traffic Alert will not remember the last
selected on or off setting.
You can also have Cross Traffic Alert
switched off permanently at an authorized
dealer. Once switched off permanently,
the system can only be switched back on
at an authorized dealer.
STEERING
Electric Power Steering WARNINGS
The electric power steering system
has diagnostic checks that
continuously monitor the system. If
a fault is detected, a message displays in
the information display. Stop your vehicle
as soon as it is safe to do so. Switch the
ignition off. After at least 10 seconds,
switch the ignition on and watch the
information display for a steering system
warning message. If a steering system
warning message returns, have the system
checked by an authorized dealer. If the system detects an error, you
may not feel a difference in the
steering, however a serious condition
may exist. Obtain immediate service from
an authorized dealer, failure to do so may
result in loss of steering control. 191
Taurus (CPH) Canada/United States of America, enUSA, First Printing Driving Aids
Page 216 of 424

This program is separate from the New
Vehicle Limited Warranty, but the coverage
is concurrent with the powertrain coverage
period of your vehicle.
Canadian customers who require roadside
assistance, call 1-800-665-2006.
Vehicles Sold in Canada: Using
Roadside Assistance
Complete the roadside assistance
identification card and place it in your
wallet for quick reference.
In Canada, this card is found in the
Warranty Guide in the glove compartment
of your vehicle.
Vehicles Sold in Canada: Roadside
Assistance Program Coverage
The service is available 24 hours a day,
seven days a week.
Canadian roadside coverage and benefits
may differ from the U.S. coverage.
For complete program coverage details
you may contact your dealer, you can call
us in Canada at 1-800-665-2006, or visit
our website at www.ford.ca.
HAZARD WARNING FLASHERS
Note:
If used when the vehicle is not
running, the battery will lose charge. There
may be insufficient power to restart your
vehicle. The hazard warning button is
located on the instrument panel.
Use it when your vehicle is
creating a safety hazard for other
motorists.
• Press the button to turn on the hazard
warning function, and the front and
rear direction indicators will flash.
• Press the button again to turn them
off. FUEL SHUTOFF WARNING
Failure to inspect and, if necessary,
repair fuel leaks after a collision may
increase the risk of fire and serious
injury. Ford Motor Company recommends
that the fuel system be inspected by an
authorized dealer after any collision. In the event of a moderate to severe
collision, this vehicle includes a fuel pump
shutoff feature that stops the flow of fuel
to the engine. Not every impact will cause
a shutoff.
Should your vehicle shut off after a
collision, you may restart your vehicle. For
vehicles equipped with a key system:
1. Switch off the ignition.
2. Switch on the ignition.
3. Repeat Steps 1 and 2 to re-enable the
fuel pump.
For vehicles equipped with a push button
start system:
1. Press the START/STOP button to
switch off the ignition.
2. Press the brake pedal and press the START/STOP
button to switch on the
ignition.
3. Remove your foot from the brake pedal
and press the
START/STOP button
to switch off the ignition.
4. You can either attempt to start the engine by pressing the brake pedal and
the
START/STOP button, or switch
on the ignition only by pressing the
START/STOP
button without
pressing the brake pedal. Both ways
re-enable the fuel system.
213
Taurus (CPH) Canada/United States of America, enUSA, First Printing Roadside Emergencies
Page 230 of 424

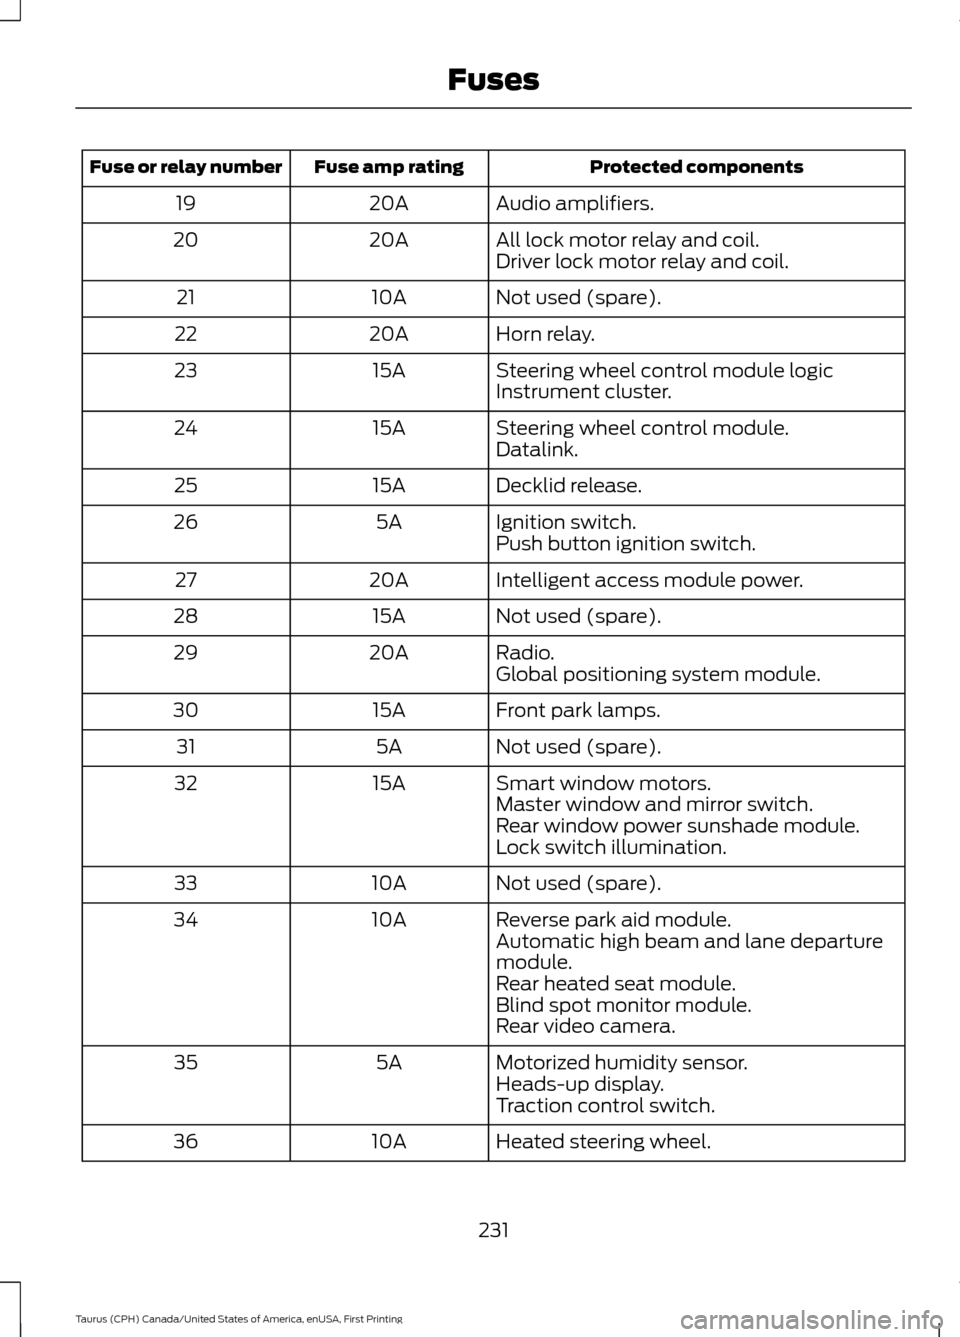
Protected components
Fuse amp rating
Fuse or relay number
Not used.
-
56
Left-hand high intensity discharge head-
lamp.
20A
*
57
Alternator A-line.
10A *
58
Brake on/off switch.
10A *
59
Not used.
-
60
Not used.
-
61
A/C clutch relay.
10A *
62
Not used.
-
63
Massage control seats.
15A *
64
Fuel pump relay.
30A *
65
Fuel injectors.
Powertrain control module relay.
Relay
66
Oxygen sensor heater.
20A *
67
Mass airflow sensor.
Variable camshaft timing solenoid valve.
Canister vent solenoid.
Canister purge solenoid.
Ignition coils.
20A *
68
Vehicle power 1 (powertrain control
module).
20A
*
69
A/C clutch.
15A *
70
Fan control relay coils 1-3.
Variable air conditioning compressor.
Auxiliary transmission warmup.
Turbo charge waste-gate control.
Electronic compressor bypass valve.
All-wheel drive module.
Positive crankcase ventilation heater.
Not used.
-
71
Not used.
-
72
Not used.
-
73
227
Taurus (CPH) Canada/United States of America, enUSA, First Printing Fuses
Page 234 of 424

Protected components
Fuse amp rating
Fuse or relay number
Audio amplifiers.
20A
19
All lock motor relay and coil.
20A
20
Driver lock motor relay and coil.
Not used (spare).
10A
21
Horn relay.
20A
22
Steering wheel control module logic
15A
23
Instrument cluster.
Steering wheel control module.
15A
24
Datalink.
Decklid release.
15A
25
Ignition switch.
5A
26
Push button ignition switch.
Intelligent access module power.
20A
27
Not used (spare).
15A
28
Radio.
20A
29
Global positioning system module.
Front park lamps.
15A
30
Not used (spare).
5A
31
Smart window motors.
15A
32
Master window and mirror switch.
Rear window power sunshade module.
Lock switch illumination.
Not used (spare).
10A
33
Reverse park aid module.
10A
34
Automatic high beam and lane departure
module.
Rear heated seat module.
Blind spot monitor module.
Rear video camera.
Motorized humidity sensor.
5A
35
Heads-up display.
Traction control switch.
Heated steering wheel.
10A
36
231
Taurus (CPH) Canada/United States of America, enUSA, First Printing Fuses
Page 254 of 424

After battery replacement, or in some
cases after charging the battery with an
external charger, the battery management
system requires eight hours of vehicle sleep
time to relearn the battery state of charge.
During this time your vehicle must remain
fully locked with the ignition switched off.
Note:
Prior to relearning the battery state
of charge, the battery management system
may temporarily disable some electrical
systems.
Electrical Accessory Installation
To make sure the battery management
system works correctly, do not connect an
electrical device ground connection
directly to the battery negative post. This
can cause inaccurate measurements of
the battery condition and potential
incorrect system operation.
Note: If you add electrical accessories or
components to the vehicle, it may adversely
affect battery performance and durability.
This may also affect the performance of
other electrical systems in the vehicle.
CHECKING THE WIPER
BLADES Run the tip of your fingers over the edge of
the blade to check for roughness.
Clean the wiper blades with washer fluid
or water applied with a soft sponge or
cloth. CHANGING THE WIPER
BLADES
Replace the wiper blades at least annually
for optimum performance.
You can improve poor wiper quality by
cleaning the wiper blades and the
windshield. See Cleaning the Windows
and Wiper Blades (page 259).
Changing the Windshield Wiper
Blades
Note: Do not hold the wiper blade when
lifting the wiper arm.
Note: Make sure that the wiper arm does
not spring back against the glass when the
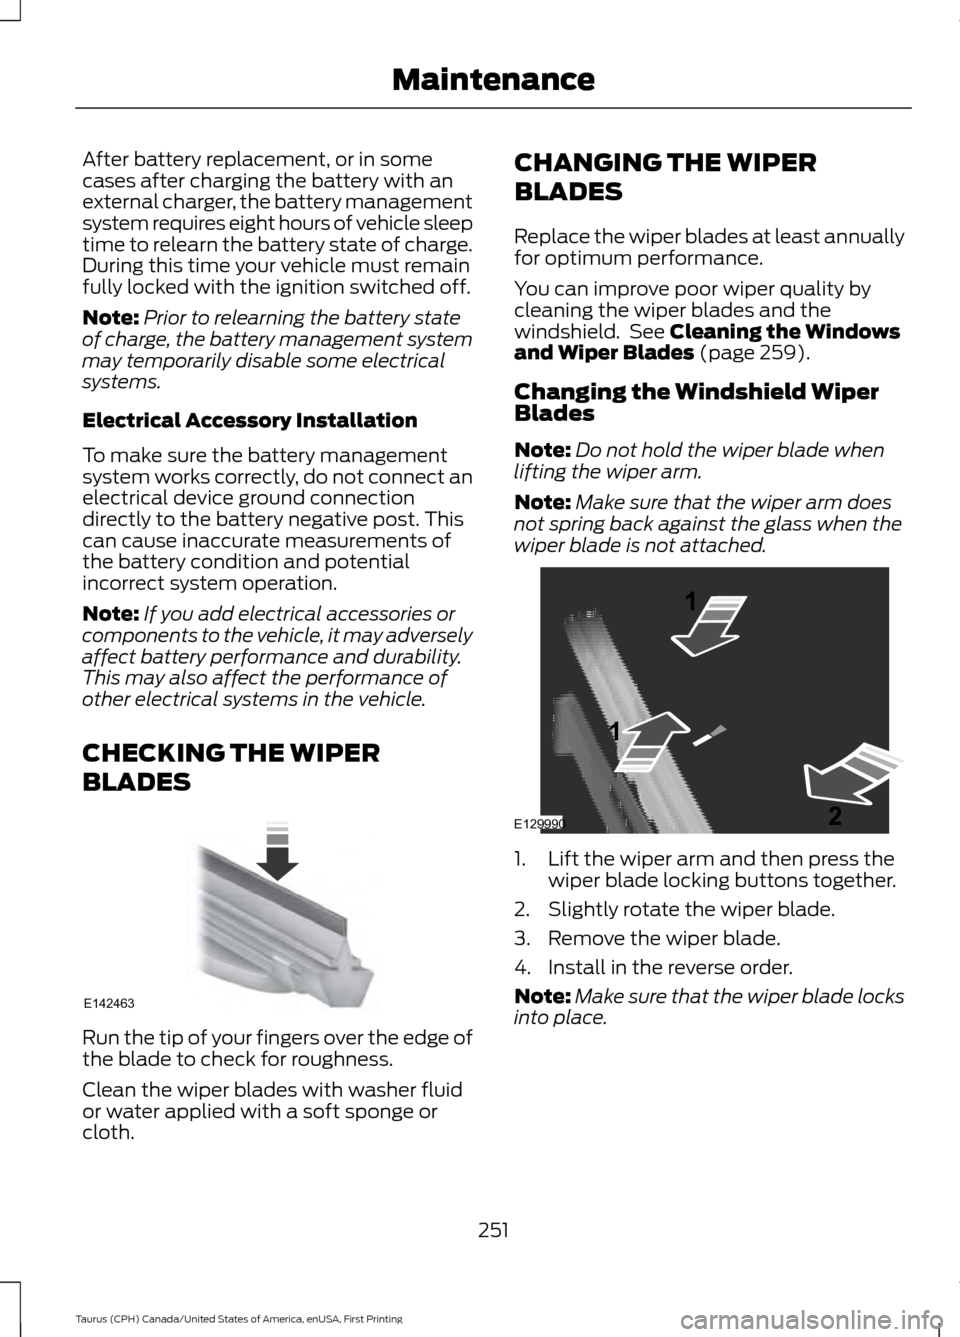
wiper blade is not attached. 1. Lift the wiper arm and then press the
wiper blade locking buttons together.
2. Slightly rotate the wiper blade.
3. Remove the wiper blade.
4. Install in the reverse order.
Note: Make sure that the wiper blade locks
into place.
251
Taurus (CPH) Canada/United States of America, enUSA, First Printing MaintenanceE142463 E129990
1
1 2