2016 FORD TAURUS brake light
[x] Cancel search: brake lightPage 11 of 424

Brake system
Cabin air filter
Check fuel cap
Child safety door lock or unlock
Child seat lower anchor
Child seat tether anchor
Cruise control
Do not open when hot
Engine air filter
Engine coolant
Engine coolant temperature
Engine oil
Explosive gas
Fan warning
Fasten seatbelt Front airbag
Front fog lamps
Fuel pump reset
Fuse compartment
Hazard warning flashers
Heated rear window
Heated windshield
Interior luggage compartment
release
Jack
Keep out of reach of children
Lighting control
Low tire pressure warning
Maintain correct fluid level
Note operating instructions
Panic alarm
8
Taurus (CPH) Canada/United States of America, enUSA, First Printing Introduction E71340 E161353
Page 32 of 424

Pregnant women should always wear their
safety belt. The lap belt portion of a
combination lap and shoulder belt should
be positioned low across the hips below
the belly and worn as tight as comfort will
allow. The shoulder belt should be
positioned to cross the middle of the
shoulder and the center of the chest.
Safety Belt Locking Modes
WARNINGS
After any vehicle crash, the safety
belt system at all passenger seating
positions must be checked by an
authorized dealer to verify that the
automatic locking retractor feature for
child seats is still functioning properly. In
addition, all safety belts should be checked
for proper function. The belt and retractor assembly
must be replaced if the safety belt
assembly automatic locking retractor
feature or any other safety belt function is
not operating properly when checked by
an authorized dealer. Failure to replace the
belt and retractor assembly could increase
the risk of injury in crashes. All safety restraints in the vehicle are
combination lap and shoulder belts. The
driver safety belt has the first type of
locking mode, and the front outboard
passenger and rear seat safety belts have
both types of locking modes described as
follows: Vehicle Sensitive Mode
This is the normal retractor mode, which
allows free shoulder belt length
adjustment to your movements and
locking in response to vehicle movement.
For example, if the driver brakes suddenly
or turns a corner sharply, or the vehicle
receives an impact of about 5 mph (8
km/h) or more, the combination safety
belts will lock to help reduce forward
movement of the driver and passengers.
In addition, the retractor is designed to lock
if the webbing is pulled out too quickly. If
this occurs, let the belt retract slightly and
pull webbing out again in a slow and
controlled manner.
Automatic Locking Mode
In this mode, the shoulder belt is
automatically pre-locked. The belt will still
retract to remove any slack in the shoulder
belt. The automatic locking mode is not
available on the driver safety belt.
When to Use the Automatic Locking
Mode
This mode should be used any time a child
safety seat, except a booster, is installed
in passenger front or rear seating positions.
Children 12 years old and under should be
properly restrained in a rear seating
position whenever possible. See Child
Safety (page 15).
29
Taurus (CPH) Canada/United States of America, enUSA, First Printing Seatbelts
Page 35 of 424

Then...
If...
The Belt-Minder feature will not activate.
You and the front seat passenger buckle
your safety belts before you switch the
ignition on or less than 1-2 minutes elapse after you switch the ignition on...
The Belt-Minder feature activates, the
safety belt warning light illuminates and a warning tone sounds for 6 seconds every
25 seconds, repeating for about 5 minutes or until you and the front seat passenger buckle your safety belts.
You or the front seat passenger do not
buckle your safety belts before your vehicle reaches at least 6 mph (9.7 km/h) and 1-2
minutes elapse after you switch the ignition on...
The Belt-Minder feature activates, the
safety belt warning light illuminates and a warning tone sounds for 6 seconds every
25 seconds, repeating for about 5 minutes or until you and the front seat passenger buckle your safety belts.
The safety belt for the driver or front
passenger is unbuckled for about 1 minute
while the vehicle is traveling at least 6 mph (9.7 km/h) and more than 1-2 minutes
elapse after you switch the ignition on...
Deactivating and Activating the
Belt-Minder Feature WARNING
While the system allows you to
deactivate it, this system is designed
to improve your chances of being
safely belted and surviving an accident.
We recommend you leave the system
activated for yourself and others who may
use the vehicle. Note:
The driver and front passenger
warnings switch on and off independently.
When you perform this procedure for one
seating position, do not buckle the other
position as this will terminate the process.
Note: If you are using MyKey, you cannot
disable Belt-Minder. Also, if the Belt-Minder
has been previously disabled, it will be
re-enabled during the use of MyKey. See
MyKey ™ (page 48). Read Steps 1 - 4 thoroughly before
proceeding with the programming
procedure.
Before following the procedure, make sure
that:
•
The parking brake is set.
• The transmission is in park (P).
• The ignition is off.
• The driver and front passenger safety
belts are unbuckled.
1. Switch the ignition on. Do not start the
vehicle.
2. Wait until the safety belt warning light turns off (about one minute). After
Step 2, wait an additional 5 seconds
before proceeding with Step 3. Once
you start Step 3, you must complete
the procedure within 20 seconds.
32
Taurus (CPH) Canada/United States of America, enUSA, First Printing Seatbelts
Page 85 of 424

•
It may take a short time for the needle
to reach full after leaving the gas
station. This is normal and depends
upon the slope of pavement at the gas
station.
• The fuel amount dispensed into the
tank is a little less or more than the
gauge indicated. This is normal and
depends upon the slope of pavement
at the gas station.
• If the gas station nozzle shuts off
before the tank is full, try a different
gas pump nozzle.
• There is a small reserve left in the tank
when the fuel gauge reaches empty.
Low Fuel Reminder
A low fuel reminder triggers when the
distance to empty reaches 75 miles (120
km), 50 miles (80 km), 25 miles (40 km),
10 miles (20 km) and 0 miles (0 km) .
Variations:
Note: The low fuel warning and
distance-to-empty warning can appear at
different fuel gauge positions depending on
fuel economy conditions. This variation is
normal.
WARNING LAMPS AND
INDICATORS
The following warning lamps and
indicators alert you to a vehicle condition
that may become serious. Some lamps
illuminate when you start your vehicle to
make sure they work. If any lamps remain
on after starting your vehicle, refer to the
respective system warning lamp for further
information.
Note: Some warning indicators appear in
the information display and function the
same as a warning lamp, but do not display
when you start your vehicle. Adaptive Cruise Control (If Equipped) The speed control system
indicator light changes color to
indicate what mode the system
is in. See Using Adaptive Cruise Control
(page
174).
On (white light): Illuminates when you
switch on the adaptive cruise control
system. Turns off when the speed control
system is turned off.
Engaged (green light): Illuminates when
you engage the adaptive cruise control
system. Turns off when you disengage the
speed control system.
Anti-Lock Braking System If it illuminates when you are
driving, this indicates a
malfunction. You continue to
have the normal braking system (without
ABS) unless the brake system warning
lamp is also illuminated. Have the system
checked by an authorized dealer.
Automatic High Beam Control It will illuminate when this
feature is on. See
Automatic
High Beam Control (page 72).
Battery If it illuminates while driving, it
indicates a malfunction. Switch
off all unnecessary electrical
equipment and have the system checked
by an authorized dealer immediately.
Blind Spot Monitor
(If Equipped) It illuminates when you switch
this feature off or in conjunction
with a message. See Blind Spot
Information System
(page 186).
82
Taurus (CPH) Canada/United States of America, enUSA, First Printing Instrument ClusterE144524 E151262
Page 86 of 424

Brake System
It illuminates when you engage
the parking brake with the
ignition on.
If it illuminates when you are driving, check
that the parking brake is not engaged. If
the parking brake is not engaged, this
indicates low brake fluid level or a brake
system malfunction. Have the system
checked immediately by an authorized
dealer. WARNING
Driving your vehicle with the warning
lamp on is dangerous. A significant
decrease in braking performance
may occur. It will take you longer to stop
your vehicle. Have your vehicle checked by
your authorized dealer immediately. Driving
extended distances with the parking brake
engaged can cause brake failure and the
risk of personal injury. Cruise Control (If Equipped)
It illuminates when you switch
this feature on.
Direction Indicator Illuminates when you switch on
the left or right direction
indicator or the hazard warning
flasher. If the indicators stay on or flash
faster, check for a burned out bulb. See
Changing a Bulb
(page 253).
Door Ajar Displays when the ignition is on
and any door is not completely
closed. Engine Coolant Temperature Illuminates when the engine
coolant temperature is high.
Stop the vehicle as soon as
possible, switch off the engine and let cool.
See
Engine Oil Check (page 239).
Engine Oil If it illuminates with the engine
running or when you are driving,
this indicates a malfunction.
Stop your vehicle as soon as it is safe to
do so and switch the engine off. Check the
engine oil level. See
Engine Oil Check
(page 239).
Note: Do not resume your journey if it
illuminates despite the level being correct.
Have the system checked by an authorized
dealer immediately.
Fasten Seatbelt It illuminates and a chime
sounds to remind you to fasten
your seatbelt. See
Seatbelt
Reminder (page 31).
Front Airbag If it fails to illuminate when you
start your vehicle, continues to
flash or remains on, it indicates
a malfunction. Have the system checked
by an authorized dealer.
Front Fog Lamps
(If Equipped) Lights when you switch the front
fog lamps on.
83
Taurus (CPH) Canada/United States of America, enUSA, First Printing Instrument ClusterE144522 E71340
Page 88 of 424

The service engine soon indicator light
illuminates when you first switch on the
ignition before engine start to check the
bulb and to indicate whether the vehicle
is ready for Inspection/Maintenance (I/M)
testing.
Normally, the service engine soon light
stays on until you crank the engine, then
turns itself off if no malfunctions are
present. However, if after 15 seconds the
service engine soon light blinks eight times,
it means that the vehicle is not ready for
I/M testing. See Emission Control
System (page 146).
Stability Control It flashes when the system is
active. If it remains illuminated
or does not illuminate when you
switch the ignition on, this indicates a
malfunction. During a malfunction the
system switches off. Have the system
checked by an authorized dealer
immediately. See
Using Stability
Control (page 163).
Stability Control Off It illuminates when you switch
the system off. It goes out when
you switch the system back on
or when you switch the ignition off. See
Using Stability Control
(page 163).
AUDIBLE WARNINGS AND
INDICATORS
Key in Ignition Warning Chime
Sounds when you leave the key in the
ignition and the driver ’s door is opened. Keyless Warning Alert
Sounds the horn twice when you exit your
vehicle with the intelligent access key, after
the last door is closed and your keyless
vehicle is in RUN, indicating your vehicle is
still on.
Headlamps On Warning Chime
Sounds when the headlamps or parking
lamps are on, the ignition is off (the key is
not in the ignition) and the driver
’s door is
opened.
Parking Brake On Warning Chime
Sounds when you leave the parking brake
on and drive your vehicle. If the warning
chime remains on after you release the
parking brake, have the system checked
by your authorized dealer immediately.
85
Taurus (CPH) Canada/United States of America, enUSA, First Printing Instrument ClusterE138639
Page 138 of 424

Ignition Modes
The keyless starting system has three
modes:
Off: Turns the ignition off.
• Without applying the brake pedal,
press and release the button once
when the ignition is in the on mode, or
when the engine is running but the
vehicle is not moving.
On:
All electrical circuits are operational
and the warning lamps and indicators
illuminate.
• Without applying the brake pedal,
press and release the button once.
Note: You may have to press the push
button ignition switch twice to switch the
ignition on.
Start:
Starts the engine.
• Press the brake pedal, and then press
the button for any length of time. An
indicator light on the button illuminates
when then ignition is on and when the
engine starts. STARTING A GASOLINE
ENGINE
When you start the engine, the idle speed
increases. This helps to warm up the
engine. If the engine idle speed does not
slow down automatically, have your
vehicle checked by an authorized dealer.
Note:
You can crank the engine for a total
of 60 seconds without the engine starting
before the starting system temporarily
disables. The 60 seconds does not have to
be all at once. For example, if you crank the
engine three times for 20 seconds each
time, without the engine starting, you
reached the 60-second time limit. A
message appears in the information display
alerting you that you exceeded the cranking
time. You cannot attempt to start the
engine for at least 15 minutes. After 15
minutes, you are limited to a 15-second
engine cranking time. You need to wait 60
minutes before you can crank the engine for
60 seconds again.
Before starting your vehicle, check the
following:
• Make sure all occupants have fastened
their safety belts.
• Make sure the headlamps and
electrical accessories are off.
• Make sure the parking brake is on.
• Make sure the transmission is in park
(P).
• Switch the ignition on. For vehicles with
a keyless ignition, see the following
instructions.
Vehicles with an Ignition Key
Note: Do not touch the accelerator pedal.
1. Fully depress the brake pedal.
2. Turn the key to the start position to start the engine.
135
Taurus (CPH) Canada/United States of America, enUSA, First Printing Starting and Stopping the EngineE191075
Page 154 of 424

Use the brake shift interlock lever to move
the gearshift lever from the park position
in the event of an electrical malfunction or
if your vehicle has a dead battery.
Apply the parking brake and turn the
ignition off before performing this
procedure.
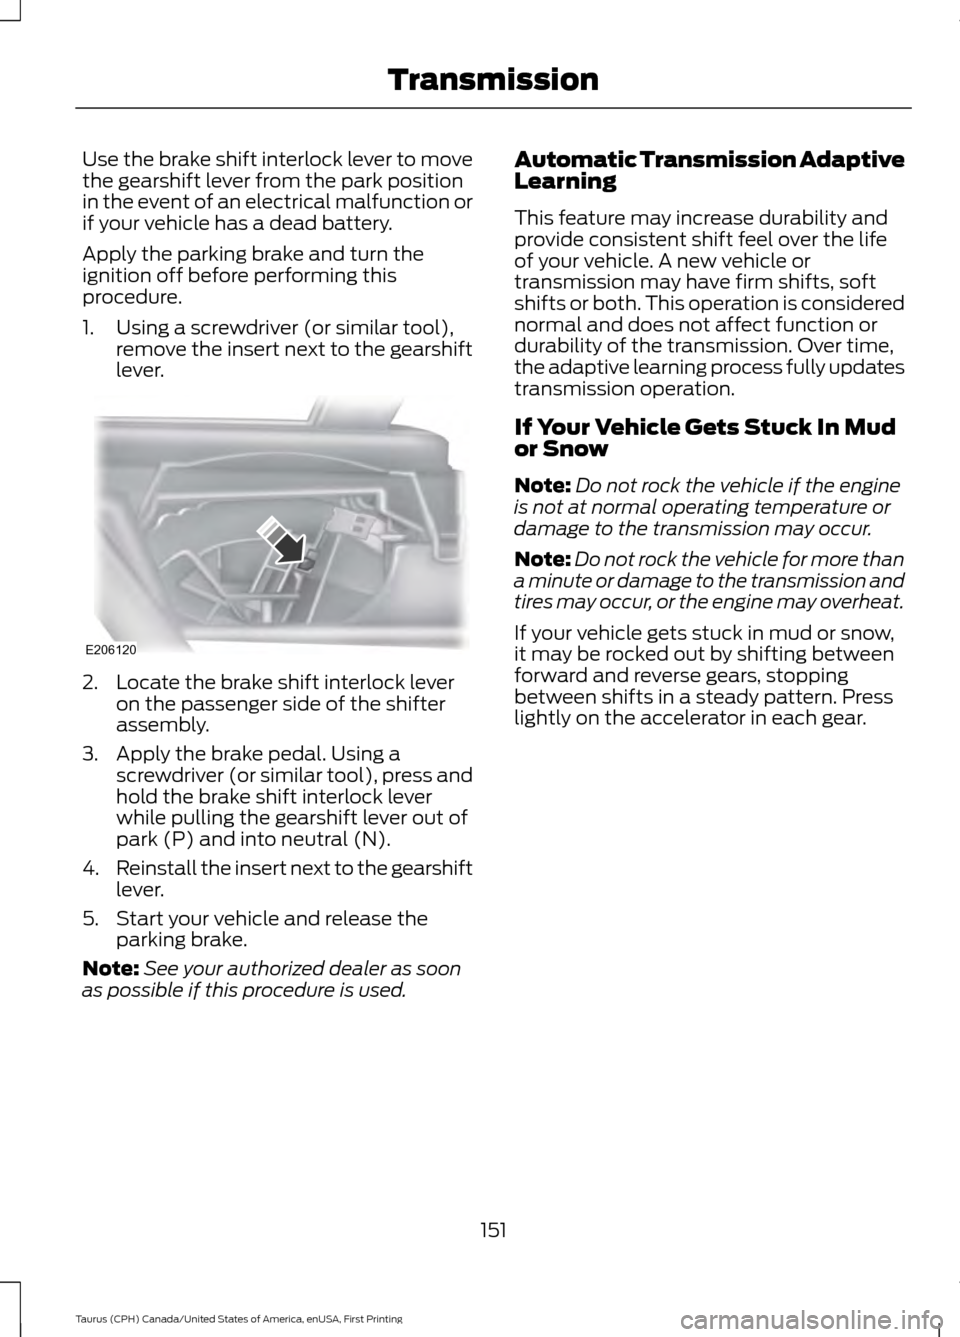
1. Using a screwdriver (or similar tool),
remove the insert next to the gearshift
lever. 2. Locate the brake shift interlock lever
on the passenger side of the shifter
assembly.
3. Apply the brake pedal. Using a screwdriver (or similar tool), press and
hold the brake shift interlock lever
while pulling the gearshift lever out of
park (P) and into neutral (N).
4. Reinstall the insert next to the gearshift
lever.
5. Start your vehicle and release the parking brake.
Note: See your authorized dealer as soon
as possible if this procedure is used. Automatic Transmission Adaptive
Learning
This feature may increase durability and
provide consistent shift feel over the life
of your vehicle. A new vehicle or
transmission may have firm shifts, soft
shifts or both. This operation is considered
normal and does not affect function or
durability of the transmission. Over time,
the adaptive learning process fully updates
transmission operation.
If Your Vehicle Gets Stuck In Mud
or Snow
Note:
Do not rock the vehicle if the engine
is not at normal operating temperature or
damage to the transmission may occur.
Note: Do not rock the vehicle for more than
a minute or damage to the transmission and
tires may occur, or the engine may overheat.
If your vehicle gets stuck in mud or snow,
it may be rocked out by shifting between
forward and reverse gears, stopping
between shifts in a steady pattern. Press
lightly on the accelerator in each gear.
151
Taurus (CPH) Canada/United States of America, enUSA, First Printing TransmissionE206120