2016 FORD TAURUS turn signal
[x] Cancel search: turn signalPage 178 of 424

The current gap setting and SET also
appears in the instrument cluster.
Setting the Adaptive Cruise Speed
1. Drive to desired speed.
2. Press and release
Set+ or Set-.
3. Take your foot off the accelerator pedal.
4. The information display will show a green indicator light, current gap
setting and desired set speed. 5. A vehicle graphic illuminates if there is
a vehicle detected in front of you.
Note: When adaptive cruise control is
active, the speedometer may vary slightly
from the set speed displayed in the
information display. Following a Vehicle WARNINGS
When following a vehicle in front of
you, your vehicle will not decelerate
automatically to a stop, nor will your
vehicle always decelerate quickly enough
to avoid a crash without driver intervention.
Always apply the brakes when necessary.
Failing to do so may result in a crash,
serious injury or death. Adaptive cruise control only warns
of vehicles detected by the radar
sensor. In some cases there may be
no warning or a delayed warning. You
should always apply the brakes when
necessary. Failing to do so may result in a
crash, serious injury or death. Note:
The brakes may emit a sound when
modulated by the adaptive cruise control
system.
When a vehicle ahead of you enters the
same lane or a slower vehicle is ahead in
the same lane, the vehicle speed adjusts
to maintain a preset gap distance. The
distance setting is adjustable.
The lead vehicle graphic will illuminate.
To help you pass a vehicle in front of you,
the adaptive cruise control system may
provide a small temporary acceleration
when you switch on your left turn signal
while following a lead car.
Your vehicle maintains a consistent gap
from the vehicle ahead until:
• the vehicle in front of you accelerates
to a speed above the set speed
• the vehicle in front of you moves out of
your lane or out of view
• the vehicle speed falls below 16 mph
(26 km/h)
• a new gap distance is set.
175
Taurus (CPH) Canada/United States of America, enUSA, First Printing Cruise ControlE173594 E173595
Page 187 of 424

Note:
The alert and aid diagrams illustrate
general zone coverage. They do not provide
exact zone parameters.
Intensity (if equipped): This setting
affects the intensity of the steering wheel
vibration used for the alert and alert + aid
modes. This setting does not affect the aid
mode.
• Low
• Normal
• High
System Display When you switch on the system, an
overhead graphic of a vehicle with lane
markings will display in the information
display. If you select aid mode when you
switch on the system, a separate white
icon will also appear or in some vehicles
arrows will display with the lane markings.
When you switch off the system, the lane
marking graphics will not display.
While the system is on, the color of the
lane markings will change to indicate the
system status. Gray: Indicates that the system is
temporarily unable to provide a warning
or intervention on the indicated side(s).
This may be because:
•
Your vehicle is under the activation
speed.
• The turn indicator is active.
• Your vehicle is in a dynamic maneuver.
• The road has no or poor lane markings
in the camera field-of-view.
• The camera is obscured or unable to
detect the lane markings due to
environmental conditions (significant
sun angles, shadows, snow, heavy rain
or fog), traffic conditions (following a
large vehicle that is blocking or
shadowing the lane), or vehicle
conditions (poor headlamp
illumination).
See
Troubleshooting for additional
information.
Green: Indicates that the system is
available or ready to provide a warning or
intervention, on the indicated side(s).
Yellow: Indicates that the system is
providing or has just provided a lane
keeping aid intervention.
Red: Indicates that the system is providing
or has just provided a lane keeping alert
warning.
The system can be temporarily suppressed
at any time by the following:
• Quick braking.
• Fast acceleration.
• Using the turn signal indicator.
• Evasive steering maneuver.
184
Taurus (CPH) Canada/United States of America, enUSA, First Printing Driving AidsE151660
Page 208 of 424

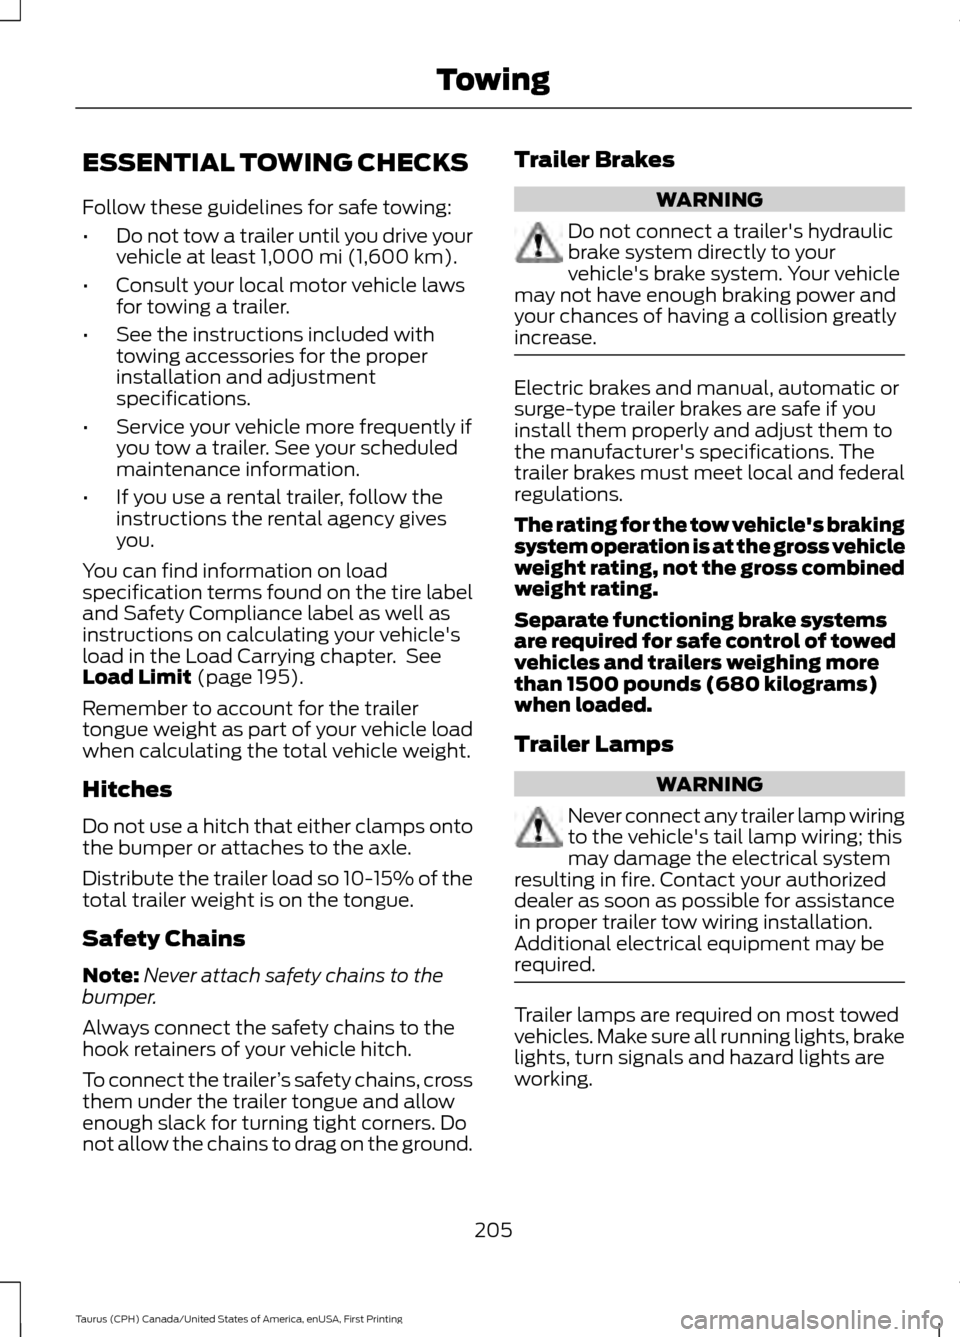
ESSENTIAL TOWING CHECKS
Follow these guidelines for safe towing:
•
Do not tow a trailer until you drive your
vehicle at least 1,000 mi (1,600 km).
• Consult your local motor vehicle laws
for towing a trailer.
• See the instructions included with
towing accessories for the proper
installation and adjustment
specifications.
• Service your vehicle more frequently if
you tow a trailer. See your scheduled
maintenance information.
• If you use a rental trailer, follow the
instructions the rental agency gives
you.
You can find information on load
specification terms found on the tire label
and Safety Compliance label as well as
instructions on calculating your vehicle's
load in the Load Carrying chapter. See
Load Limit
(page 195).
Remember to account for the trailer
tongue weight as part of your vehicle load
when calculating the total vehicle weight.
Hitches
Do not use a hitch that either clamps onto
the bumper or attaches to the axle.
Distribute the trailer load so 10-15% of the
total trailer weight is on the tongue.
Safety Chains
Note: Never attach safety chains to the
bumper.
Always connect the safety chains to the
hook retainers of your vehicle hitch.
To connect the trailer ’s safety chains, cross
them under the trailer tongue and allow
enough slack for turning tight corners. Do
not allow the chains to drag on the ground. Trailer Brakes WARNING
Do not connect a trailer's hydraulic
brake system directly to your
vehicle's brake system. Your vehicle
may not have enough braking power and
your chances of having a collision greatly
increase. Electric brakes and manual, automatic or
surge-type trailer brakes are safe if you
install them properly and adjust them to
the manufacturer's specifications. The
trailer brakes must meet local and federal
regulations.
The rating for the tow vehicle's braking
system operation is at the gross vehicle
weight rating, not the gross combined
weight rating.
Separate functioning brake systems
are required for safe control of towed
vehicles and trailers weighing more
than 1500 pounds (680 kilograms)
when loaded.
Trailer Lamps
WARNING
Never connect any trailer lamp wiring
to the vehicle's tail lamp wiring; this
may damage the electrical system
resulting in fire. Contact your authorized
dealer as soon as possible for assistance
in proper trailer tow wiring installation.
Additional electrical equipment may be
required. Trailer lamps are required on most towed
vehicles. Make sure all running lights, brake
lights, turn signals and hazard lights are
working.
205
Taurus (CPH) Canada/United States of America, enUSA, First Printing Towing
Page 257 of 424

2. Remove the screws that secure the
lamp assembly. 3. Remove the bulb.
BULB SPECIFICATION CHART
The specified replacement bulbs are in the
chart below. Headlamp bulbs must be
marked with an authorized D.O.T.
(Department of Transportation) for North
America to affirm lamp performance, light
brightness and pattern and safe visibility.
The correct bulbs will not damage the
lamp assembly or void the lamp assembly
warranty and will provide quality bulb burn
time.
Trade number
Function
D3S
* Headlamp (high intensity discharge) Low
and High
LED
* Sidemarker - front
LED
* Park lamp - front
7444NA
* Turn lamp - front
LED
Signal indicator mirror lamp
LED
Approach lamp
LED
* Tail and brake lamp
LED
* Turn lamp - rear
LED
* Backup lamp
254
Taurus (CPH) Canada/United States of America, enUSA, First Printing MaintenanceE178598 E178599
Page 288 of 424

Please note that the TPMS is not a
substitute for proper tire maintenance, and
it is the driver
’s responsibility to maintain
correct tire pressure, even if under-inflation
has not reached the level to trigger
illumination of the TPMS low tire pressure
telltale.
Your vehicle has also been equipped with
a TPMS malfunction indicator to indicate
when the system is not operating properly.
The TPMS malfunction indicator is
combined with the low tire pressure
telltale. When the system detects a
malfunction, the telltale will flash for
approximately one minute and then remain
continuously illuminated. This sequence
will continue upon subsequent vehicle
start-ups as long as the malfunction exists.
When the malfunction indicator is
illuminated, the system may not be able
to detect or signal low tire pressure as
intended. TPMS malfunctions may occur
for a variety of reasons, including the
installation of replacement or alternate
tires or wheels on the vehicle that prevent
the TPMS from functioning properly.
Always check the TPMS malfunction
telltale after replacing one or more tires or
wheels on your vehicle to ensure that the
replacement or alternate tires and wheels
allow the TPMS to continue to function
properly.
The tire pressure monitoring system
complies with part 15 of the FCC rules and
with RSS-210 of Industry Canada.
Operation is subject to the following two
conditions: (1) This device may not cause
harmful interference, and (2) This device
must accept any interference received,
including interference that may cause
undesired operation. Changing Tires With a Tire
Pressure Monitoring System
Note:
Each road tire is equipped with a tire
pressure sensor located inside the wheel
and tire assembly cavity. The pressure
sensor is attached to the valve stem. The
pressure sensor is covered by the tire and is
not visible unless the tire is removed. Take
care when changing the tire to avoid
damaging the sensor
You should always have your tires serviced
by an authorized dealer.
Check the tire pressure periodically (at
least monthly) using an accurate tire
gauge. See Inflating Your Tires in this
chapter.
Understanding Your Tire Pressure
Monitoring System
The tire pressure monitoring system
measures pressure in your four road tires
and sends the tire pressure readings to
your vehicle. The low tire pressure warning
light will turn on if the tire pressure is
significantly low. Once the light is
illuminated, your tires are under-inflated
and need to be inflated to the
manufacturer ’s recommended tire
pressure. Even if the light turns on and a
short time later turns off, your tire pressure
still needs to be checked.
285
Taurus (CPH) Canada/United States of America, enUSA, First Printing Wheels and TiresE142549
Page 324 of 424

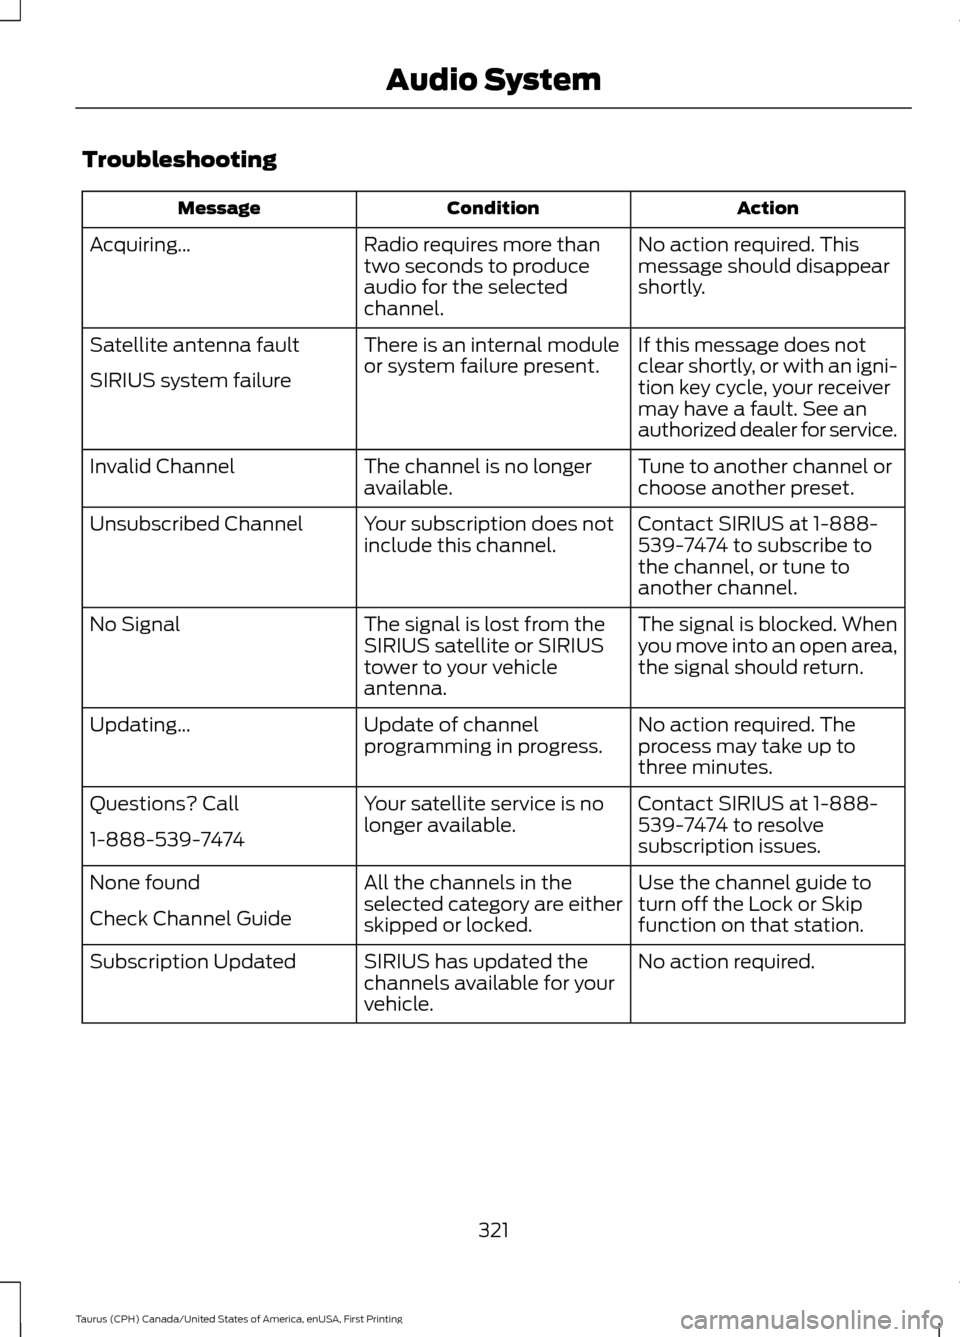
Troubleshooting
Action
Condition
Message
No action required. This
message should disappear
shortly.
Radio requires more than
two seconds to produce
audio for the selected
channel.
Acquiring\b
If this message does not
clear shortly, or with an igni-
tion key cycle, your receiver
may have a fault. See an
authorized dealer for service.
There is an internal module
or system failure present.
Satellite antenna fault
SIRIUS system failure
Tune to another channel or
choose another preset.
The channel is no longer
available.
Invalid Channel
Contact SIRIUS at 1-888-
539-7474 to subscribe to
the channel, or tune to
another channel.
Your subscription does not
include this channel.
Unsubscribed Channel
The signal is blocked. When
you move into an open area,
the signal should return.
The signal is lost from the
SIRIUS satellite or SIRIUS
tower to your vehicle
antenna.
No Signal
No action required. The
process may take up to
three minutes.
Update of channel
programming in progress.
Updating\b
Contact SIRIUS at 1-888-
539-7474 to resolve
subscription issues.
Your satellite service is no
longer available.
Questions? Call
1-888-539-7474
Use the channel guide to
turn off the Lock or Skip
function on that station.
All the channels in the
selected category are either
skipped or locked.
None found
Check Channel Guide
No action required.
SIRIUS has updated the
channels available for your
vehicle.
Subscription Updated
321
Taurus (CPH) Canada/United States of America, enUSA, First Printing Audio System
Page 341 of 424

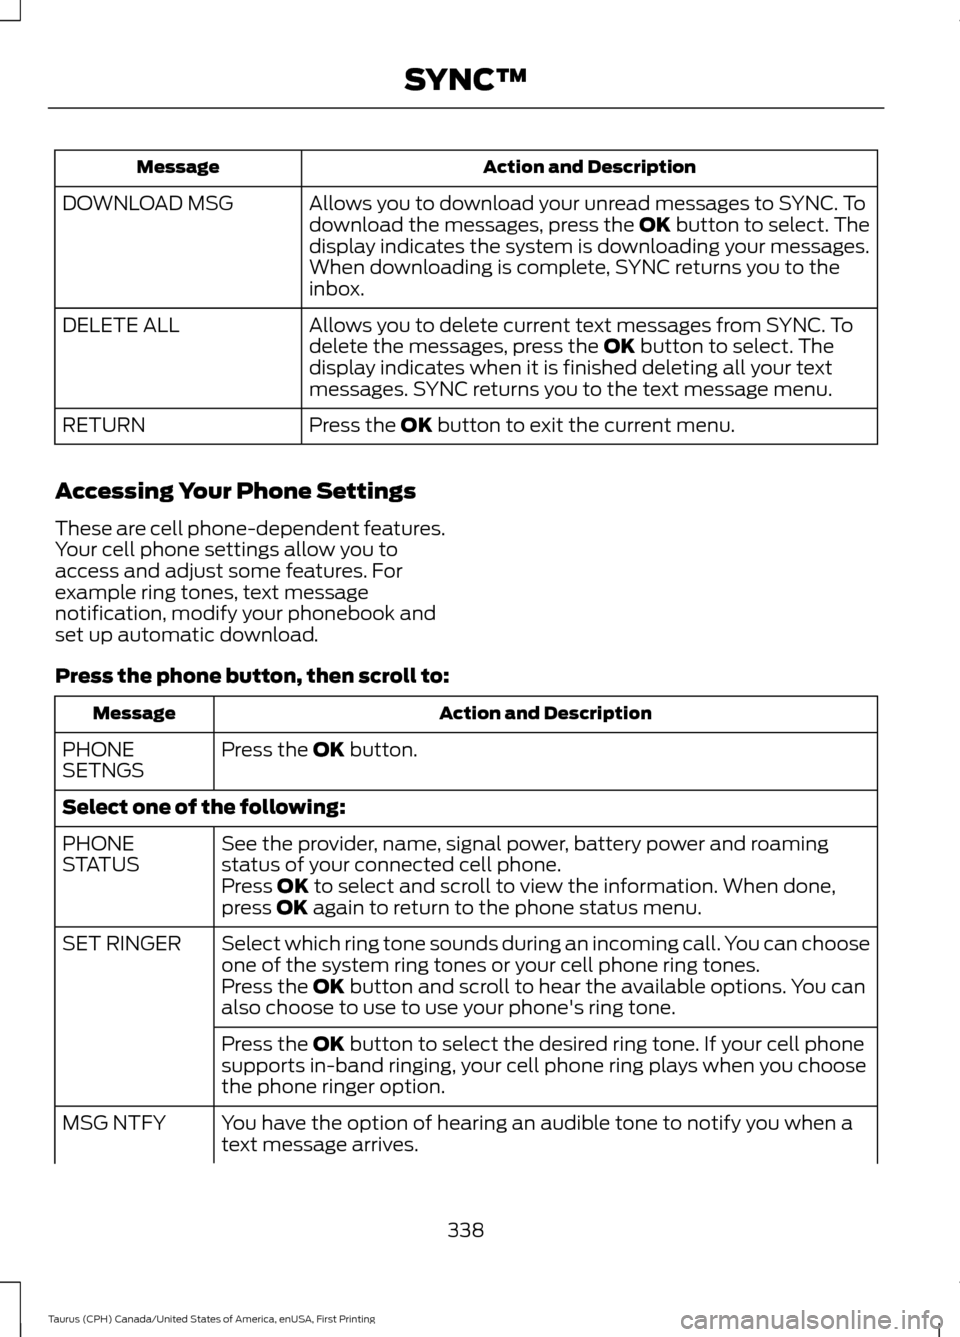
Action and Description
Message
Allows you to download your unread messages to SYNC. To
download the messages, press the OK button to select. The
display indicates the system is downloading your messages.
When downloading is complete, SYNC returns you to the
inbox.
DOWNLOAD MSG
Allows you to delete current text messages from SYNC. To
delete the messages, press the
OK button to select. The
display indicates when it is finished deleting all your text
messages. SYNC returns you to the text message menu.
DELETE ALL
Press the
OK button to exit the current menu.
RETURN
Accessing Your Phone Settings
These are cell phone-dependent features.
Your cell phone settings allow you to
access and adjust some features. For
example ring tones, text message
notification, modify your phonebook and
set up automatic download.
Press the phone button, then scroll to: Action and Description
Message
Press the
OK button.
PHONE
SETNGS
Select one of the following:
See the provider, name, signal power, battery power and roaming
status of your connected cell phone.
PHONE
STATUS
Press
OK to select and scroll to view the information. When done,
press OK again to return to the phone status menu.
Select which ring tone sounds during an incoming call. You can choose
one of the system ring tones or your cell phone ring tones.
SET RINGER
Press the
OK button and scroll to hear the available options. You can
also choose to use to use your phone's ring tone.
Press the
OK button to select the desired ring tone. If your cell phone
supports in-band ringing, your cell phone ring plays when you choose
the phone ringer option.
You have the option of hearing an audible tone to notify you when a
text message arrives.
MSG NTFY
338
Taurus (CPH) Canada/United States of America, enUSA, First Printing SYNC™
Page 347 of 424

•
A connected Bluetooth-enabled phone
must have adequate network coverage,
battery power and signal strength.
• The vehicle must have battery power
and be located in the U.S., Canada or
in a territory in which 911 is the
emergency number.
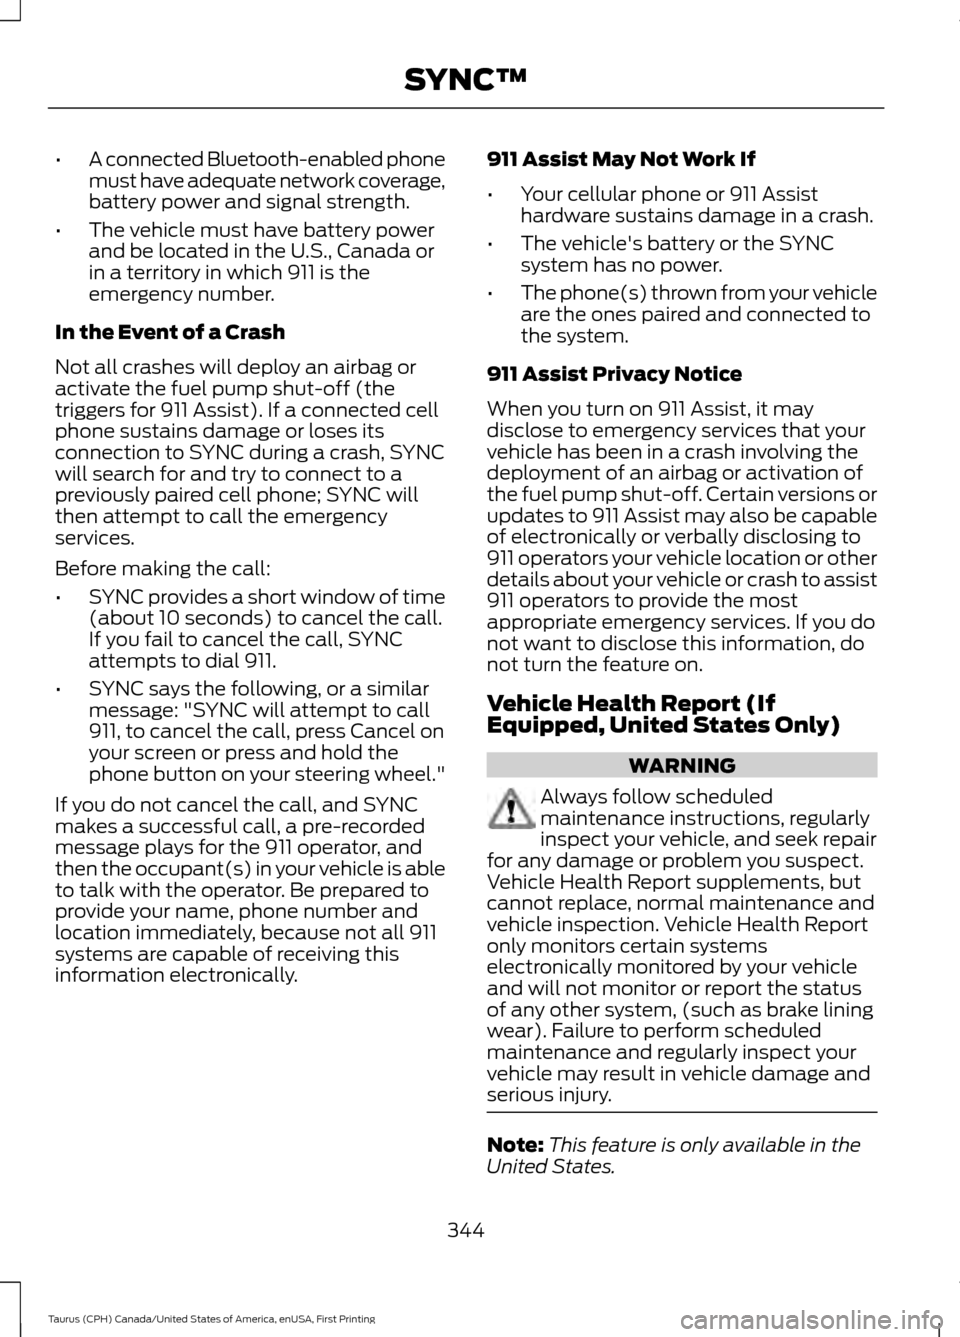
In the Event of a Crash
Not all crashes will deploy an airbag or
activate the fuel pump shut-off (the
triggers for 911 Assist). If a connected cell
phone sustains damage or loses its
connection to SYNC during a crash, SYNC
will search for and try to connect to a
previously paired cell phone; SYNC will
then attempt to call the emergency
services.
Before making the call:
• SYNC provides a short window of time
(about 10 seconds) to cancel the call.
If you fail to cancel the call, SYNC
attempts to dial 911.
• SYNC says the following, or a similar
message: "SYNC will attempt to call
911, to cancel the call, press Cancel on
your screen or press and hold the
phone button on your steering wheel."
If you do not cancel the call, and SYNC
makes a successful call, a pre-recorded
message plays for the 911 operator, and
then the occupant(s) in your vehicle is able
to talk with the operator. Be prepared to
provide your name, phone number and
location immediately, because not all 911
systems are capable of receiving this
information electronically. 911 Assist May Not Work If
•
Your cellular phone or 911 Assist
hardware sustains damage in a crash.
• The vehicle's battery or the SYNC
system has no power.
• The phone(s) thrown from your vehicle
are the ones paired and connected to
the system.
911 Assist Privacy Notice
When you turn on 911 Assist, it may
disclose to emergency services that your
vehicle has been in a crash involving the
deployment of an airbag or activation of
the fuel pump shut-off. Certain versions or
updates to 911 Assist may also be capable
of electronically or verbally disclosing to
911 operators your vehicle location or other
details about your vehicle or crash to assist
911 operators to provide the most
appropriate emergency services. If you do
not want to disclose this information, do
not turn the feature on.
Vehicle Health Report (If
Equipped, United States Only) WARNING
Always follow scheduled
maintenance instructions, regularly
inspect your vehicle, and seek repair
for any damage or problem you suspect.
Vehicle Health Report supplements, but
cannot replace, normal maintenance and
vehicle inspection. Vehicle Health Report
only monitors certain systems
electronically monitored by your vehicle
and will not monitor or report the status
of any other system, (such as brake lining
wear). Failure to perform scheduled
maintenance and regularly inspect your
vehicle may result in vehicle damage and
serious injury. Note:
This feature is only available in the
United States.
344
Taurus (CPH) Canada/United States of America, enUSA, First Printing SYNC™