2016 FORD TAURUS ECU
[x] Cancel search: ECUPage 269 of 424
•
When inflating a tire or other objects,
use the black air hose only. Do not use
the transparent hose which is designed
for sealant application only.
• Operating the kit could cause an
electrical disturbance in radio, CD, and
DVD player operation.
What to do when a Tire Is
Punctured
A tire puncture within the tire tread area
can be repaired in two stages with the kit.
• In the first stage, the tire will be
reinflated with a sealing compound
and air. After the tire has been
reinflated, you will need to drive the
vehicle a short distance 4 mi (6 km) to
distribute the sealant in the tire.
• In the second stage, you will need to
check the tire pressure and adjust, if
necessary, to the vehicle tire inflation
pressure.
First Stage: Reinflating the Tire
with Sealing Compound and Air WARNINGS
Do not stand directly over the kit
while inflating the tire. If you notice
any unusual bulges or deformations
in the tire sidewall during inflation, stop
and call roadside assistance. If the tire does not inflate to the
recommended tire pressure within
15 minutes, stop and call roadside
assistance. Preparation: Park the vehicle in a safe, level
and secure area, away from moving traffic.
Turn the hazard lights on. Apply the parking
brake and turn the engine off. Inspect the
flat tire for visible damage. Sealant compound contains latex. To
avoid any allergic reactions, use the
non-latex gloves located in the accessory
box on the underside of the kit housing.
Do not remove any foreign object that has
pierced the tire. If a puncture is located in
the tire sidewall, stop and call roadside
assistance.
1. Remove the valve cap from the tire
valve.
2. Unwrap the clear tube from the compressor housing.
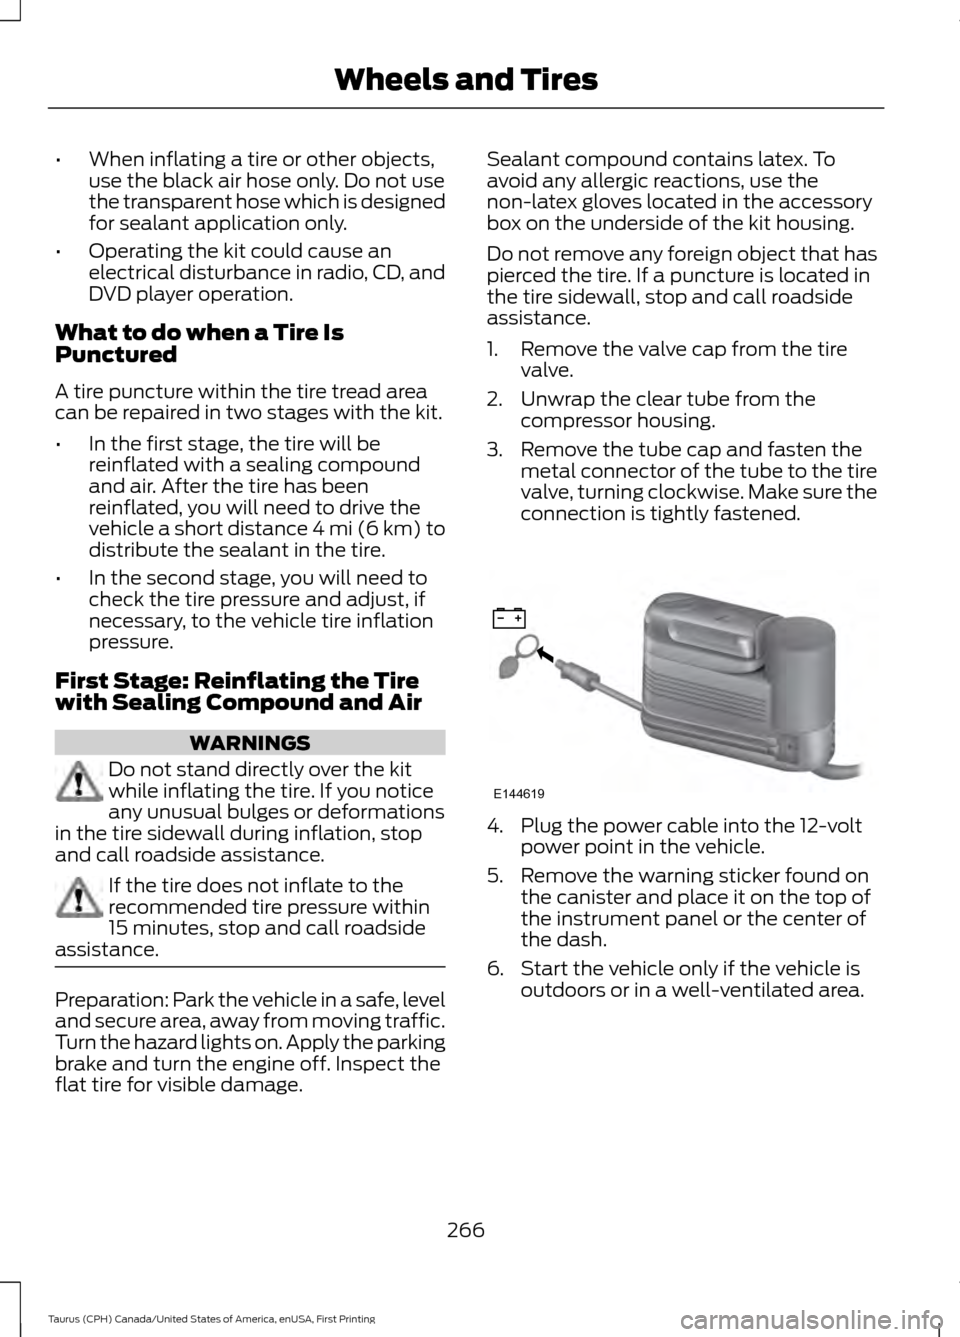
3. Remove the tube cap and fasten the metal connector of the tube to the tire
valve, turning clockwise. Make sure the
connection is tightly fastened. 4. Plug the power cable into the 12-volt
power point in the vehicle.
5. Remove the warning sticker found on the canister and place it on the top of
the instrument panel or the center of
the dash.
6. Start the vehicle only if the vehicle is outdoors or in a well-ventilated area.
266
Taurus (CPH) Canada/United States of America, enUSA, First Printing Wheels and TiresE144619
Page 287 of 424
Note:
The suspension insulation and
bumpers will help prevent vehicle damage.
Do not remove these components from your
vehicle when using snow tires and chains.
The tires on your vehicle have all-weather
treads to provide traction in rain and snow.
However, in some climates, you may need
to use snow tires and cables. If you need
to use cables, it is recommended that steel
wheels (of the same size and
specifications) be used, as cables may chip
aluminum wheels.
Follow these guidelines when using snow
tires and chains:
• If possible, avoid fully loading your
vehicle.
• Use only SAE Class S snow chains,
snow cables or equivalent on the front
axle for P235/55R18 equipped vehicles.
The use of snow chains, snow cables
or other traction assist devices that are
larger than SAE Class S may cause
damage to your vehicle ’s wheel house,
suspension and/or body.
• Do not install tire chains, cables, or
optional traction devices on the rear
tires. This could cause damage to the
vehicle ’s wheel house or body.
• Install cable chains securely, verifying
that the cables do not touch any wiring,
brake lines or fuel lines.
• Do not exceed 30 mph (48 km/h) with
tire cables on your vehicle.
• Drive cautiously. If you hear the cables
rub or bang against your vehicle, stop
and retighten the cables. If this does
not work, remove the cables to prevent
damage to your vehicle.
• Remove the tire cables when they are
no longer needed. Do not use tire
cables on dry roads. TIRE PRESSURE MONITORING
SYSTEM WARNING
The tire pressure monitoring system
is not a substitute for manually
checking tire pressure. The tire
pressure should be checked periodically
(at least monthly) using a tire gauge, see
Inflating your tires in this chapter. Failure
to properly maintain your tire pressure
could increase the risk of tire failure, loss
of control, vehicle rollover and personal
injury. Each tire, including the spare (if
provided), should be checked
monthly when cold and inflated
to the inflation pressure recommended by
the vehicle manufacturer on the vehicle
placard or tire inflation pressure label. (If
your vehicle has tires of a different size
than the size indicated on the vehicle
placard or tire inflation pressure label, you
should determine the proper tire inflation
pressure for those tires.)
As an added safety feature, your vehicle
has been equipped with a Tire Pressure
Monitoring System (TPMS) that
illuminates a low tire pressure telltale
when one or more of your tires is
significantly under-inflated. Accordingly,
when the low tire pressure telltale
illuminates, you should stop and check
your tires as soon as possible, and inflate
them to the proper pressure. Driving on a
significantly under-inflated tire causes the
tire to overheat and can lead to tire failure.
Under-inflation also reduces fuel efficiency
and tire tread life, and may affect the
vehicle ’s handling and stopping ability.
284
Taurus (CPH) Canada/United States of America, enUSA, First Printing Wheels and Tires
Page 293 of 424
WARNINGS
Never get underneath a vehicle that
is supported only by a jack. If the
vehicle slips off the jack, you or
someone else could be seriously injured. Do not attempt to change a tire on
the side of the vehicle close to
moving traffic. Pull far enough off the
road to avoid the danger of being hit when
operating the jack or changing the wheel. Always use the jack provided as
original equipment with your vehicle.
If using a jack other than the one
provided as original equipment with your
vehicle, make sure the jack capacity is
adequate for the vehicle weight, including
any vehicle cargo or modifications. To reduce the risk of possible serious
injury or death, do not remove the full
size spare tire from the factory
secured location. This location is necessary
to achieve police-rated 75 mph rear impact
crash-test performance. Removal
increases the risk of fuel leak in high-speed
rear impacts. Note:
Passengers should not remain in your
vehicle when the vehicle is being jacked.
Note: Jack at the specified locations to
avoid damage to the vehicle.
1. Park on a level surface, set the parking
brake and activate the hazard flashers.
2. Place the transmission in park (P) and
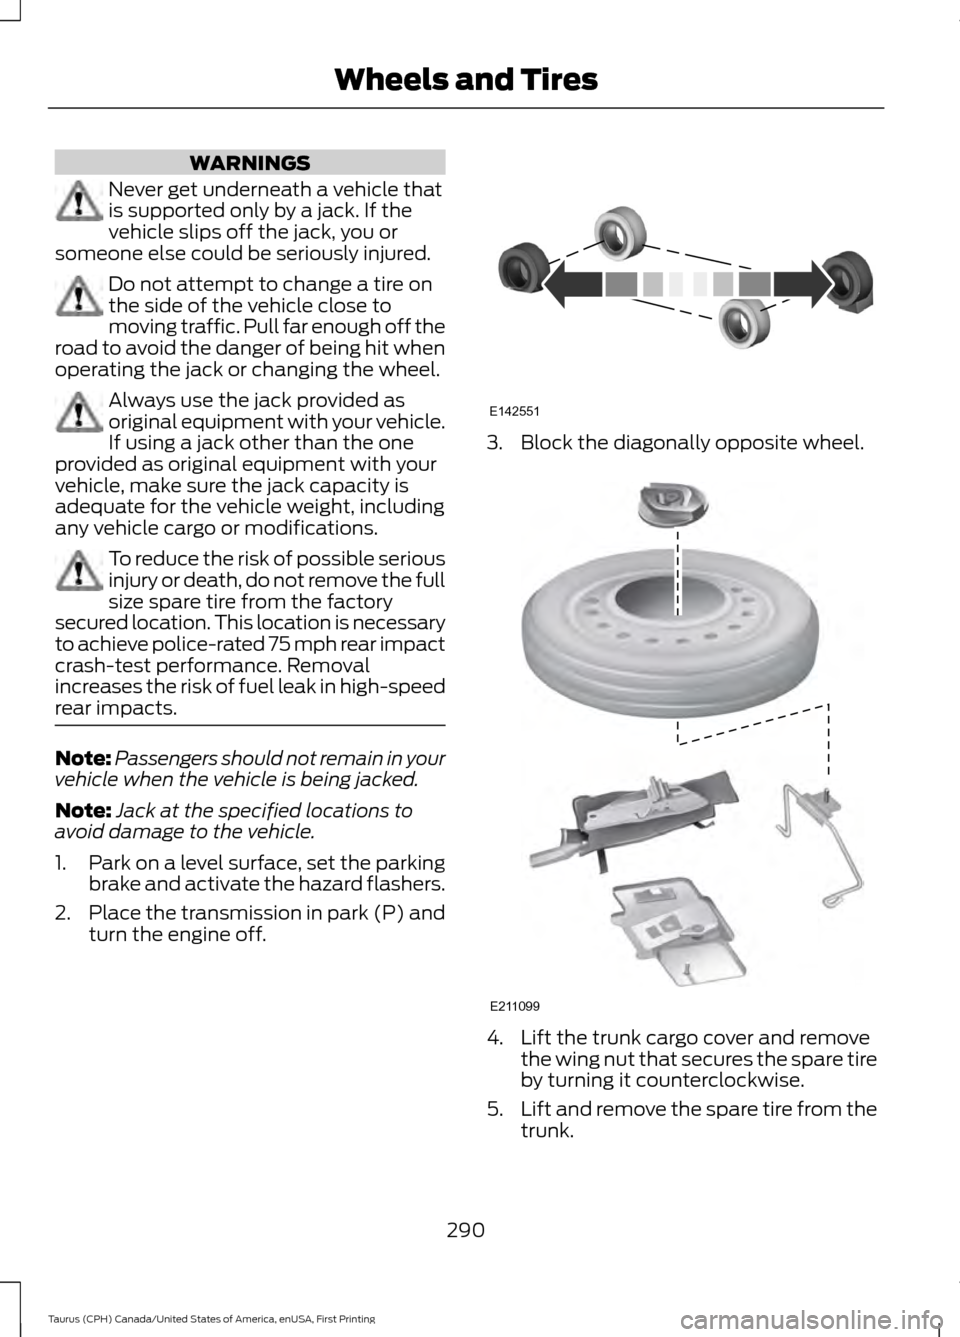
turn the engine off. 3. Block the diagonally opposite wheel.
4. Lift the trunk cargo cover and remove
the wing nut that secures the spare tire
by turning it counterclockwise.
5. Lift and remove the spare tire from the
trunk.
290
Taurus (CPH) Canada/United States of America, enUSA, First Printing Wheels and TiresE142551 E211099
Page 294 of 424

6. Remove the second wing nut that
secures the jack retention bracket by
turning it counterclockwise, then
remove the jack kit from your vehicle.
7. Remove the jack and the wrench from the felt bag. Fold down the wrench
socket used to loosen the lug nuts and
to operate the jack.
8. Loosen each wheel lug nut one-half turn counterclockwise, but do not
remove them until the wheel is raised
off the ground. 9. The vehicle jacking points are shown
here, and are depicted on the warning
label on the jack. Small arrow-shaped
marks on the sills show the location of
the jacking points. 10. Raise the wheel by turning the jack
handle clockwise.
11. Remove the lug nuts with the lug wrench. 12. Replace the flat tire with the spare
tire, making sure the valve stem is
facing outward. Reinstall the lug nuts
until the wheel is snug against the
hub. Do not fully tighten the lug nuts
until the wheel has been lowered.
13. Lower the wheel by turning the jack handle counterclockwise. 14.
Remove the jack and fully tighten the
lug nuts in the order shown. See
Technical Specifications (page
293).
Stowing the jack and flat tire
1. Remove the extension bolt from the exterior pocket of the felt bag.
291
Taurus (CPH) Canada/United States of America, enUSA, First Printing Wheels and TiresE145908 E201156 12
3
4
5
E75442
Page 295 of 424
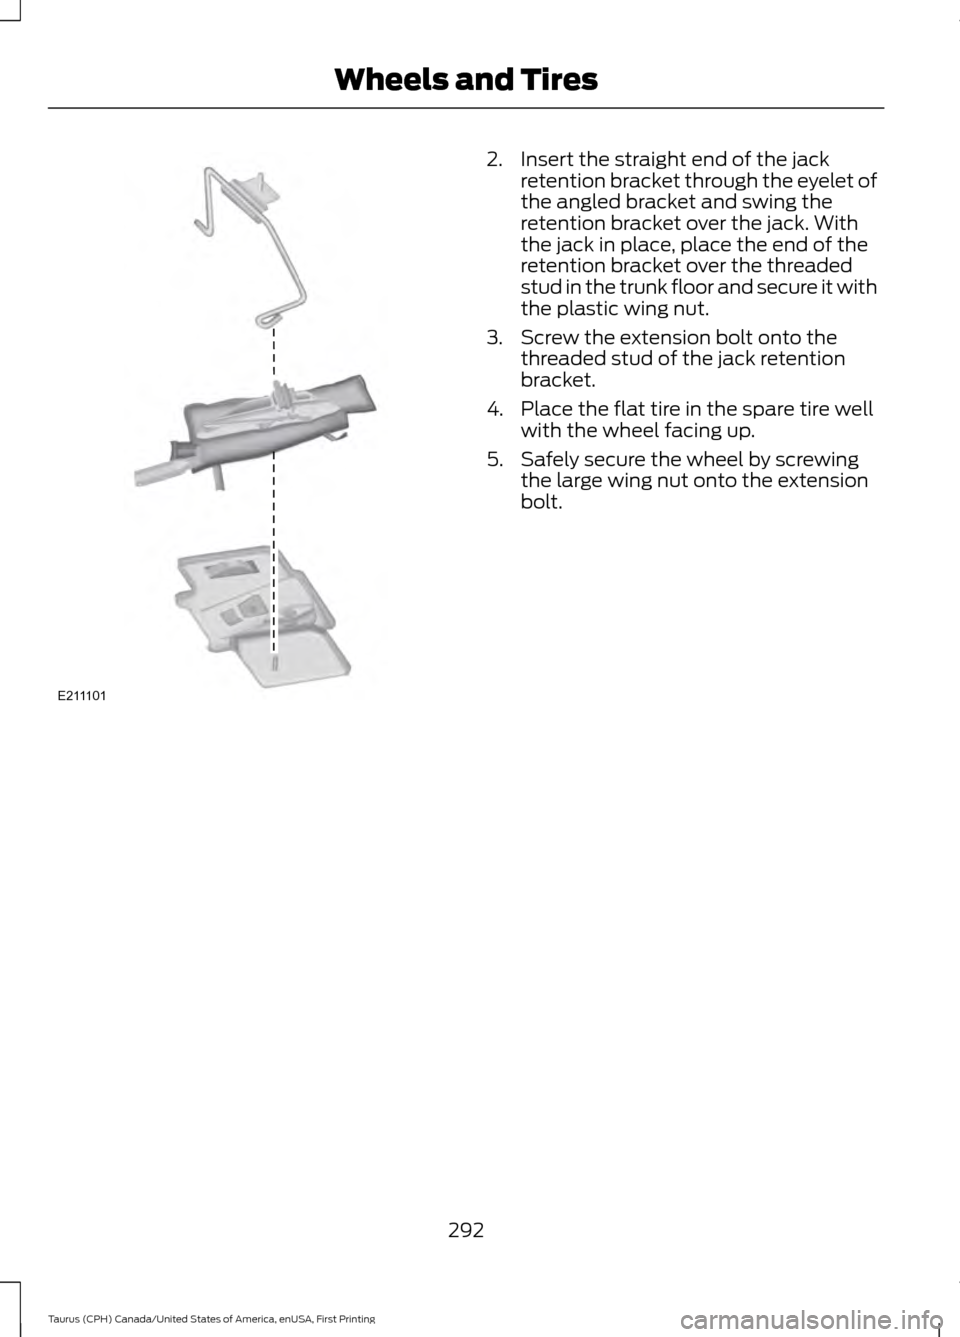
2. Insert the straight end of the jack
retention bracket through the eyelet of
the angled bracket and swing the
retention bracket over the jack. With
the jack in place, place the end of the
retention bracket over the threaded
stud in the trunk floor and secure it with
the plastic wing nut.
3. Screw the extension bolt onto the threaded stud of the jack retention
bracket.
4. Place the flat tire in the spare tire well with the wheel facing up.
5. Safely secure the wheel by screwing the large wing nut onto the extension
bolt.
292
Taurus (CPH) Canada/United States of America, enUSA, First Printing Wheels and TiresE211101
Page 296 of 424

TECHNICAL SPECIFICATIONS
Wheel Lug Nut Torque Specifications
WARNING
When a wheel is installed, always remove any corrosion, dirt or foreign materials
present on the mounting surfaces of the wheel or the surface of the wheel hub,
brake drum or brake disc that contacts the wheel. Make sure that any fasteners
that attach the rotor to the hub are secured so they do not interfere with the mounting
surfaces of the wheel. Installing wheels without correct metal-to-metal contact at the
wheel mounting surfaces can cause the wheel nuts to loosen and the wheel to come off
while your vehicle is in motion, resulting in loss of control. Ib-ft (Nm)
*
Bolt size
100 (135)
1/2-20 x 1.5
* Torque specifications are for nut and bolt threads free of dirt and rust. Use only Ford
recommended replacement fasteners.
Retighten the lug nuts to the specified torque within 100 miles (160 kilometers) after any
wheel disturbance (such as tire rotation, changing a flat tire, wheel removal). Wheel pilot bore
A
Inspect the wheel pilot bore and
mounting surface prior to installation.
Remove any visible corrosion or loose
particles.
293
Taurus (CPH) Canada/United States of America, enUSA, First Printing Wheels and TiresE145950
Page 325 of 424

AUDIO INPUT JACK
WARNINGS
Driving while distracted can result in
loss of vehicle control, crash and
injury. We strongly recommend that
you use extreme caution when using any
device that may take your focus off the
road. Your primary responsibility is the safe
operation of your vehicle. We recommend
against the use of any hand-held device
while driving and encourage the use of
voice-operated systems when possible.
Make sure you are aware of all applicable
local laws that may affect the use of
electronic devices while driving. For safety reasons, do not connect
or adjust the settings on your
portable music player while your
vehicle is moving. Store the portable music player in a
secure location, such as the center
console or the glove box, when your
vehicle is moving. Hard objects may
become projectiles in a collision or sudden
stop, which may increase the risk of serious
injury. The audio extension cable must be
long enough to allow the portable music
player to be safely stored while your
vehicle is moving. The auxiliary input jack allows you to
connect and play music from your portable
music player through your vehicle speakers.
You can use any portable music player
designed for use with headphones. Your
audio extension cable must have male
1/8th-inch (3.5 millimeter) connectors at
each end.
1. Switch off the engine, radio and
portable music player. Set the parking
brake and put the transmission in
position P.
2. Plug the extension cable from the portable music player into the auxiliary
input jack.
3. Switch the radio on. Select either a tuned FM station or a CD.
4. Adjust the volume as desired.
5. Switch your portable music player on and adjust its volume to half its
maximum level.
6. Press the media button until the audio
input option appears in the display. You
should hear music from your device
even if it is low.
7. Adjust the volume on your portable music player until it reaches the volume
level of the FM station or CD. Do this
by switching back and forth between
the AUX and FM or CD controls.
322
Taurus (CPH) Canada/United States of America, enUSA, First Printing Audio SystemE149149
Page 345 of 424
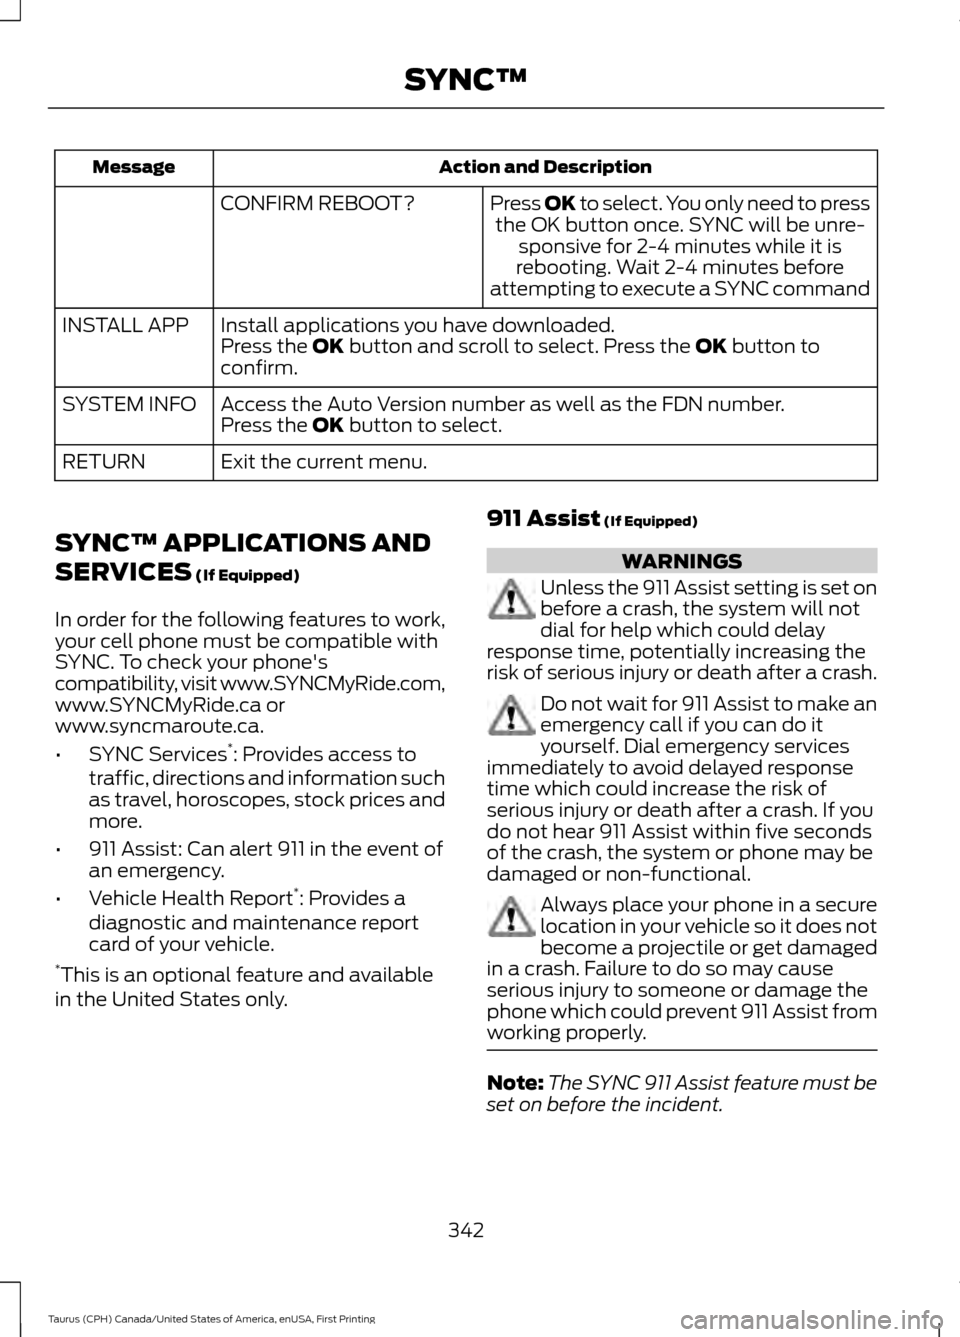
Action and Description
Message
Press OK to select. You only need to pressthe OK button once. SYNC will be unre- sponsive for 2-4 minutes while it is
rebooting. Wait 2-4 minutes before
attempting to execute a SYNC command
CONFIRM REBOOT?
Install applications you have downloaded.
INSTALL APP
Press the OK button and scroll to select. Press the OK button to
confirm.
Access the Auto Version number as well as the FDN number.
SYSTEM INFO
Press the
OK button to select.
Exit the current menu.
RETURN
SYNC™ APPLICATIONS AND
SERVICES
(If Equipped)
In order for the following features to work,
your cell phone must be compatible with
SYNC. To check your phone's
compatibility, visit www.SYNCMyRide.com,
www.SYNCMyRide.ca or
www.syncmaroute.ca.
• SYNC Services *
: Provides access to
traffic, directions and information such
as travel, horoscopes, stock prices and
more.
• 911 Assist: Can alert 911 in the event of
an emergency.
• Vehicle Health Report *
: Provides a
diagnostic and maintenance report
card of your vehicle.
* This is an optional feature and available
in the United States only. 911 Assist
(If Equipped) WARNINGS
Unless the 911 Assist setting is set on
before a crash, the system will not
dial for help which could delay
response time, potentially increasing the
risk of serious injury or death after a crash. Do not wait for 911 Assist to make an
emergency call if you can do it
yourself. Dial emergency services
immediately to avoid delayed response
time which could increase the risk of
serious injury or death after a crash. If you
do not hear 911 Assist within five seconds
of the crash, the system or phone may be
damaged or non-functional. Always place your phone in a secure
location in your vehicle so it does not
become a projectile or get damaged
in a crash. Failure to do so may cause
serious injury to someone or damage the
phone which could prevent 911 Assist from
working properly. Note:
The SYNC 911 Assist feature must be
set on before the incident.
342
Taurus (CPH) Canada/United States of America, enUSA, First Printing SYNC™