2016 FORD POLICE INTERCEPTOR SEDAN tow
[x] Cancel search: towPage 6 of 358
Cruise Control
Principle of Operation..................................121
Using Cruise Control.....................................121
Driving Aids
Blind Spot Information System...............123
Cross Traffic Alert.........................................125
Steering............................................................128
Load Carrying
Rear Loadspace Hatches..........................130
Rear Under Floor Storage
..........................130
Load Limit
.......................................................130
Towing
Towing a Trailer.............................................138
Recommended Towing Weights............139
Essential Towing Checks...........................140
Transporting the Vehicle............................142
Towing the Vehicle on Four Wheels......142
Driving Hints
Breaking-In......................................................144
Economical Driving......................................144
Driving Through Water
................................145
Floor Mats
.......................................................145
Roadside Emergencies
Roadside Assistance...................................147
Hazard Warning Flashers
..........................148
Fuel Shutoff
...................................................148
Jump Starting the Vehicle
.........................149
Customer Assistance
Getting the Services You Need
................152
In California (U.S. Only)..............................153
The Better Business Bureau (BBB) Auto Line Program (U.S. Only)......................154
Utilizing the Mediation/Arbitration Program (Canada Only)........................155 Getting Assistance Outside the U.S. and
Canada.........................................................155
Ordering Additional Owner's Literature.....................................................156
Reporting Safety Defects (U.S. Only)..............................................................157
Reporting Safety Defects (Canada Only)..............................................................157
Fuses
Fuse Specification Chart...........................159
Changing a Fuse
...........................................168
Maintenance
General Information
....................................170
Opening and Closing the Hood
...............170
Under Hood Overview - 2.0L EcoBoost™.................................................172
Under Hood Overview - 3.5L Ecoboost™.................................................173
Under Hood Overview - 3.5L Duratec/ 3.7L.................................................................174
Engine Oil Dipstick - 2.0L EcoBoost™.................................................175
Engine Oil Dipstick - 3.5L Duratec/3.5L Ecoboost™/3.7L.......................................175
Engine Oil Check
...........................................175
Oil Change Indicator Reset.......................176
Engine Coolant Check.................................176
Automatic Transmission Fluid Check - 2.0L EcoBoost™
......................................180
Automatic Transmission Fluid Check - 3.5L Duratec/3.5L Ecoboost™/
3.7L................................................................180
Brake Fluid Check.........................................184
Power Steering Fluid Check.....................184
Washer Fluid Check.....................................184
Fuel Filter
.........................................................185
Changing the 12V Battery..........................185
Checking the Wiper Blades
.......................187
Changing the Wiper Blades
......................187
Adjusting the Headlamps..........................187
3
Police Interceptor (CPH), enUSA, Edition date: 10/2015, First Printing Table of Contents
Page 17 of 358
PROTECTING THE
ENVIRONMENT
You must play your part in protecting the
environment. Correct vehicle usage and
the authorized disposal of waste, cleaning
and lubrication materials are significant
steps toward this aim.
14
Police Interceptor (CPH), enUSA, Edition date: 10/2015, First Printing Environment
Page 22 of 358
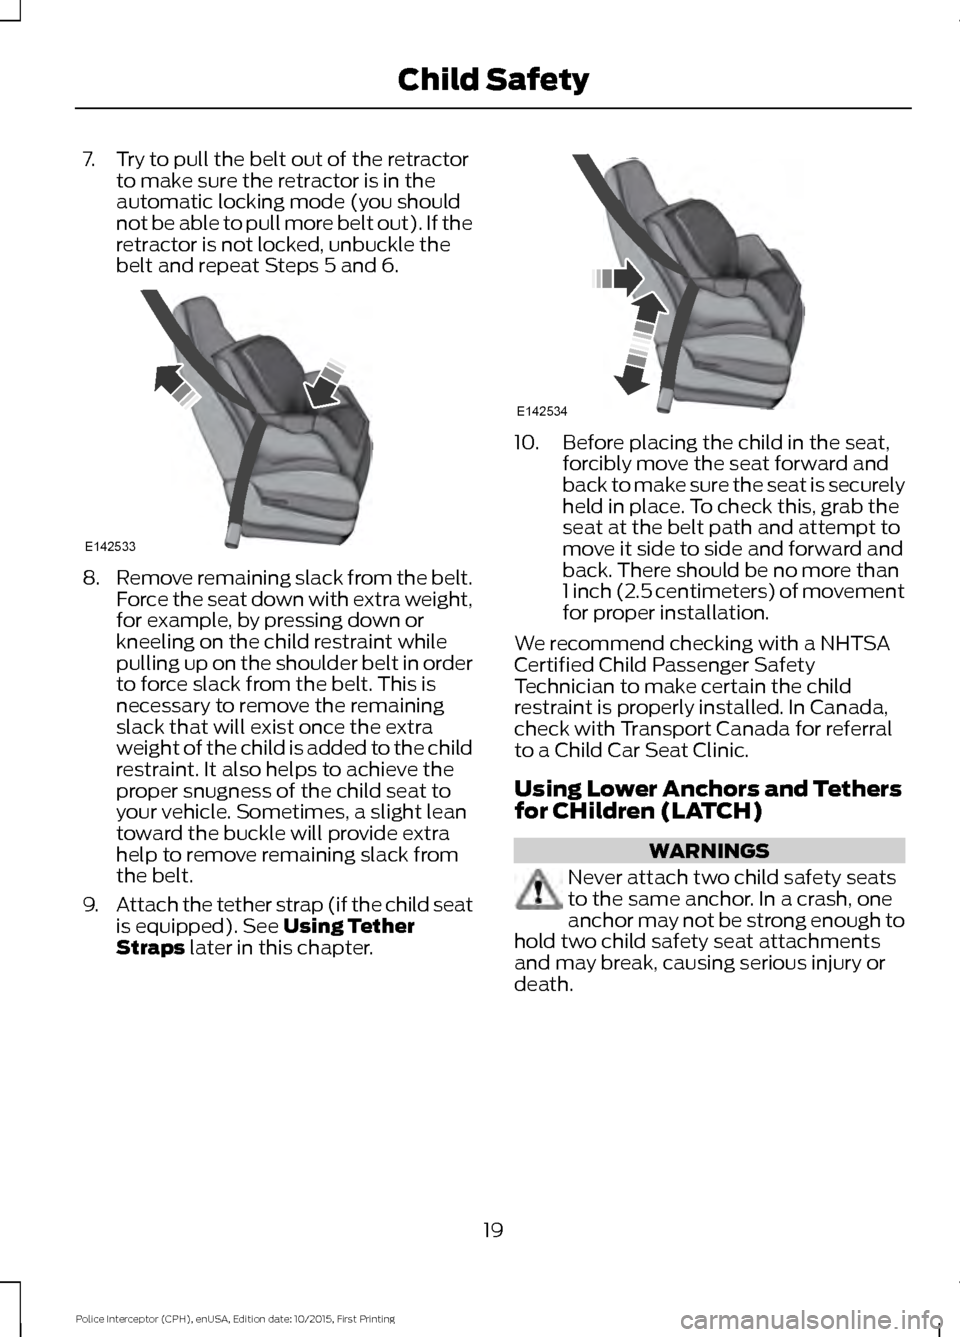
7. Try to pull the belt out of the retractor
to make sure the retractor is in the
automatic locking mode (you should
not be able to pull more belt out). If the
retractor is not locked, unbuckle the
belt and repeat Steps 5 and 6. 8.
Remove remaining slack from the belt.
Force the seat down with extra weight,
for example, by pressing down or
kneeling on the child restraint while
pulling up on the shoulder belt in order
to force slack from the belt. This is
necessary to remove the remaining
slack that will exist once the extra
weight of the child is added to the child
restraint. It also helps to achieve the
proper snugness of the child seat to
your vehicle. Sometimes, a slight lean
toward the buckle will provide extra
help to remove remaining slack from
the belt.
9. Attach the tether strap (if the child seat
is equipped). See Using Tether
Straps later in this chapter. 10. Before placing the child in the seat,
forcibly move the seat forward and
back to make sure the seat is securely
held in place. To check this, grab the
seat at the belt path and attempt to
move it side to side and forward and
back. There should be no more than
1 inch (2.5 centimeters) of movement
for proper installation.
We recommend checking with a NHTSA
Certified Child Passenger Safety
Technician to make certain the child
restraint is properly installed. In Canada,
check with Transport Canada for referral
to a Child Car Seat Clinic.
Using Lower Anchors and Tethers
for CHildren (LATCH) WARNINGS
Never attach two child safety seats
to the same anchor. In a crash, one
anchor may not be strong enough to
hold two child safety seat attachments
and may break, causing serious injury or
death.
19
Police Interceptor (CPH), enUSA, Edition date: 10/2015, First Printing Child SafetyE142533 E142534
Page 28 of 358
WARNINGS
manufacturer. A safety seat that is
improperly installed or utilized, is
inappropriate for your child's height, age,
or weight or does not properly fit the child
may increase the risk of serious injury or
death. Never let a passenger hold a child on
his or her lap while your vehicle is
moving. The passenger cannot
protect the child from injury in a crash,
which may result in serious injury or death. Never use pillows, books, or towels
to boost a child. They can slide
around and increase the likelihood
of injury or death in a crash. WARNINGS
Always restrain an unoccupied child
seat or booster seat. These objects
may become projectiles in a crash or
sudden stop, which may increase the risk
of serious injury. Never place, or allow a child to place,
the shoulder belt under a child's arm
or behind the back because it
reduces the protection for the upper part
of the body and may increase the risk of
injury or death in a crash. To avoid risk of injury, do not leave
children or pets unattended in your
vehicle.
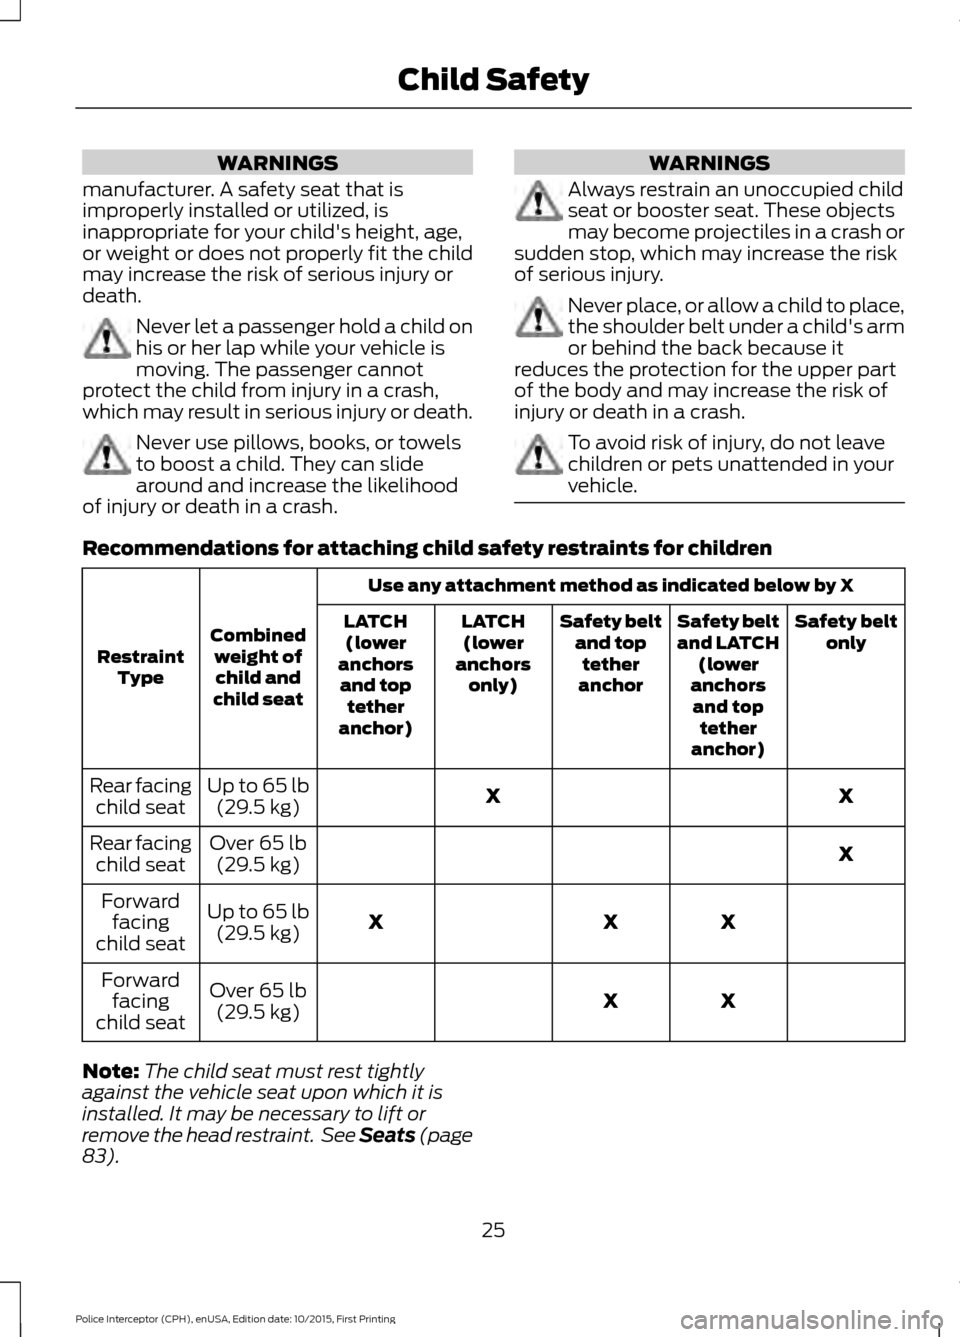
Recommendations for attaching child safety restraints for children
Use any attachment method as indicated below by X
Combined weight ofchild and
child seat
Restraint
Type Safety belt
only
Safety belt
and LATCH
(lower
anchors and top tether
anchor)
Safety belt
and toptether
anchor
LATCH
(lower
anchors only)
LATCH
(lower
anchors and top tether
anchor)
X
X
Up to 65 lb
(29.5 kg)
Rear facing
child seat
X
Over
65 lb
(29.5 kg)
Rear facing
child seat
X
X
X
Up to
65 lb
(29.5 kg)
Forward
facing
child seat
X
X
Over
65 lb
(29.5 kg)
Forward
facing
child seat
Note: The child seat must rest tightly
against the vehicle seat upon which it is
installed. It may be necessary to lift or
remove the head restraint. See Seats (page
83
).
25
Police Interceptor (CPH), enUSA, Edition date: 10/2015, First Printing Child Safety
Page 41 of 358

feet comfortably extended on the floor.
Sitting improperly can increase the chance
of injury in a crash event. For example, if
an occupant slouches, lies down, turns
sideways, sits forward, leans forward or
sideways, or puts one or both feet up, the
chance of injury during a crash is greatly
increased.
If you think that the status of the passenger
airbag off indicator lamp is incorrect, check
for the following:
•
Objects lodged underneath the seat.
• Objects between the seat cushion and
the center console.
• Objects hanging off the seatback.
• Objects stowed in the seatback map
pocket.
• Objects placed on the occupant's lap.
• Cargo interference with the seat
• Other passengers pushing or pulling on
the seat.
• Rear passenger feet and knees resting
or pushing on the seat.
The conditions listed above may cause the
weight of a properly seated occupant to
be incorrectly interpreted by the front
passenger sensing system. The person in
the front passenger seat may appear
heavier or lighter due to the conditions
described in the list above. Make sure the front passenger
sensing system is operating
properly. See Crash Sensors
and Airbag Indicator (page 41).
If the airbag readiness light is lit, do the
following:
The driver and adult passengers should
check for objects lodged underneath the
front passenger seat, or cargo interfering
with the seat. If there are lodged objects, or cargo is
interfering with the seat, take the following
steps to remove the obstruction:
•
Pull the vehicle over.
• Turn the vehicle off.
• Driver and adult passengers should
check for any objects lodged
underneath the front passenger seat
or cargo interfering with the seat.
• Remove the obstruction(s) (if found).
• Restart the vehicle.
• Wait at least two minutes and verify
that the airbag readiness light is no
longer illuminated.
• If the airbag readiness light remains
illuminated, this may or may not be a
problem due to the front passenger
sensing system.
Do not attempt to repair or service the
system. Take your vehicle immediately to
an authorized dealer.
If it is necessary to modify an advanced
front airbag system to accommodate a
person with disabilities, contact the Ford
Customer Relationship Center. See
Getting the Services You Need
(page
152).
SIDE AIRBAGS WARNINGS
Do not place objects or mount
equipment on or near the airbag
cover, on the side of the seatbacks
(of the front seats), or in front seat areas
that may come into contact with a
deploying airbag. Failure to follow these
instructions may increase the risk of
personal injury in the event of a crash.
38
Police Interceptor (CPH), enUSA, Edition date: 10/2015, First Printing Supplementary Restraints System
Page 44 of 358

CRASH SENSORS AND
AIRBAG INDICATOR
WARNING
Modifying or adding equipment to
the front end of the vehicle (including
frame, bumper, front end body
structure and tow hooks) may affect the
performance of the airbag system,
increasing the risk of injury. Do not modify
the front end of the vehicle. Your vehicle has a collection of crash and
occupant sensors which provide
information to the restraints control
module. The restraints control module
deploys (activates) the front seatbelt
pretensioners, driver airbag, passenger
airbag, seat mounted side airbags and the
Safety Canopy. Based on the type of crash,
the restraints control module will deploy
the appropriate safety devices.
The restraints control module also
monitors the readiness of the above safety
devices plus the crash and occupant
sensors. The readiness of the safety
system is indicated by a warning indicator
light in the instrument cluster or by a
backup tone if the warning light is not
working. Routine maintenance of the
airbag is not required.
A difficulty with the system is indicated by
one or more of the following:
•
The readiness light will either flash or
stay lit.
• A series of five beeps will be heard. The
tone pattern will repeat periodically
until the problem, the light or both are
repaired. · The readiness light will not
illuminate immediately after the
ignition is turned on. If any of these things happen, even
intermittently, have the supplemental
restraint system serviced at an authorized
dealer immediately. Unless serviced, the
system may not function properly in the
event of a crash.
The seatbelt pretensioners and the airbag
supplemental restraint system are
designed to activate when the vehicle
sustains frontal or sideways deceleration
sufficient to cause the restraints control
module to deploy a safety device or when
a certain likelihood of a rollover event is
detected by the rollover sensor.
The fact that the seatbelt pretensioners
or airbags did not activate for both front
seat occupants in a crash does not mean
that something is wrong with the system.
Rather, it means the restraints control
module determined the accident
conditions (crash severity, belt usage)
were not appropriate to activate these
safety devices.
•
The design of the front airbags is to
activate only in frontal and near-frontal
crashes (not rollovers, side impacts or
rear impacts) unless the crash causes
sufficient frontal deceleration.
• The design of the seatbelt
pretensioners is to activate in frontal,
near-frontal and side crashes and in
rollovers.
• The design of the side airbags is to
inflate in certain side impact crashes.
Side airbags may activate in other
types of crashes if the vehicle
experiences sufficient sideways motion
or deformation.
• The design of the Safety Canopy is to
inflate in certain side impact crashes
or rollover events. The Safety Canopy
may activate in other types of crashes
if the vehicle experiences sufficient
sideways motion or deformation, or a
certain likelihood of rollover.
41
Police Interceptor (CPH), enUSA, Edition date: 10/2015, First Printing Supplementary Restraints System
Page 49 of 358

GENERAL INFORMATION ON
RADIO FREQUENCIES
This device complies with Part 15 of the
FCC Rules and with Industry Canada
license-exempt RSS standard(s).
Operation is subject to the following two
conditions: (1) This device may not cause
harmful interference, and (2) This device
must accept any interference received,
including interference that may cause
undesired operation.
Note:
Changes or modifications not
expressively approved by the party
responsible for compliance could void the
user's authority to operate the equipment.
The term IC before the radio certification
number only signifies that Industry Canada
technical specifications were met.
The typical operating range for your
transmitter is approximately 33 feet (10
meters). Vehicles with the remote start
feature will have a greater range. One of
the following could cause a decrease in
operating range:
• weather conditions
• nearby radio towers
• structures around the vehicle
• other vehicles parked next to your
vehicle
The radio frequency used by your remote
control can also be used by other short
distance radio transmissions, for example
amateur radios, medical equipment,
wireless headphones, remote controls and
alarm systems. If the frequencies are
jammed, you will not be able to use your
remote control. You can lock and unlock
the doors with the key.
Note: Make sure to lock your vehicle before
leaving it unattended.
Note: If you are in range, the remote control
will operate if you press any button
unintentionally. Note:
The remote control contains sensitive
electrical components. Exposure to moisture
or impact may cause permanent damage.
REMOTE CONTROL Note:
If there are problems with the remote
entry system, make sure to take all remote
entry transmitters with you to an authorized
dealer to aid in troubleshooting the problem.
Changing the Remote Control
Battery
The remote control uses one coin-type
three-volt lithium battery CR2032 or
equivalent. Make sure that you dispose of
old batteries in an
environmentally friendly way.
Seek advice from your local authority
about recycling old batteries.
46
Police Interceptor (CPH), enUSA, Edition date: 10/2015, First Printing Keys and Remote ControlsE215678 E107998
Page 52 of 358
Press and hold both the lock and unlock
buttons on the remote control for three
seconds to change between driver door or
all doors unlock mode. The direction
indicators will flash twice to indicate a
change to the unlocking mode. Driver door
mode only unlocks the driver door when
you press the unlock button once. All door
mode unlocks all doors when you press
the unlock button once. The unlocking
mode applies to the remote control.
Locking the Doors
Press the button to lock all
doors. The direction indicators
will flash. Press the button again
within three seconds to confirm that all
the doors are closed.
The doors will lock again, the horn will
sound and the direction indicators will
flash if all the doors and the luggage
compartment are closed.
Note: If any door or the luggage
compartment is open, or if the hood is open
on vehicles with an anti-theft alarm or
remote start, the horn will sound twice and
the direction indicators will not flash.
Locking and Unlocking the Doors
with the Key Blade
Locking the Doors
Turn the top of the key toward the front of
your vehicle.
Unlocking the Doors
Turn the top of the key toward the rear of
your vehicle.
Note: If the child safety locks are on and
you pull the interior handle, you only switch
off the emergency locking, not the child
safety lock. You can only open the doors
using the external door handle. Opening a Rear Door From the
Inside
Pull the interior door handle twice to
unlock and open a rear door. The first pull
unlocks the door and the second pull
opens the door.
Illuminated Entry (If Equipped)
The interior lamps and some exterior
lamps illuminate when you unlock the
doors with the remote control.
The lamps turn off if:
• The ignition is on.
• You press the remote control lock
button.
• 25 seconds have elapsed.
The lamps do not turn off if:
• You switch them on with the lighting
control.
• Any door is open.
Illuminated Exit
(If Equipped)
The interior lamps and some exterior
lamps illuminate when all doors are closed
and you switch the ignition off.
The lamps will turn off if all the doors
remain closed and:
• 25 seconds have elapsed.
• You lock your vehicle from the outside.
Battery Saver
If you leave the courtesy lamps, interior
lamps or headlamps on, the battery saver
shuts them off 10 minutes after you switch
the ignition off.
49
Police Interceptor (CPH), enUSA, Edition date: 10/2015, First Printing LocksE138623