2016 FORD POLICE INTERCEPTOR SEDAN ECU
[x] Cancel search: ECUPage 161 of 358
Transport Canada Contact Information
www.tc.gc.ca/eng/motorvehiclesafety/safevehicles-defectinvestigations-
index-76.htm (English)
Website
www.tc.gc.ca/fra/securiteautomobile/VehiculesSecuritaires-Enquetes-
index-76.htm (French)
Website
1–800–333–0510
Phone Ford of Canada Contact Information
www.ford.ca
Website
1–800–565-3673
Phone
158
Police Interceptor (CPH), enUSA, Edition date: 10/2015, First Printing Customer Assistance
Page 178 of 358
Engine Shield
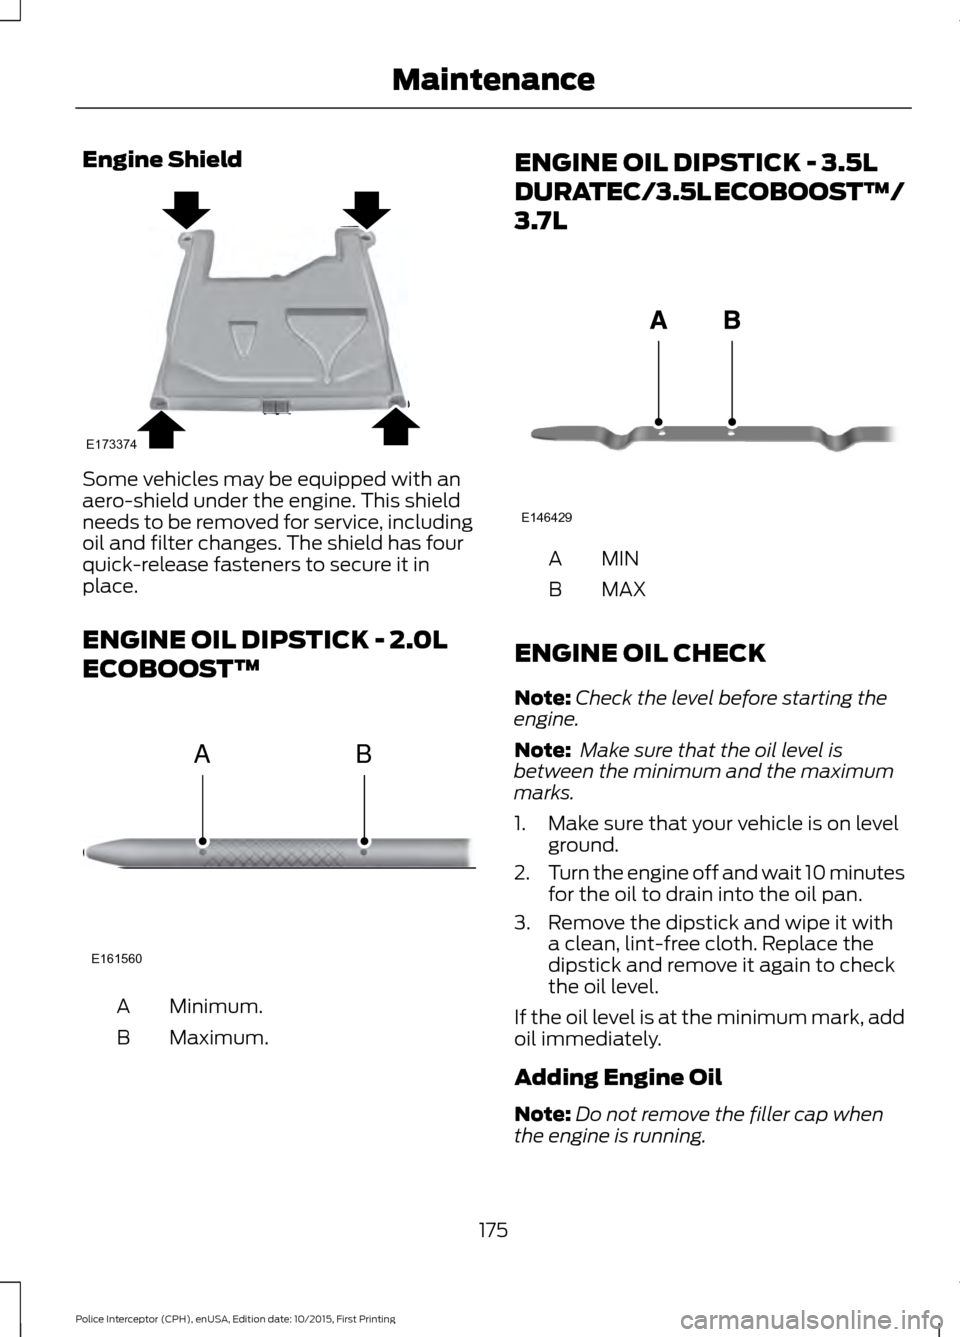
Some vehicles may be equipped with an
aero-shield under the engine. This shield
needs to be removed for service, including
oil and filter changes. The shield has four
quick-release fasteners to secure it in
place.
ENGINE OIL DIPSTICK - 2.0L
ECOBOOST™
Minimum.
A
Maximum.
B ENGINE OIL DIPSTICK - 3.5L
DURATEC/3.5L ECOBOOST™/
3.7L
MINA
MAX
B
ENGINE OIL CHECK
Note: Check the level before starting the
engine.
Note: Make sure that the oil level is
between the minimum and the maximum
marks.
1. Make sure that your vehicle is on level ground.
2. Turn the engine off and wait 10 minutes
for the oil to drain into the oil pan.
3. Remove the dipstick and wipe it with a clean, lint-free cloth. Replace the
dipstick and remove it again to check
the oil level.
If the oil level is at the minimum mark, add
oil immediately.
Adding Engine Oil
Note: Do not remove the filler cap when
the engine is running.
175
Police Interceptor (CPH), enUSA, Edition date: 10/2015, First Printing MaintenanceE173374 E161560
AB E146429
Page 192 of 358
CHANGING A BULB
WARNINGS
Bulbs can become hot. Let the bulb
cool down before removing it. Failure
to do so could result in personal
injury. Switch the lamps and the ignition off.
Failure to follow this warning could
result in serious personal injury.
Use the correct specification bulb. See
Bulb Specification Chart (page 190).
Install in the reverse order unless otherwise
stated.
High-Intensity Discharge
Headlamps
These lamps operate at a high voltage. See
an authorized dealer if they fail.
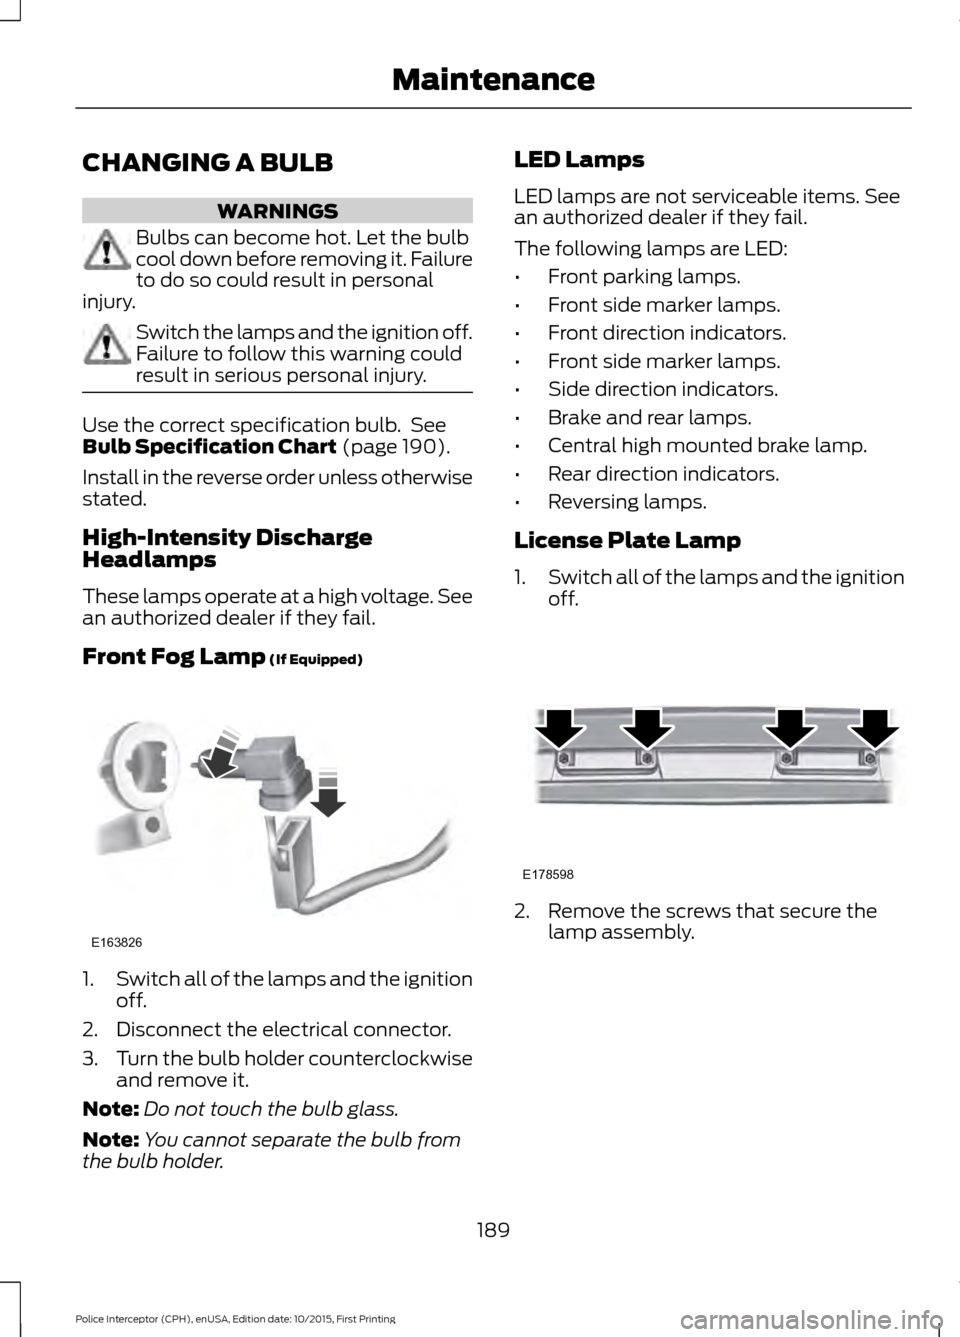
Front Fog Lamp
(If Equipped) 1.
Switch all of the lamps and the ignition
off.
2. Disconnect the electrical connector.
3. Turn the bulb holder counterclockwise
and remove it.
Note: Do not touch the bulb glass.
Note: You cannot separate the bulb from
the bulb holder. LED Lamps
LED lamps are not serviceable items. See
an authorized dealer if they fail.
The following lamps are LED:
•
Front parking lamps.
• Front side marker lamps.
• Front direction indicators.
• Front side marker lamps.
• Side direction indicators.
• Brake and rear lamps.
• Central high mounted brake lamp.
• Rear direction indicators.
• Reversing lamps.
License Plate Lamp
1. Switch all of the lamps and the ignition
off. 2. Remove the screws that secure the
lamp assembly.
189
Police Interceptor (CPH), enUSA, Edition date: 10/2015, First Printing MaintenanceE163826 E178598
Page 195 of 358
CHANGING THE ENGINE AIR
FILTER
WARNING
Do not start the engine with the air
cleaner removed. This can cause
damage not covered by the vehicle
Warranty and can result in serious injury. When changing the air filter element, use
only the air filter element listed. See
Capacities and Specifications (page
229).
For vehicles with EcoBoost engines, when
servicing the air cleaner, it is important that
no foreign material enters the air induction
system. The engine and turbocharger are
susceptible to damage from even small
particles.
Change the air filter element at the correct
interval. See
Scheduled Maintenance
(page 310).
Note: Failure to use the correct air filter
element may result in severe engine
damage. Resulting component damage
may not be covered by the vehicle Warranty.
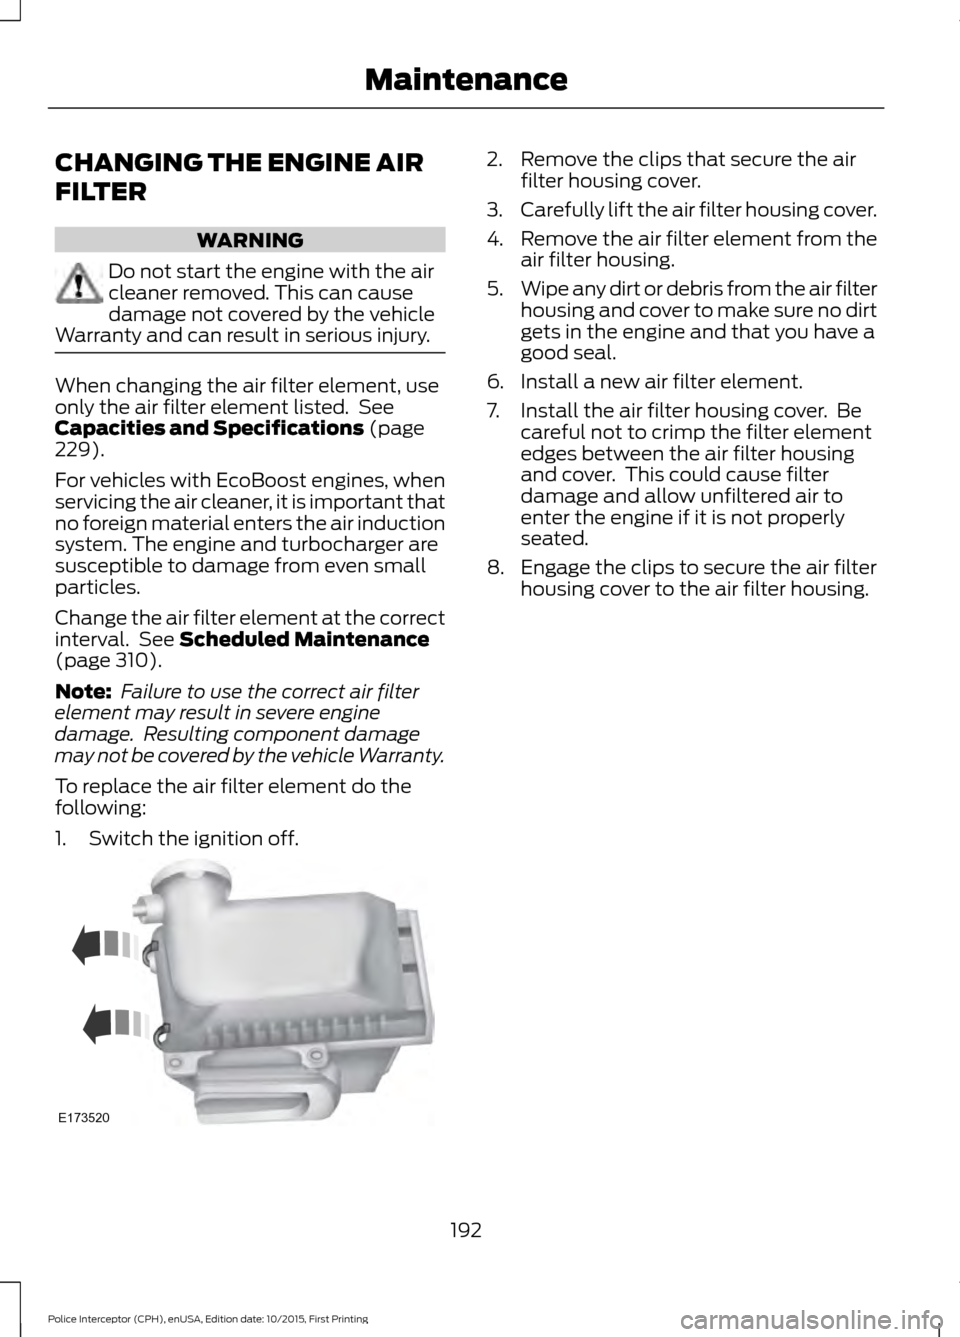
To replace the air filter element do the
following:
1. Switch the ignition off. 2. Remove the clips that secure the air
filter housing cover.
3. Carefully lift the air filter housing cover.
4. Remove the air filter element from the
air filter housing.
5. Wipe any dirt or debris from the air filter
housing and cover to make sure no dirt
gets in the engine and that you have a
good seal.
6. Install a new air filter element.
7. Install the air filter housing cover. Be careful not to crimp the filter element
edges between the air filter housing
and cover. This could cause filter
damage and allow unfiltered air to
enter the engine if it is not properly
seated.
8. Engage the clips to secure the air filter housing cover to the air filter housing.
192
Police Interceptor (CPH), enUSA, Edition date: 10/2015, First Printing MaintenanceE173520
Page 204 of 358

General Information
WARNING
Failure to follow these guidelines
could result in an increased risk of
loss of vehicle control, injury or death.
Note:
Do not use the kit if a tire has become
severely damaged by driving the vehicle with
a tire that has insufficient air pressure. Only
punctured areas located within the tire tread
can be sealed with the kit.
Do not attempt to repair punctures larger
than ¼ inch (6 millimeters) or damage to
the tire's sidewall. The tire may not
completely seal.
Loss of air pressure may adversely affect
tire performance. For this reason:
Note: Do not drive the vehicle above
50 mph (80 km/h).
Note: Do not drive further than
120 mi
(200 km). Drive only to the closest
authorized Ford dealer or tire repair shop to
have your tire inspected.
• Drive carefully and avoid abrupt
steering maneuvers.
• Periodically monitor tire inflation
pressure in the affected tire. If the tire
is losing pressure, have the vehicle
towed.
• Read the information in the Tips for
Use of the Kit section to make sure safe
operation of the kit and your vehicle.
Tips for Use of the Kit
Read the following list of tips to ensure
safe operation of the kit: •
Before operating the kit, make sure
your vehicle is safely off the road and
away from moving traffic. Turn on the
hazard lights.
• Always set the parking brake to ensure
the vehicle does not move
unexpectedly.
• Do not remove any foreign objects,
such as nails or screws, from the tire.
• When using the kit, leave the engine
running (only if the vehicle is outdoors
or in a well-ventilated area) so the
compressor does not drain the vehicle
battery.
• Do not allow the compressor to
operate continuously for more than 15
minutes. This will help prevent the
compressor from overheating.
• Never leave the kit unattended when
it is operating.
• Sealant compound contains latex.
Make sure that you use the non-latex
gloves provided to avoid an allergic
reaction.
• Keep the kit away from children.
• Only use the kit when the ambient
temperature is between
-22°F (-30°C)
and 158°F (70°C).
• Only use the sealing compound before
the use by date. The use by date is on
the lower right hand corner of the label
located on the sealant canister
(bottle). Check the use by date
regularly and replace the canister after
four years.
• Do not store the kit unsecured inside
the passenger compartment of the
vehicle as it may cause injury during a
sudden stop or crash. Always store the
kit in its original location.
• After sealant use, the tire pressure
monitoring system sensor and valve
stem on the wheel must be replaced
by an authorized Ford dealer.
201
Police Interceptor (CPH), enUSA, Edition date: 10/2015, First Printing Wheels and Tires
Page 205 of 358
•
When inflating a tire or other objects,
use the black air hose only. Do not use
the transparent hose which is designed
for sealant application only.
• Operating the kit could cause an
electrical disturbance in radio, CD, and
DVD player operation.
What to do when a Tire Is
Punctured
A tire puncture within the tire tread area
can be repaired in two stages with the kit.
• In the first stage, the tire will be
reinflated with a sealing compound
and air. After the tire has been
reinflated, you will need to drive the
vehicle a short distance 4 mi (6 km) to
distribute the sealant in the tire.
• In the second stage, you will need to
check the tire pressure and adjust, if
necessary, to the vehicle tire inflation
pressure.
First Stage: Reinflating the Tire
with Sealing Compound and Air WARNINGS
Do not stand directly over the kit
while inflating the tire. If you notice
any unusual bulges or deformations
in the tire sidewall during inflation, stop
and call roadside assistance. If the tire does not inflate to the
recommended tire pressure within
15 minutes, stop and call roadside
assistance. Preparation: Park the vehicle in a safe, level
and secure area, away from moving traffic.
Turn the hazard lights on. Apply the parking
brake and turn the engine off. Inspect the
flat tire for visible damage. Sealant compound contains latex. To
avoid any allergic reactions, use the
non-latex gloves located in the accessory
box on the underside of the kit housing.
Do not remove any foreign object that has
pierced the tire. If a puncture is located in
the tire sidewall, stop and call roadside
assistance.
1. Remove the valve cap from the tire
valve.
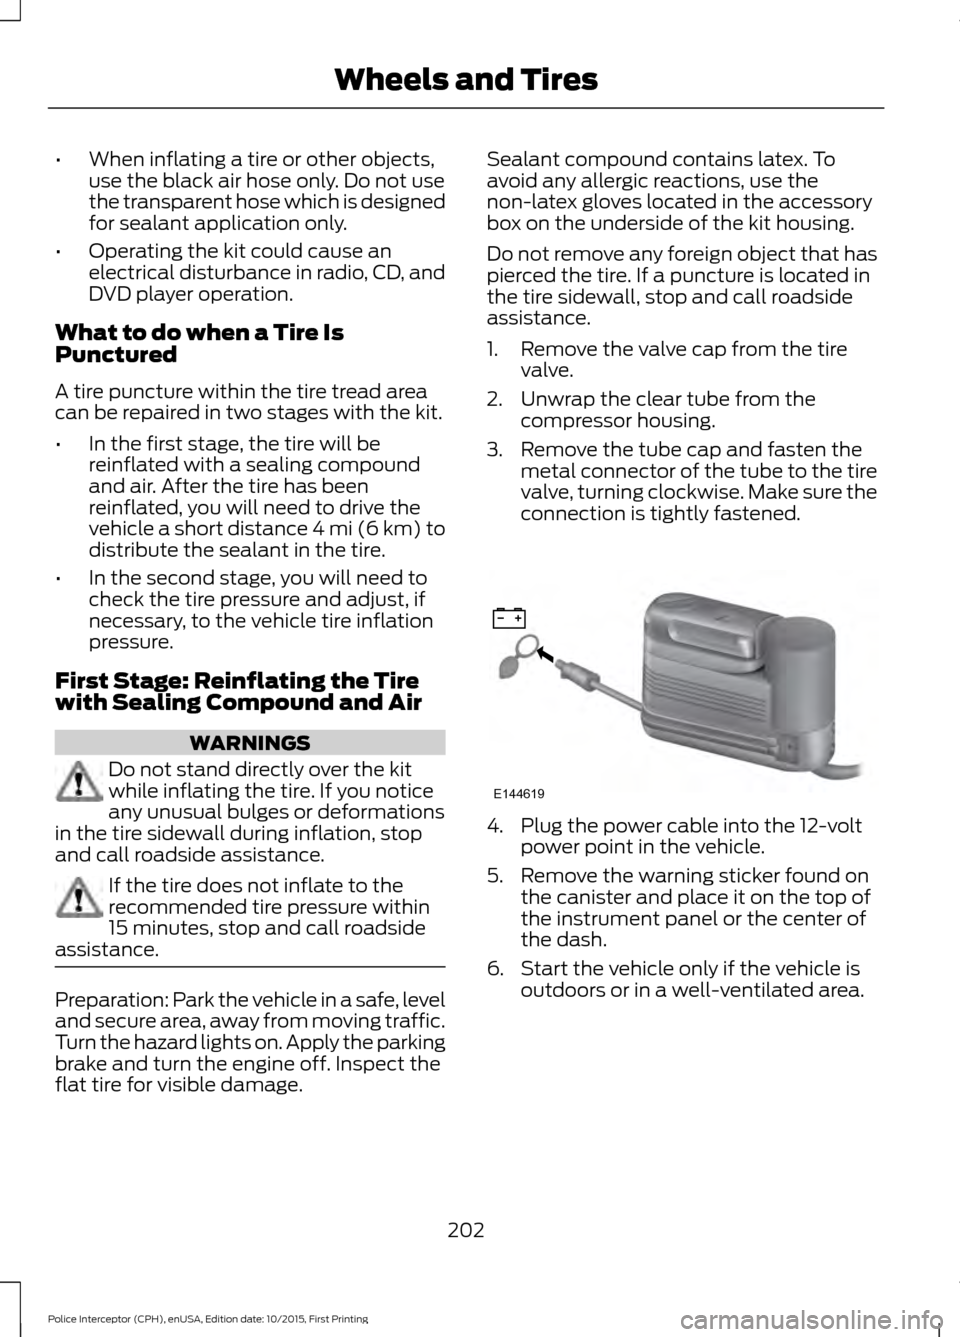
2. Unwrap the clear tube from the compressor housing.
3. Remove the tube cap and fasten the metal connector of the tube to the tire
valve, turning clockwise. Make sure the
connection is tightly fastened. 4. Plug the power cable into the 12-volt
power point in the vehicle.
5. Remove the warning sticker found on the canister and place it on the top of
the instrument panel or the center of
the dash.
6. Start the vehicle only if the vehicle is outdoors or in a well-ventilated area.
202
Police Interceptor (CPH), enUSA, Edition date: 10/2015, First Printing Wheels and TiresE144619
Page 229 of 358

WARNINGS
Never get underneath a vehicle that
is supported only by a jack. If the
vehicle slips off the jack, you or
someone else could be seriously injured. Do not attempt to change a tire on
the side of the vehicle close to
moving traffic. Pull far enough off the
road to avoid the danger of being hit when
operating the jack or changing the wheel. Always use the jack provided as
original equipment with your vehicle.
If using a jack other than the one
provided as original equipment with your
vehicle, make sure the jack capacity is
adequate for the vehicle weight, including
any vehicle cargo or modifications. To reduce the risk of possible serious
injury or death, do not remove the full
size spare tire from the factory
secured location. This location is necessary
to achieve police-rated 75 mph rear impact
crash-test performance. Removal
increases the risk of fuel leak in high-speed
rear impacts. Note:
Passengers should not remain in your
vehicle when the vehicle is being jacked.
Note: Jack at the specified locations to
avoid damage to the vehicle.
1. Park on a level surface, set the parking
brake and activate the hazard flashers.
2. Place the transmission in park (P) and
turn the engine off. 3. Block the diagonally opposite wheel.
4.
Lift truck cargo cover, then remove the
wingnut that secures the spare tire by
turning counterclockwise.
5. Remove the spare tire from the spare tire well.
6. Remove the wing nut bolt that secures
the jack kit by turning it
counterclockwise.
7. Remove the jack and the wrench from the bag. Fold down the wrench socket
to use to loosen the lug nuts and to
operate the jack.
8. Loosen each wheel lug nut one-half turn counterclockwise, but do not
remove them until the wheel is raised
off the ground. 9. The vehicle jacking points are shown
here, and are depicted on the warning
label on the jack. Small arrow-shaped
marks on the sills show the location of
the jacking points.
226
Police Interceptor (CPH), enUSA, Edition date: 10/2015, First Printing Wheels and TiresE142551 E145908
Page 230 of 358

10. Raise the wheel by turning the jack
handle clockwise.
11. Remove the lug nuts with the lug wrench.
12. Replace the flat tire with the spare tire, marking sure the valve stem is
facing outward. Reinstall the lug nuts
until the wheel is snug against the
hub. Do not fully tighten the lug nuts
until the wheel has been lowered.
13. Lower the wheel by turning the jack handle counterclockwise. 14.
Remove the jack and fully tighten the
lug nuts in the order shown. See
Technical Specifications (page
228). Stowing the jack and flat tire
1. Insert the straight end of the jack
retention bracket through the eyelet of
the angled bracket and swing the
retention bracket over the jack. With
the jack in place, place the end of the
retention bracket over the threaded
stud in the trunk floor and secure it with
the plastic wing nut.
2. Screw the extension bolt onto the threaded stud of the jack retention
bracket.
3. Place the flat tire in the spare tire well with the wheel facing up.
4. Safely secure the wheel by screwing the large wing nut onto the extension
bolt.
227
Police Interceptor (CPH), enUSA, Edition date: 10/2015, First Printing Wheels and TiresE201156 12
3
4
5
E75442 E211101