2016 FORD FUSION (AMERICAS) manual
[x] Cancel search: manualPage 178 of 518
Note:
On manual transmission vehicles,
you must fully press the clutch pedal before
the drive away release feature will operate.
Drive as normal using the accelerator and
clutch pedals and the electric parking brake
will be automatically released.
The brake system warning lamp will go off
to confirm that the electric parking brake
has been released.
Note: The electric parking brake drive away
release makes starting on a hill easier. This
feature will release the parking brake
automatically when the vehicle has
sufficient drive force to move up the hill. To
assure drive away release when starting
uphill, press the accelerator pedal quickly.
Driving with a Trailer
Depending on the slope and the weight of
the trailer, your vehicle and trailer may roll
backwards slightly when you start on a
slope.
To prevent this from happening, do the
following:
1. Pull the switch up and hold it in this position.
2. Drive your vehicle, then release the switch when you notice that the engine
has developed sufficient driving force.
Battery With No Charge WARNING
You will not be able to apply or
release the electric parking brake if
the battery is low or has no charge.
If the battery is low or has no charge, use
jumper cables and a booster battery. HILL START ASSIST WARNINGS
The system does not replace the
parking brake. When you leave your
vehicle, always apply the parking
brake. Failure to leave your vehicle securely
parked may lead to a crash or injury. See
Electric Parking Brake (page 173). You must remain in your vehicle
when the system turns on. At all
times, you are responsible for
controlling your vehicle, supervising the
system and intervening, if required. Failure
to take care may result in the loss of
control of your vehicle, serious personal
injury or death. The system will turn off if a
malfunction is apparent or if you rev
the engine excessively. Failure to
take care may result in the loss of control
of your vehicle, serious personal injury or
death. The system makes it easier to pull away
when your vehicle is on a slope without the
need to use the parking brake.
When the system is active, your vehicle
remains stationary on the slope for two to
three seconds after you release the brake
pedal. This allows time to move your foot
from the brake to the accelerator pedal.
The system releases the brakes
automatically once the engine has
developed sufficient drive to prevent your
vehicle from rolling down the slope. This
is an advantage when pulling away on a
slope, for example from a car park ramp,
traffic lights or when reversing uphill into
a parking space.
Note:
The system only functions when you
bring your vehicle to a complete standstill
with the vehicle in an uphill gear (for
example, second (2) when facing uphill or
reverse (R) when facing downhill).
175
Fusion/Mondeo (CC7) Canada/United States of America, enUSA, First Printing Brakes
Page 179 of 518
Note:
There is no warning light to indicate
the system is either on or off.
Using Hill Start Assist
1. Press the brake pedal to bring your vehicle to a complete standstill. Keep
the brake pedal pressed.
2. If the sensors detect that your vehicle is on a slope, the system activates
automatically.
3. When you remove your foot from the brake pedal, your vehicle remains on
the slope without rolling away for
about two to three seconds. This hold
time automatically extends if you are
in the process of driving off.
4. Drive off in the normal manner. The system releases the brakes
automatically.
Note: When you remove your foot from the
brake pedal and press the pedal again when
the system is active, you will experience
significantly reduced brake pedal travel. This
is normal.
Switching the System On and Off
Vehicles with Manual Transmission
You can switch this feature on or off in the
information display. The system
remembers the last setting when you start
your vehicle.
Vehicles with Automatic Transmission
You cannot turn the system on or off.
When you switch the ignition on, the
system automatically turns on.
176
Fusion/Mondeo (CC7) Canada/United States of America, enUSA, First Printing Brakes
Page 180 of 518
PRINCIPLE OF OPERATION
The traction control system helps avoid
drive wheel spin and loss of traction.
If your vehicle begins to slide, the system
applies the brakes to individual wheels
and, when needed, reduces engine power
at the same time. If the wheels spin when
accelerating on slippery or loose surfaces,
the system reduces engine power in order
to increase traction.
USING TRACTION CONTROL
In certain situations for example, stuck in
snow or mud, turning the traction control
off may be beneficial as this allows the
wheels to spin with full engine power.
Depending on the type of system you have
on your vehicle, you can either turn the
system off using the information display
or by pressing the button.
Switching the System Off Using
the Information Display Controls
(If Equipped)
Your vehicle comes with this feature
already enabled. If required, you can switch
this feature off using the information
display controls. See (page 96).
Switching the System Off Using a
Switch
(If Equipped)
The button is located in the instrument
panel.
Press the button. You will see a message
in conjunction with an illuminated icon in
the display. Press the button again to
return the system to normal mode.
When you switch the traction control
system off, stability control remains fully
active. System Indicator Lights and
Messages WARNING
If a failure has been detected within
the AdvanceTrac system, the
stability control light will illuminate
steadily. Verify that the AdvanceTrac
system was not manually disabled through
the information display. If the stability
control light still illuminates steadily, have
the system serviced by an authorized
dealer immediately. Operating your vehicle
with AdvanceTrac disabled could lead to
an increased risk of loss of vehicle control,
vehicle rollover, personal injury and death. The stability control light
temporarily illuminates on
engine start-up and flashes
when a driving condition activates the
stability system. The stability control off light
temporarily illuminates on
engine start-up and stays on
when you turn the traction control system
off.
When you turn the traction control system
off or on, a message appears in the
information display showing system status.
177
Fusion/Mondeo (CC7) Canada/United States of America, enUSA, First Printing Traction ControlE138639
Page 183 of 518

Coverage area of up to 6 ft (1.8 m) from
the rear bumper. There may be decreased
coverage area at the outer corners of the
bumper.
The system detects certain objects while
the transmission is in reverse (R) :
• Your vehicle is moving toward a
stationary object at a speed of
3 mph
(5 km/h) or less.
• Your vehicle is not moving, but a
moving object is approaching the rear
of your vehicle at a speed of
3 mph
(5 km/h) or less.
• Your vehicle is moving at a speed of
less than 3 mph (5 km/h) and a moving
object is approaching the rear of your
vehicle at a speed of less than
3 mph
(5 km/h).
The system provides audio warnings only
when your vehicle is moving or when your
vehicle is stationary and the detected
obstacle is less than
12 in (30 cm) away
from the bumper.
FRONT PARKING AID
The front sensors are active when the
transmission is in reverse (R) or drive (D). Coverage area of up to
28 in (70 cm) from
the front bumper. There is decreased
coverage area at the outer corners.
When your vehicle approaches an object,
a warning tone sounds. When your vehicle
moves closer to an object, the warning
tone repeat rate increases. The warning
tone sounds continuously when an object
is
12 in (30 cm) or less from the front
bumper.
If the transmission is in reverse (R), the
front sensing system provides audio
warnings when your vehicle is moving and
the detected obstacle is stationary or
moving towards your vehicle.
If the transmission is in drive (D) or any
other forward gear (for example, low (L),
sport (S) or any forward gear in a manual
transmission), the front sensing system
provides audio warnings when your vehicle
is moving below a speed of
7 mph
(12 km/h) and an obstacle is located inside
the detection area.
180
Fusion/Mondeo (CC7) Canada/United States of America, enUSA, First Printing Parking AidsE130178 E187330
Page 186 of 518

When you think your vehicle has enough
space in front and behind it, or you hear a
solid tone from the parking aid
(accompanied by a touchscreen display
message and a chime), bring your vehicle
to a complete stop.
When automatic steering is finished, the
touch screen displays a message and a
tone sounds, indicating that the active park
assist process is done. The driver is
responsible for checking the parking job
and making any necessary corrections
before putting the transmission in park (P).
Deactivating the Park Assist
Feature
Manually deactivate the system by:
•
Pressing the active park assist button.
• Grabbing the steering wheel. •
Driving above approximately 50 mph
(80 km/h) for 10 seconds during an
active park search.
• Driving above
6 mph (9 km/h) during
automatic steering.
• Turning off the traction control system.
Certain vehicle conditions can also
deactivate the system, such as:
• Traction control has activated on a
slippery or loose surface.
• There is an anti-lock brake system
activation or failure.
• Something touches the steering wheel.
If a problem occurs with the system, a
warning message is displayed, followed
by a tone. Occasional system messages
may occur in normal operation. For
recurring or frequent system faults, contact
an authorized dealer to have your vehicle
serviced.
Troubleshooting the System The system does not look for a space
The traction control system may be off
The transmission is in Reverse ( R); your vehicle must be moving forward to detect a
parking space The system does not offer a particular space
Something may be contacting the front bumper or side sensors
There is not enough room on both sides of your vehicle in order to park
There is not enough space for the parking maneuver on the opposite side of the parking
space
The parking space is farther than
4.9 ft (1.5 m) or closer than 15.7 in (0.4 m) away.
The transmission is in Reverse ( R); your vehicle must be moving forward to detect a
parking space
Your vehicle is going faster than
22 mph (35 km/h)
183
Fusion/Mondeo (CC7) Canada/United States of America, enUSA, First Printing Parking Aids
Page 189 of 518
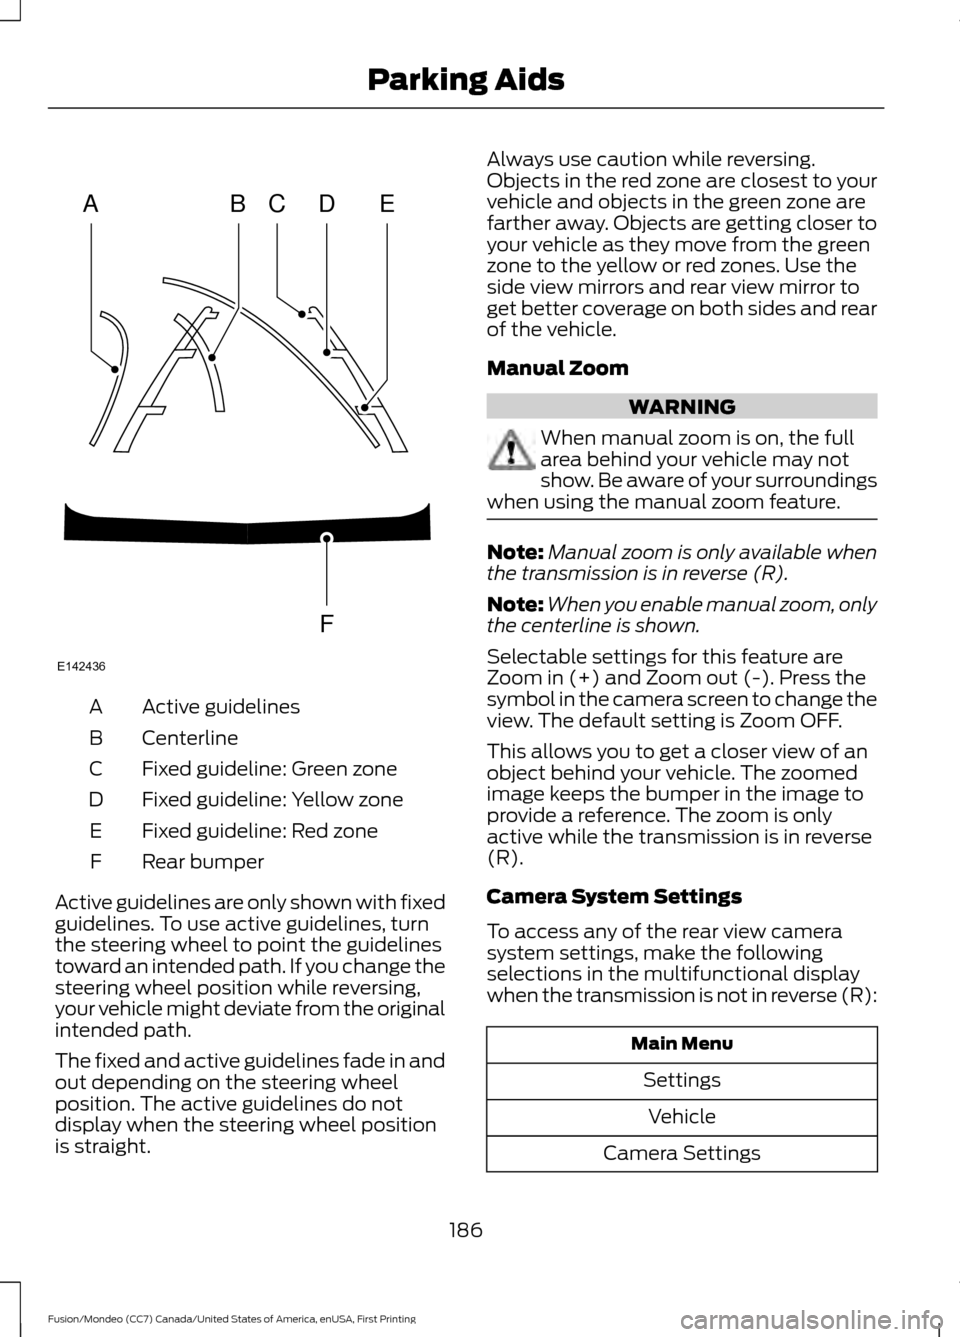
Active guidelines
A
Centerline
B
Fixed guideline: Green zone
C
Fixed guideline: Yellow zone
D
Fixed guideline: Red zone
E
Rear bumper
F
Active guidelines are only shown with fixed
guidelines. To use active guidelines, turn
the steering wheel to point the guidelines
toward an intended path. If you change the
steering wheel position while reversing,
your vehicle might deviate from the original
intended path.
The fixed and active guidelines fade in and
out depending on the steering wheel
position. The active guidelines do not
display when the steering wheel position
is straight. Always use caution while reversing.
Objects in the red zone are closest to your
vehicle and objects in the green zone are
farther away. Objects are getting closer to
your vehicle as they move from the green
zone to the yellow or red zones. Use the
side view mirrors and rear view mirror to
get better coverage on both sides and rear
of the vehicle.
Manual Zoom
WARNING
When manual zoom is on, the full
area behind your vehicle may not
show. Be aware of your surroundings
when using the manual zoom feature. Note:
Manual zoom is only available when
the transmission is in reverse (R).
Note: When you enable manual zoom, only
the centerline is shown.
Selectable settings for this feature are
Zoom in (+) and Zoom out (-). Press the
symbol in the camera screen to change the
view. The default setting is Zoom OFF.
This allows you to get a closer view of an
object behind your vehicle. The zoomed
image keeps the bumper in the image to
provide a reference. The zoom is only
active while the transmission is in reverse
(R).
Camera System Settings
To access any of the rear view camera
system settings, make the following
selections in the multifunctional display
when the transmission is not in reverse (R): Main Menu
SettingsVehicle
Camera Settings
186
Fusion/Mondeo (CC7) Canada/United States of America, enUSA, First Printing Parking AidsABCD
F
E
E142436
Page 195 of 518
Disengaging the System
Press the brake pedal or press CNCL. The
last set speed displays in grey but does not
erase.
Overriding the System WARNING
Whenever the driver presses the
accelerator pedal and overrides the
system, the system does not
automatically apply the brakes to maintain
the set distance from any vehicle ahead. Press the accelerator pedal to override the
set speed and gap distance.
When you override the system,
the green indicator light
illuminates and the lead vehicle
graphic does not show in the
information display.
The system resumes operation when you
release the accelerator pedal. The vehicle
speed decreases to the set speed, or a
slower speed if following a slower vehicle.
Changing the Set Speed
• Press and release
SET+ or SET-. The
set speed changes in approximately
1 mph (2 km/h)
increments.
• Press the accelerator or brake pedal
until you reach the desired speed. Press
and release
SET+.
• Press and hold SET+ or SET-. Release
the control when you reach the desired
speed.
The system may apply the brakes to slow
the vehicle to the new set speed. The set
speed displays continuously in the
information display when the system is
active. Canceling the Set Speed
Press the brake pedal or press and release
CNCL
. The last set speed displays with a
strikethrough.
Resuming the Set Speed
Note: Only use resume if you are aware of
the set speed and intend to return to it.
Press and release RES. The vehicle returns
to the previously set speed. The set speed
displays continuously in the information
display while the system is active.
Automatic Cancellation
The system does not operate below
12 mph (20 km/h)
. An audible warning
sounds and the automatic braking releases
if the vehicle drops below this speed.
Automatic cancellation can also occur if:
• The tires lose traction.
• The engine speed is too low.
• You apply the parking brake.
Note: If the engine speed drops too low,
the information display indicates low engine
speed. Shift to a lower gear (manual
transmission only) to avoid automatic
cancellation.
Hilly Condition Usage
Note: An audible alarm sounds and the
system shuts down if it is applying brakes
for an extended period of time. This allows
the brakes to cool. The system functions
normally again when the brakes cool.
Select a lower gear during prolonged
downhill driving on steep slopes, such as
mountainous areas, when the system is
active. In such situations, the system needs
additional engine braking to reduce the
load on the vehicle ’s regular brake system
to prevent the brakes from overheating.
192
Fusion/Mondeo (CC7) Canada/United States of America, enUSA, First Printing Cruise ControlE144529
Page 198 of 518
Due to the nature of radar technology, it is
possible to get a blockage warning with no
actual block. This happens, for example,
when driving in sparse rural or desert
environments. A false blocked condition
either self clears or clears after a you
restart your vehicle.
Switching to Normal Cruise
Control
WARNING
Normal cruise control does not brake
for slower vehicles. Always be aware
of which mode you have selected
and apply the brakes when necessary. You can manually change from adaptive
cruise control to normal cruise control
through the information display.
The cruise control indicator light
replaces the adaptive cruise
control indicator light if you
select normal cruise control. The gap
setting does not display, the system does
not automatically respond to lead vehicles
and automatic braking does not activate.
195
Fusion/Mondeo (CC7) Canada/United States of America, enUSA, First Printing Cruise ControlE71340