2016 FORD FIESTA reset
[x] Cancel search: resetPage 108 of 363

Folding the Head Restraint
1. Press and hold button E.
2. Pull it back up to reset.
MANUAL SEATS
WARNING
Do not adjust the driver seat when
your vehicle is moving.
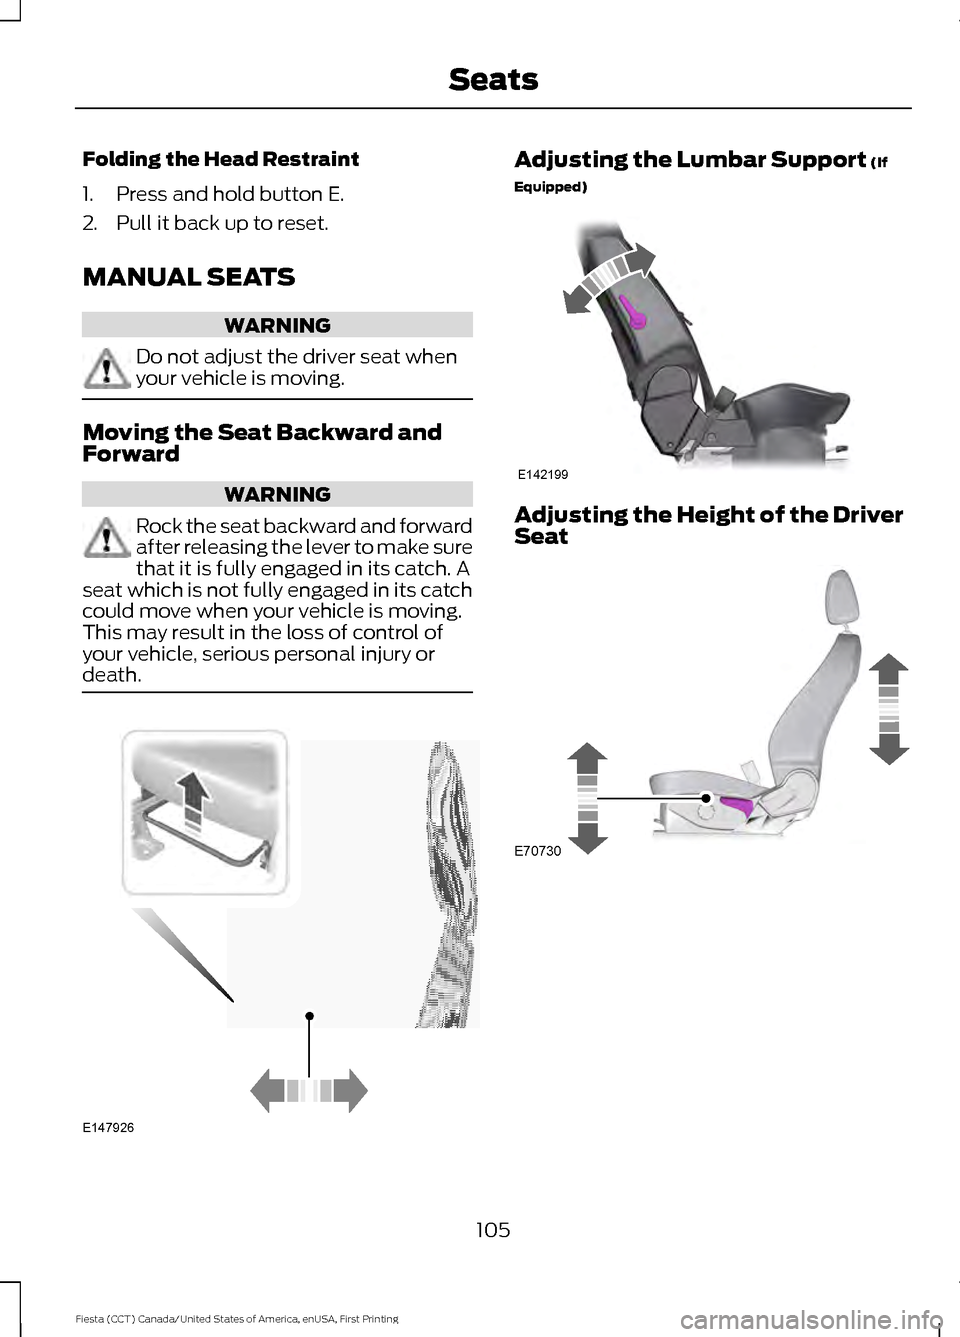
Moving the Seat Backward and
Forward
WARNING
Rock the seat backward and forward
after releasing the lever to make sure
that it is fully engaged in its catch. A
seat which is not fully engaged in its catch
could move when your vehicle is moving.
This may result in the loss of control of
your vehicle, serious personal injury or
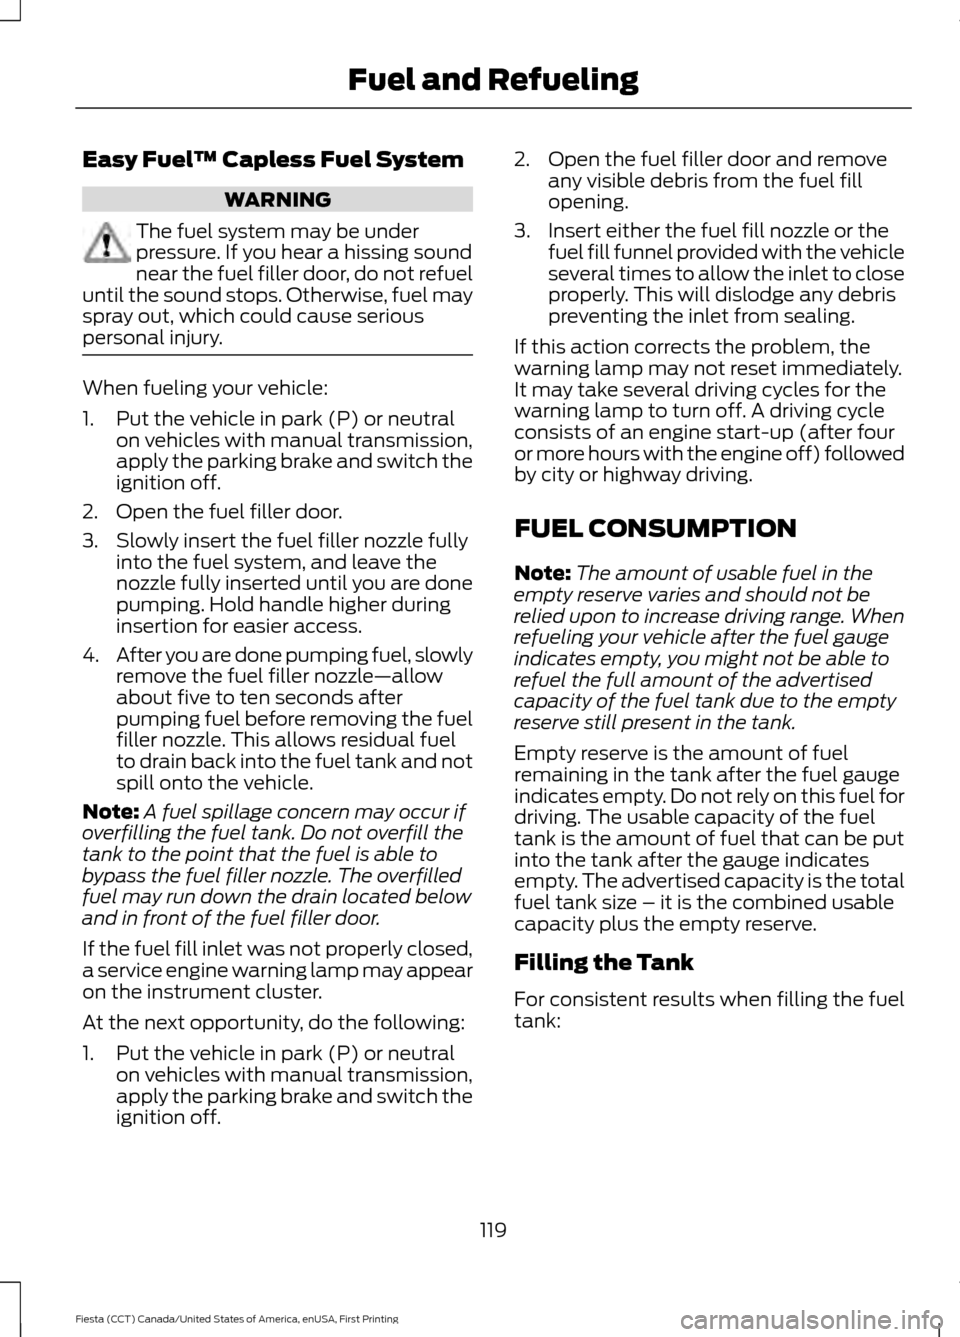
death. Adjusting the Lumbar Support (If
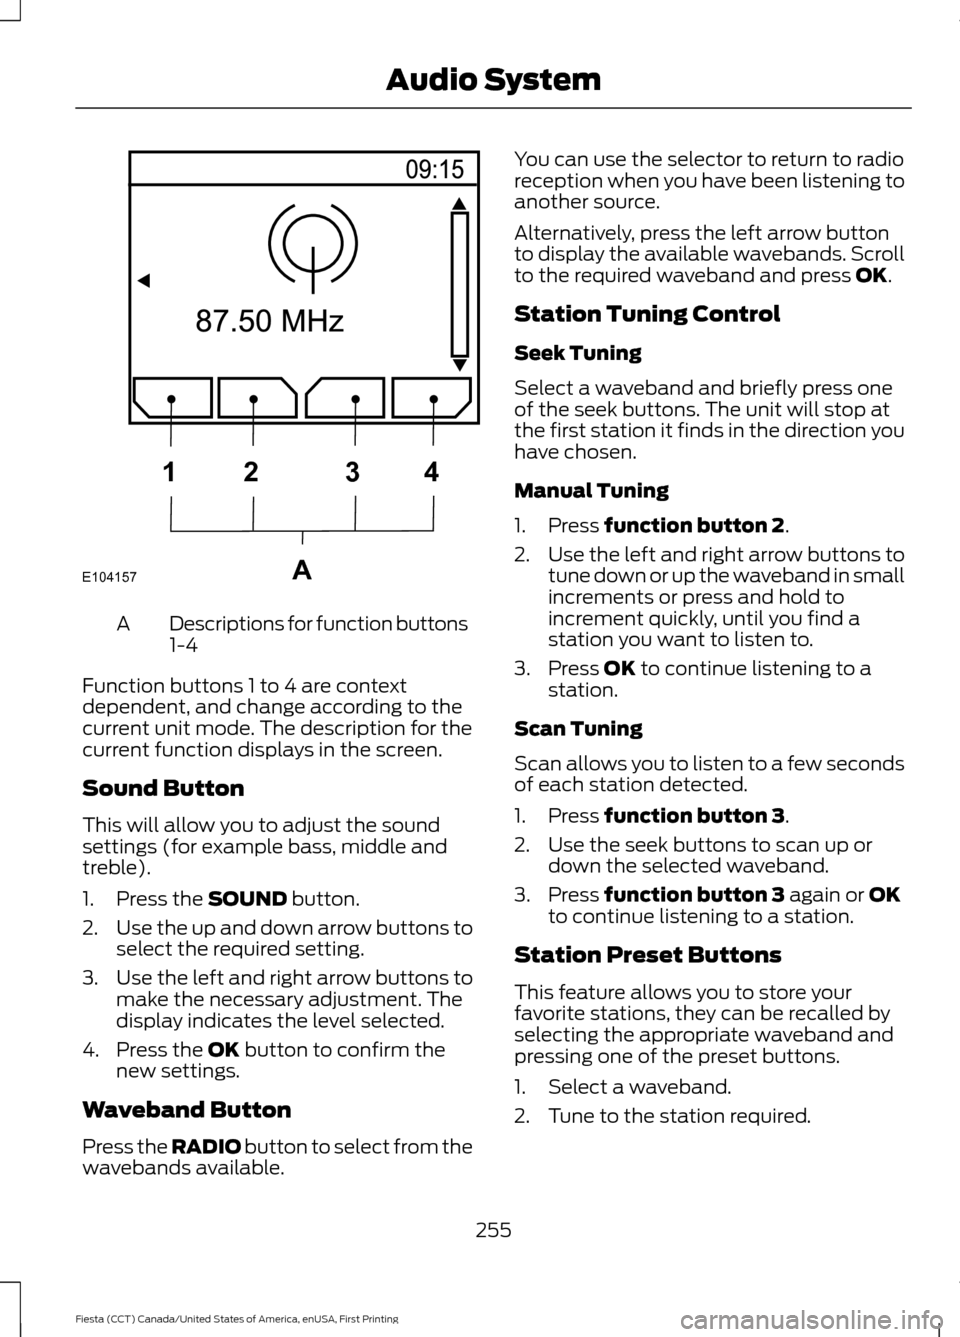
Equipped) Adjusting the Height of the Driver
Seat
105
Fiesta (CCT) Canada/United States of America, enUSA, First Printing SeatsE147926 E142199 E70730
Page 122 of 363

Easy Fuel
™ Capless Fuel System WARNING
The fuel system may be under
pressure. If you hear a hissing sound
near the fuel filler door, do not refuel
until the sound stops. Otherwise, fuel may
spray out, which could cause serious
personal injury. When fueling your vehicle:
1. Put the vehicle in park (P) or neutral
on vehicles with manual transmission,
apply the parking brake and switch the
ignition off.
2. Open the fuel filler door.
3. Slowly insert the fuel filler nozzle fully into the fuel system, and leave the
nozzle fully inserted until you are done
pumping. Hold handle higher during
insertion for easier access.
4. After you are done pumping fuel, slowly
remove the fuel filler nozzle—allow
about five to ten seconds after
pumping fuel before removing the fuel
filler nozzle. This allows residual fuel
to drain back into the fuel tank and not
spill onto the vehicle.
Note: A fuel spillage concern may occur if
overfilling the fuel tank. Do not overfill the
tank to the point that the fuel is able to
bypass the fuel filler nozzle. The overfilled
fuel may run down the drain located below
and in front of the fuel filler door.
If the fuel fill inlet was not properly closed,
a service engine warning lamp may appear
on the instrument cluster.
At the next opportunity, do the following:
1. Put the vehicle in park (P) or neutral on vehicles with manual transmission,
apply the parking brake and switch the
ignition off. 2. Open the fuel filler door and remove
any visible debris from the fuel fill
opening.
3. Insert either the fuel fill nozzle or the fuel fill funnel provided with the vehicle
several times to allow the inlet to close
properly. This will dislodge any debris
preventing the inlet from sealing.
If this action corrects the problem, the
warning lamp may not reset immediately.
It may take several driving cycles for the
warning lamp to turn off. A driving cycle
consists of an engine start-up (after four
or more hours with the engine off) followed
by city or highway driving.
FUEL CONSUMPTION
Note: The amount of usable fuel in the
empty reserve varies and should not be
relied upon to increase driving range. When
refueling your vehicle after the fuel gauge
indicates empty, you might not be able to
refuel the full amount of the advertised
capacity of the fuel tank due to the empty
reserve still present in the tank.
Empty reserve is the amount of fuel
remaining in the tank after the fuel gauge
indicates empty. Do not rely on this fuel for
driving. The usable capacity of the fuel
tank is the amount of fuel that can be put
into the tank after the gauge indicates
empty. The advertised capacity is the total
fuel tank size – it is the combined usable
capacity plus the empty reserve.
Filling the Tank
For consistent results when filling the fuel
tank:
119
Fiesta (CCT) Canada/United States of America, enUSA, First Printing Fuel and Refueling
Page 186 of 363

Note:
The oil consumption of new engines
reaches its normal level after approximately
3,000 mi (5,000 km).
Adding Engine Oil Only use oils certified for gasoline engines
by the American Petroleum Institute (API).
An oil with this trademark symbol
conforms to the current engine and
emission system protection standards and
fuel economy requirements of the
International Lubricants Specification
Advisory Council (ILSAC), comprised of
U.S. and Japanese automobile
manufacturers.
WARNINGS
Only add oil when the engine is cold.
If the engine is hot, wait 10 minutes
for the engine to cool down.
Do not remove the filler cap when
the engine is running.
1. Remove the engine oil filler cap.
2. Add engine oil that meets Ford
specifications. See
Maintenance
(page 177).
3. Wipe off any spilled oil.
4. Replace the engine oil filler cap. Turn it clockwise until you feel a strong
resistance. Note:
Do not add oil further than the
maximum mark. Oil levels above the
maximum mark may cause engine damage.
Note: Soak up any spillage with an
absorbent cloth immediately.
OIL CHANGE INDICATOR
RESET
Resetting the Oil Life Monitoring
System
Only reset the oil life monitoring system
after changing the engine oil and oil filter.
1. Switch the ignition on. Do not start the
engine. For vehicles with push-button
start, press and hold the start button
for two seconds without pressing the
brake pedal. Do not start the engine.
2. Press the accelerator and brake pedals
at the same time.
3. Keep the accelerator and brake pedals
fully pressed.
4. After three seconds, a message confirming that the reset is in progress
will be displayed.
5. After 25 seconds, a message confirming that the reset is complete
will be displayed.
6. Release the accelerator and brake pedals.
7. The message confirming that the reset
is complete will no longer be displayed.
8. Switch the ignition off. For vehicles with
push-button start, press the start
button to switch the ignition off.
183
Fiesta (CCT) Canada/United States of America, enUSA, First Printing MaintenanceE142732
Page 211 of 363

We engineer and test all motor vehicles
and their components for reliable, regular
driving. Under various conditions,
long-term storage may lead to degraded
engine performance or failure unless you
use specific precautions to preserve engine
components.
General
•
Store all vehicles in a dry, ventilated
place.
• Protect from sunlight, if possible.
• If vehicles are stored outside, they
require regular maintenance to protect
against rust and damage.
Body
• Wash your vehicle thoroughly to
remove dirt, grease, oil, tar or mud from
exterior surfaces, rear-wheel housing
and the underside of front fenders.
• Periodically wash your vehicle if it is
stored in exposed locations.
• Touch-up exposed or primed metal to
prevent rust.
• Cover chrome and stainless steel parts
with a thick coat of auto wax to prevent
discoloration. Re-wax as necessary
when you wash your vehicle.
• Lubricate all hood, door and luggage
compartment hinges and latches with
a light grade oil.
• Cover interior trim to prevent fading.
• Keep all rubber parts free from oil and
solvents. Engine
•
Change the engine oil and filter prior to
storage because used engine oil
contains contaminates which may
cause engine damage.
• Start the engine every 15 days for a
minimum of 15 minutes. Run at fast idle
with the climate controls set to defrost
until the engine reaches normal
operating temperature.
• With your foot on the brake, shift
through all the gears while the engine
is running.
• We recommend that you change the
engine oil before you use your vehicle
again.
Fuel system
• Fill the fuel tank with high-quality fuel
until the first automatic shutoff of the
fuel pump nozzle.
Cooling system
• Protect against freezing temperatures.
• When removing your vehicle from
storage, check coolant fluid level.
Confirm that there are no cooling
system leaks and that fluid is at the
recommended level.
Battery
• Check and recharge as necessary. Keep
connections clean.
• If storing your vehicle for more than 30
days without recharging the battery,
we recommend that you disconnect
the battery cables to maintain battery
charge for quick starting.
Note: It is necessary to reset memory
features if battery cables are disconnected.
208
Fiesta (CCT) Canada/United States of America, enUSA, First Printing Vehicle Care
Page 255 of 363

4. Press OK to continue listening to a
station.
Station Preset Buttons
This feature allows you to store your
favorite stations, they can be recalled by
selecting the appropriate waveband and
pressing one of the preset buttons.
1. Select a waveband.
2. Tune to the station required.
3. Press and hold one of the preset buttons. A progress bar and message
will appear. When the progress bar
completes the station has been stored.
The audio unit will also mute
momentarily as confirmation.
You can repeat this on each waveband and
for each preset button.
Note: When you drive to another part of the
country, stations that broadcast on
alternative frequencies and are stored on
preset buttons, may be updated with the
correct frequency and station name for that
area.
Autostore Control
Note: This will store up to a maximum of
the six strongest signals available, either
from the AM or the FM waveband and
overwrite the previously stored stations. You
can also store stations manually in the same
way as other wavebands.
• Press and hold the
RADIO button.
• When the search is complete, sound is
restored and the strongest signals are
stored on the autostore presets.
Automatic Volume Control
When available, automatic volume control
adjusts the volume level to compensate
for engine noise and road speed noise.
1. Press the
MENU button and select
Audio Settings. 2. Select
Spd. Comp. Vol.
3. Use the left or right arrow button to adjust the setting.
4. Press the
OK button to confirm your
selection.
5. Press the
MENU button to return.
Alternative Frequencies
The majority of programs that broadcast
on the FM waveband have a program
identification code that can be recognized
by audio units.
When your vehicle moves from one
transmission area to another with the
alternative frequencies tuning switched
on, this function will search for the
strongest station signal.
Under certain conditions, alternative
frequencies tuning may temporarily disrupt
normal reception.
When selected, the unit continually
evaluates signal strength and if a better
signal becomes available, the unit will
switch to that alternative. It mutes while
it checks a list of alternative frequencies
and if necessary, it will search once across
the selected waveband for a genuine
alternative frequency.
It will restore radio reception when it finds
one or if one is not found, the unit will
return to the original stored frequency.
When selected, AF
will be shown in the
display.
1. Press the
MENU button.
2. Select
Audio Settings.
3. Scroll to
Alternat. freq. or Alt.
Frequency and turn on or off with the
OK button.
4. Press the
MENU button to return.
252
Fiesta (CCT) Canada/United States of America, enUSA, First Printing Audio System
Page 258 of 363

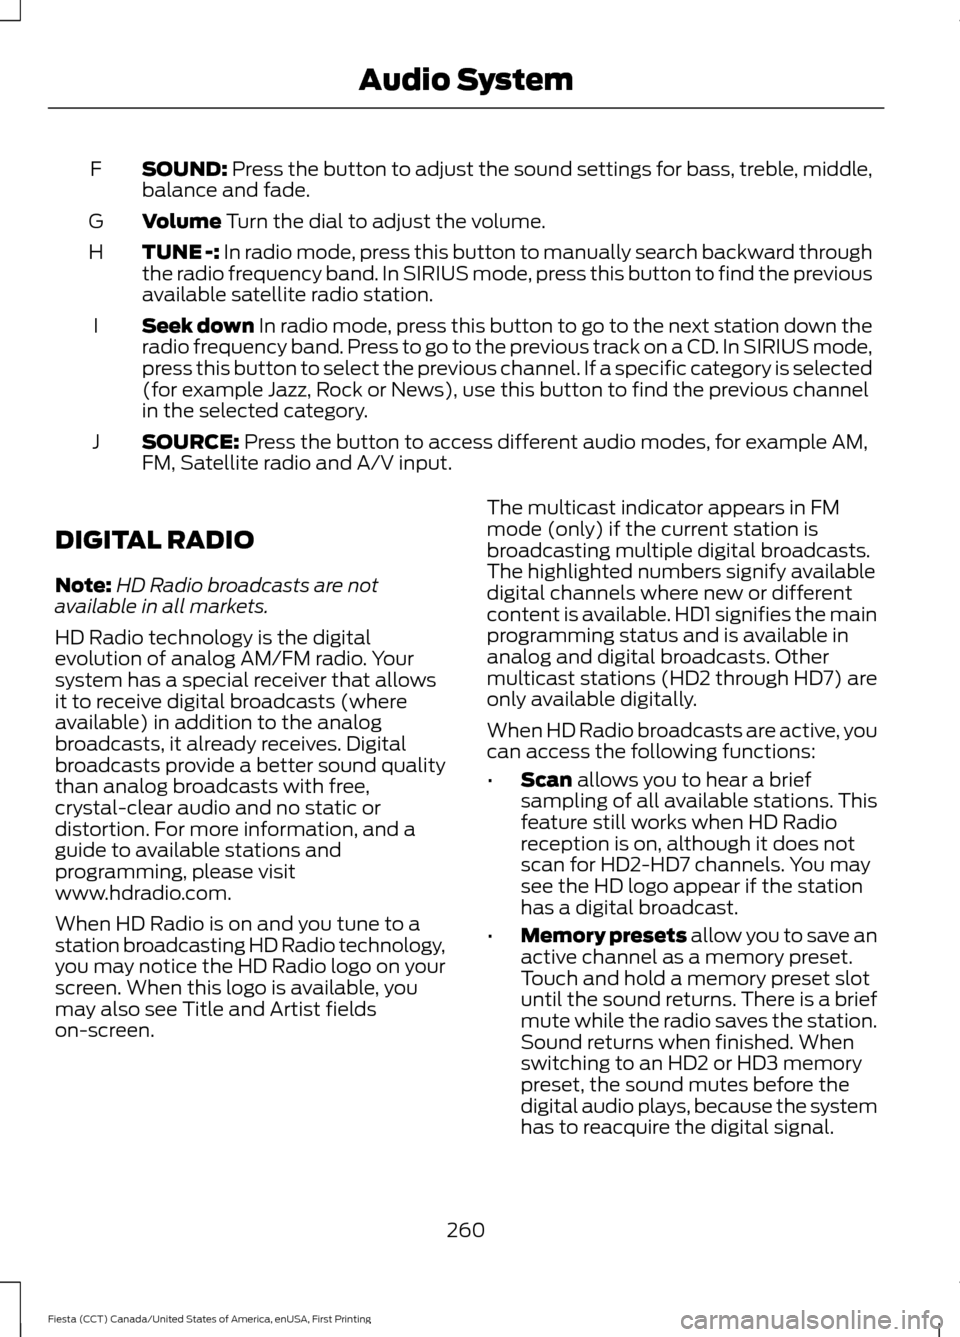
Descriptions for function buttons
1-4
A
Function buttons 1 to 4 are context
dependent, and change according to the
current unit mode. The description for the
current function displays in the screen.
Sound Button
This will allow you to adjust the sound
settings (for example bass, middle and
treble).
1. Press the SOUND button.
2. Use the up and down arrow buttons to
select the required setting.
3. Use the left and right arrow buttons to
make the necessary adjustment. The
display indicates the level selected.
4. Press the
OK button to confirm the
new settings.
Waveband Button
Press the
RADIO button to select from the
wavebands available. You can use the selector to return to radio
reception when you have been listening to
another source.
Alternatively, press the left arrow button
to display the available wavebands. Scroll
to the required waveband and press
OK.
Station Tuning Control
Seek Tuning
Select a waveband and briefly press one
of the seek buttons. The unit will stop at
the first station it finds in the direction you
have chosen.
Manual Tuning
1. Press
function button 2.
2. Use the left and right arrow buttons to
tune down or up the waveband in small
increments or press and hold to
increment quickly, until you find a
station you want to listen to.
3. Press
OK to continue listening to a
station.
Scan Tuning
Scan allows you to listen to a few seconds
of each station detected.
1. Press
function button 3.
2. Use the seek buttons to scan up or down the selected waveband.
3. Press
function button 3 again or OK
to continue listening to a station.
Station Preset Buttons
This feature allows you to store your
favorite stations, they can be recalled by
selecting the appropriate waveband and
pressing one of the preset buttons.
1. Select a waveband.
2. Tune to the station required.
255
Fiesta (CCT) Canada/United States of America, enUSA, First Printing Audio SystemE104157A
1
2 34
Page 259 of 363

3. Press and hold one of the preset
buttons. A progress bar and message
will appear. When the progress bar
completes the station has been stored.
The audio unit will also mute
momentarily as confirmation.
You can repeat this on each waveband and
for each preset button.
Note: When you drive to another part of the
country, stations that broadcast on
alternative frequencies, and are stored on
preset buttons, may be updated with the
correct frequency and station name for that
area.
Autostore Control
Note: This will store up to a maximum of
the 10 strongest signals available, either
from the AM or the FM waveband, and
overwrite the previously stored stations. You
can also store stations manually in the same
way as other wavebands.
• Press and hold the RADIO button.
• When the search is complete, sound is
restored and the strongest signals are
stored on the autostore presets.
Automatic Volume Control
When available, automatic volume control
adjusts the volume level to compensate
for engine noise and road speed noise.
1. Press the
MENU button and
selectAudio Settings.
2. Select
Spd. Comp. Vol.
3. Use the left or right arrow button to adjust the setting.
4. Press the
OK button to confirm your
selection.
5. Press the
MENU button to return. Alternative Frequencies
The majority of programs that broadcast
on the FM waveband have a program
identification code, it can be recognized by
audio units.
When your vehicle moves from one
transmission area to another with the
alternative frequencies tuning switched
on, this function will search for the
strongest station signal.
Under certain conditions, alternative
frequencies tuning may temporarily disrupt
normal reception.
When selected, the unit continually
evaluates signal strength and, if a better
signal becomes available, the unit will
switch to that alternative. It mutes while
it checks a list of alternative frequencies
and if necessary, it will search once across
the selected waveband for a genuine
alternative frequency.
It will restore radio reception when it finds
one or if one is not found, the unit will
return to the original stored frequency.
When selected,
AF
will be shown in the
display.
1. Press the
MENU button.
2. Select
Audio Settings.
3. Scroll to
Alternat. freq. or Alt.
Frequency. and turn on or off with the
OK button.
4. Press the
MENU button to return.
256
Fiesta (CCT) Canada/United States of America, enUSA, First Printing Audio System
Page 263 of 363

SOUND: Press the button to adjust the sound settings for bass, treble, middle,
balance and fade.
F
Volume
Turn the dial to adjust the volume.
G
TUNE -:
In radio mode, press this button to manually search backward through
the radio frequency band. In SIRIUS mode, press this button to find the previous
available satellite radio station.
H
Seek down
In radio mode, press this button to go to the next station down the
radio frequency band. Press to go to the previous track on a CD. In SIRIUS mode,
press this button to select the previous channel. If a specific category is selected
(for example Jazz, Rock or News), use this button to find the previous channel
in the selected category.
I
SOURCE:
Press the button to access different audio modes, for example AM,
FM, Satellite radio and A/V input.
J
DIGITAL RADIO
Note: HD Radio broadcasts are not
available in all markets.
HD Radio technology is the digital
evolution of analog AM/FM radio. Your
system has a special receiver that allows
it to receive digital broadcasts (where
available) in addition to the analog
broadcasts, it already receives. Digital
broadcasts provide a better sound quality
than analog broadcasts with free,
crystal-clear audio and no static or
distortion. For more information, and a
guide to available stations and
programming, please visit
www.hdradio.com.
When HD Radio is on and you tune to a
station broadcasting HD Radio technology,
you may notice the HD Radio logo on your
screen. When this logo is available, you
may also see Title and Artist fields
on-screen. The multicast indicator appears in FM
mode (only) if the current station is
broadcasting multiple digital broadcasts.
The highlighted numbers signify available
digital channels where new or different
content is available. HD1 signifies the main
programming status and is available in
analog and digital broadcasts. Other
multicast stations (HD2 through HD7) are
only available digitally.
When HD Radio broadcasts are active, you
can access the following functions:
•
Scan
allows you to hear a brief
sampling of all available stations. This
feature still works when HD Radio
reception is on, although it does not
scan for HD2-HD7 channels. You may
see the HD logo appear if the station
has a digital broadcast.
• Memory presets
allow you to save an
active channel as a memory preset.
Touch and hold a memory preset slot
until the sound returns. There is a brief
mute while the radio saves the station.
Sound returns when finished. When
switching to an HD2 or HD3 memory
preset, the sound mutes before the
digital audio plays, because the system
has to reacquire the digital signal.
260
Fiesta (CCT) Canada/United States of America, enUSA, First Printing Audio System