2016 FORD F250 SUPER DUTY steering wheel
[x] Cancel search: steering wheelPage 169 of 507

On some four-wheel drive vehicles, whenthe transfer case is in the N (Neutral)position, the engine and transmission aredisconnected from the rest of the driveline.Therefore, the vehicle is free to roll even ifthe automatic transmission is in P (Park)or the manual transmission is in gear. Donot leave the vehicle unattended with thetransfer case in the N (Neutral) position.Always set the parking brake fully and turnoff the ignition when leaving the vehicle.
Maintenance and Modifications
The suspension and steering systems onyour vehicle have been designed andtested to provide predictable performancewhether loaded or empty. For this reason,we strongly recommend that you do notmake modifications such as adding orremoving parts (i.e. lift kits or stabilizerbars) or by using replacement parts notequivalent to the original factoryequipment.
We recommend that you use caution whenyour vehicle has either a high load or device(i.e. ladder or luggage racks). Anymodifications to your vehicle that raise thecenter of gravity may cause your vehicleto roll over when there is a loss of vehiclecontrol.
Failure to maintain your vehicle correctlymay void the warranty, increase your repaircost, reduce vehicle performance andoperational capabilities and adverselyaffect you and your passenger's safety. Werecommend you frequently inspect yourvehicle's chassis components when yourvehicle is subject to off road usage.
166
Super Duty (TFA) Canada/United States of America, enUSA, First Printing
Four-Wheel Drive (If Equipped)
Page 170 of 507

LIMITED SLIP DIFFERENTIAL
This axle provides added traction onslippery surfaces, particularly when onewheel is on a poor traction surface. Undernormal conditions, the limited-slip axlefunctions like a standard rear axle. The axlemay exhibit a slight noise or vibrationduring tight turns with low vehicle speed.This is normal behavior and indicates theaxle is working.
ELECTRONIC LOCKING
DIFFERENTIAL (If Equipped)
Note:The electronic locking differential isfor off-road use only and is not for use ondry pavement. Using the electronic lockingdifferential on dry pavement will result inincreased tire wear, noise and vibration.
The electronic locking differential is adevice housed in the rear axle that allowsboth rear wheels to turn at the samespeed. The electronic locking differentialcan provide additional traction should yourvehicle become stuck. You can activatethe differential electronically and shift iton the fly within the differential operatingspeed range. The differential is for use inmud, rocks, sand, or any off-road conditionwhere you need maximum traction. It isnot for use on dry pavement.
The following conditions will affect theelectronic locking differential:
•On 2WD vehicles and 4WD vehicles in2H (4X2) or 4H (4X4 High), the ELDwill not engage if the vehicle speed isabove 20 mph (32 km/h).
•On 2WD vehicles and 4WD vehicles in2H (4X2) or 4H (4X4 High), the ELDwill automatically disengage at speedsabove 25 mph (40 km/h) and willautomatically reengage at speedsbelow 20 mph (32 km/h).
•On 4WD vehicles in 4L (4X4 Low), theELD can be engaged at any speed andwill not automatically disengage.
Activating the Electronic LockingDifferential
Note:Do not use electronic lockingdifferential on dry, hard surfaced roads.Doing so will produce excessive noise,vibration and increase tire wear.
Note:If the electronic locking differentialhas difficulty disengaging, release theaccelerator pedal and turn the steeringwheel in the opposite direction while rolling.
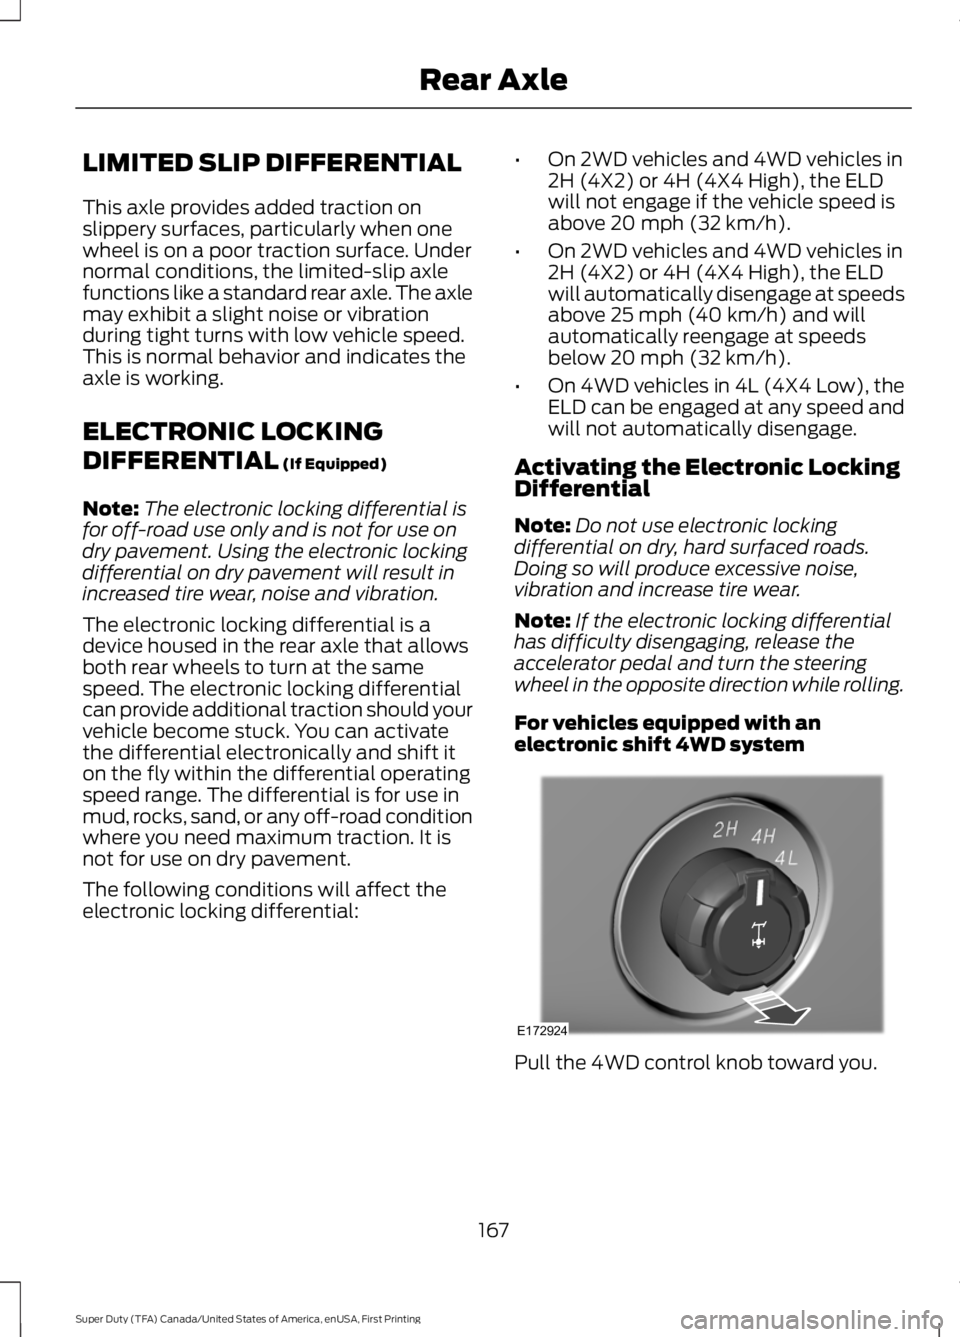
For vehicles equipped with anelectronic shift 4WD system
Pull the 4WD control knob toward you.
167
Super Duty (TFA) Canada/United States of America, enUSA, First Printing
Rear AxleE172924
Page 172 of 507

GENERAL INFORMATION
Note:Occasional brake noise is normal. Ifa metal-to-metal, continuous grinding orcontinuous squeal sound is present, thebrake linings may be worn-out. Have thesystem checked by an authorized dealer. Ifyour vehicle has continuous vibration orshudder in the steering wheel while braking,have it checked by an authorized dealer.
Note:Brake dust may accumulate on thewheels, even under normal drivingconditions. Some dust is inevitable as thebrakes wear and does not contribute tobrake noise. See Cleaning the AlloyWheels (page 261).
See Warning Lamps andIndicators (page 84).
Wet brakes result in reduced brakingefficiency. Gently press the brake pedal afew times when driving from a car wash orstanding water to dry the brakes.
Brake Over Accelerator
In the event the accelerator pedalbecomes stuck or entrapped, apply steadyand firm pressure to the brake pedal toslow the vehicle and reduce engine power.If you experience this condition, apply thebrakes and bring your vehicle to a safestop. Move the transmission to park (P),switch the engine off and apply the parkingbrake. Inspect the accelerator pedal forany interference. If none are found and thecondition persists, have your vehicle towedto the nearest authorized dealer.
Brake Assist
Brake assist detects when you brakerapidly by measuring the rate at which youpress the brake pedal. It providesmaximum braking efficiency as long as youpress the pedal, and can reduce stoppingdistances in critical situations.
Anti-lock Brake System
This system helps you maintain steeringcontrol during emergency stops by keepingthe brakes from locking.
This lamp momentarilyilluminates when you turn theignition on. If the light does notilluminate during start up, remains on orflashes, the system may be disabled. Havethe system checked by an authorizeddealer. If the anti-lock brake system isdisabled, normal braking is still effective.
If the brake warning lampilluminates when you release theparking brake, have the systemchecked by an authorized dealer.
HINTS ON DRIVING WITH
ANTI-LOCK BRAKES
Note:When the system is operating, thebrake pedal will pulse and may travelfurther. Maintain pressure on the brakepedal. You may also hear a noise from thesystem. This is normal.
The anti-lock braking system will noteliminate the risks when:
•You drive too closely to the vehicle infront of you.
•Your vehicle is hydroplaning.
•You take corners too fast.
•The road surface is poor.
169
Super Duty (TFA) Canada/United States of America, enUSA, First Printing
BrakesE144522 E144522
Page 177 of 507

PRINCIPLE OF OPERATION
WARNINGS
Vehicle modifications involvingbraking system, aftermarket roofracks, suspension, steering system,tire construction and wheel and tire sizemay change the handling characteristicsof your vehicle and may adversely affectthe performance of the AdvanceTracsystem. In addition, installing any stereoloudspeakers may interfere with andadversely affect the AdvanceTrac system.Install any aftermarket stereo loudspeakeras far as possible from the front centerconsole, the tunnel, and the front seats inorder to minimize the risk of interfering withthe AdvanceTrac sensors. Reducing theeffectiveness of the AdvanceTrac systemcould lead to an increased risk of loss ofvehicle control, vehicle rollover, personalinjury and death.
Remember that even advancedtechnology cannot defy the laws ofphysics. It’s always possible to losecontrol of a vehicle due to inappropriatedriver input for the conditions. Aggressivedriving on any road condition can causeyou to lose control of your vehicleincreasing the risk of personal injury orproperty damage. Activation of theAdvanceTrac system is an indication thatat least some of the tires have exceededtheir ability to grip the road; this couldreduce the operator’s ability to control thevehicle potentially resulting in a loss ofvehicle control, vehicle rollover, personalinjury and death. If your AdvanceTracsystem activates, SLOW DOWN.
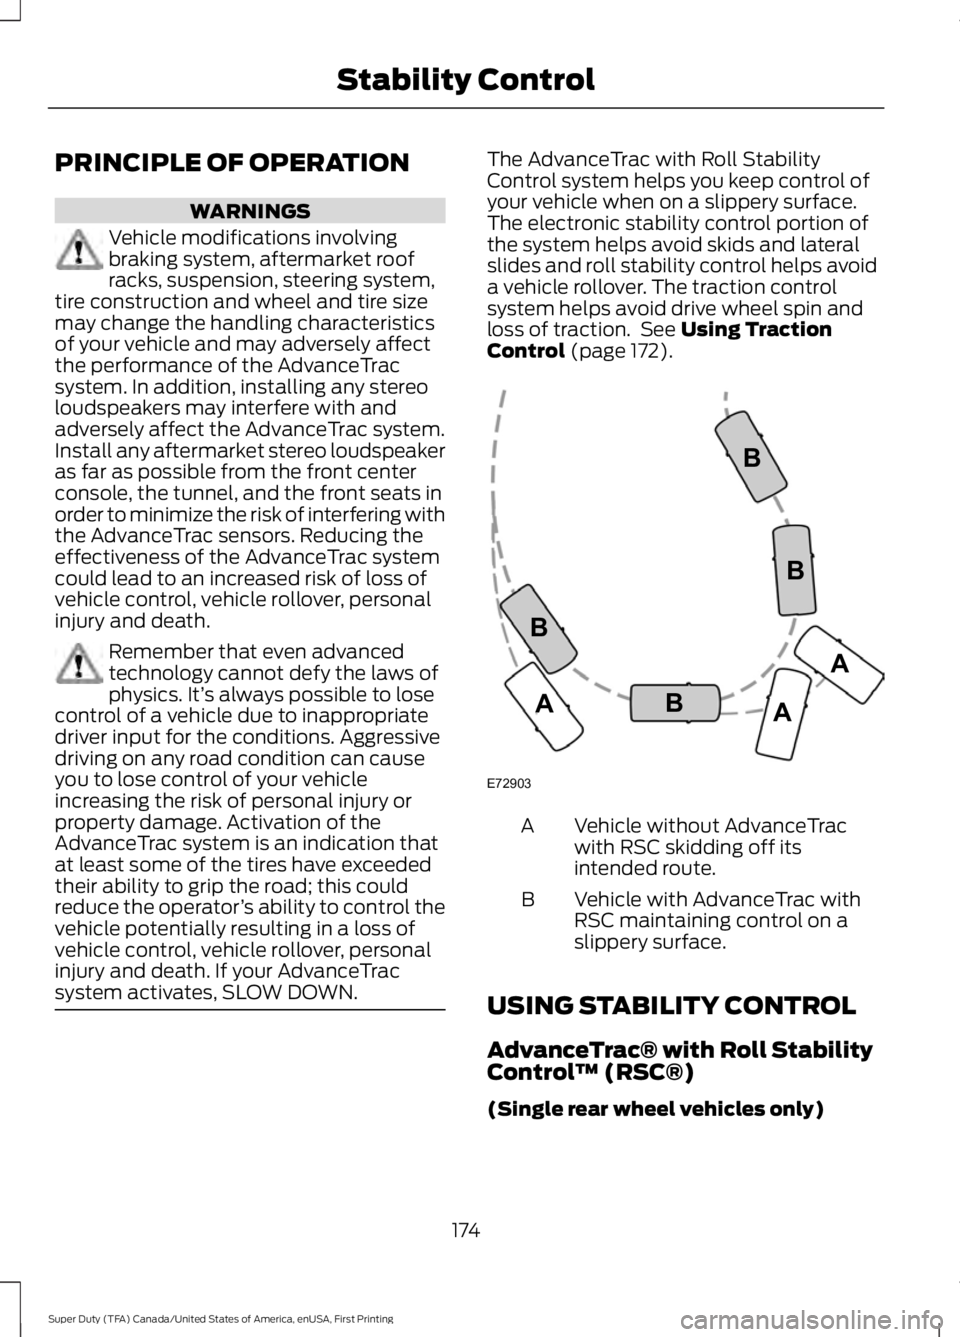
The AdvanceTrac with Roll StabilityControl system helps you keep control ofyour vehicle when on a slippery surface.The electronic stability control portion ofthe system helps avoid skids and lateralslides and roll stability control helps avoida vehicle rollover. The traction controlsystem helps avoid drive wheel spin andloss of traction. See Using TractionControl (page 172).
Vehicle without AdvanceTracwith RSC skidding off itsintended route.
A
Vehicle with AdvanceTrac withRSC maintaining control on aslippery surface.
B
USING STABILITY CONTROL
AdvanceTrac® with Roll StabilityControl™ (RSC®)
(Single rear wheel vehicles only)
174
Super Duty (TFA) Canada/United States of America, enUSA, First Printing
Stability ControlE72903A
AA
B
BB
B
Page 185 of 507

Fixed guidelines are always shown in thedisplay, but the active guidelines onlydisplay when the steering wheel is turned.To use active guidelines, turn the steeringwheel to point the guidelines toward anintended path. If the steering wheelposition is changed while reversing, thevehicle might deviate from the originalintended path.
The active guidelines fade in and outdepending on the steering wheel position.The active guidelines are not shown whenthe steering wheel position is straight.
Always use caution while reversing.Objects in the red zone are closest to yourvehicle and objects in the green zone arefarther away. Objects are getting closer toyour vehicle as they move from the greenzone to the yellow or red zones. Use theside view mirrors and rear view mirror toget better coverage on both sides and rearof your vehicle.
Enhanced Park Aids
Note:Enhanced park aids is only availablewhen the transmission is in reverse (R).
Note:The reverse sensing system is noteffective at speeds above 3 mph (5 km/h)and may not detect certain angular ormoving objects.
The system uses red, yellow and greenhighlights which appear on top of the videoimage when an object is detected by thereverse sensing system. The alert highlightsthe closest object detected. The reversesensing alert can be disabled and if visualpark aid alert is enabled, highlighted areasare still displayed.
Selectable settings for this feature are ONand OFF.
Manual Zoom
WARNING
When manual zoom is on, the fullarea behind your vehicle is notshown. Be aware of yoursurroundings when using the manual zoomfeature.
Note:Manual zoom is only available whenthe transmission is in reverse (R).
Note:When manual zoom is enabled, onlythe centerline is shown.
This feature allows you to get a closer viewof an object behind your vehicle (forexample, a trailer). The zoomed imagekeeps the bumper in the image to providea reference. The zoom is only active whilethe transmission is in reverse (R). Whenthe transmission is shifted out of reverse(R), the feature automatically turns offand must be reset when it is used again.
Selectable settings for this feature is OFF,Level 1, Level 2 and Level 3. The selectedlevel will appear between the buttons (forexample, Level 1) The default setting forthe manual zoom is OFF.
Rear Camera Delay
When shifting the transmission out ofreverse (R) and into any gear other thanpark (P), the camera image remains in thedisplay until your vehicle speed reaches5 mph (8 km/h). This occurs when the rearcamera delay feature is on or until a radiobutton is selected.
Selectable settings for this feature are ONand OFF. The default setting for the rearcamera delay is ON.
182
Super Duty (TFA) Canada/United States of America, enUSA, First Printing
Parking Aids
Page 186 of 507

PRINCIPLE OF OPERATION
Cruise control lets you maintain a setspeed without keeping your foot on theaccelerator pedal. You can use cruisecontrol when your vehicle speed is greaterthan 20 mph (30 km/h).
USING CRUISE CONTROL
WARNINGS
Do not use cruise control in heavytraffic, on winding roads or when theroad surface is slippery. This couldresult in loss of vehicle control, seriousinjury or death.
When you are going downhill, yourvehicle speed may increase abovethe set speed. The system will notapply the brakes. Change down a gear toassist the system in maintaining the setspeed. Failure to do so could result in lossof vehicle control, serious injury or death.
Note:Cruise control will disengage if thevehicle speed decreases more than 10 mph(16 km/h) below your set speed whiledriving uphill.
The cruise controls are located on thesteering wheel.
Switching Cruise Control On
Press and release ON.
The indicator will appear in theinstrument cluster.
Setting a Speed
1. Accelerate to the desired speed.
2. Press and release SET+.
3. Take your foot off the acceleratorpedal.
The indicator will change colors in theinstrument cluster.
Changing the Set Speed
Note:If you accelerate by pressing theaccelerator pedal, the set speed will notchange. When you release the acceleratorpedal, you will return to the speed that youpreviously set.
•Press and hold SET+ or SET-. Releasethe control when you reach the desiredspeed.
•Press and release SET+ or SET-. Theset speed will change in approximately1 mph (2 km/h) increments.
•Press the accelerator or brake pedaluntil you reach the desired speed. Pressand release SET+.
Canceling the Set Speed
Press CNCL or tap the brake pedal. Youwill not erase the set speed.
Resuming the Set Speed
Press and release RSM.
Switching Cruise Control Off
Note:You will erase the set speed if youswitch the system off.
Press and release OFF or switch theignition off.
183
Super Duty (TFA) Canada/United States of America, enUSA, First Printing
Cruise Control (If Equipped)E163053 E71340
Page 187 of 507

STEERING
To help prevent damage to the powersteering system:
•Never hold the steering wheel at itsfurthest turning points (until it stops)for more than three to five secondswhen the engine is running.
•Do not operate the vehicle with a lowpower steering pump fluid level (belowthe MIN mark on the reservoir).
•Some noise is normal during operation.If excessive, check for low powersteering pump fluid level beforeseeking service by your dealer.
•Heavy or uneven efforts may be causedby low power steering fluid. Check forlow power steering pump fluid levelbefore seeking service by your dealer.
•Do not fill the power steering pumpreservoir above the MAX mark on thereservoir, as this may result in leaksfrom the reservoir.
If the power steering system breaks down(or if the engine is turned off), you cansteer the vehicle manually, but it takesmore effort.
If the steering wanders or pulls, check for:
•an improperly inflated tire
•uneven tire wear
•loose or worn suspension components
•loose or worn steering components
•improper vehicle alignment
If any steering components are serviced orreplaced, install new fasteners (many arecoated with thread adhesive or haveprevailing torque features which may notbe re-used). Never re-use a bolt or nut.Torque fasteners to specifications.
A high crown in the road or high crosswindsmay also make the steering seem towander or pull.
184
Super Duty (TFA) Canada/United States of America, enUSA, First Printing
Driving Aids
Page 200 of 507

Remember to account for the trailertongue weight as part of your vehicle loadwhen calculating the total vehicle weight.
Trailer Towing Connector
When attaching the trailer wiring connectorto your vehicle, only use a proper fittingconnector that works with the vehicle andtrailer functions. Some seven-positionconnectors may have the SAE J2863 logo,which confirms that it is the proper wiringconnector and works correctly with yourvehicle.
FunctionColor
Left turn signal and stop lampYellow
Ground (-)White
Electric brakesBlue
Right turn signal and stoplampGreen
Battery (+)Orange
Running lightsBrown
Reverse lightsGrey
Dynamic Hitching Using the RearView Camera System
Note:Active guidelines and fixed guidelinesare only available when the transmission isin reverse (R).
Use the centerline (B) guideline to assistyou in setting your steering wheel properlyto help align the trailer hitch and tongue.
Active guidelinesA
CenterlineB
Fixed guideline: Green zoneC
Fixed guideline: Yellow zoneD
Fixed guideline: Red zoneE
Rear bumperF
197
Super Duty (TFA) Canada/United States of America, enUSA, First Printing
TowingE163167 ABCD
F
E
E142436