Page 296 of 507

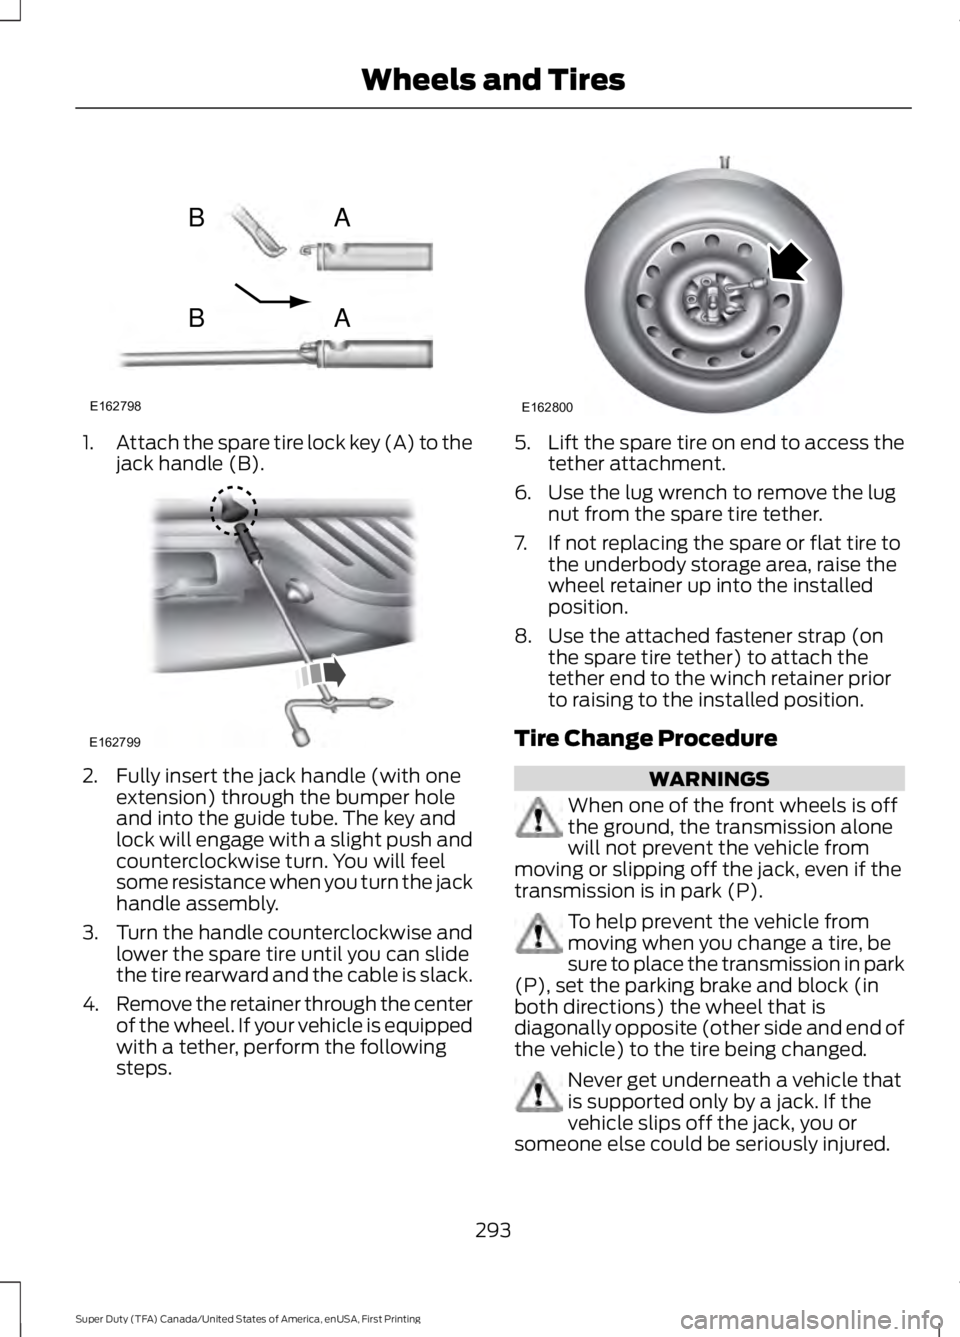
1.Attach the spare tire lock key (A) to thejack handle (B).
2. Fully insert the jack handle (with oneextension) through the bumper holeand into the guide tube. The key andlock will engage with a slight push andcounterclockwise turn. You will feelsome resistance when you turn the jackhandle assembly.
3.Turn the handle counterclockwise andlower the spare tire until you can slidethe tire rearward and the cable is slack.
4.Remove the retainer through the centerof the wheel. If your vehicle is equippedwith a tether, perform the followingsteps.
5.Lift the spare tire on end to access thetether attachment.
6. Use the lug wrench to remove the lugnut from the spare tire tether.
7. If not replacing the spare or flat tire tothe underbody storage area, raise thewheel retainer up into the installedposition.
8. Use the attached fastener strap (onthe spare tire tether) to attach thetether end to the winch retainer priorto raising to the installed position.
Tire Change Procedure
WARNINGS
When one of the front wheels is offthe ground, the transmission alonewill not prevent the vehicle frommoving or slipping off the jack, even if thetransmission is in park (P).
To help prevent the vehicle frommoving when you change a tire, besure to place the transmission in park(P), set the parking brake and block (inboth directions) the wheel that isdiagonally opposite (other side and end ofthe vehicle) to the tire being changed.
Never get underneath a vehicle thatis supported only by a jack. If thevehicle slips off the jack, you orsomeone else could be seriously injured.
293
Super Duty (TFA) Canada/United States of America, enUSA, First Printing
Wheels and TiresE162798
AB
AB E162799 E162800
Page 297 of 507

WARNINGS
Do not attempt to change a tire onthe side of the vehicle close tomoving traffic. Pull far enough off theroad to avoid the danger of being hit whenoperating the jack or changing the wheel.
Always use the jack provided asoriginal equipment with your vehicle.If using a jack other than the oneprovided as original equipment with yourvehicle, make sure the jack capacity isadequate for the vehicle weight, includingany vehicle cargo or modifications.
Note:Passengers should not remain in thevehicle when the vehicle is being jacked.
Park on a level surface, set the parkingbrake and activate the hazard flashers.
1.Turn the engine off and block the wheelthat is diagonally opposite of the flattire using the wheel chock.Note: Lockthe manual hub on the wheel if thevehicle is a 4x4.
2. Remove the jack, jack handle, lugwrench and spare tire from thestowage locations.
3.Use the tip of the lug wrench to removeany wheel trim.
4. Loosen each wheel lug nut ½ turncounterclockwise, but do not removethem until the wheel is raised off theground.
F-250 and F-350 Single Rear WheelVehicles
1. Insert the hooked end of the jackhandle into the jack and use the handleto slide the jack under the vehicle.
2. Position the jack according to thefollowing guides:
Front (4x2)
294
Super Duty (TFA) Canada/United States of America, enUSA, First Printing
Wheels and TiresE142551 E162801 E162802
Page 300 of 507
1. Slide the notched end of the jackhandle over the release valve and usethe handle to slide the jack under thevehicle. Make sure the valve is closedby turning it clockwise.
2. Position the jack according to thefollowing guides:
Front (4x2): F-350 dual rear wheel
Note:Place the jack directly under theI-beam.
Front driver side (4x4): F-350 dual rearwheel
Note:Make sure the jack fits onto the flatarea on the outboard side of the differentialhousing.
Front passenger side (4x4): F-350 dualrear wheel
Note:View shown from the rear of thevehicle to clearly identify the jack point.
Note:Place the jack directly under the axleand inboard of the radius arm so that thejack clears the radius arm.
Front: F-450 and F-550
297
Super Duty (TFA) Canada/United States of America, enUSA, First Printing
Wheels and TiresE162813 E162814 E162815 E162816
Page 322 of 507

CLK: Press this button to switch the display between the clock and radiofrequency. To set the time, press and hold the button until the hours start toflash. Press the arrow buttons (B) to adjust the hours, then repeat to set theminutes. Press CLK again to exit clock mode.
A
Tune: Press these arrow buttons to manually search through the radio frequencyband. Press and hold for a fast search. In AUDIO mode, press the buttons toadjust different sound settings.
B
AUDIO: Press this button to access settings for Treble, Middle, Bass, Fade andBalance.C
SEEK: Press this button to go to the previous or next strong station on thefrequency band.D
Memory presets: Store your favorite radio stations. To store a radio station,tune to the station, then press and hold a preset button until sound returns.E
AM/FM: Press this button to select a frequency band.F
VOL-PUSH: Press the button to switch the system on and off. Turn the controlto adjust the volume.G
AUDIO UNIT - VEHICLES WITH:
AM/FM/CD/SYNC
WARNING
Driving while distracted can result inloss of vehicle control, crash andinjury. We strongly recommend thatyou use extreme caution when using anydevice that may take your focus off theroad. Your primary responsibility is the safeoperation of your vehicle. We recommendagainst the use of any hand-held devicewhile driving and encourage the use ofvoice-operated systems when possible.Make sure you are aware of all applicablelocal laws that may affect the use ofelectronic devices while driving.
319
Super Duty (TFA) Canada/United States of America, enUSA, First Printing
Audio System
Page 378 of 507

This system uses a four-corner strategy toprovide quick access to several vehiclefeatures and settings. The touchscreenprovides easy interaction with your cellphone, entertainment, information andsystem settings. The corners display activemodes within the menus, for example; yourcell phone's status.
Note:Some features are not available whileyour vehicle is moving.
Note:You can access the entertainmentfeatures for 30 minutes after you switch theignition off, and no doors are opened.
PHONE
Press to select any of the following:
Message
Phone
Quick Dial
Phonebook
History
Messaging
Settings
NAVIGATION
Press to select any of the following:
Message
My Home
Favorites
Previous Destinations
Point of Interest
Emergency
Street Address
Intersection
Message
City Center
Map
Edit Route
Cancel Route
CLIMATE
Press the corresponding icons to controlthe following options:
•Driver Settings
•Recirculated Air
•Auto
•Dual
•Passenger Settings
•A/C
•Defrost
SETTINGS
Press to select any of the following:
Message
Clock
Display
Sound
Vehicle
Settings
Help
HOME
Press to access the homescreen.
375
Super Duty (TFA) Canada/United States of America, enUSA, First Printing
MyFord Touch™ (If Equipped)E142607 E142613
Page 385 of 507
SETTINGS
MessageItem
ClockA
DisplayB
SoundC
VehicleD
SettingsE
HelpF
Clock
Under this menu, you can set the clock,access and adjust the display, sound andvehicle settings as well as access settingsfor specific modes or the help feature.
To make adjustments using the touchscreen, select:
Action and DescriptionMenu Item
Press the settings icon.Settings
Press the + or - to adjust the time.ClockFrom this screen, you can also make other adjustments suchas 12-hour or 24-hour mode, activate GPS time synchroniza-tion and have the system automatically update new timezones.
382
Super Duty (TFA) Canada/United States of America, enUSA, First Printing
MyFord Touch™ (If Equipped)A
B
C
D
E
F
E161968
Page 386 of 507

Action and DescriptionMenu Item
You can also switch the outside air temperature display offand on. It appears at the top center of the touchscreen, nextto the time and date.
Note:You cannot manually set the date. Your vehicle’s GPS does this for you.
Note:If the battery has been disconnected, your vehicle needs to acquire a GPS signal toupdate the clock. Once your vehicle acquires the signal, it may take a few minutes for theupdate to display the correct time.
Display
You can adjust the display using thetouchscreen or the voice button on thesteering wheel controls.
To make adjustments using the touchscreen, select:
Action and DescriptionMenu Item
Press the settings icon.Settings
Display
Then select from the following:
When set to On, lets you use the automatic dimming feature.Auto DimWhen set to Off you are able to adjust the brightness of the screen.
Make the screen display brighter or dimmer.Brightness
Allows you to switch the display off. It also allows you to set the screento a certain brightness or have the system automatically change basedon the outside light level.
Mode
If you also select:
These features will allow you to adjust the dimming ofyour screen.Auto
Night
Allows you to adjust screen dimming as the outside lighting conditionschange from day to night.Auto DimManual Offset
Allows you to display the default photo or upload your own.Edit Wallpaper
383
Super Duty (TFA) Canada/United States of America, enUSA, First Printing
MyFord Touch™ (If Equipped)
Page 434 of 507

Touch the + or – to increase or decrease the air temperature on the passengerside of the vehicle.
Touch the heated seat icon to turn the heated seat off and on (if equipped).
Touch the climate-controlled seat icon to turn the climate-controlled seat offand on (if equipped).
Note:If your vehicle is equipped with awood-trimmed steering wheel, it does notheat between the 10 o'clock and 2 o'clockpositions.
Climate Control Voice Commands
Press the voice button on thesteering wheel controls. Whenprompted, say any of thefollowing or a similar command:
Voice commands
Climate On
Climate Off
Adjust the temperature between 59.0°F(15°C)-86.0°F (30°C).Set temperature
NAVIGATION
Note:The navigation SD card must be inthe SD card slot to operate the navigationsystem. If you need a replacement SD card,see an authorized dealer.
Note:The SD card slot is spring-loaded. Toremove the SD card, just push the card inand release it. Do not attempt to pull thecard out to remove it; this could causedamage.
Your navigation system is comprised oftwo main features, destination mode andmap mode.
Destination Mode
To set a destination, press the greencorner of your touchscreen, then press:
Menu Item
Dest.
Choose any of the following:
My Home
Favorites
Previous Destinations
Point of Interest
Emergency
Street Address
Intersection
City Center
431
Super Duty (TFA) Canada/United States of America, enUSA, First Printing
MyFord Touch™ (If Equipped)E142599