2016 FORD F250 SUPER DUTY oil level
[x] Cancel search: oil levelPage 86 of 507

Engine Oil Pressure Gauge
Indicates engine oil pressure. The needleshould stay in the normal operating range(between L and H). If the needle fallsbelow the normal range, stop the vehicle,turn off the engine and check the engineoil level. Add oil if needed. If the oil level iscorrect, have your vehicle checked by yourauthorized dealer.
Engine Coolant TemperatureGauge
WARNING
Never remove the coolant reservoircap while the engine is running or hot.
Indicates engine coolant temperature. Atnormal operating temperature, the levelindicator will be in the normal range. If theengine coolant temperature exceeds thenormal range, stop the vehicle as soon assafely possible, switch off the engine andlet the engine cool.
Transmission Fluid TemperatureGauge
Indicates transmission fluid temperature.At normal operating temperature, the levelindicator will be in the normal range. If thetransmission fluid temperature exceedsthe normal range, stop the vehicle as soonas safely possible and verify the airflow isnot restricted such as snow or debrisblocking airflow through the grill. Also,higher than normal operating temperaturecan be caused by special operationconditions (i.e. snowplowing, towing oroff-road use). Refer to Special operatingconditions in the scheduled maintenanceinformation for instructions. Operating the
transmission for extended periods of timewith the gauge in the higher than normalarea may cause internal transmissiondamage. Altering the severity of the drivingconditions is recommended to lower thetransmission temperature into the normalrange. If the gauge continues to show hightemperatures, see your authorized dealer.
Fuel Gauge
Note:The fuel gauge may vary slightlywhen your vehicle is moving or on a gradient.
Switch the ignition on. The fuel gauge willindicate approximately how much fuel isleft in the fuel tank. The arrow adjacent tothe fuel pump symbol indicates on whichside of your vehicle the fuel filler door islocated.
The needle should move toward F whenyou refuel your vehicle. If the needle pointsto E after adding fuel, this indicates yourvehicle needs service soon.
After refueling some variability in needleposition is normal:
•It may take a short time for the needleto reach F after leaving the gas station.This is normal and depends upon theslope of pavement at the gas station.
•The fuel amount dispensed into thetank is a little less or more than thegauge indicated. This is normal anddepends upon the slope of pavementat the gas station.
•If the gas station nozzle shuts offbefore the tank is full, try a differentgas pump nozzle.
Low Fuel Reminder
A low fuel reminder triggers when the fuelgauge needle is at 1/16th.
83
Super Duty (TFA) Canada/United States of America, enUSA, First Printing
Instrument Cluster
Page 88 of 507

WARNING
Driving your vehicle with the warninglamp on is dangerous. A significantdecrease in braking performancemay occur. It will take you longer to stopyour vehicle. Have your vehicle checked byyour authorized dealer immediately. Drivingextended distances with the parking brakeengaged can cause brake failure and therisk of personal injury.
Check Fuel Cap (If Equipped)
Illuminates when the fuel capmay not be properly installed.Continued driving with this lighton may cause the Service engine soonwarning indicator to come on.
Cruise Control (If Equipped)
Illuminates when you switch thisfeature on. See Using CruiseControl (page 183).
Direction Indicator
Illuminates when the left or rightturn signal or the hazard warningflasher is turned on. If theindicators stay on or flash faster, check fora burned out bulb.
Door Ajar
Displays when the ignition is onand any door is not completelyclosed.
Electronic Locking Differential
Illuminates when using theelectronic locking differential.
Engine Coolant Temperature
Illuminates when the enginecoolant temperature is high.Stop the vehicle as soon aspossible, switch off the engine and let cool.
Engine Oil
If it illuminates with the enginerunning or when you are driving,this indicates a malfunction.Stop your vehicle as soon as it is safe todo so and switch the engine off. Check theengine oil level. See Engine Oil Check(page 235).
Note:Do not resume your journey if itilluminates despite the level being correct.Have the system checked by your authorizeddealer immediately.
Fasten Safety Belt
It will illuminate and a chime willsound to remind you to fastenyour safety belt.
Front Airbag
If it fails to illuminate when youstart your vehicle, continues toflash or remains on, it indicatesa malfunction. Have the system checkedby your authorized dealer.
High Beam
Illuminates when you switch thehigh beam headlamps on. It willflash when you use theheadlamp flasher.
Hill Descent (If Equipped)
Illuminates when hill descent isswitched on.
85
Super Duty (TFA) Canada/United States of America, enUSA, First Printing
Instrument Cluster E71340 E163170 E163171
Page 94 of 507

EXHAUST FILTER
For more information, refer to the Dieselsupplement.
System check and vehicle featurecustomization
Press the SETUP button repeatedly tocycle the information display through thefollowing features:
Note:Some options may appear slightlydifferent or not at all if the items areoptional.
Note:When returning to the SETUP menuand you selected a non-English language,HOLD RESET FOR ENGLISH will display tochange back to English. Press and hold theRESET button to change back to English.
SETUP
OIL LIFEpress the RESET buttonRESET FOR SYSTEMCHECKEXHAUST FLUID LEVEL(Diesel only)
ENGINE HOURS
ENGINE IDLE HOURS
CHARGING SYSTEM
DOOR
BRAKE SYSTEM
TBC GAIN = XX.X
FUEL LEVEL
MYKEY DISTANCE
SETUP (cont’d)
MYKEY(S) PROGRAMMEDpress the RESETbuttonRESET FORSYSTEM CHECKADMIN KEYS PROGRAMMED
OIL LIFE
English or Metricpress the RESETbuttonUNITS
0 to 180 secondsAUTOLAMP (SEC)
On or OffAUTOLOCK
On or OffAUTOUNLOCK
On or OffCOURTESY WIPE
91
Super Duty (TFA) Canada/United States of America, enUSA, First Printing
Information Displays
Page 104 of 507

Diesel MessagesWARNING
When the CLEANING EXHAUSTFILTER message appears in theinformation display, do not park nearflammable materials, vapors or structuresuntil filter cleaning is complete.
ActionMessage
The coolant additive needs checking. Refer to your dieselsupplement for more information.CHECK COOLANTADDITIVE
Your vehicle has entered the cleaning mode. Various engineactions will raise the exhaust temperature in the DieselParticulate Filter system to burn off the particles (exhaustsoot). After the vehicle burns the particles off the exhausttemperature will return to normal levels. This message isNORMAL. Refer to your diesel supplement for more informa-tion.
CLEANING EXHAUSTFILTER
The diesel particulate filter is full of particles (exhaust soot)and you are not operating the vehicle in a manner that allowsnormal cleaning. One of these messages will stay on until theexhaust filter cleaning has begun, at which time the CLEANINGEXHAUST FILTER message displays. We recommend youdrive the vehicle above 30 mph (48 km/h) until the CLEANINGEXHAUST FILTER message turns off. Refer to your dieselsupplement for more information.
EXHAUST OVER-LOADED DRIVE TOCLEANEXHAUST AT LIMITDRIVE TO CLEAN NOW
The diesel particulate filter will continue to fill with particles(exhaust soot) if you ignore this message. The service enginesoon light will illuminate and engine power may be limited, ifcleaning is not permitted. Dealer service will then be requiredto restore your vehicle to full-power operation.
Your vehicle exhaust system temperature exceeds intendedoperating range. If this warning occurs, a chime will sound,followed by reduced engine power. The engine will shut downwhen your vehicle speed is below 3 mph (5 km/h). Stop thevehicle as soon as safely possible. Have the system checkedby an authorized dealer.
STOP SAFELY NOW
The diluted engine oil needs to be changed. Refer to yourdiesel supplement for more information.ENGINE OIL DILUTED
The powertrain control module will intentionally turn theengine off due to your vehicle being in the final second of acountdown. The diesel engine shutdown is a optional feature.Refer to your diesel supplement for more information.
ENGINE TURNS OFF IN1 SECOND
101
Super Duty (TFA) Canada/United States of America, enUSA, First Printing
Information Displays
Page 109 of 507

Maintenance
ActionMessage
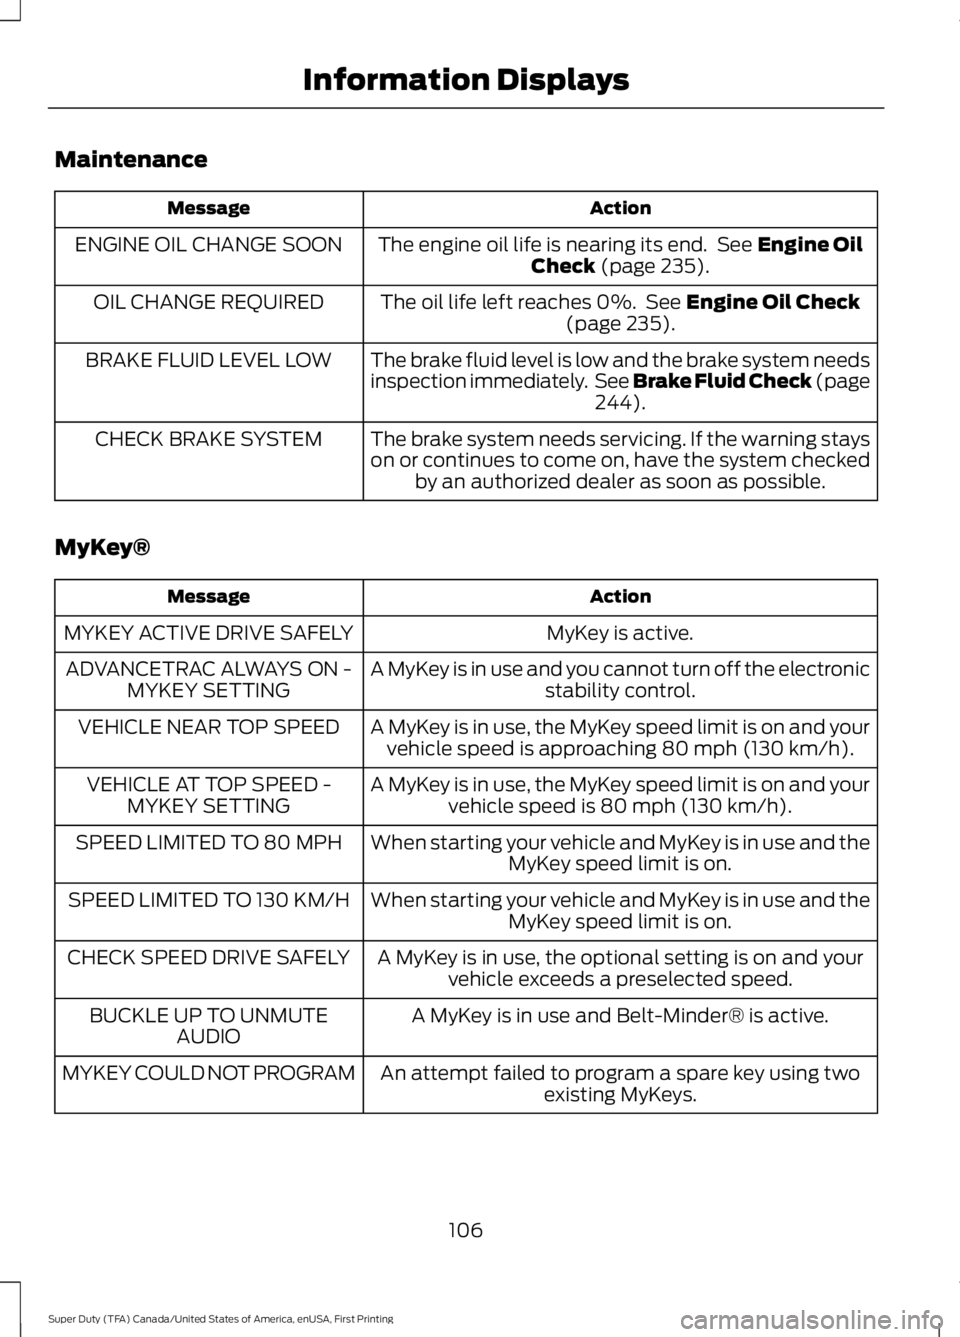
The engine oil life is nearing its end. See Engine OilCheck (page 235).ENGINE OIL CHANGE SOON
The oil life left reaches 0%. See Engine Oil Check(page 235).OIL CHANGE REQUIRED
The brake fluid level is low and the brake system needsinspection immediately. See Brake Fluid Check (page244).
BRAKE FLUID LEVEL LOW
The brake system needs servicing. If the warning stayson or continues to come on, have the system checkedby an authorized dealer as soon as possible.
CHECK BRAKE SYSTEM
MyKey®
ActionMessage
MyKey is active.MYKEY ACTIVE DRIVE SAFELY
A MyKey is in use and you cannot turn off the electronicstability control.ADVANCETRAC ALWAYS ON -MYKEY SETTING
A MyKey is in use, the MyKey speed limit is on and yourvehicle speed is approaching 80 mph (130 km/h).VEHICLE NEAR TOP SPEED
A MyKey is in use, the MyKey speed limit is on and yourvehicle speed is 80 mph (130 km/h).VEHICLE AT TOP SPEED -MYKEY SETTING
When starting your vehicle and MyKey is in use and theMyKey speed limit is on.SPEED LIMITED TO 80 MPH
When starting your vehicle and MyKey is in use and theMyKey speed limit is on.SPEED LIMITED TO 130 KM/H
A MyKey is in use, the optional setting is on and yourvehicle exceeds a preselected speed.CHECK SPEED DRIVE SAFELY
A MyKey is in use and Belt-Minder® is active.BUCKLE UP TO UNMUTEAUDIO
An attempt failed to program a spare key using twoexisting MyKeys.MYKEY COULD NOT PROGRAM
106
Super Duty (TFA) Canada/United States of America, enUSA, First Printing
Information Displays
Page 238 of 507

Engine oil filler capD.
Engine oil dipstickE.
Power steering fluid reservoirF.
Brake fluid reservoirG.
Engine coolant reservoirH.
Air filter assemblyI.
Power distribution boxJ.
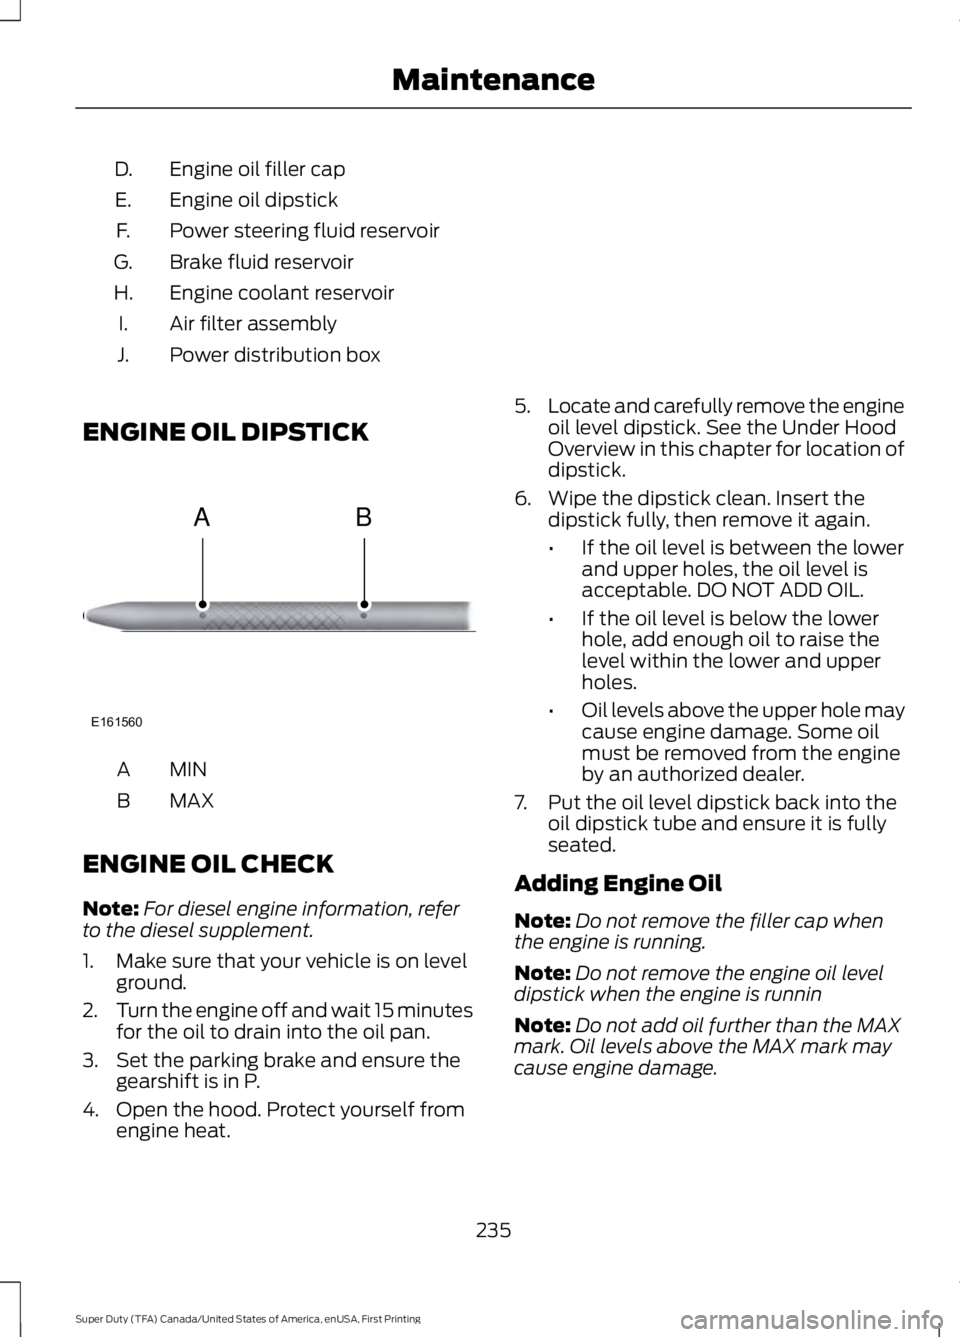
ENGINE OIL DIPSTICK
MINA
MAXB
ENGINE OIL CHECK
Note:For diesel engine information, referto the diesel supplement.
1. Make sure that your vehicle is on levelground.
2.Turn the engine off and wait 15 minutesfor the oil to drain into the oil pan.
3. Set the parking brake and ensure thegearshift is in P.
4. Open the hood. Protect yourself fromengine heat.
5.Locate and carefully remove the engineoil level dipstick. See the Under HoodOverview in this chapter for location ofdipstick.
6. Wipe the dipstick clean. Insert thedipstick fully, then remove it again.
•If the oil level is between the lowerand upper holes, the oil level isacceptable. DO NOT ADD OIL.
•If the oil level is below the lowerhole, add enough oil to raise thelevel within the lower and upperholes.
•Oil levels above the upper hole maycause engine damage. Some oilmust be removed from the engineby an authorized dealer.
7. Put the oil level dipstick back into theoil dipstick tube and ensure it is fullyseated.
Adding Engine Oil
Note:Do not remove the filler cap whenthe engine is running.
Note:Do not remove the engine oil leveldipstick when the engine is runnin
Note:Do not add oil further than the MAXmark. Oil levels above the MAX mark maycause engine damage.
235
Super Duty (TFA) Canada/United States of America, enUSA, First Printing
MaintenanceE161560
AB
Page 239 of 507

Only use oils certified for gasoline enginesby the American Petroleum Institute (API).An oil with this trademark symbolconforms to the current engine andemission system protection standards andfuel economy requirements of theInternational Lubricants SpecificationAdvisory Council (ILSAC), comprised ofU.S. and Japanese automobilemanufacturers.
1. Check the engine oil level.
2. If the engine oil level is not within thenormal range, add engine oil thatmeets Ford specifications. SeeCapacities and Specifications for moreinformation.
3. Remove the engine oil filler cap anduse a funnel to pour the engine oil intothe opening.
4.Recheck the engine oil level. Make surethe oil level is not above the normaloperating range on the engine oil leveldipstick.
5. Install the engine oil level dipstick andensure it is fully seated.
6. Fully install the engine oil filler cap byturning the filler cap clockwise untilthree clicks are heard or until the capis fully seated.
OIL CHANGE INDICATOR
RESET
Resetting the Oil Life MonitoringSystem
Only reset the oil life monitoring systemafter changing the engine oil and oil filter.
1.Switch the ignition on. Do not start theengine. For vehicles with push-buttonstart, press and hold the start buttonfor two seconds without pressing thebrake pedal. Do not start the engine.
2.Press the accelerator and brake pedalsat the same time.
3.Keep the accelerator and brake pedalsfully pressed.
4. After three seconds, a messageconfirming that the reset is in progresswill be displayed.
5. After 25 seconds, a messageconfirming that the reset is completewill be displayed.
6. Release the accelerator and brakepedals.
7.The message confirming that the resetis complete will no longer be displayed.
8.Switch the ignition off. For vehicles withpush-button start, press the startbutton to switch the ignition off.
ENGINE COOLANT CHECK
WARNINGS
Do not add engine coolant when theengine is hot. Steam and scaldingliquids released from a hot coolingsystem can burn you badly. Also, you canbe burned if you spill coolant on hot engineparts.
236
Super Duty (TFA) Canada/United States of America, enUSA, First Printing
MaintenanceE142732
Page 251 of 507

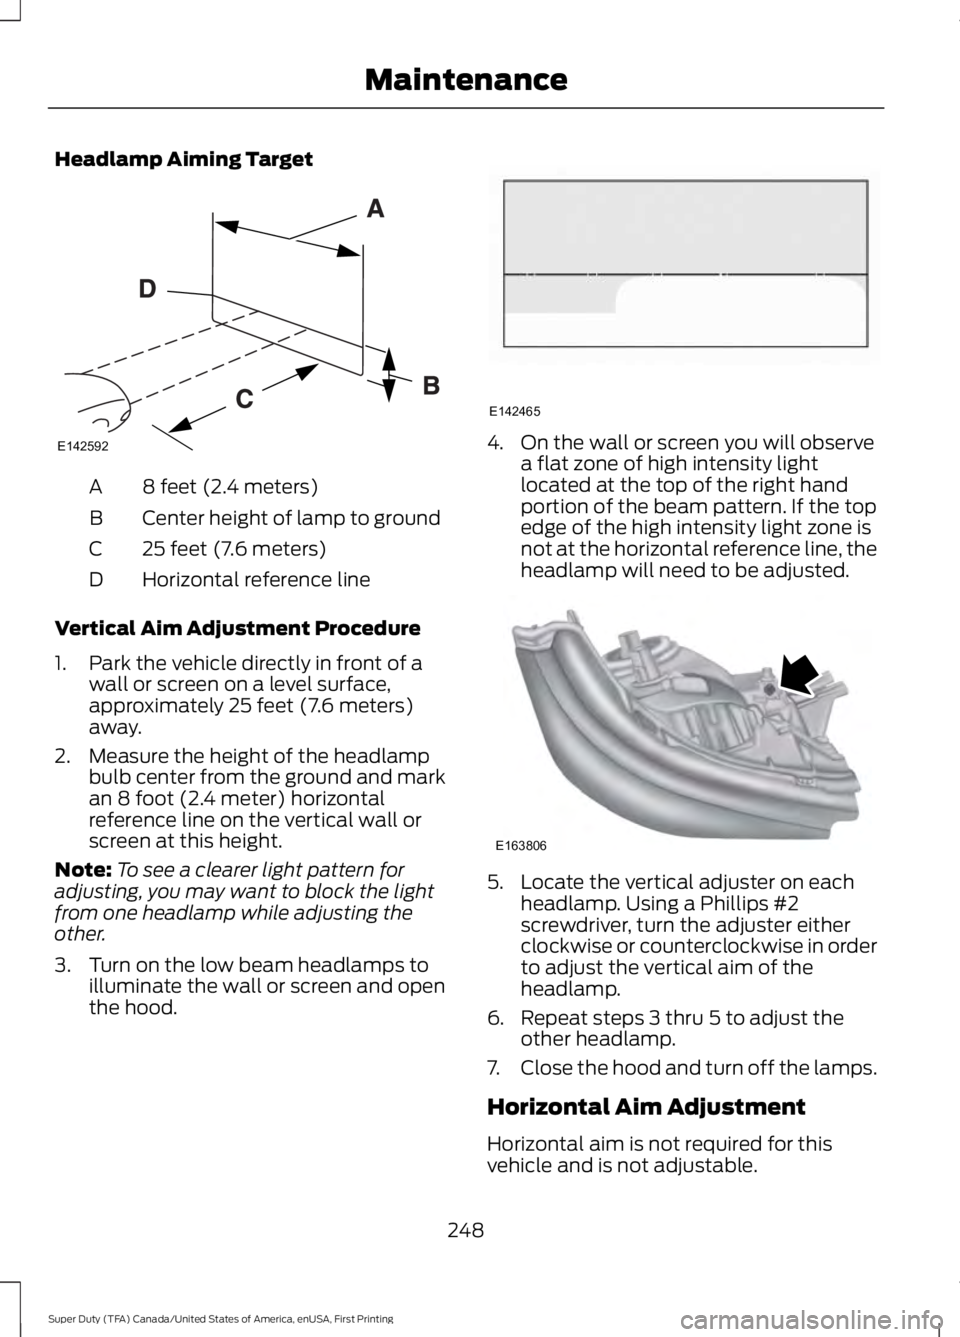
Headlamp Aiming Target
8 feet (2.4 meters)A
Center height of lamp to groundB
25 feet (7.6 meters)C
Horizontal reference lineD
Vertical Aim Adjustment Procedure
1. Park the vehicle directly in front of awall or screen on a level surface,approximately 25 feet (7.6 meters)away.
2. Measure the height of the headlampbulb center from the ground and markan 8 foot (2.4 meter) horizontalreference line on the vertical wall orscreen at this height.
Note:To see a clearer light pattern foradjusting, you may want to block the lightfrom one headlamp while adjusting theother.
3. Turn on the low beam headlamps toilluminate the wall or screen and openthe hood.
4. On the wall or screen you will observea flat zone of high intensity lightlocated at the top of the right handportion of the beam pattern. If the topedge of the high intensity light zone isnot at the horizontal reference line, theheadlamp will need to be adjusted.
5. Locate the vertical adjuster on eachheadlamp. Using a Phillips #2screwdriver, turn the adjuster eitherclockwise or counterclockwise in orderto adjust the vertical aim of theheadlamp.
6. Repeat steps 3 thru 5 to adjust theother headlamp.
7.Close the hood and turn off the lamps.
Horizontal Aim Adjustment
Horizontal aim is not required for thisvehicle and is not adjustable.
248
Super Duty (TFA) Canada/United States of America, enUSA, First Printing
MaintenanceE142592 E142465 E163806