2016 FORD F SERIES MOTORHOME AND COMMERCIAL CHASSIS brake
[x] Cancel search: brakePage 99 of 154
Body
•Wash your vehicle thoroughly toremove dirt, grease, oil, tar or mud fromexterior surfaces, rear-wheel housingand the underside of front fenders.
•Periodically wash your vehicle if it isstored in exposed locations.
•Touch-up exposed or primed metal toprevent rust.
•Cover chrome and stainless steel partswith a thick coat of auto wax to preventdiscoloration. Re-wax as necessarywhen you wash your vehicle.
•Lubricate all hood, door and luggagecompartment hinges and latches witha light grade oil.
•Cover interior trim to prevent fading.
•Keep all rubber parts free from oil andsolvents.
Engine
•Change the engine oil and filter prior tostorage because used engine oilcontains contaminates which maycause engine damage.
•Start the engine every 15 days for aminimum of 15 minutes. Run at fast idlewith the climate controls set to defrostuntil the engine reaches normaloperating temperature.
•With your foot on the brake, shiftthrough all the gears while the engineis running.
•We recommend that you change theengine oil before you use your vehicleagain.
Fuel system
•Fill the fuel tank with high-quality fueluntil the first automatic shutoff of thefuel pump nozzle.
Cooling system
•Protect against freezing temperatures.
•When removing your vehicle fromstorage, check coolant fluid level.Confirm that there are no coolingsystem leaks and that fluid is at therecommended level.
Battery
•Check and recharge as necessary. Keepconnections clean.
•If storing your vehicle for more than 30days without recharging the battery,we recommend that you disconnectthe battery cables to maintain batterycharge for quick starting.
Note:It is necessary to reset memoryfeatures if battery cables are disconnected.
Brakes
•Make sure the brakes and parking brakerelease fully.
Tires
•Maintain recommended air pressure.
Miscellaneous
•Make sure all linkages, cables, leversand pins under your vehicle are coveredwith grease to prevent rust.
•Move vehicles at least 25 ft (7.5 m)every 15 days to lubricate working partsand prevent corrosion.
Removing Vehicle From Storage
When your vehicle is ready to come out ofstorage, do the following:
•Wash your vehicle to remove any dirtor grease film build-up on windowsurfaces.
•Check windshield wipers for anydeterioration.
96Motorhome (TY3) , enUSA, First PrintingVehicle Care
Page 100 of 154
•Check under the hood for any foreignmaterial that may have collectedduring storage such as mice or squirrelnests.
•Check the exhaust for any foreignmaterial that may have collectedduring storage.
•Check tire pressures and set tireinflation per the Tire Label.
•Check brake pedal operation. Driveyour vehicle 15 ft (4.5 m) back andforth to remove rust build-up.
•Check fluid levels (including coolant,oil and gas) to make sure there are noleaks, and fluids are at recommendedlevels.
•If you remove the battery, clean thebattery cable ends and check fordamage.
Contact an authorized dealer if you haveany concerns or issues.
97Motorhome (TY3) , enUSA, First PrintingVehicle Care
Page 117 of 154
Note:The suspension insulation andbumpers help prevent vehicle damage. Donot remove these components from yourvehicle when using snow tires and chains.
Follow these guidelines when using snowtires and chains:
•If possible, avoid fully loading yourvehicle.
•Use only SAE Class S chains.
•Install chains securely, verifying thatthe chains do not touch any wiring,brake lines or fuel lines.
•Drive cautiously. If you hear the chainsrub or bang against your vehicle, stopand retighten the chains. If this doesnot work, remove the chains to preventdamage to your vehicle.
•Remove the tire chains when they areno longer needed. Do not use tirechains on dry roads.
If you have any questions regarding snowchains or cables, please contact yourauthorized dealer.
CHANGING A ROAD WHEEL
If you get a flat tire while driving, do notapply the brake heavily. Instead, graduallydecrease your speed. Hold the steeringwheel firmly and slowly move to a safeplace on the side of the road.
Dissimilar Spare Wheel and TireAssembly Information
WARNING
Failure to follow these guidelinescould result in an increased risk ofloss of vehicle control, injury or death.
If you have a dissimilar spare wheel andtire, then it is intended for temporary useonly. This means that if you need to use it,you should replace it as soon as possiblewith a road wheel and tire assembly thatis the same size and type as the road tiresand wheels that were originally providedby Ford. If the dissimilar spare tire or wheelis damaged, it should be replaced ratherthan repaired.
A dissimilar spare wheel and tire assemblyis defined as a spare wheel and tireassembly that is different in brand, size orappearance from the road tires and wheelsand can be one of three types:
1.T-type mini-spare: This spare tirebegins with the letter T for tire size andmay have Temporary Use Only molded inthe sidewall.
2.Full-size dissimilar spare with labelon wheel: This spare tire has a label onthe wheel that states: THIS WHEEL ANDTIRE ASSEMBLY FOR TEMPORARY USEONLY.
When driving with one of the dissimilarspare tires listed above, do not:
•Exceed 50 mph (80 km/h).
•Load the vehicle beyond maximumvehicle load rating listed on the SafetyCompliance Label.
•Tow a trailer.
•Use snow chains on the end of thevehicle with the dissimilar spare tire.
•Use more than one dissimilar spare tireat a time.
•Use commercial car washingequipment.
•Try to repair the dissimilar spare tire.
114Motorhome (TY3) , enUSA, First PrintingWheels and Tires
Page 118 of 154
Use of one of the dissimilar spare tireslisted above at any one wheel location canlead to impairment of the following:
•Handling, stability and brakingperformance.
•Comfort and noise.
•Ground clearance and parking at curbs.
•Winter weather driving capability.
•Wet weather driving capability.
•All-wheel driving capability.
3.Full-size dissimilar spare withoutlabel on wheel
When driving with the full-size dissimilarspare wheel and tire assembly, do not:
•Exceed 70 mph (113 km/h).
•Use more than one dissimilar sparewheel and tire assembly at a time.
•Use commercial car washingequipment.
•Use snow chains on the end of thevehicle with the dissimilar spare wheeland tire assembly.
The usage of a full-size dissimilar sparewheel and tire assembly can lead toimpairment of the following:
•Handling, stability and brakingperformance.
•Comfort and noise.
•Ground clearance and parking at curbs.
•Winter weather driving capability.
•Wet weather driving capability.
•All-wheel driving capability.
When driving with the full-size dissimilarspare wheel and tire assembly additionalcaution should be given to:
•Towing a trailer.
•Driving vehicles equipped with acamper body.
•Driving vehicles with a load on thecargo rack.
Drive cautiously when using a full-sizedissimilar spare wheel and tire assemblyand seek service as soon as possible.
Tire Change Procedure
WARNINGS
When one of the front wheels is offthe ground, the transmission alonewill not prevent the vehicle frommoving or slipping off the jack, even if thetransmission is in park (P).
To help prevent the vehicle frommoving when you change a tire, besure to place the transmission in park(P), set the parking brake and block (inboth directions) the wheel that isdiagonally opposite (other side and end ofthe vehicle) to the tire being changed.
Never get underneath a vehicle thatis supported only by a jack. If thevehicle slips off the jack, you orsomeone else could be seriously injured.
Do not attempt to change a tire onthe side of the vehicle close tomoving traffic. Pull far enough off theroad to avoid the danger of being hit whenoperating the jack or changing the wheel.
Always use the jack provided asoriginal equipment with your vehicle.If using a jack other than the oneprovided as original equipment with yourvehicle, make sure the jack capacity isadequate for the vehicle weight, includingany vehicle cargo or modifications.
1.Park on a level surface, set the parkingbrake and activate the hazard flashers.
2.Place the transmission in park (P) andturn the engine off.
115Motorhome (TY3) , enUSA, First PrintingWheels and Tires
Page 119 of 154
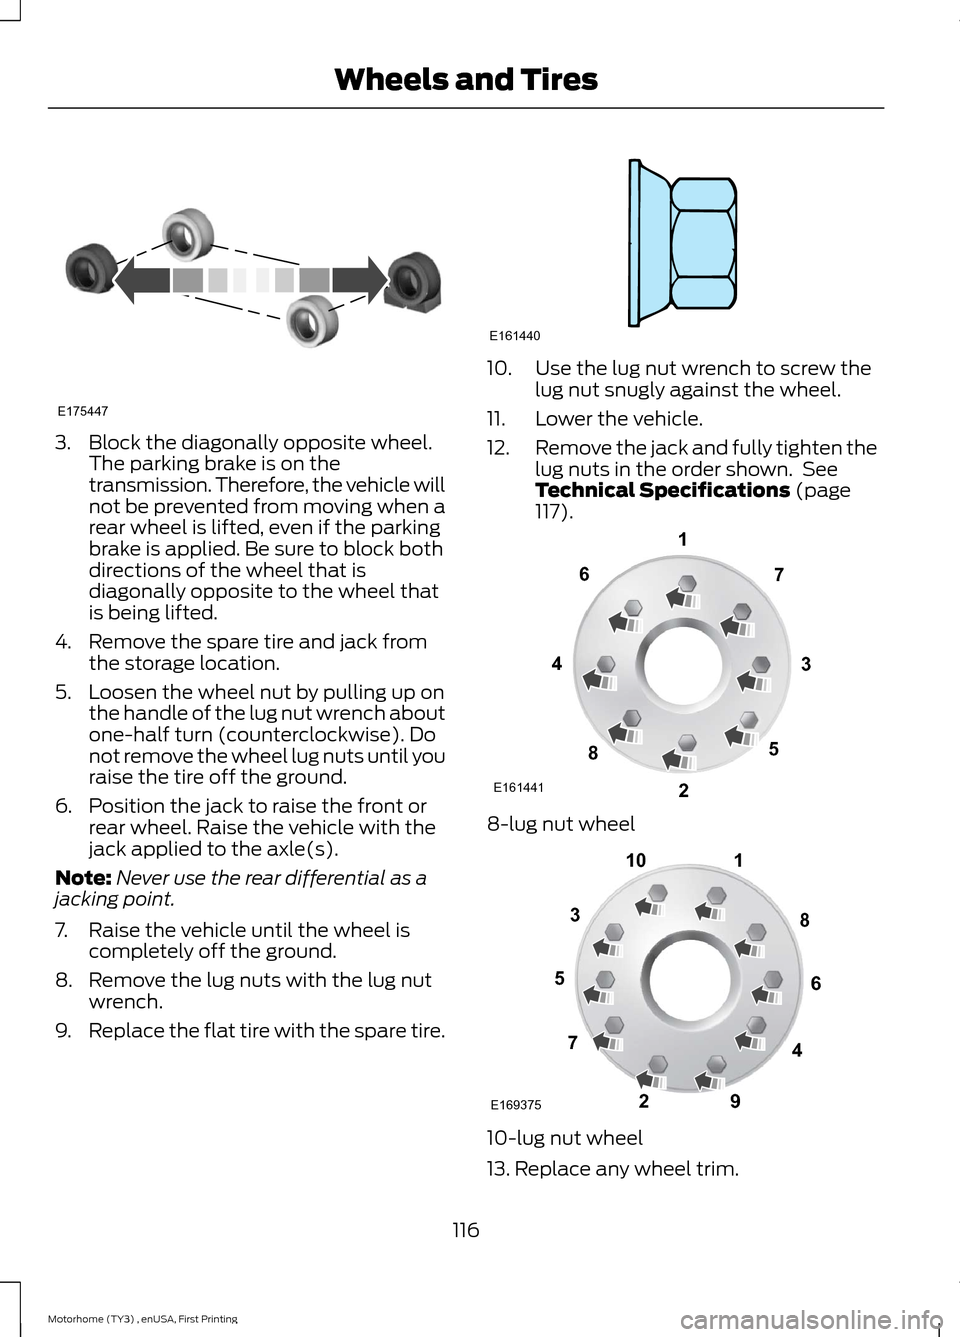
3.Block the diagonally opposite wheel.The parking brake is on thetransmission. Therefore, the vehicle willnot be prevented from moving when arear wheel is lifted, even if the parkingbrake is applied. Be sure to block bothdirections of the wheel that isdiagonally opposite to the wheel thatis being lifted.
4.Remove the spare tire and jack fromthe storage location.
5.Loosen the wheel nut by pulling up onthe handle of the lug nut wrench aboutone-half turn (counterclockwise). Donot remove the wheel lug nuts until youraise the tire off the ground.
6.Position the jack to raise the front orrear wheel. Raise the vehicle with thejack applied to the axle(s).
Note:Never use the rear differential as ajacking point.
7.Raise the vehicle until the wheel iscompletely off the ground.
8.Remove the lug nuts with the lug nutwrench.
9.Replace the flat tire with the spare tire.
10.Use the lug nut wrench to screw thelug nut snugly against the wheel.
11.Lower the vehicle.
12.Remove the jack and fully tighten thelug nuts in the order shown. SeeTechnical Specifications (page117).
8-lug nut wheel
10-lug nut wheel
13. Replace any wheel trim.
116Motorhome (TY3) , enUSA, First PrintingWheels and TiresE175447 E161440 E16144113427658 12345678910E169375
Page 120 of 154
14. Stow the jack, handle and lug wrench.15. Unblock the wheels.
TECHNICAL SPECIFICATIONS
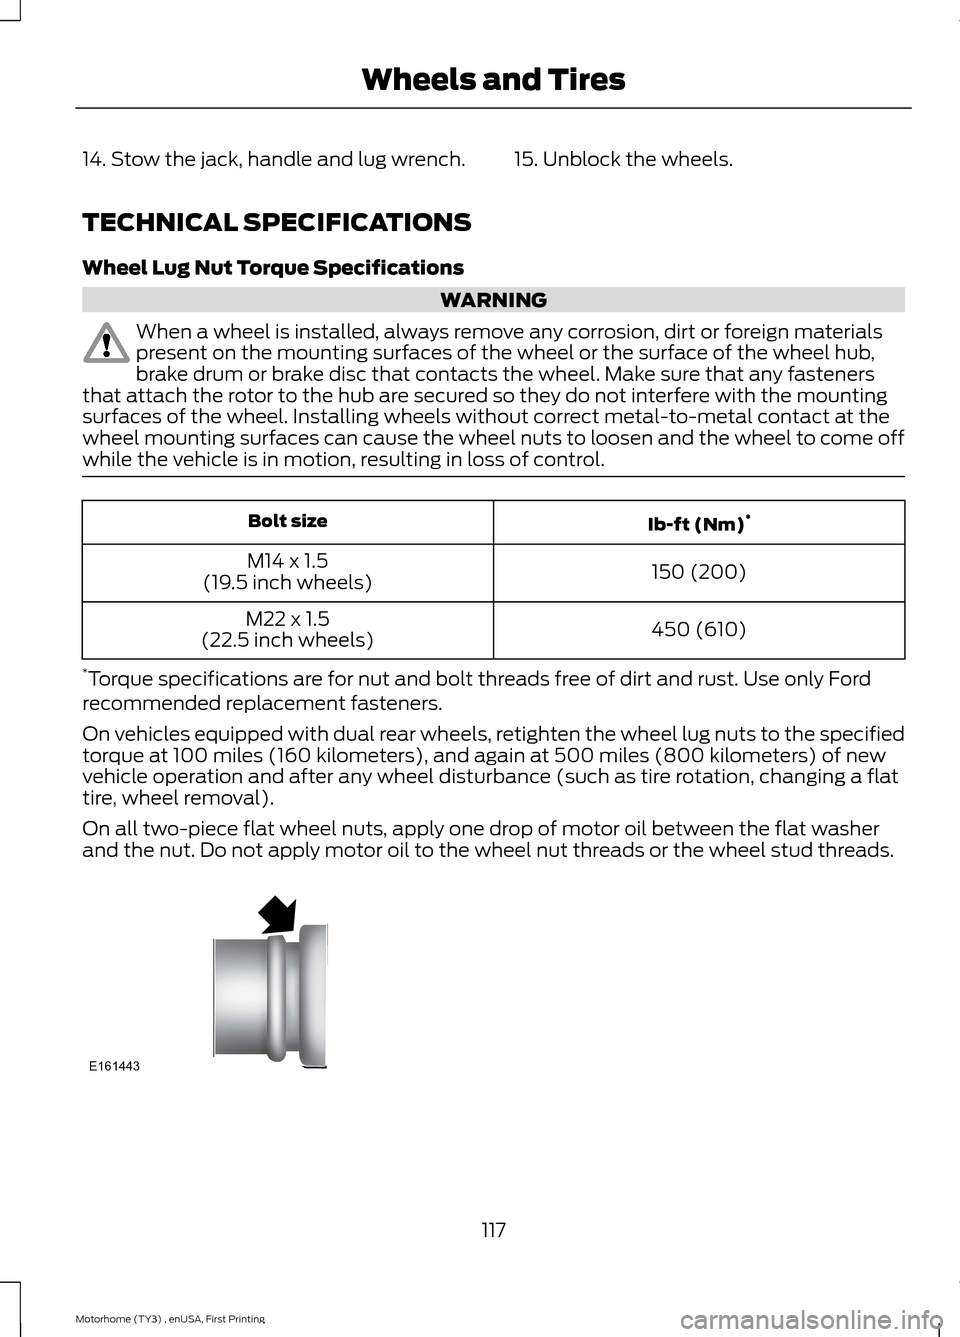
Wheel Lug Nut Torque Specifications
WARNING
When a wheel is installed, always remove any corrosion, dirt or foreign materialspresent on the mounting surfaces of the wheel or the surface of the wheel hub,brake drum or brake disc that contacts the wheel. Make sure that any fastenersthat attach the rotor to the hub are secured so they do not interfere with the mountingsurfaces of the wheel. Installing wheels without correct metal-to-metal contact at thewheel mounting surfaces can cause the wheel nuts to loosen and the wheel to come offwhile the vehicle is in motion, resulting in loss of control.
Ib-ft (Nm)*Bolt size
150 (200)M14 x 1.5(19.5 inch wheels)
450 (610)M22 x 1.5(22.5 inch wheels)
*Torque specifications are for nut and bolt threads free of dirt and rust. Use only Fordrecommended replacement fasteners.
On vehicles equipped with dual rear wheels, retighten the wheel lug nuts to the specifiedtorque at 100 miles (160 kilometers), and again at 500 miles (800 kilometers) of newvehicle operation and after any wheel disturbance (such as tire rotation, changing a flattire, wheel removal).
On all two-piece flat wheel nuts, apply one drop of motor oil between the flat washerand the nut. Do not apply motor oil to the wheel nut threads or the wheel stud threads.
117Motorhome (TY3) , enUSA, First PrintingWheels and TiresE161443
Page 123 of 154
VEHICLE IDENTIFICATION
NUMBER
The vehicle identification number islocated near the cowl to the right of the airfilter.
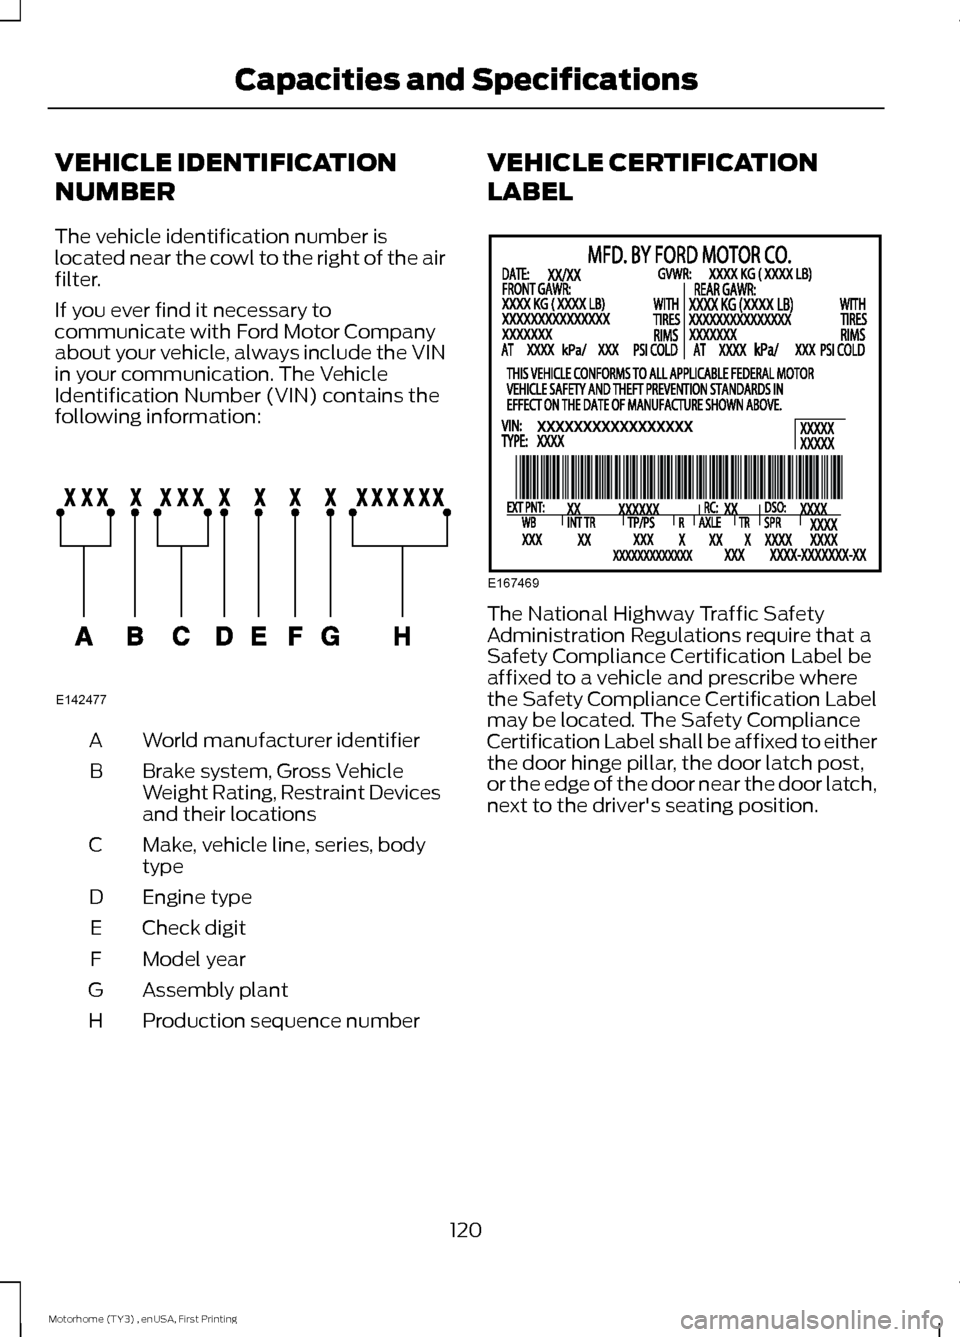
If you ever find it necessary tocommunicate with Ford Motor Companyabout your vehicle, always include the VINin your communication. The VehicleIdentification Number (VIN) contains thefollowing information:
World manufacturer identifierA
Brake system, Gross VehicleWeight Rating, Restraint Devicesand their locations
B
Make, vehicle line, series, bodytypeC
Engine typeD
Check digitE
Model yearF
Assembly plantG
Production sequence numberH
VEHICLE CERTIFICATION
LABEL
The National Highway Traffic SafetyAdministration Regulations require that aSafety Compliance Certification Label beaffixed to a vehicle and prescribe wherethe Safety Compliance Certification Labelmay be located. The Safety ComplianceCertification Label shall be affixed to eitherthe door hinge pillar, the door latch post,or the edge of the door near the door latch,next to the driver's seating position.
120Motorhome (TY3) , enUSA, First PrintingCapacities and SpecificationsE142477 E167469
Page 125 of 154
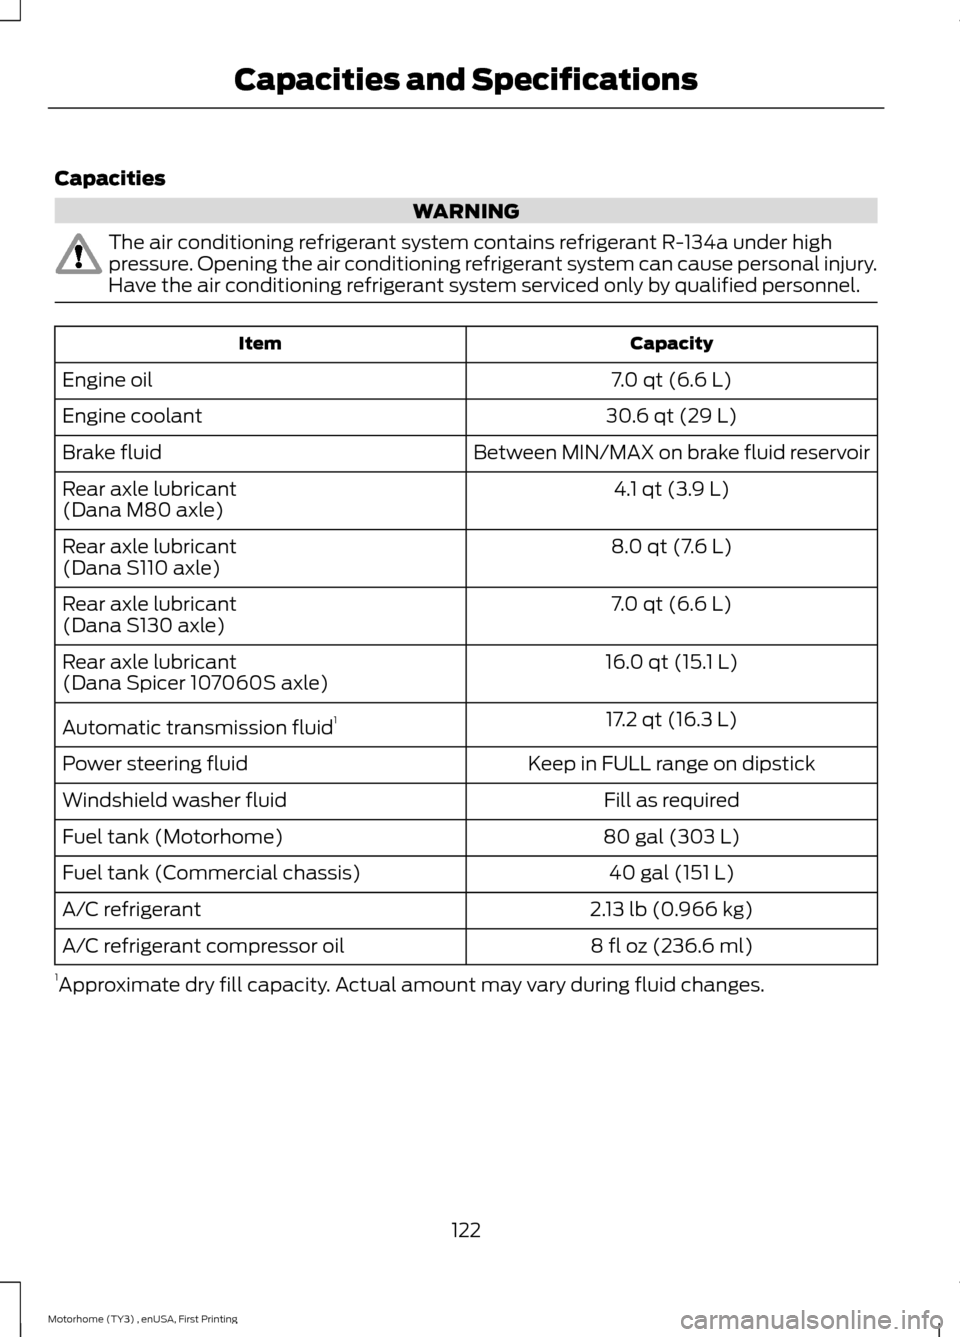
Capacities
WARNING
The air conditioning refrigerant system contains refrigerant R-134a under highpressure. Opening the air conditioning refrigerant system can cause personal injury.Have the air conditioning refrigerant system serviced only by qualified personnel.
CapacityItem
7.0 qt (6.6 L)Engine oil
30.6 qt (29 L)Engine coolant
Between MIN/MAX on brake fluid reservoirBrake fluid
4.1 qt (3.9 L)Rear axle lubricant(Dana M80 axle)
8.0 qt (7.6 L)Rear axle lubricant(Dana S110 axle)
7.0 qt (6.6 L)Rear axle lubricant(Dana S130 axle)
16.0 qt (15.1 L)Rear axle lubricant(Dana Spicer 107060S axle)
17.2 qt (16.3 L)Automatic transmission fluid1
Keep in FULL range on dipstickPower steering fluid
Fill as requiredWindshield washer fluid
80 gal (303 L)Fuel tank (Motorhome)
40 gal (151 L)Fuel tank (Commercial chassis)
2.13 lb (0.966 kg)A/C refrigerant
8 fl oz (236.6 ml)A/C refrigerant compressor oil
1Approximate dry fill capacity. Actual amount may vary during fluid changes.
122Motorhome (TY3) , enUSA, First PrintingCapacities and Specifications