2016 FORD EXPEDITION brake
[x] Cancel search: brakePage 151 of 421
Automatic Engine Shutdown
For vehicles with a keyless ignition, this
feature automatically shuts down the
engine if it has been idling for an extended
period. The ignition also turns off in order
to save battery power. Before your vehicle
shuts down, a message appears in the
information display showing a timer
counting down from 30 seconds. If you do
not intervene within 30 seconds, your
vehicle shuts down. Another message
appears in the information display to
inform you that your vehicle has shut down
to save fuel. Start your vehicle as you
normally do.
Automatic Engine Shutdown Override
Note:
You cannot permanently switch off
the automatic shutdown feature. When you
switch it off temporarily, it turns on at the
next ignition cycle.
You can stop the shutdown, or reset the
timer, at any point before the 30-second
countdown has expired by doing any of the
following:
• You can reset the timer by interacting
with your vehicle, for example pressing
the brake or accelerator pedal.
• You can temporarily switch off the
shutdown feature any time the ignition
is on using the information display. See
Information Displays (page 92). The
feature only remains off for the current
ignition cycle.
• During the 30-second countdown, the
system prompts you to press OK or
RESET to temporarily switch the
feature off for the current ignition cycle
only.
Stopping the Engine When Your
Vehicle is Stationary
Vehicles with an Ignition Key
1. Shift into park (P). 2. Switch the ignition off.
3. Apply the parking brake.
Vehicles with Keyless Start
1. Shift into park (P).
2. Press the push button ignition switch.
3. Apply the parking brake.
Note:
The ignition, all electrical circuits and
all warning lamps and indicators will be
turned off.
Note: If the engine is idling for 30 minutes,
the ignition and engine automatically shut
down.
Stopping the Engine When Your
Vehicle is Moving WARNING
Switching off the engine when the
vehicle is still moving will result in a
loss of brake and steering assistance.
The steering will not lock, but higher effort
will be required. When the ignition is
switched off, some electrical circuits,
including air bags, warning lamps and
indicators may also be off. If the ignition
was turned off accidentally, you can shift
into neutral (N) and re-start the engine. Vehicles with an Ignition Key
1.
Shift into neutral and use the brakes to
bring your vehicle to a safe stop.
2. When your vehicle has stopped, shift into park (P) and switch the ignition
off.
3. Apply the parking brake.
Vehicles with Keyless Start
1. Shift into neutral and use the brakes to
bring your vehicle to a safe stop.
2. When your vehicle has stopped, shift into park (P).
148
Expedition (TB7) Canada/United States of America, enUSA, First Printing Starting and Stopping the Engine
Page 152 of 421
3.
Press and hold the push button ignition
switch, or press it three times within
two seconds.
4. Apply the parking brake.
Guarding Against Exhaust Fumes WARNING
If you smell exhaust fumes inside
your vehicle, have your vehicle
checked by your authorized dealer
immediately. Do not drive your vehicle if
you smell exhaust fumes. Carbon
monoxide is present in exhaust fumes.
Take precautions to avoid its dangerous
effects. Important Ventilating Information
If you stop your vehicle and then leave the
engine idling for long periods, we
recommend that you do one of the
following:
•
Open the windows at least 1 in (3 cm).
• Set your climate control to outside air.
ENGINE BLOCK HEATER (If
Equipped) WARNINGS
Failure to follow engine block heater
instructions could result in property
damage or serious personal injury.
Do not use your heater with
ungrounded electrical systems or
two-pronged adapters. There is a risk
of electrical shock. Do not fully close the hood, or allow
it to drop under its own weight when
using the engine block heater. This
could damage the power cable and may
cause an electrical short resulting in fire,
injury and property damage. Note:
The heater is most effective when
outdoor temperatures are below 0°F
(-18°C).
The heater acts as a starting aid by
warming the engine coolant. This allows
the climate control system to respond
quickly. The equipment includes a heater
element (installed in the engine block) and
a wire harness. You can connect the
system to a grounded 120-volt AC
electrical source.
We recommend that you do the following
for a safe and correct operation:
• Use a 16-gauge outdoor extension cord
that is product certified by
Underwriter ’s Laboratory (UL) or
Canadian Standards Association
(CSA). This extension cord must be
suitable for use outdoors, in cold
temperatures, and be clearly marked
Suitable for Use with Outdoor
Appliances. Do not use an indoor
extension cord outdoors. This could
result in an electric shock or become a
fire hazard.
• Use as short an extension cord as
possible.
• Do not use multiple extension cords.
• Make sure that when in operation, the
extension cord plug and heater cord
plug connections are free and clear of
water. This could cause an electric
shock or fire.
• Make sure your vehicle is parked in a
clean area, clear of combustibles.
• Make sure the heater, heater cord and
extension cord are firmly connected.
• Check for heat anywhere in the
electrical hookup once the system has
been operating for approximately 30
minutes.
149
Expedition (TB7) Canada/United States of America, enUSA, First Printing Starting and Stopping the Engine
Page 162 of 421
AUTOMATIC TRANSMISSION
WARNINGS
Always set the parking brake fully
and latch the gearshift in park (P).
Turn the ignition to the off position
and remove the key whenever you leave
your vehicle. Do not use the tow/haul feature
when driving in icy or slippery
conditions as the increased engine
braking can cause the rear wheels to slide
and your vehicle to swing around with the
possible loss of vehicle control. Selector Lever Positions
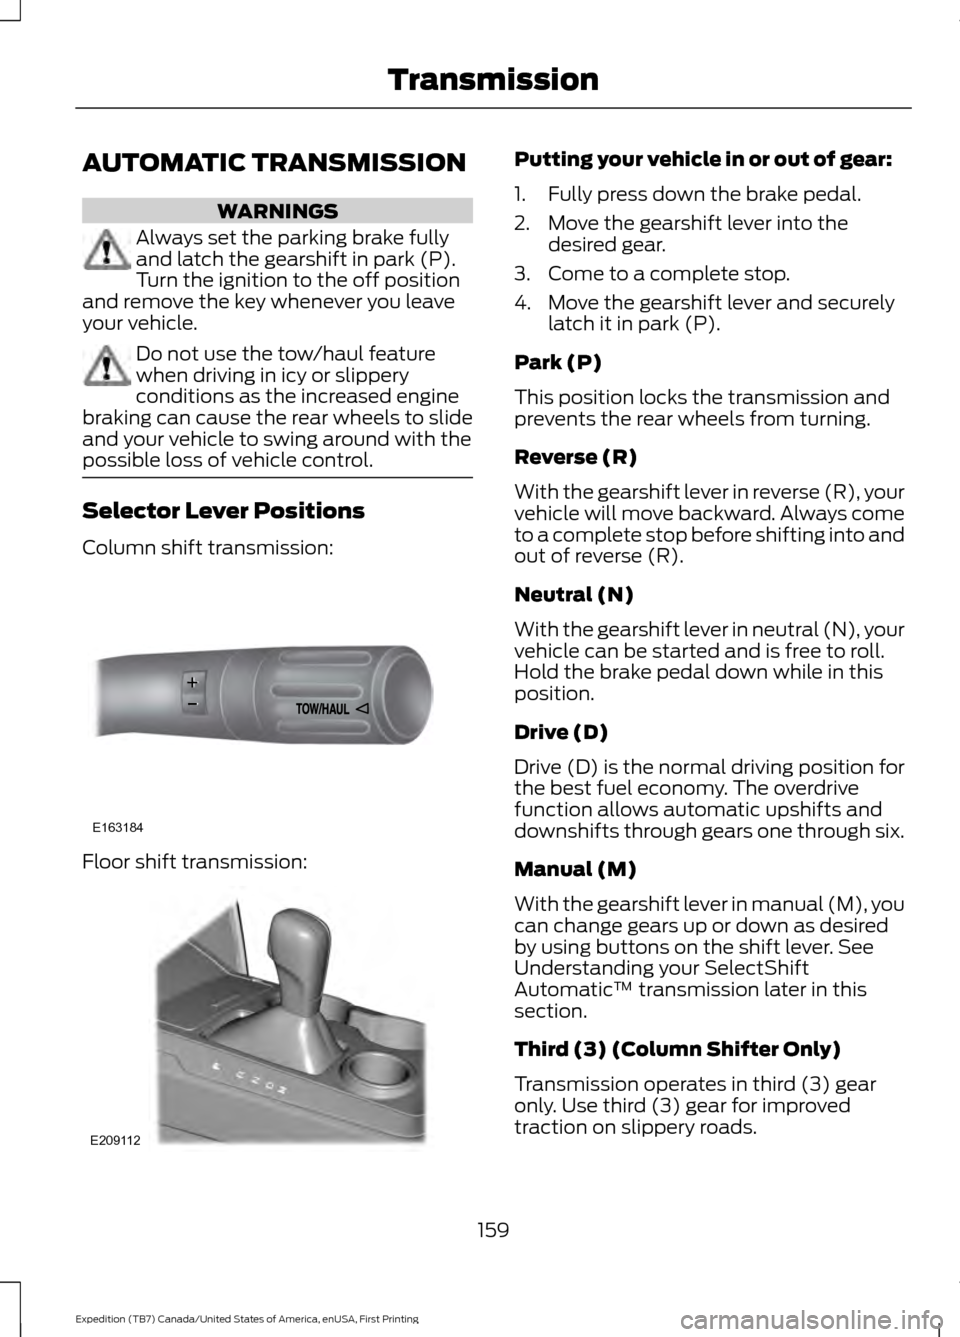
Column shift transmission:
Floor shift transmission: Putting your vehicle in or out of gear:
1. Fully press down the brake pedal.
2. Move the gearshift lever into the
desired gear.
3. Come to a complete stop.
4. Move the gearshift lever and securely latch it in park (P).
Park (P)
This position locks the transmission and
prevents the rear wheels from turning.
Reverse (R)
With the gearshift lever in reverse (R), your
vehicle will move backward. Always come
to a complete stop before shifting into and
out of reverse (R).
Neutral (N)
With the gearshift lever in neutral (N), your
vehicle can be started and is free to roll.
Hold the brake pedal down while in this
position.
Drive (D)
Drive (D) is the normal driving position for
the best fuel economy. The overdrive
function allows automatic upshifts and
downshifts through gears one through six.
Manual (M)
With the gearshift lever in manual (M), you
can change gears up or down as desired
by using buttons on the shift lever. See
Understanding your SelectShift
Automatic ™ transmission later in this
section.
Third (3) (Column Shifter Only)
Transmission operates in third (3) gear
only. Use third (3) gear for improved
traction on slippery roads.
159
Expedition (TB7) Canada/United States of America, enUSA, First Printing TransmissionE163184 E209112
Page 163 of 421
Second (2)
Transmission operates in second (2) gear
only. Use second (2) gear to start-up on
slippery roads.
First (1)
•
Transmission operates in first (1) gear
only.
• Provides maximum engine braking.
• Allows upshifts by moving gearshift
lever.
• Will not downshift into first (1) gear at
high speeds; allows for first (1) gear
when vehicle reaches slower speeds.
Tow/Haul Mode To activate tow/haul, press the
button on the gearshift lever
once. The TOW HAUL indicator
light will illuminate in the instrument
cluster.
The tow/haul feature:
• Delays upshifts to reduce the frequency
of transmission shifting.
• Provides engine braking in all forward
gears, which will slow your vehicle and
assist you in controlling your vehicle
when descending a grade.
• Depending on driving conditions and
load conditions, may downshift the
transmission, slow your vehicle and
control your vehicle speed when
descending a hill, without pressing the
accelerator pedal. The amount of
downshift braking provided will vary
based upon the amount the brake
pedal is pressed.
The tow/haul feature improves
transmission operation when towing a
trailer or a heavy load. All transmission
gear ranges are available when using
tow/haul. To deactivate the tow/haul feature and
return to normal driving mode, press the
button on the gearshift lever twice. The
TOW HAUL light will deactivate. Tow/haul
will also deactivate when you power down
your vehicle. WARNING
Do not use the tow/haul feature
when driving in icy or slippery
conditions as the increased engine
braking can cause the rear wheels to slide
and your vehicle to swing around with the
possible loss of vehicle control. Forced Downshifts
•
Allowed in drive (D) with the tow/haul
feature on or off.
• Press the accelerator to the floor.
• Allows transmission to select an
appropriate gear.
Automatic Transmission Adaptive
Learning
This feature may increase durability and
provide consistent shift feel over the life
of your vehicle. A new vehicle or
transmission may have firm shifts, soft
shifts or both. This operation is considered
normal and will not affect function or
durability of the transmission. Over time,
the adaptive learning process will fully
update transmission operation.
Understanding your SelectShift
Automatic ™ Transmission (If
Equipped)
Your vehicle is equipped with a SelectShift
Automatic transmission gearshift lever.
The SelectShift Automatic transmission
gives you the ability to change gears up or
down (without a clutch) as desired.
160
Expedition (TB7) Canada/United States of America, enUSA, First Printing TransmissionE161509
Page 165 of 421

Brake-Shift Interlock
WARNINGS
Do not drive your vehicle until you
verify that the brake lamps are
working.
When doing this procedure, you will
be taking your vehicle out of park (P)
which means your vehicle can roll
freely. To avoid unwanted vehicle
movement, always fully set the parking
brake prior to doing this procedure. Use
wheel chocks if appropriate. If you fully release the parking brake
and the brake warning lamp remains
illuminated, the brakes may not be
working properly. See your authorized
dealer. Your vehicle is equipped with a brake-shift
interlock feature that prevents moving the
gearshift lever from park (P) when the
ignition is in the on position and the brake
pedal is not pressed.
If you cannot move the gearshift lever out
of park (P) position with the ignition in the
on position and the brake pedal pressed,
a malfunction may have occurred. It is
possible that a fuse has blown or your
vehicle
’s brake lamps are not operating
properly. See Fuse Specification Chart
(page 234).
If the fuse is not blown and the brake
lamps are working properly, the following
procedure will allow you to move the
gearshift lever from park (P):
Column-shifter
1. Apply the parking brake. Turn the ignition key to the off position, then
remove the key.
2. Move the steering column to the full down and full rearward position
(toward the driver ’s seat). 3. Remove the gearshift lever boot.
4. Place fingers into gearshift lever boot
hole and pull top half of shroud up and
forward to separate it from the lower
half of the shroud. There is a hinge at
the forward edge of the top shroud.
Roll the top half of the shroud upward
on the hinge point to clear the hazard
flasher button, then pull straight
rearward toward the driver ’s seat to
remove.
5. Remove the top half of the shroud.
6. Remove the three fasteners under the column that secure the lower shroud
half to the column. 7.
Pull the lock lever into the full unlocked
position and remove the lower shroud
cover by pulling the lever handle
through the slot in the cover. 162
Expedition (TB7) Canada/United States of America, enUSA, First Printing TransmissionE163185 E163186
Page 166 of 421
8. Apply the brake, pull the white disk
then move the shifter to neutral (N).
9. Start your vehicle.
Perform Steps 4 through 8 in reverse order,
making sure to engage the hinge pivots
between the upper and lower halves of the
shroud. Keep slight pressure in the forward
direction as the halves rotate together.
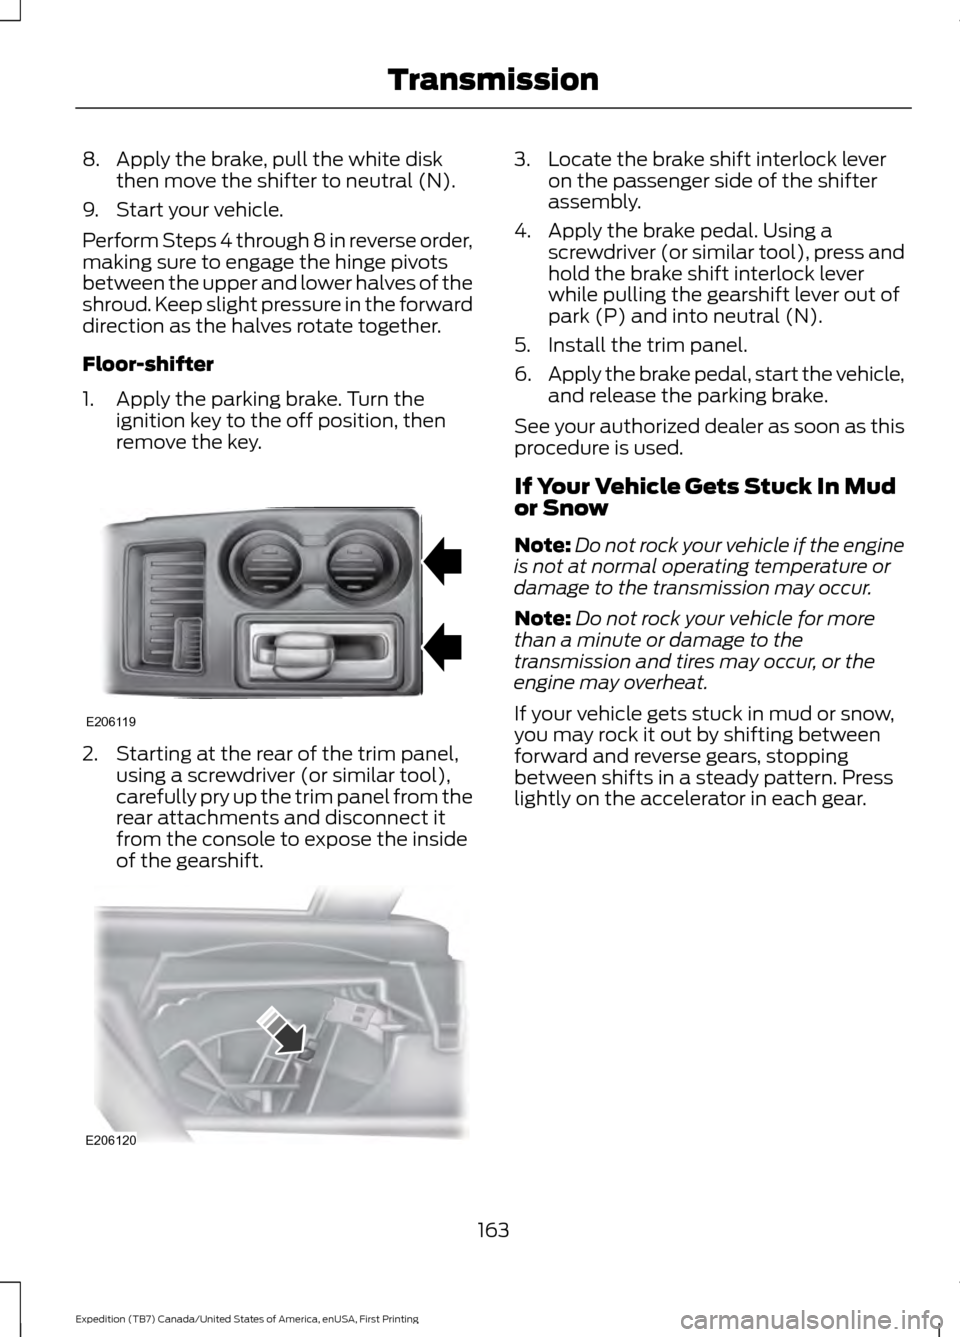
Floor-shifter
1. Apply the parking brake. Turn the ignition key to the off position, then
remove the key. 2. Starting at the rear of the trim panel,
using a screwdriver (or similar tool),
carefully pry up the trim panel from the
rear attachments and disconnect it
from the console to expose the inside
of the gearshift. 3. Locate the brake shift interlock lever
on the passenger side of the shifter
assembly.
4. Apply the brake pedal. Using a screwdriver (or similar tool), press and
hold the brake shift interlock lever
while pulling the gearshift lever out of
park (P) and into neutral (N).
5. Install the trim panel.
6. Apply the brake pedal, start the vehicle,
and release the parking brake.
See your authorized dealer as soon as this
procedure is used.
If Your Vehicle Gets Stuck In Mud
or Snow
Note: Do not rock your vehicle if the engine
is not at normal operating temperature or
damage to the transmission may occur.
Note: Do not rock your vehicle for more
than a minute or damage to the
transmission and tires may occur, or the
engine may overheat.
If your vehicle gets stuck in mud or snow,
you may rock it out by shifting between
forward and reverse gears, stopping
between shifts in a steady pattern. Press
lightly on the accelerator in each gear.
163
Expedition (TB7) Canada/United States of America, enUSA, First Printing TransmissionE206119 E206120
Page 167 of 421
USING FOUR-WHEEL DRIVE
WARNING
For important information regarding
safe operation of this type of vehicle,
see General Information in the
Wheels and Tires chapter. Note:
Do not use 4H or 4L mode on dry,
hard surfaced roads. Doing so will produce
excessive noise, increase tire wear and may
damage drive components. 4H and 4L mode
is only intended for consistently slippery or
loose surfaces.
Note: If 4L mode is selected while your
vehicle is moving above 3 mph (5 km/h),
the 4WD system will not perform a shift.
This is normal and should be no reason for
concern. Refer to Shifting to or from 4L for
proper operation.
4WD Indicator Lights
The indicator lights illuminate in the
information display in the reconfigurable
telltale (RTT) location under the following
conditions. See
Warning Lamps and
Indicators (page 88).
Note: When a 4X4 system fault is present,
the system will typically remain in whichever
4WD mode was selected prior to the fault
condition occurring. It will not default to 4X2
in all circumstances. When this warning is
displayed, have your vehicle serviced by an
authorized dealer.
4X2 Momentarily illuminates when
2H is selected.
4X4 AUTO Continuously illuminates when
4A is selected. 4X4 HIGH Continuously illuminates when
4H is selected.
4X4 LOW Continuously illuminates when
4L is selected.
4WD Switch Positions WARNING
Utility and four-wheel drive vehicles
are not designed for cornering at
speeds as high as passenger cars any
more than low-slung sports cars are
designed to perform satisfactorily under
off-road conditions. Avoid sharp turns or
abrupt maneuvers in these vehicles. Note:
If your vehicle is equipped with
AdvanceTrac® with RSC®, the system will
automatically turn off the stability
enhancement feature when you shift the
4WD system into 4L (4X4 LOW). You can
manually turn the system off by pressing
the AdvanceTrac button. See Using
Traction Control (page 175). This will
disable the engine management feature,
allowing the vehicle to maintain full power
and enhanced momentum through the
obstacle. The brake traction enhancement
feature will still be enabled.
Note: The Control Trac® selector switch
should not be changed while the rear wheels
are slipping.
164
Expedition (TB7) Canada/United States of America, enUSA, First Printing Four-Wheel Drive
(If Equipped)E181778 E181781 E181779 E181780
Page 170 of 421
The transfer case supples power to all four
wheels. On four-wheel drive vehicles, the
transfer case allows you to select different
4WD modes when necessary. You can find
information on transfer case operation and
shifting procedures in this chapter. You can
find information on transfer case
maintenance in the Maintenance chapter.
You should become thoroughly familiar
with this information before you operate
your vehicle.
Four-wheel drive (when you select a 4WD
mode) uses all four wheels to power your
vehicle. This increases traction, enabling
you to drive over terrain and road
conditions that a conventional two-wheel
drive vehicle cannot.
Basic Operating Principles
•
Do not use 4H or 4L on dry, hard
surfaced roads. Doing so will produce
excessive noise, increase tire wear and
may damage drive components. 4H or
4L modes are only intended for
consistently slippery or loose surfaces.
• Drive slower in strong crosswinds which
can affect the normal steering
characteristics of your vehicle.
• When driving your vehicle on surfaces
made slippery by loose sand, water,
gravel, snow or ice proceed with care.
If Your Vehicle leaves the Road
If your vehicle leaves the road, reduce your
vehicle speed and avoid severe braking.
When your vehicle speed decreases, ease
your vehicle back onto the road. Do not
turn the steering wheel sharply while
returning your vehicle to the road.
It may be safer to stay on the shoulder of
the road and slow down gradually before
returning to the road. You may lose control
if you do not slow down or if you turn the
steering wheel too sharply or abruptly. It may be less risky to strike small objects,
such as freeway reflectors, with minor
damage to your vehicle rather than
attempt a sudden return to the road which
could cause your vehicle to slide sideways
out of control or roll over. Remember, your
safety and the safety of others should be
your primary concern.
If your vehicle gets stuck
WARNING
Do not spin the wheels at over 35
mph (56 km/h). The tires may fail
and injure a passenger or bystander.
Note:
Do not rock your vehicle if the engine
is not at normal operating temperature,
damage to the transmission may occur.
Note: Do not rock your vehicle for more
than a minute, damage to the transmission
and tires may occur or the engine may
overheat.
If your vehicle gets stuck in mud or snow it
may be rocked out by shifting between
forward and reverse gears, stopping
between shifts, in a steady pattern. Press
lightly on the accelerator in each gear.
Emergency Maneuvers
In an unavoidable emergency situation
where a sudden sharp turn must be made,
remember to avoid over-driving your
vehicle (i.e. turn the steering wheel only as
rapidly and as far as required to avoid the
emergency). Excessive steering can result
in loss of vehicle control. Apply smooth
pressure to the accelerator pedal or brake
pedal when changes in vehicle speed are
required. Avoid abrupt steering,
acceleration and braking. This could result
in an increased risk of vehicle roll over, loss
of vehicle control and personal injury. Use
all available road surface to bring your
vehicle to a safe direction of travel.
167
Expedition (TB7) Canada/United States of America, enUSA, First Printing Four-Wheel Drive (If Equipped)