2016 FORD EXPEDITION automatic transmission
[x] Cancel search: automatic transmissionPage 218 of 421

•
Allow more distance for stopping with
a trailer attached. Anticipate stops and
brake gradually.
• Avoid parking on a grade. However, if
you must park on a grade:
1. Turn the steering wheel to point your vehicle tires away from traffic flow.
2. Set your vehicle parking brake.
3. Place the automatic transmission in position P.
4. Place wheel chocks in front and back of the trailer wheels. (Chocks not
included with vehicle.)
Your vehicle may be equipped with a
temporary or conventional spare tire. A
"temporary" spare tire is different in size
(diameter or width), tread-type
(All-Season or All Terrain) or is from a
different manufacturer than the road tires
on your vehicle. Consult information on the
tire label or Safety Compliance label for
limitations when using.
Launching or Retrieving a Boat or
Personal Watercraft (PWC)
Note: Disconnect the wiring to the trailer
before
backing the trailer into the water.
Note: Reconnect the wiring to the trailer
after
removing the trailer from the water.
When backing down a ramp during boat
launching or retrieval:
• Do not allow the static water level to
rise above the bottom edge of the rear
bumper.
• Do not allow waves to break higher
than 6 inches (15 centimeters) above
the bottom edge of the rear bumper. Exceeding these limits may allow water to
enter vehicle components:
•
Causing internal damage to the
components.
• Affecting driveability, emissions, and
reliability.
Replace the rear axle lubricant anytime
the rear axle has been submerged in water.
Water may have contaminated the rear
axle lubricant, which is not normally
checked or changed unless a leak is
suspected or other axle repair is required.
TOWING POINTS
(If Equipped) WARNINGS
Using recovery hooks is dangerous
and should only be done by a person
familiar with proper vehicle recovery
safety practices. Improper use of recovery
hooks may cause hook failure or separation
from the vehicle and could result in serious
injury or death. Always slowly remove the slack from
the recovery strap prior to pulling.
Failure to do so can introduce
significantly higher loads which can cause
the recovery hooks to break off, or the
recovery strap to fail which can cause
serious injury or death. Never link two straps together with
a clevis pin. These heavy metal
objects could become projectiles if
the strap breaks and can cause serious
injury or death. Your vehicle comes equipped with
frame-mounted front recovery hooks.
These hooks should never have a load
applied to them greater than the gross
vehicle weight rating of your vehicle.
215
Expedition (TB7) Canada/United States of America, enUSA, First Printing Towing
Page 228 of 421

3.
Remove your foot from the brake pedal
and press the START/STOP button
to switch off the ignition.
4. You can either attempt to start the engine by pressing the brake pedal and
the
START/STOP button, or switch
on the ignition only by pressing the
START/STOP
button without
pressing the brake pedal. Both ways
re-enable the fuel system.
Note: When you try to restart your vehicle
after a fuel shutoff, the vehicle makes sure
that various systems are safe to restart.
Once your vehicle determines that the
systems are safe, then the vehicle will allow
you to restart.
Note: In the event that your vehicle does
not restart after your third attempt, contact
an authorized dealer.
JUMP STARTING THE VEHICLE WARNINGS
Batteries normally produce explosive
gases which can cause personal
injury. Therefore, do not allow
flames, sparks or lighted substances to
come near the battery. When working near
the battery, always shield your face and
protect your eyes. Always provide correct
ventilation. Keep batteries out of reach of
children. Batteries contain sulfuric
acid. Avoid contact with skin, eyes or
clothing. Shield your eyes when working
near the battery to protect against possible
splashing of acid solution. In case of acid
contact with skin or eyes, flush
immediately with water for a minimum of
15 minutes and get prompt medical
attention. If acid is swallowed, call a
physician immediately. Use only adequately sized cables
with insulated clamps. Preparing Your Vehicle
Do not attempt to push-start your
automatic transmission vehicle.
Note:
Attempting to push-start a vehicle
with an automatic transmission may cause
transmission damage.
Note: Use only a 12-volt supply to start your
vehicle.
Note: Do not disconnect the battery of the
disabled vehicle as this could damage the
vehicle electrical system.
Park the booster vehicle close to the hood
of the disabled vehicle, making sure the
two vehicles do not touch.
Connecting the Jumper Cables WARNINGS
Do not attach the cables to fuel lines,
engine rocker covers, the intake
manifold or electrical components
as grounding points. Stay clear of moving
parts. To avoid reverse polarity
connections, make sure that you correctly
identify the positive (+) and negative (-)
terminals on both the disabled and booster
vehicles before connecting the cables. Do not attach the end of the positive
cable to the studs or L-shaped eyelet
located above the positive (+)
terminal of your vehicle ’s battery. High
current may flow through and cause
damage to the fuses. Do not connect the end of the
second cable to the negative (-)
terminal of the battery to be jumped.
A spark may cause an explosion of the
gases that surround the battery. Note:
In the illustration, the bottom vehicle
represents the booster vehicle.
225
Expedition (TB7) Canada/United States of America, enUSA, First Printing Roadside Emergencies
Page 253 of 421

At this time, you may notice your engine
coolant temperature gauge needle move
toward the H and the POWER REDUCED
TO LOWER TEMP message may appear
in the information display.
You may notice a reduction in vehicle
speed caused by reduced engine power.
In order to manage the engine fluid
temperatures, your vehicle may enter this
mode if certain high-temperature and
high-load conditions take place. The
amount of speed reduction depends on
many factors such as vehicle loading,
towing, grade and ambient temperature.
If this occurs, there is no need to pull off
the road. You can continue to drive your
vehicle while this message is active.
The air conditioning may also cycle on and
off during severe operating conditions to
protect overheating of the engine. When
the engine coolant temperature decreases
to a normal operating temperature, the air
conditioning will turn on once again.
If the engine coolant temperature gauge
moves fully into the red (hot) area, or if the
coolant temperature warning or service
engine soon messages appear in your
information display:
1. Pull off the road as soon as safely possible and shift the transmission into
P
.
2. Leave the engine running until the coolant temperature gauge needle
moves away from the red (hot) area.
After several minutes, if the
temperature does not drop, follow the
remaining steps.
3. Switch the engine off and wait for it to
cool before checking the coolant level.
4. If the coolant level is normal, restart your engine and continue. 5. If the coolant is low, add coolant, and
restart the engine. See Adding Engine
Coolant
or How Fail-Safe Cooling
Works in this chapter for more
information.
AUTOMATIC TRANSMISSION
FLUID CHECK
If required, have an authorized dealer check
and change the transmission fluid at the
correct service interval. See
Scheduled
Maintenance (page 372).
The automatic transmission does not have
a transmission fluid dipstick.
Refer to your scheduled maintenance
information for scheduled intervals for fluid
checks and changes. Your transmission
does not consume fluid. However, if the
transmission slips, shifts slowly or if you
notice a sign of leaking fluid, contact an
authorized dealer.
Do not use supplemental transmission
fluid additives, treatments or cleaning
agents. The use of these materials may
affect transmission operation and result
in damage to internal transmission
components.
250
Expedition (TB7) Canada/United States of America, enUSA, First Printing Maintenance
Page 309 of 421

VEHICLE CERTIFICATION
LABEL
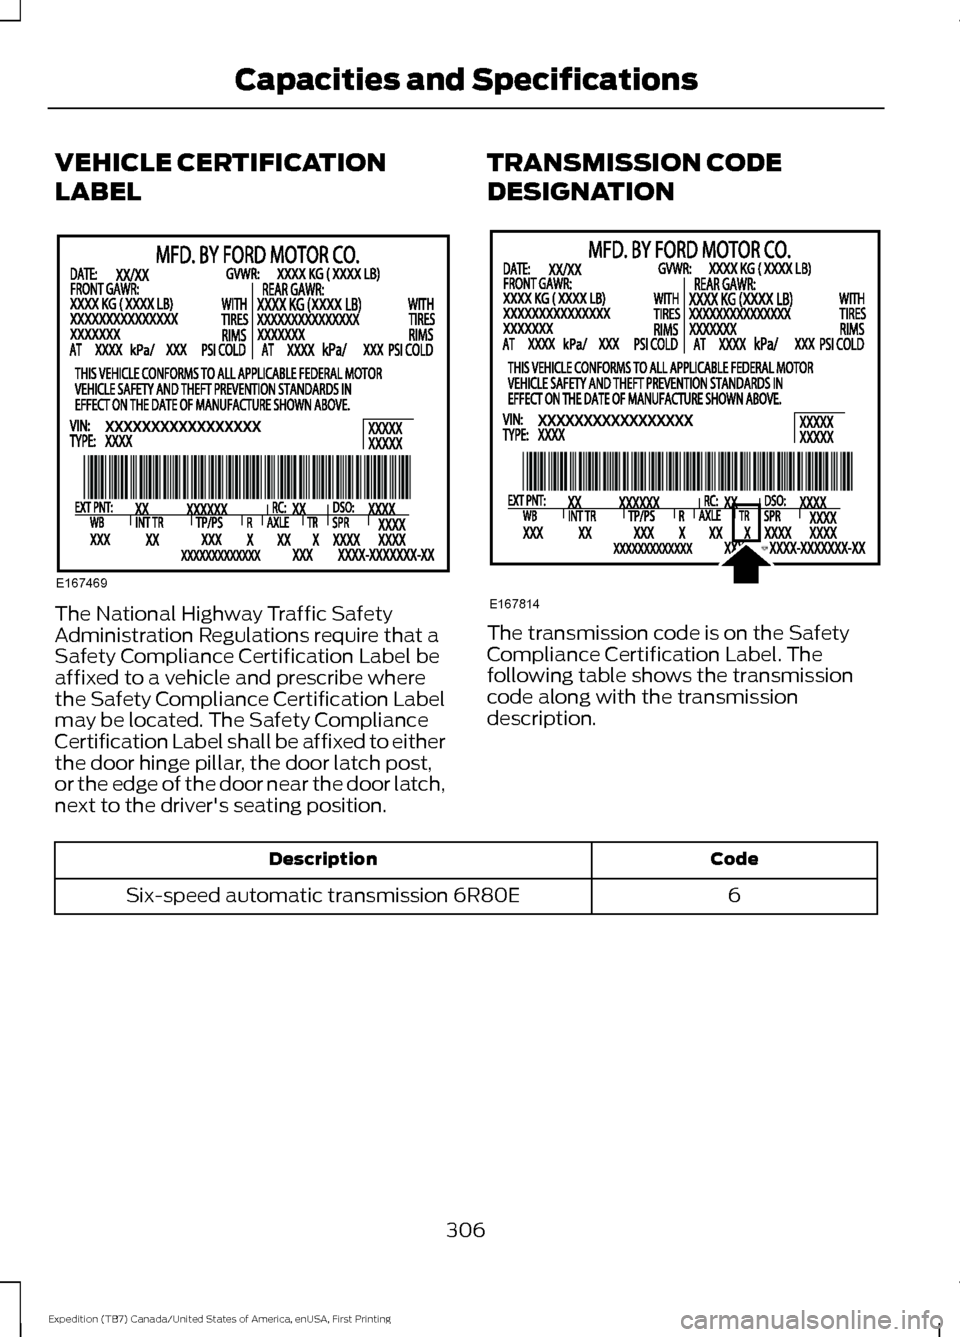
The National Highway Traffic Safety
Administration Regulations require that a
Safety Compliance Certification Label be
affixed to a vehicle and prescribe where
the Safety Compliance Certification Label
may be located. The Safety Compliance
Certification Label shall be affixed to either
the door hinge pillar, the door latch post,
or the edge of the door near the door latch,
next to the driver's seating position.
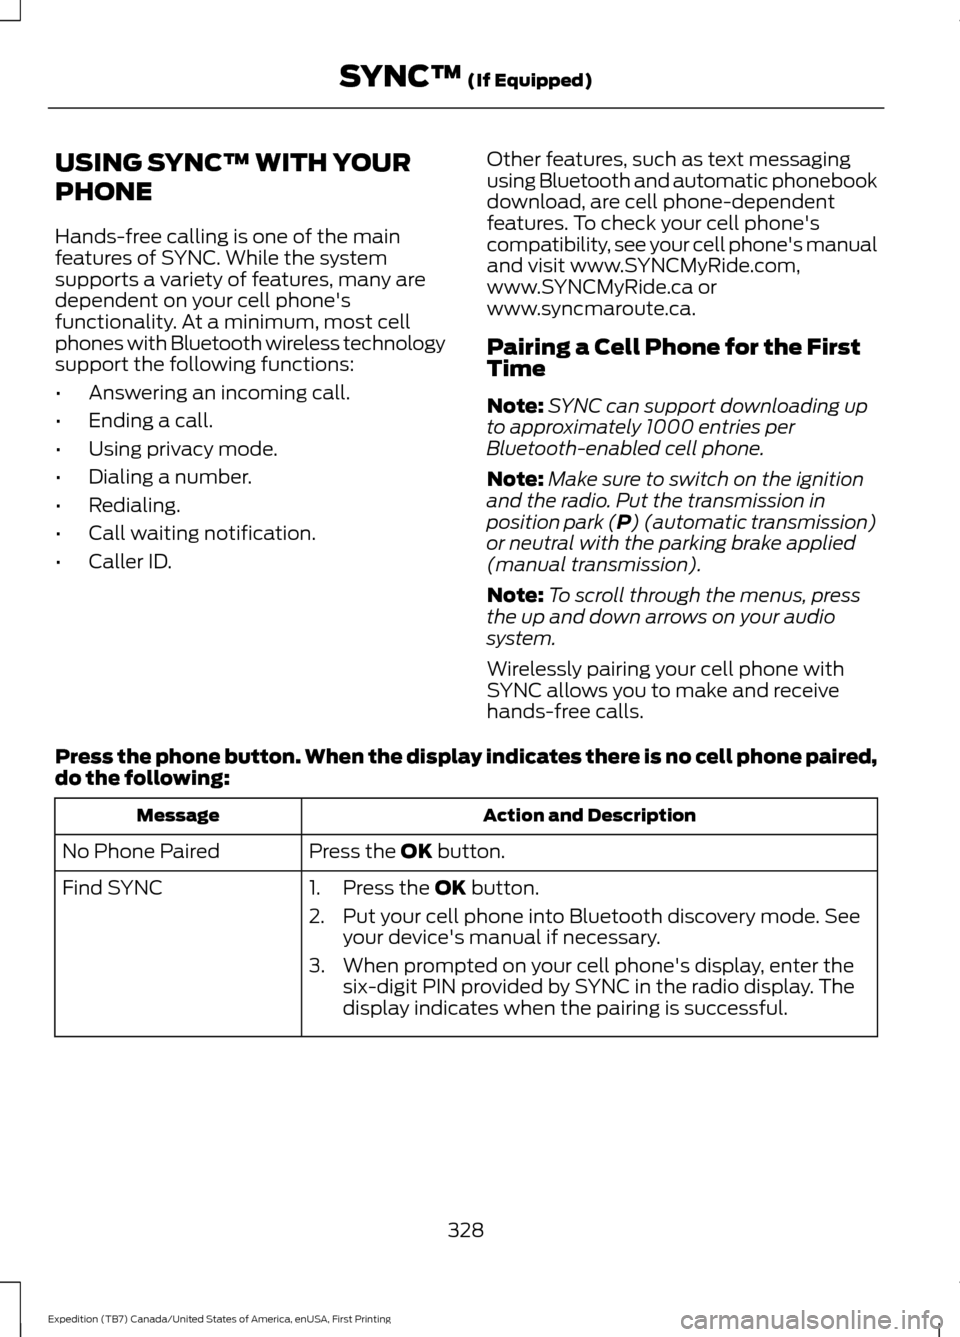
TRANSMISSION CODE
DESIGNATION The transmission code is on the Safety
Compliance Certification Label. The
following table shows the transmission
code along with the transmission
description.
Code
Description
6
Six-speed automatic transmission 6R80E
306
Expedition (TB7) Canada/United States of America, enUSA, First Printing Capacities and SpecificationsE167469 E167814
Page 310 of 421

CAPACITIES AND SPECIFICATIONS - 3.5L ECOBOOST™
Capacities
WARNING
The air conditioning refrigerant system contains refrigerant R-134a under high
pressure. Opening the air conditioning refrigerant system can cause personal injury.
Have the air conditioning refrigerant system serviced only by qualified personnel.
Capacity
Item
6.0 qt (5.7 L)
Engine oil
18.5 qt (17.5 L)
Engine coolant (Base radiator with auxiliary
rear heat)
18.0 qt (17 L)
Engine coolant (Heavy Duty trailer towing
with auxiliary rear heat)
Between MIN and MAX on brake fluidreservoir 1
Brake fluid
3.5 pt (1.7 L)
Front axle
4.5 pt (2.1 L) 2
Rear axle (Conventional differential)
4.25 pt (2.01 L) 2,3
Rear axle (Limited-slip differential)
13.1 qt (12.4 L)4
Automatic transmission fluid
1.5 qt (1.4 L)
Transfer case fluid
Fill as required
Windshield washer fluid
28.0 gal (106 L)
Fuel tank
33.5 gal (126.8 L)
Fuel tank (Expedition EL)
44 oz (1.25 kg)
A/C refrigerant
307
Expedition (TB7) Canada/United States of America, enUSA, First Printing Capacities and Specifications
Page 312 of 421

Specification
Name
WSS-M6C65-A1
Brake fluid (U.S. and Mexico):
Motorcraft DOT 3 Motor Vehicle Brake Fluid
PM-1-C
WSS-M6C65-A1
Brake fluid (Canada):
High Performance DOT 3 Motor Vehicle Brake Fluid
CPM-1-C
WSS-M6C65-A2
Brake fluid:
Motorcraft® DOT 4 LV High Performance Motor Vehicle
Brake Fluid (U.S. Canada and Mexico)
PM-20
WSS-M2C938-A
Automatic transmission fluid (U.S. and Mexico):
MERCON LV
Motorcraft MERCON LV Automatic Transmission Fluid
XT-10-QLVC
WSS-M2C938-A
Automatic transmission fluid (Canada):
MERCON LV
Motorcraft MERCON LV Automatic Transmission Fluid
CXT-10-LV12
WSS-M2C942-A
Front axle fluid:
Motorcraft SAE 75W-85 Hypoid Gear Lube
XY-75W85-QL
WSS-M2C942-A
Rear axle fluid:
Motorcraft SAE 75W-85 Hypoid Gear Lube
XY-75W85-QL
WSS-M2C938-A
Transfer case fluid (U.S. and Mexico):
MERCON® LV
Motorcraft Transfer Case Fluid
XT-10-QLVC
WSS-M2C938-A
Transfer case fluid (Canada):
MERCON® LV
Motorcraft Transfer Case Fluid
CXT-10-LV12
WSB-M8B16-A2
Windshield washer fluid (U.S. and Mexico):
Motorcraft Premium Windshield Wash Concentrate with
Bitterant
ZC-32-B2
WSB-M8B16-A2
Windshield washer fluid (Canada):
Motorcraft Premium Quality Windshield Washer Fluid
CXC-37-(A, B, D, F)
WSH-M17B19-A
A/C refrigerant (U.S.):
Motorcraft R-134a Refrigerant
YN-19
309
Expedition (TB7) Canada/United States of America, enUSA, First Printing Capacities and Specifications
Page 314 of 421

An oil that displays this symbol conforms
to current engine, emission system and
fuel economy performance standards of
the International Lubricants Specification
Advisory Council (ILSAC).
Do not use supplemental engine oil
additives because they are unnecessary
and could lead to engine damage that may
not be covered by your vehicle warranty.
Note:
We recommend using DOT 3 or DOT
4 Low Viscosity (LV) High Performance
Brake Fluid or equivalent meeting
WSS-M6C65-A1 or WSS-M6C65-A2.
Please refer to the brake reservoir cap for
the proper brake fluid. Use of any fluid other
than the recommended fluid may cause
degraded brake performance and not meet
the Ford performance standards. Keep brake
fluid clean and dry. Contamination with dirt,
water, petroleum products or other
materials may result in brake system
damage and possible failure.
Note: Automatic transmissions that require
MERCON LV transmission fluid should only
use MERCON LV transmission fluid. The
use of any other fluid may cause
transmission damage.
311
Expedition (TB7) Canada/United States of America, enUSA, First Printing Capacities and SpecificationsE142732
Page 331 of 421

USING SYNC™ WITH YOUR
PHONE
Hands-free calling is one of the main
features of SYNC. While the system
supports a variety of features, many are
dependent on your cell phone's
functionality. At a minimum, most cell
phones with Bluetooth wireless technology
support the following functions:
•
Answering an incoming call.
• Ending a call.
• Using privacy mode.
• Dialing a number.
• Redialing.
• Call waiting notification.
• Caller ID. Other features, such as text messaging
using Bluetooth and automatic phonebook
download, are cell phone-dependent
features. To check your cell phone's
compatibility, see your cell phone's manual
and visit www.SYNCMyRide.com,
www.SYNCMyRide.ca or
www.syncmaroute.ca.
Pairing a Cell Phone for the First
Time
Note:
SYNC can support downloading up
to approximately 1000 entries per
Bluetooth-enabled cell phone.
Note: Make sure to switch on the ignition
and the radio. Put the transmission in
position park (P) (automatic transmission)
or neutral with the parking brake applied
(manual transmission).
Note: To scroll through the menus, press
the up and down arrows on your audio
system.
Wirelessly pairing your cell phone with
SYNC allows you to make and receive
hands-free calls.
Press the phone button. When the display indicates there is no cell phone paired,
do the following: Action and Description
Message
Press the
OK button.
No Phone Paired
Find SYNC 1. Press the
OK button.
2. Put your cell phone into Bluetooth discovery mode. See your device's manual if necessary.
3. When prompted on your cell phone's display, enter the six-digit PIN provided by SYNC in the radio display. The
display indicates when the pairing is successful.
328
Expedition (TB7) Canada/United States of America, enUSA, First Printing SYNC™
(If Equipped)