2016 FORD EXPEDITION ignition
[x] Cancel search: ignitionPage 71 of 421

End of Travel Position
The steering column sets a stopping
position just short of the end of the column
position to prevent damage to the steering
column. A new stopping position sets if the
steering column encounters an object
when tilting or telescoping.
To reset the steering column to its normal
stopping position:
1. Confirm there is nothing obstructing
the motion of the steering column.
2. Press and hold the steering column control until the steering column stops
moving.
3. Press the steering column control again. The steering column may begin
to move again.
4. When the steering column stops, continue holding the control for an
additional few seconds.
5. Repeat for each direction as necessary.
A new stopping position is set. The next
time you tilt or telescope the steering
column, it will stop just short of the end of
the column position.
Memory Feature
You can save and recall the steering
column position with the memory function.
See Memory Function (page 126).
Note: Pressing the adjustment control
during memory recall cancels the operation.
Easy Entry and Exit Feature
When you switch the ignition off, the
steering column will move to allow extra
room to exit your vehicle. The column will
return to the previous setting when you
switch the ignition on. You can enable or
disable this feature in the information
display. See Information Displays (page
92
). AUDIO CONTROL
(If Equipped)
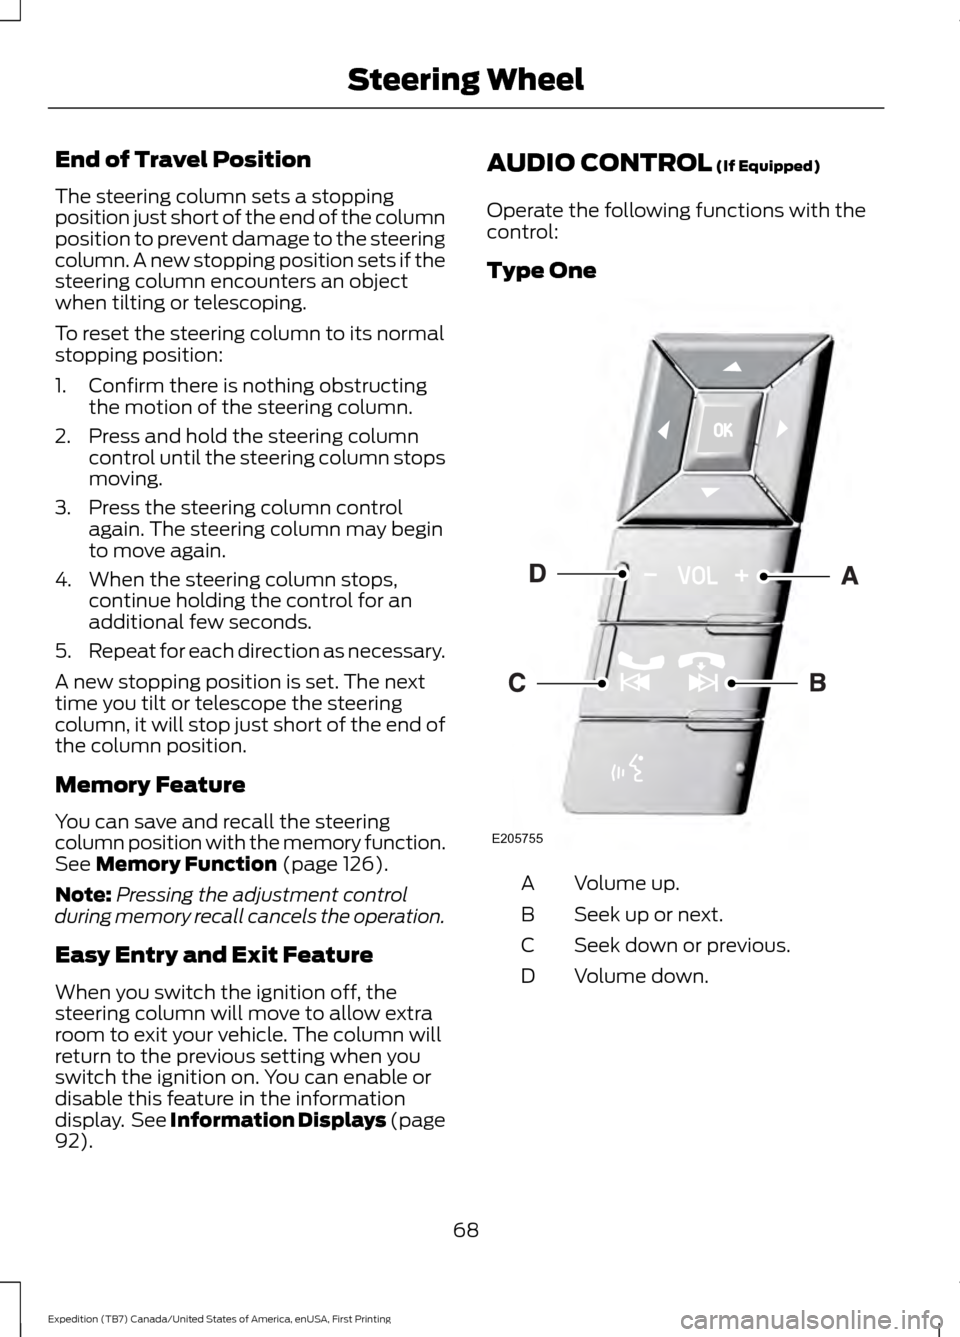
Operate the following functions with the
control:
Type One Volume up.
A
Seek up or next.
B
Seek down or previous.
C
Volume down.
D
68
Expedition (TB7) Canada/United States of America, enUSA, First Printing Steering WheelE205755
Page 78 of 421

Headlamp Flasher
Slightly pull the lever toward you and
release it to flash the headlamps.
AUTOLAMPS
WARNING
The autolamps switch position may
not activate the headlamps in all low
visibility conditions, such as daytime
fog. Make sure the headlamps are
switched to auto or on, as appropriate,
during all low visibility conditions. Failure
to do so may result in a crash. When the lighting control is in the
autolamps position, the headlamps
automatically turn on in low light situations
or when the wipers activate. If equipped, the following also activate
when the lighting control is in the
autolamps position and you switch them
on in the information display:
•
Configurable daytime running lamps.
• Automatic high beam control.
• Adaptive headlamp control.
The headlamps remain on for a period of
time after you switch the ignition off. Use
the information display controls to adjust
the period of time that the headlamps
remain on. See Information Displays
(page 92).
Note: With the headlamps in the
autolamps position, you cannot switch the
high beam headlamps on until the
autolamps system turns the low beam
headlamps on.
Windshield Wiper Activated
Headlamps
The windshield wiper activated headlamps
turn on within 10 seconds when you switch
the windshield wipers on and the lighting
control is in the autolamps position. They
turn off approximately 60 seconds after
you switch the windshield wipers off.
The headlamps do not turn on by wiper
activation:
• During a mist wipe.
• When the wipers are on to clear washer
fluid during a wash condition.
• If the wipers are in intermittent mode.
Note: If you switch autolamps and
autowipers on, the headlamps will
automatically turn on when the windshield
wipers continuously operate.
75
Expedition (TB7) Canada/United States of America, enUSA, First Printing LightingE163268 E173258
A
Page 79 of 421

INSTRUMENT LIGHTING
DIMMER
Use to adjust the brightness of the
instrument panel and all applicable lit
components in the vehicle during
headlamp and parking lamp operation.
•
Tap the top or bottom of the control
to brighten/dim all interior lit
components incrementally, or
• Press and hold at the first position the
top or bottom of the control until the
desired lighting level is reached.
• Press and hold the top of the control
to the full on position to activate the
“dome on ” feature. This will turn on the
interior courtesy lights. The lights will
remain on until the bottom of the
control is pressed. DAYTIME RUNNING LAMPS (If
Equipped) WARNING
The daytime running lamps system
does not activate the rear lamps and
may not provide adequate lighting
during low visibility driving conditions. Also,
the autolamps switch position may not
activate the headlamps in all low visibility
conditions, such as daytime fog. Make sure
the headlamps are switched to auto or on,
as appropriate, during all low visibility
conditions. Failure to do so may result in a
crash. Type 1 - Conventional (Non-
Configurable)
The daytime running lamps turn on when:
1. The ignition is switched to the on
position.
2. The transmission is not in park (P) for vehicles with automatic transmissions
or the parking brake is released for
vehicles with manual transmissions.
3. The lighting control is in the off, parking
lamp or autolamps positions.
4. The headlamps are off.
Type 2 - Configurable
Switch the daytime running lamps on or
off using the information display controls.
See
Information Displays (page 92).
The daytime running lamps turn on when:
1. They are switched on in the information
display. See
Information Displays
(page 92).
2. The ignition is switched to the on position.
76
Expedition (TB7) Canada/United States of America, enUSA, First Printing LightingE163270
Page 81 of 421

INTERIOR LAMPS
Front Row Map Lamps (If Equipped)
Press the switches on either side of each
map lamp to turn on the lamps. The map
lamps light when:
• any door is opened.
• the instrument panel dimmer switch is
pressed up until the courtesy lamps
come on.
• any of the remote entry controls are
pressed and the ignition is off. Front Row Map and Dome Lamps
(If Equipped)
Press the switches on either side of the
dome lamp to turn on the lamps. The
dome lamp lights when:
•
any door is opened.
• the instrument panel dimmer switch is
pressed up until the courtesy lamps
come on.
• any of the remote entry controls are
pressed and the ignition is off. Second Row Map Lamps
(If Equipped)
The map lamps are located in the
headliner above the second row seats. The
map lamps light when:
• any door is opened.
• the instrument panel dimmer switch is
pressed up until the courtesy lamps
come on.
• any of the remote entry controls are
pressed and the ignition is off.
Press the controls to activate the lamps. 78
Expedition (TB7) Canada/United States of America, enUSA, First Printing LightingE163273 E163274 E206071
Page 82 of 421

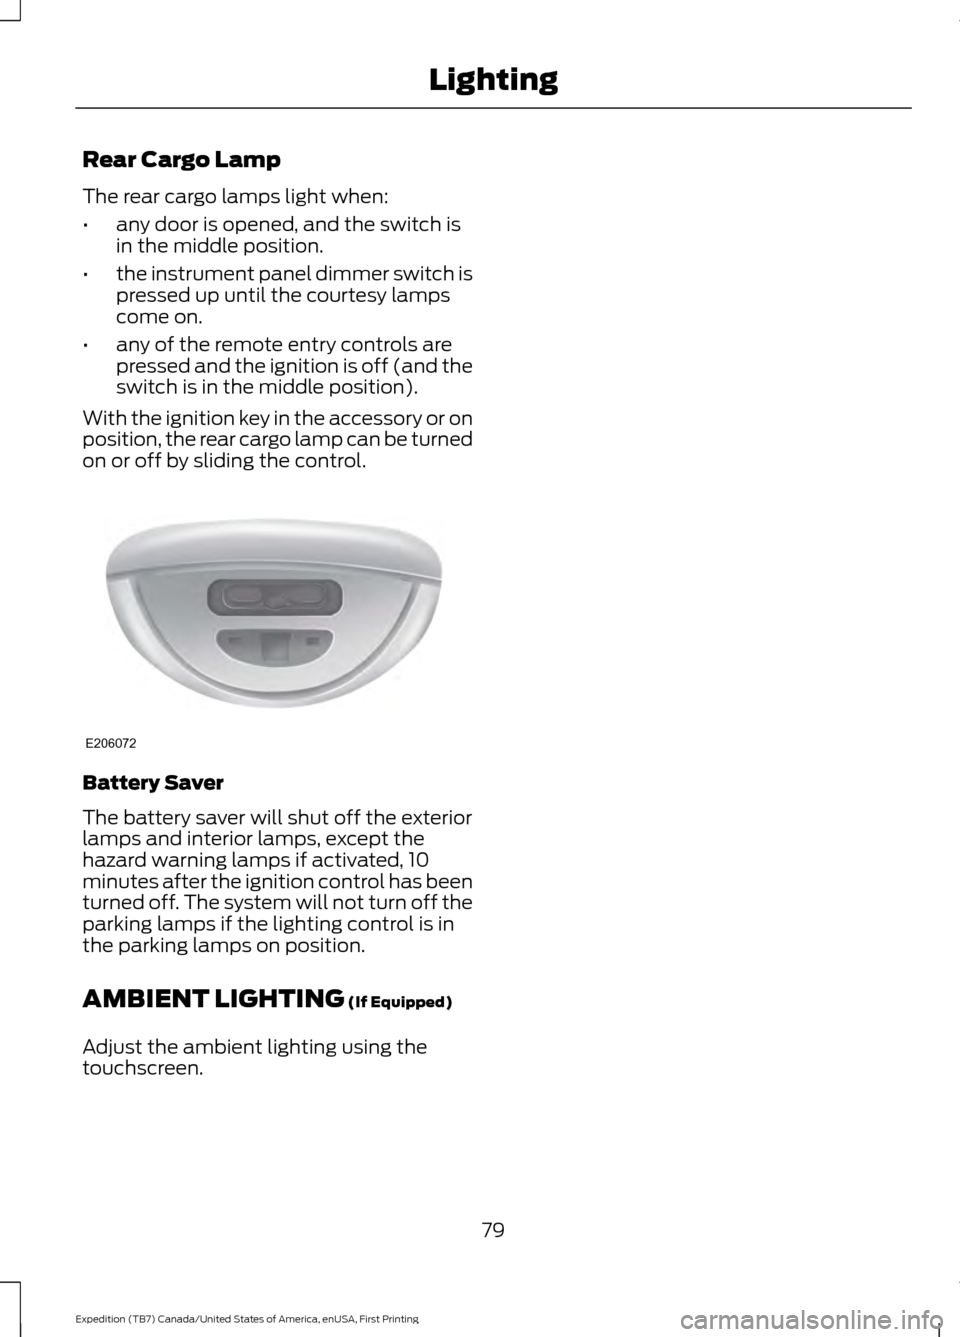
Rear Cargo Lamp
The rear cargo lamps light when:
•
any door is opened, and the switch is
in the middle position.
• the instrument panel dimmer switch is
pressed up until the courtesy lamps
come on.
• any of the remote entry controls are
pressed and the ignition is off (and the
switch is in the middle position).
With the ignition key in the accessory or on
position, the rear cargo lamp can be turned
on or off by sliding the control. Battery Saver
The battery saver will shut off the exterior
lamps and interior lamps, except the
hazard warning lamps if activated, 10
minutes after the ignition control has been
turned off. The system will not turn off the
parking lamps if the lighting control is in
the parking lamps on position.
AMBIENT LIGHTING (If Equipped)
Adjust the ambient lighting using the
touchscreen.
79
Expedition (TB7) Canada/United States of America, enUSA, First Printing LightingE206072
Page 83 of 421

POWER WINDOWS
WARNINGS
Do not leave children unattended in
your vehicle and do not let them play
with the power windows. They may
seriously injure themselves. When closing the power windows,
you should verify they are free of
obstructions and make sure that
children and pets are not in the proximity
of the window openings. Note:
You may hear a pulsing noise when
just one of the windows is open. Lower the
opposite window slightly to reduce this
noise.
Press the control to open the window.
Lift the control to close the window.
One-Touch Down
Press the control fully and release it. Press
again or lift it to stop the window.
One-Touch Up
Lift the control fully and release it. Press
again or lift it to stop the window.
Bounce-Back
The window will automatically stop and
reverse some distance if it detects an
obstacle while closing. Overriding the Bounce-Back Feature WARNING
When you override the bounce-back
feature the window will not reverse
if it detects an obstacle. Take care
when closing the windows to avoid
personal injury or damage to your vehicle. Pull up the window switch and hold within
a few seconds of the window reaching the
bounce-back position. The window travels
up with no bounce-back protection. The
window will stop if you release the switch
before the window fully closes.
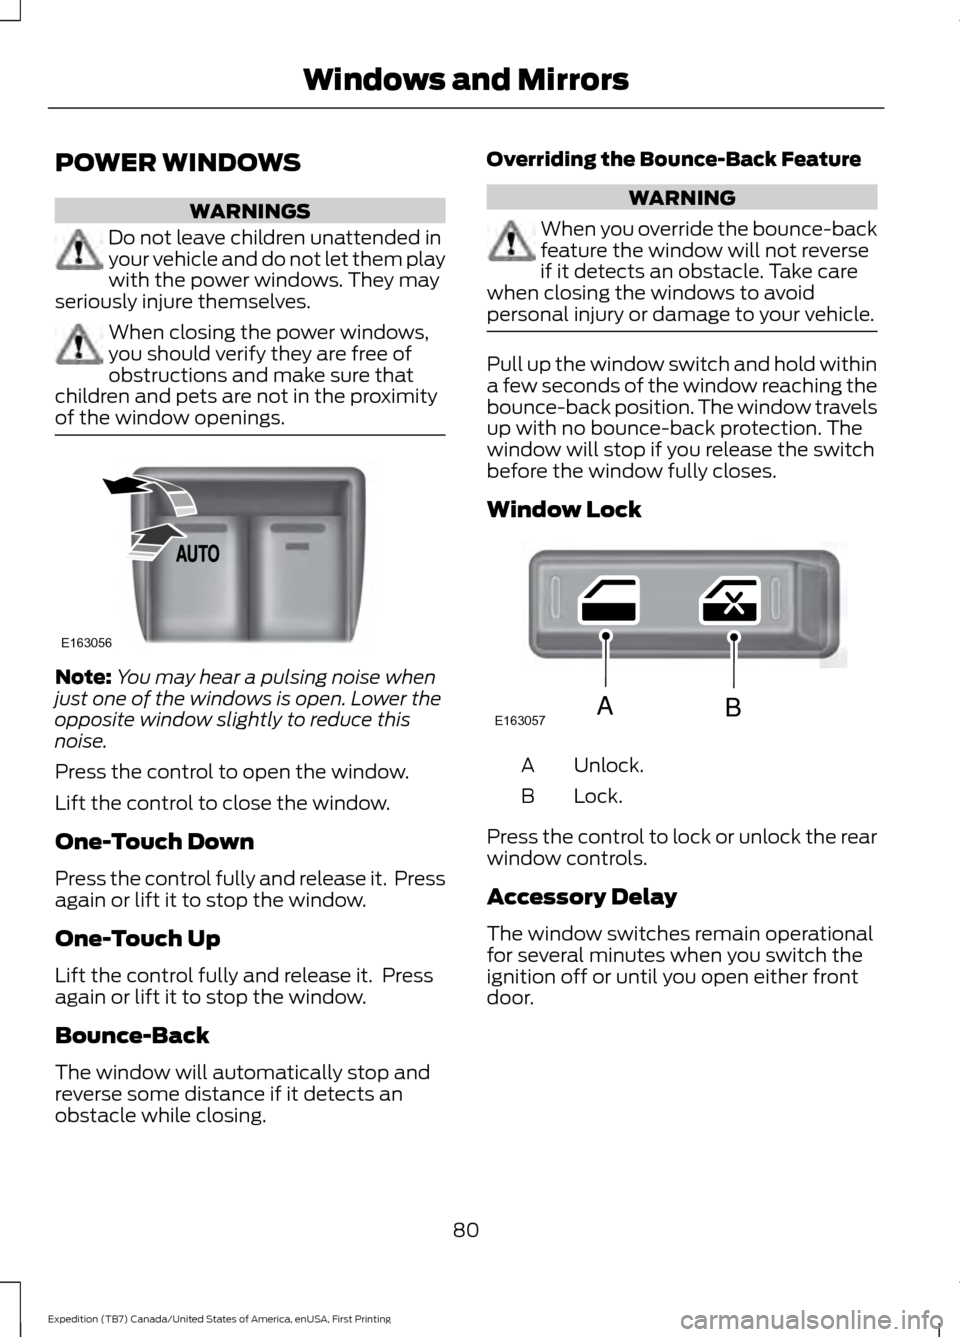
Window Lock
Unlock.
A
Lock.
B
Press the control to lock or unlock the rear
window controls.
Accessory Delay
The window switches remain operational
for several minutes when you switch the
ignition off or until you open either front
door.
80
Expedition (TB7) Canada/United States of America, enUSA, First Printing Windows and MirrorsE163056 E163057AB
Page 89 of 421

Vehicle Settings and Personalization
See General Information (page 92).
Fuel Gauge
Note: The fuel gauge may vary slightly
when your vehicle is moving or on a gradient.
Switch the ignition on. The fuel gauge
indicates approximately how much fuel
remains in the fuel tank. The arrow
adjacent to the fuel pump symbol
indicates on which side of your vehicle the
fuel filler door is located.
The needle should move toward F when
you refuel your vehicle. If the needle points
to E after adding fuel, this indicates your
vehicle needs service soon.
After refueling, the needle may not always
return to the exact same position. This is
normal.
Note: It may take a short time for the
needle to reach F after leaving the gas
station. This is normal and depends upon
the slope of pavement at the gas station.
Note: The fuel amount dispensed into the
tank is a little less or more than the gauge
indicated. This is normal and depends upon
the slope of pavement at the gas station. Note:
If the gas station nozzle shuts off
before the tank is full, try a different gas
pump nozzle.
Note: There is a small reserve left in the
tank when the fuel gauge reaches empty.
Low Fuel Reminder
A low reminder displays when the distance
to empty reaches 50 miles (80 km) to
empty.
Note: The low fuel reminder can appear at
different fuel gauge positions depending on
fuel economy conditions. This variation is
normal.
Engine Coolant Temperature Gauge
Shows the temperature of the engine
coolant. At normal operating temperature,
the needle remains in the center section.
If the needle enters the red section, the
engine is overheating. Stop the engine,
switch the ignition off and determine the
cause once the engine has cooled down.
Note: Do not restart the engine until you
conclude the cause of overheating. WARNING
Never remove the coolant reservoir
cap while the engine is running or hot.
The hot coolant is under pressure
and may cause serious burns. 86
Expedition (TB7) Canada/United States of America, enUSA, First Printing Instrument Cluster
Page 91 of 421

WARNING LAMPS AND
INDICATORS
The following warning lamps and
indicators alert you to a vehicle condition
that may become serious. Some lamps
illuminate when you start your vehicle to
make sure they work. If any lamps remain
on after starting your vehicle, refer to the
respective system warning lamp for further
information.
Note:
Some warning indicators appear in
the information display and function the
same as a warning lamp but do not display
when you start your vehicle.
Anti-Lock Braking System If it illuminates when you are
driving, this indicates a
malfunction. You continue to
have the normal braking system (without
ABS) unless the brake warning lamp is also
illuminated. Have the system checked by
an authorized dealer.
Battery If it illuminates while driving, it
indicates a malfunction. Switch
off all unnecessary electrical
equipment and have the system checked
by an authorized dealer.
Brake System It illuminates when you engage
the parking brake and the
ignition is on.
If it illuminates when you are driving, check
that the parking brake is not engaged. If
the parking brake is not engaged, this
indicates low brake fluid level or a brake
system malfunction. Have the system
checked immediately by an authorized
dealer. WARNING
Driving a vehicle with the brake
system warning light on is dangerous.
A significant decrease in braking
performance may occur. It will take you
longer to stop the vehicle. Have the vehicle
checked by your authorized dealer as soon
as possible. Driving extended distances
with the parking brake engaged can cause
brake failure and the risk of personal injury. Cruise Control
It illuminates when you switch
this feature on. See Using
Cruise Control (page 186).
Direction Indicator Illuminates when you switch the
left or right direction indicator or
the hazard warning flasher on. If
the indicators stay on or flash faster, check
for a burned out bulb.
Door Ajar Displays when the ignition is on
and any door is not completely
closed.
Engine Coolant Temperature Illuminates when the engine
coolant temperature is high.
Stop the vehicle as soon as
possible, switch off the engine and let cool.
See
Engine Coolant Check (page 247).
88
Expedition (TB7) Canada/United States of America, enUSA, First Printing Instrument Cluster E144522 E71340