2016 FORD EXPEDITION warning
[x] Cancel search: warningPage 189 of 421

PRINCIPLE OF OPERATION
Cruise control lets you maintain a set
speed without keeping your foot on the
accelerator pedal. You can use cruise
control when your vehicle speed is greater
than 20 mph (30 km/h).
USING CRUISE CONTROL WARNINGS
Do not use cruise control on winding
roads, in heavy traffic or when the
road surface is slippery. This could
result in loss of vehicle control, serious
injury or death. When you are going downhill, your
vehicle speed may increase above
the set speed. The system will not
apply the brakes but a warning displays.
Failure to follow this warning could result
in serious personal injury or death. Note:
Cruise control will disengage if the
vehicle speed decreases more than 10 mph
(16 km/h) below the set speed while driving
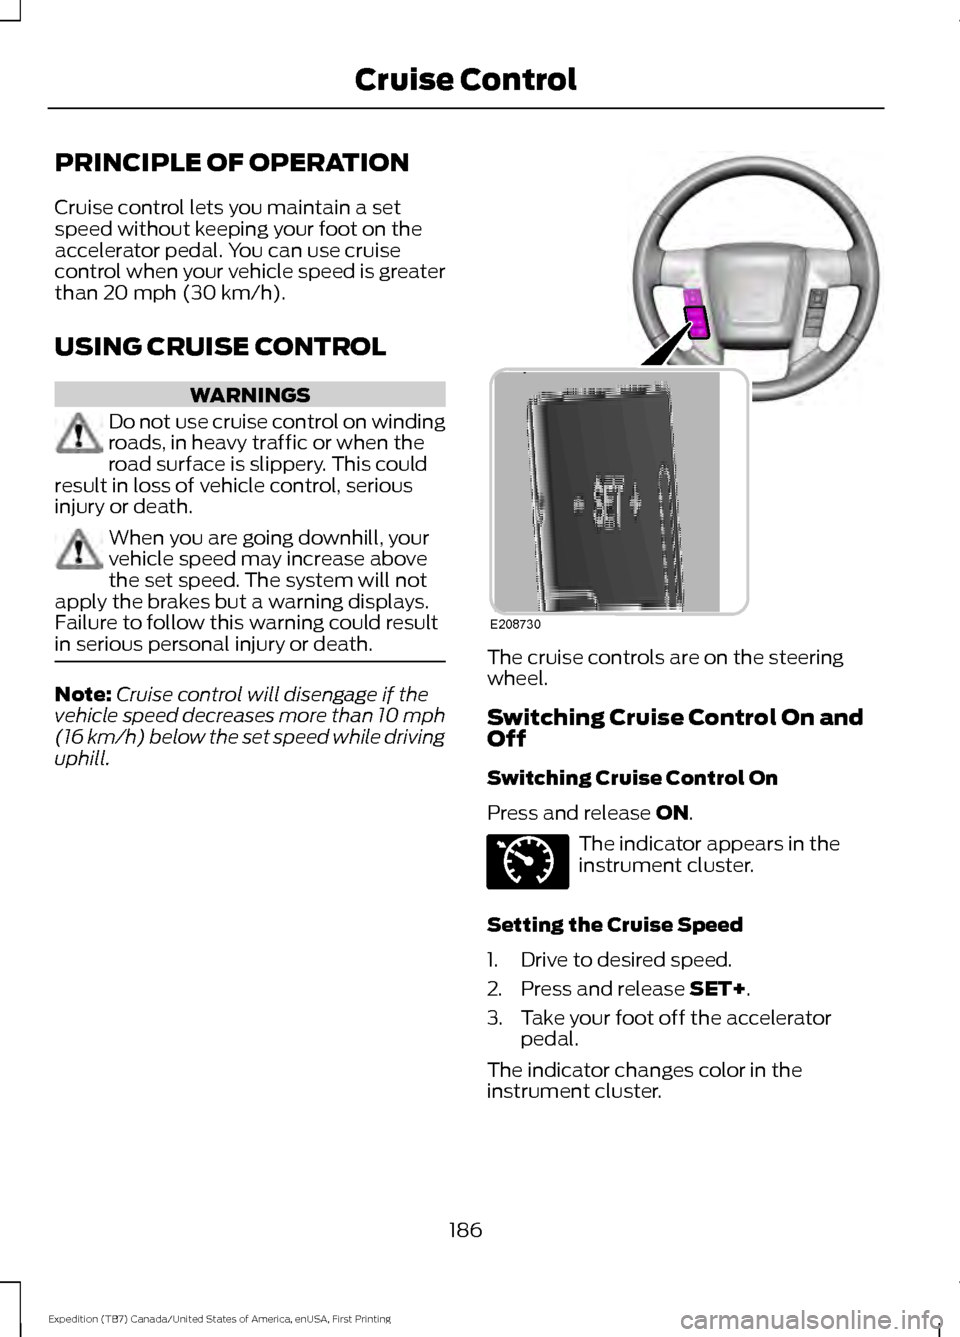
uphill. The cruise controls are on the steering
wheel.
Switching Cruise Control On and
Off
Switching Cruise Control On
Press and release
ON.
The indicator appears in the
instrument cluster.
Setting the Cruise Speed
1. Drive to desired speed.
2. Press and release
SET+.
3. Take your foot off the accelerator pedal.
The indicator changes color in the
instrument cluster.
186
Expedition (TB7) Canada/United States of America, enUSA, First Printing Cruise ControlE208730 E71340
Page 191 of 421

BLIND SPOT INFORMATION
SYSTEM
WARNING
To help avoid injuries, NEVER use the
Blind Spot Information System as a
replacement for using the interior
and exterior mirrors or looking over your
shoulder before changing lanes. The Blind
Spot Information System is not a
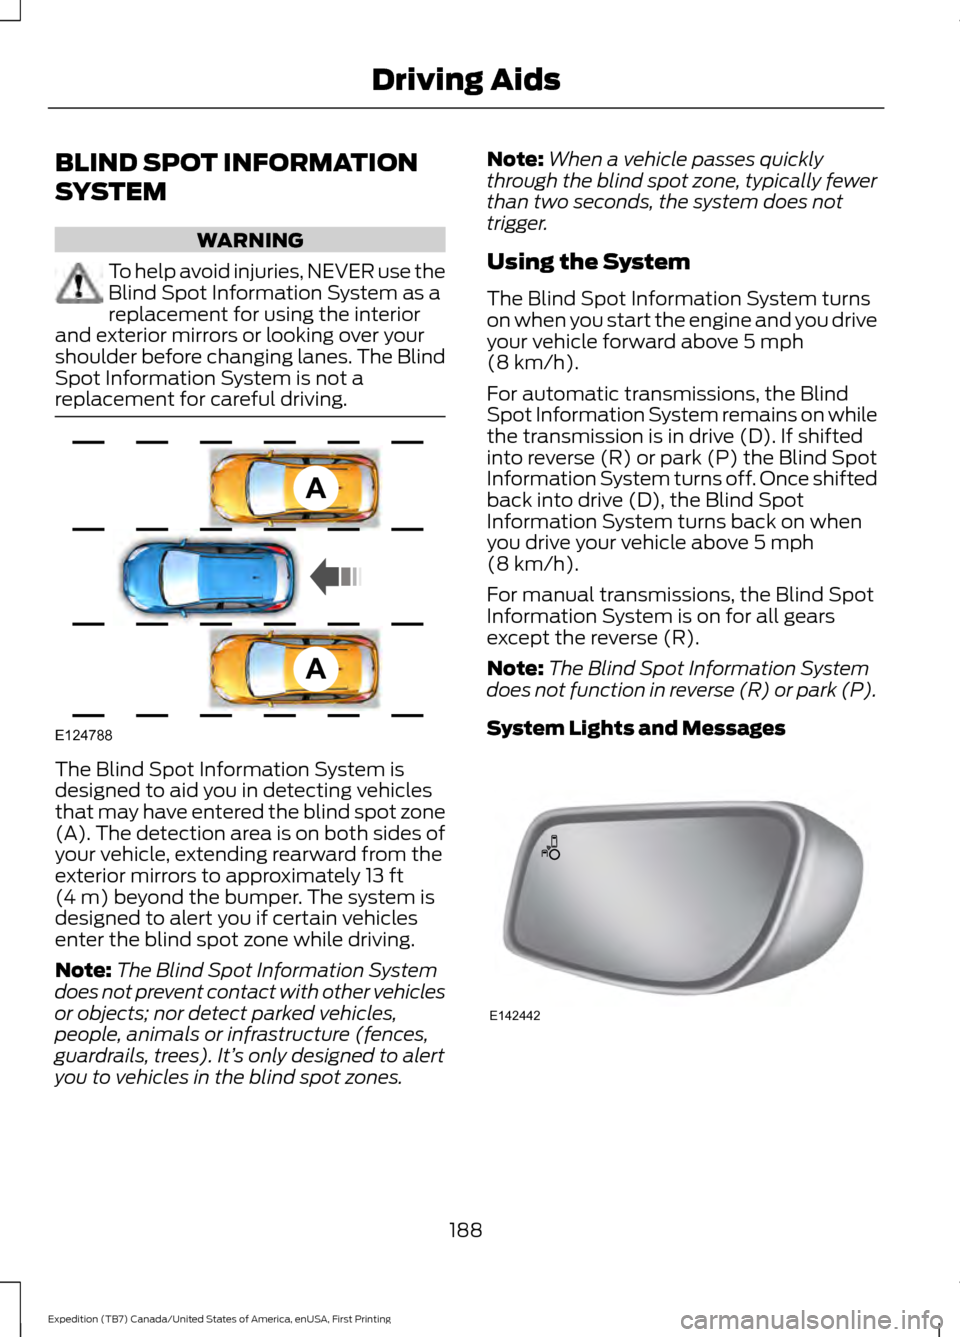
replacement for careful driving. The Blind Spot Information System is
designed to aid you in detecting vehicles
that may have entered the blind spot zone
(A). The detection area is on both sides of
your vehicle, extending rearward from the
exterior mirrors to approximately 13 ft
(4 m) beyond the bumper. The system is
designed to alert you if certain vehicles
enter the blind spot zone while driving.
Note: The Blind Spot Information System
does not prevent contact with other vehicles
or objects; nor detect parked vehicles,
people, animals or infrastructure (fences,
guardrails, trees). It’ s only designed to alert
you to vehicles in the blind spot zones. Note:
When a vehicle passes quickly
through the blind spot zone, typically fewer
than two seconds, the system does not
trigger.
Using the System
The Blind Spot Information System turns
on when you start the engine and you drive
your vehicle forward above
5 mph
(8 km/h).
For automatic transmissions, the Blind
Spot Information System remains on while
the transmission is in drive (D). If shifted
into reverse (R) or park (P) the Blind Spot
Information System turns off. Once shifted
back into drive (D), the Blind Spot
Information System turns back on when
you drive your vehicle above
5 mph
(8 km/h).
For manual transmissions, the Blind Spot
Information System is on for all gears
except the reverse (R).
Note: The Blind Spot Information System
does not function in reverse (R) or park (P).
System Lights and Messages 188
Expedition (TB7) Canada/United States of America, enUSA, First Printing Driving AidsA
A
E124788 E142442
Page 192 of 421

The Blind Spot Information System
illuminates an amber alert indicator in the
outside mirror on the side of your vehicle
the approaching vehicle is coming from.
When the Blind Spot Information System
is alerting on a vehicle and the
corresponding turn signal is ON, the Blind
Spot Information System alert indicator
flashes as an increased warning level.
The alert indicator dims when the system
detects nighttime darkness.
Note:
The alert indicator flashes in case of
an alert and the turn signal is set to that side
at the same time.
System Sensor Blockage WARNING
To help avoid injuries, NEVER use the
Blind Spot Information System as a
replacement for using the interior
and exterior mirrors or looking over your
shoulder before changing lanes. The Blind
Spot Information System is not a
replacement for careful driving. The system uses radar sensors that are
located behind the bumper fascia on each
side of your vehicle. Any dirt, mud and
snow in front of the sensors and/or driving
in heavy rain can cause system
degradation. Also, other types of
obstructions in front of the sensor can
cause system degradation. This is referred
to as a
‘blocked ’ condition.
Note: Do not apply bumper stickers and/or
repair compound to these areas, this can
cause degraded system performance.
189
Expedition (TB7) Canada/United States of America, enUSA, First Printing Driving AidsE205199
Page 193 of 421

If the system detects a degraded
performance condition, a message warning
of a blocked sensor will appear in the
information display. Also the BLIS alert
indicators will remain ON and BLIS will no
longer provide any vehicle warnings. You
can clear the information display warning
but the alert indicators will remain
illuminated.
A "blocked" condition can be cleared in
two ways:
•
After the blockage in front of the
sensors is removed or the
rainfall/snowfall rate decreases or
stops, drive for a few minutes in traffic
to allow the sensors to detect passing
vehicles.
• By cycling the ignition from ON to OFF
and then back ON.
Note: If your vehicle has a tow bar with a
factory equipped trailer tow module and it
is towing a trailer, the sensors will
automatically turn the Blind Spot
Information System off. If your vehicle has
a tow bar but no factory equipped trailer
tow module, it is recommended to turn the
Blind Spot Information System off
manually. Operating the Blind Spot
Information System with a trailer attached
will cause poor system performance.
System Errors
If the system senses a problem with the
left or right sensor, the telltale will
illuminate and a message will appear in
the information display. See Information
Messages (page 103). Switching the System Off and On
You can temporarily switch the Blind Spot
Information System off in the information
display. See
General Information (page
92). When the Blind Spot Information
System switches off, you will not receive
alerts and the information display shows
a system off message. The telltale in the
cluster also illuminates. When you switch
the Blind Spot Information System on or
off, the alert indicators flash twice.
Note: The Blind Spot Information System
remembers the last selected on or off
setting.
You can also have the Blind Spot
Information System switched off
permanently at an authorized dealer. Once
switched off permanently, the system can
only be switched back on at an authorized
dealer.
CROSS TRAFFIC ALERT WARNING
To help avoid personal injury, NEVER
use the Cross Traffic Alert system as
a replacement for using the interior
and exterior mirrors and looking over your
shoulder before backing out of a parking
space. Cross Traffic Alert is not a
replacement for careful driving. Cross Traffic Alert is designed to warn you
of vehicles approaching from the sides
when the transmission is in reverse (R).
Using the System
Cross Traffic Alert turns on when you start
the engine and you shift into reverse (R).
Once shifted out of reverse (R), Cross
Traffic Alert turns off.
Note:
Cross Traffic Alert only functions
while your transmission is in reverse (R).
190
Expedition (TB7) Canada/United States of America, enUSA, First Printing Driving Aids
Page 196 of 421

The following are other situations that may
limit the Cross Traffic Alert performance:
•
Adjacently parked vehicles or objects
obstructing the sensors.
• Approaching vehicles passing at
speeds greater than 37 mph
(60 km/h).
• Driving in reverse faster than
7 mph
(12 km/h).
• Backing out of an angled parking spot.
False Alerts
Note: If your vehicle has a tow bar with a
factory equipped trailer tow module and it
is towing a trailer, the sensors will
automatically turn the Cross Traffic Alert
off. If your vehicle has a tow bar but no
factory equipped trailer tow module, it is
recommended to turn the Cross Traffic Alert
off manually. Operating Cross Traffic Alert
with a trailer attached will cause poor Cross
Traffic Alert performance.
There may be certain instances when there
is a false alert by the Cross Traffic Alert
system that illuminates the alert indicator
with no vehicle in the coverage zone. Some
amount of false alerts are normal; they are
temporary and self-correct.
System Errors
If Cross Traffic Alert senses a problem with
the left or right sensor a message will
appear in the information display. See
Information Messages
(page 103).
Switching the System Off and On
You can temporarily switch Cross Traffic
Alert off in the information display. See
General Information
(page 92). When
you switch Cross Traffic Alert off, you will
not receive alerts and the information
display will display a system off message. Note:
The Cross Traffic Alert switches on
whenever the ignition is switched on and
ready to provide appropriate alerts when
the transmission is in reverse (R). Cross
Traffic Alert will not remember the last
selected on or off setting.
You can also have Cross Traffic Alert
switched off permanently at an authorized
dealer. Once switched off permanently,
the system can only be switched back on
at an authorized dealer.
STEERING
Electric Power Steering WARNINGS
The electric power steering system
has diagnostic checks that
continuously monitor the system. If
a fault is detected, a message displays in
the information display. Stop your vehicle
as soon as it is safe to do so. Switch the
ignition off. After at least 10 seconds,
switch the ignition on and watch the
information display for a steering system
warning message. If a steering system
warning message returns, have the system
checked by an authorized dealer. If the system detects an error, you
may not feel a difference in the
steering, however a serious condition
may exist. Obtain immediate service from
an authorized dealer, failure to do so may
result in loss of steering control. Your vehicle has an electric power steering
system. There is no fluid reservoir. No
maintenance is required.
If your vehicle loses electrical power while
you are driving, electric power steering
assistance is lost. The steering system still
operates and you can steer your vehicle
manually. Manually steering your vehicle
requires more effort.
193
Expedition (TB7) Canada/United States of America, enUSA, First Printing Driving Aids
Page 199 of 421

REAR UNDER FLOOR
STORAGE (If Equipped)
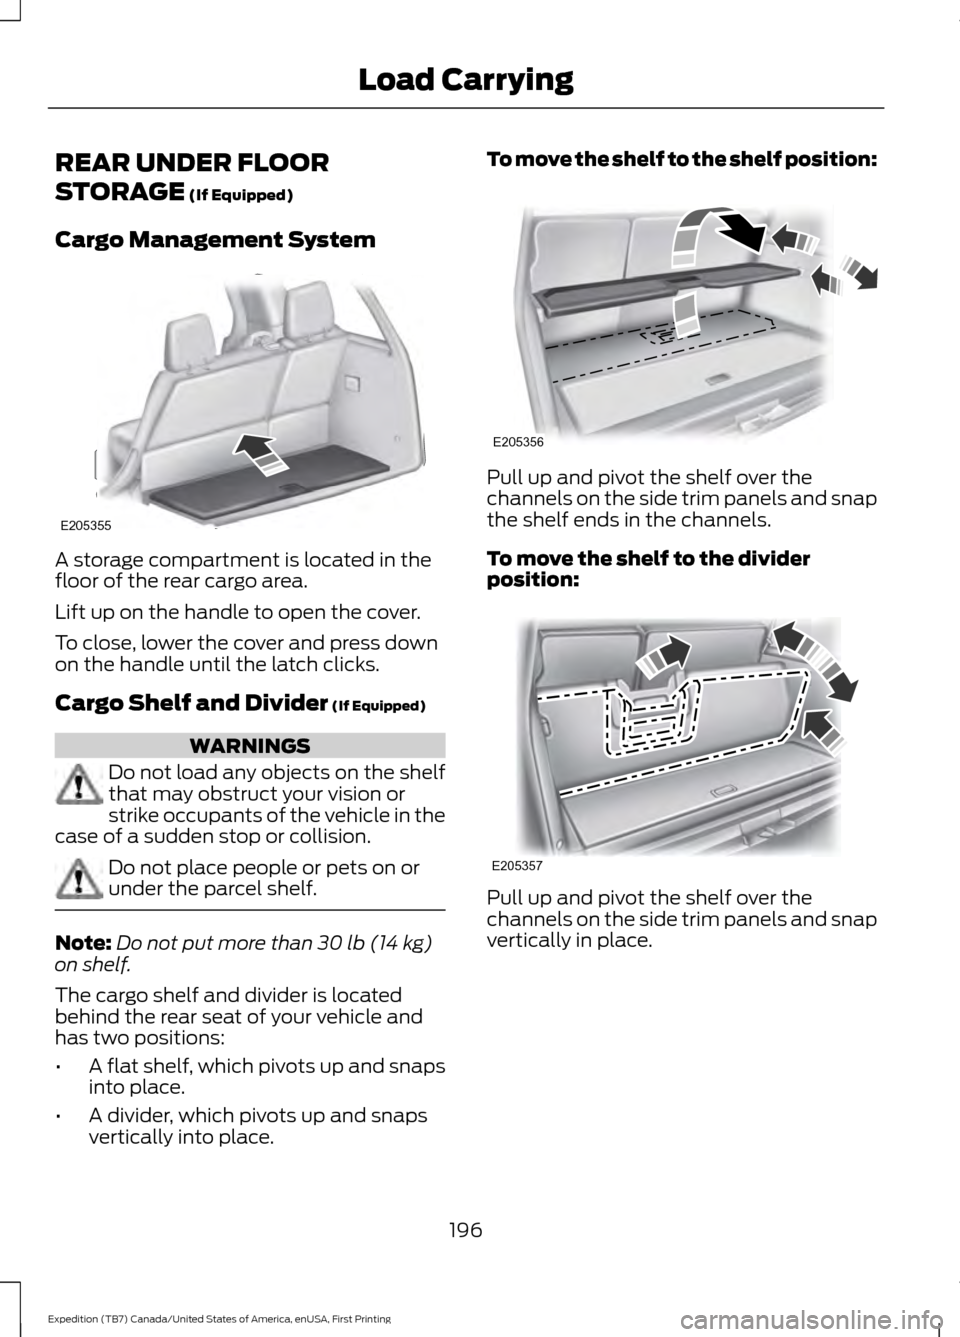
Cargo Management System A storage compartment is located in the
floor of the rear cargo area.
Lift up on the handle to open the cover.
To close, lower the cover and press down
on the handle until the latch clicks.
Cargo Shelf and Divider
(If Equipped)
WARNINGS
Do not load any objects on the shelf
that may obstruct your vision or
strike occupants of the vehicle in the
case of a sudden stop or collision. Do not place people or pets on or
under the parcel shelf.
Note:
Do not put more than
30 lb (14 kg)
on shelf.
The cargo shelf and divider is located
behind the rear seat of your vehicle and
has two positions:
• A flat shelf, which pivots up and snaps
into place.
• A divider, which pivots up and snaps
vertically into place. To move the shelf to the shelf position:
Pull up and pivot the shelf over the
channels on the side trim panels and snap
the shelf ends in the channels.
To move the shelf to the divider
position:
Pull up and pivot the shelf over the
channels on the side trim panels and snap
vertically in place.
196
Expedition (TB7) Canada/United States of America, enUSA, First Printing Load CarryingE205355 E205356 E205357
Page 200 of 421

Third Row Storage Bin (If Equipped)
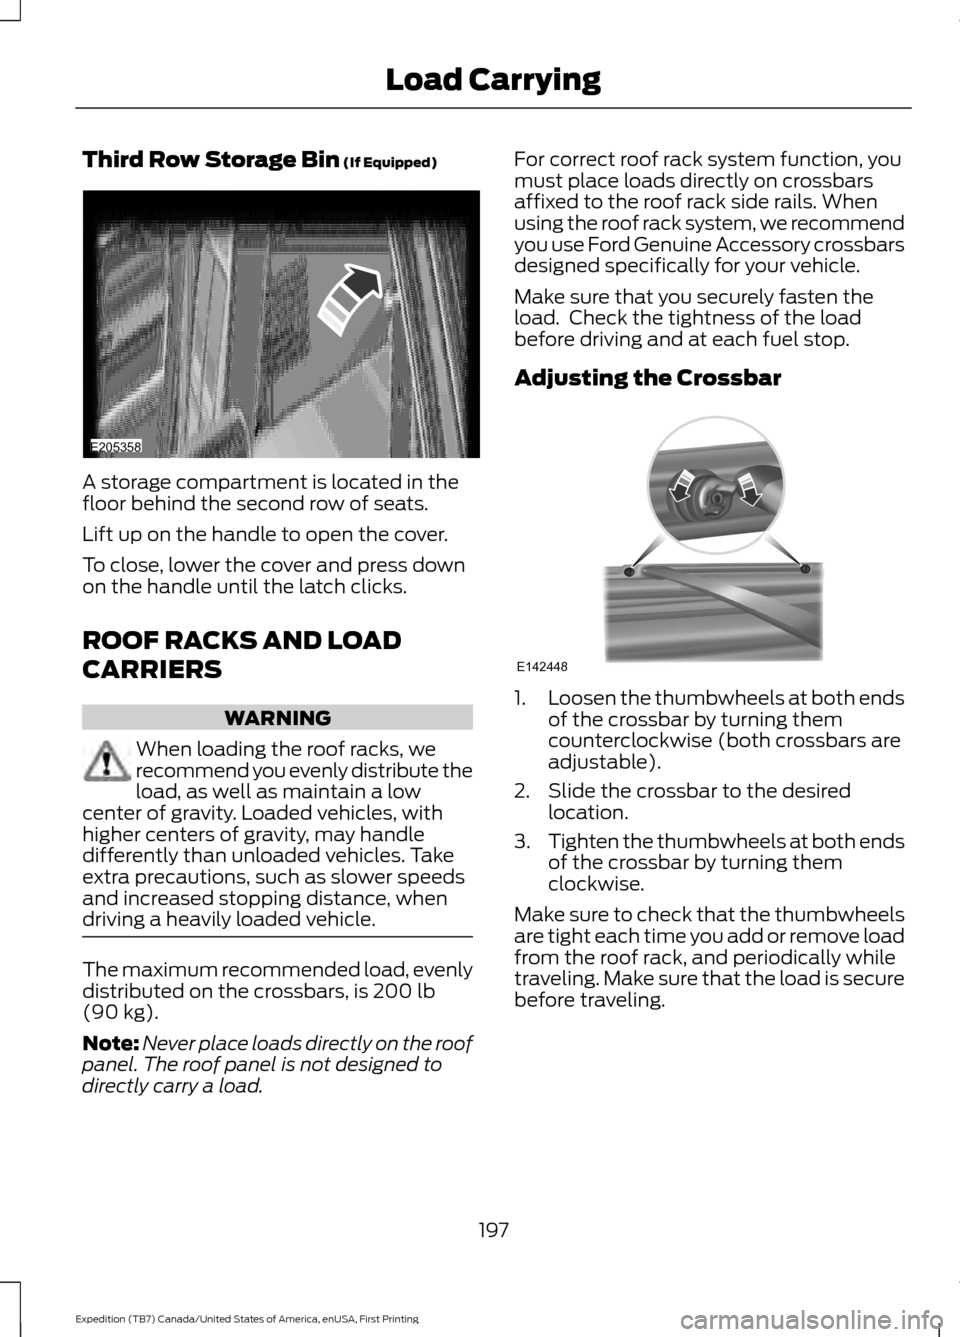
A storage compartment is located in the
floor behind the second row of seats.
Lift up on the handle to open the cover.
To close, lower the cover and press down
on the handle until the latch clicks.
ROOF RACKS AND LOAD
CARRIERS
WARNING
When loading the roof racks, we
recommend you evenly distribute the
load, as well as maintain a low
center of gravity. Loaded vehicles, with
higher centers of gravity, may handle
differently than unloaded vehicles. Take
extra precautions, such as slower speeds
and increased stopping distance, when
driving a heavily loaded vehicle. The maximum recommended load, evenly
distributed on the crossbars, is
200 lb
(90 kg).
Note: Never place loads directly on the roof
panel. The roof panel is not designed to
directly carry a load. For correct roof rack system function, you
must place loads directly on crossbars
affixed to the roof rack side rails. When
using the roof rack system, we recommend
you use Ford Genuine Accessory crossbars
designed specifically for your vehicle.
Make sure that you securely fasten the
load. Check the tightness of the load
before driving and at each fuel stop.
Adjusting the Crossbar
1.
Loosen the thumbwheels at both ends
of the crossbar by turning them
counterclockwise (both crossbars are
adjustable).
2. Slide the crossbar to the desired location.
3. Tighten the thumbwheels at both ends
of the crossbar by turning them
clockwise.
Make sure to check that the thumbwheels
are tight each time you add or remove load
from the roof rack, and periodically while
traveling. Make sure that the load is secure
before traveling.
197
Expedition (TB7) Canada/United States of America, enUSA, First Printing Load CarryingE205358 E142448
Page 202 of 421

WARNING
The appropriate loading
capacity of your vehicle can
be limited either by volume
capacity (how much space is
available) or by payload capacity
(how much weight the vehicle
should carry). Once you have
reached the maximum payload of
your vehicle, do not add more
cargo, even if there is space
available. Overloading or
improperly loading your vehicle
can contribute to loss of vehicle
control and vehicle rollover. Example only:
199
Expedition (TB7) Canada/United States of America, enUSA, First Printing Load CarryingE210944 E210945 E143817CARGO