Page 304 of 421

5. Remove the jack and fully tighten thelug nuts in the order shown. SeeTechnical Specifications (page 301).
Stowing the Flat or Spare Tire
1.Lay the tire on the ground, near the rearof the vehicle, with the valve stem sidefacing up.
2. Slide the wheel partially under thevehicle and install the retainer throughthe wheel center. If equipped, you mayhave to remove the wheel center capprior to pushing the retainer throughthe center of the wheel. To remove thecenter cap, press it off with the jacktool from the inner side of the wheel.Pull on the cable to align thecomponents at the end of the cable.
3. Assemble the jack handle and winchextension, then insert the winchextension through the access holebehind the third row seat and engagethe winch.
4. Turn the jack handle clockwise untilthe tire is raised to its stowed positionunderneath the vehicle. The wrenchwill become harder to turn and thespare tire winch will rachet or slip whenthe tire is raised to maximum tightness.A clicking sound will be heard from thewinch indicating that the tire is properlystowed.
5. Disassembly the jack tool and winchextension and snap them back into thetool tray.
6. Reinstall the jack bag properly aroundthe jack and tool assembly tray, makingsure the strap is fastened.
7. Close the access hole with the rubberplug.
8. Reinstall the tray into the vehicle andsecure it with the wing nut.
TECHNICAL SPECIFICATIONS
Wheel Lug Nut Torque Specifications
WARNING
When a wheel is installed, always remove any corrosion, dirt or foreign materialspresent on the mounting surfaces of the wheel or the surface of the wheel hub,brake drum or brake disc that contacts the wheel. Make sure that any fastenersthat attach the rotor to the hub are secured so they do not interfere with the mountingsurfaces of the wheel. Installing wheels without correct metal-to-metal contact at thewheel mounting surfaces can cause the wheel nuts to loosen and the wheel to come offwhile your vehicle is in motion, resulting in loss of control.
lb.ft (Nm)Bolt size
150 lb.ft (204 Nm)M14 x 1.5
*Torque specifications are for nut and bolt threads free of dirt and rust. Use only Fordrecommended replacement fasteners.
Retighten the lug nuts to the specified torque within 100 miles (160 kilometers) after anywheel disturbance (such as tire rotation, changing a flat tire, wheel removal).
301
Expedition (TB7) Canada/United States of America, enUSA, First Printing
Wheels and Tires
Page 318 of 421

Power and volume: Press this button to switch the system off and on. Turnthe control to adjust the volume.G
CD slot: Insert a CD.H
Eject: Press this button to eject a CD.I
SOUND: Press this button to adjust settings for Treble, Midrange, Bass, Balanceand Fade.J
CLOCK: Press this button to access the clock setting. Use the center arrowcontrols to change the hours and minutes.K
PHONE: Press this button to access the phone features of the SYNC system.L
MENU: Press this button to access different audio system features.M
MUTE or SIRIUS: Press this button to mute the playing audio, or if equipped,listen to Sirius satellite radio.N
AUX: Press this button to access your auxiliary input jack or switch betweendevices you plug into the input jack or USB port.O
RADIO: Press this button to listen to the radio or change radio frequency bands.Press the function buttons below the radio screen to select different radiofunctions.
P
CD: Press this button to listen to a CD. Press the function buttons below theradio screen to select on-screen options of Repeat or Shuffle.Q
AUDIO UNIT - VEHICLES WITH:
SONY AM/FM/CD
WARNING
Driving while distracted can result inloss of vehicle control, crash andinjury. We strongly recommend thatyou use extreme caution when using anydevice that may take your focus off theroad. Your primary responsibility is the safeoperation of your vehicle. We recommendagainst the use of any hand-held devicewhile driving and encourage the use ofvoice-operated systems when possible.Make sure you are aware of all applicablelocal laws that may affect the use ofelectronic devices while driving.
Note:The touchscreen controls most ofthe audio features. See your SYNCinformation.
315
Expedition (TB7) Canada/United States of America, enUSA, First Printing
Audio System
Page 320 of 421

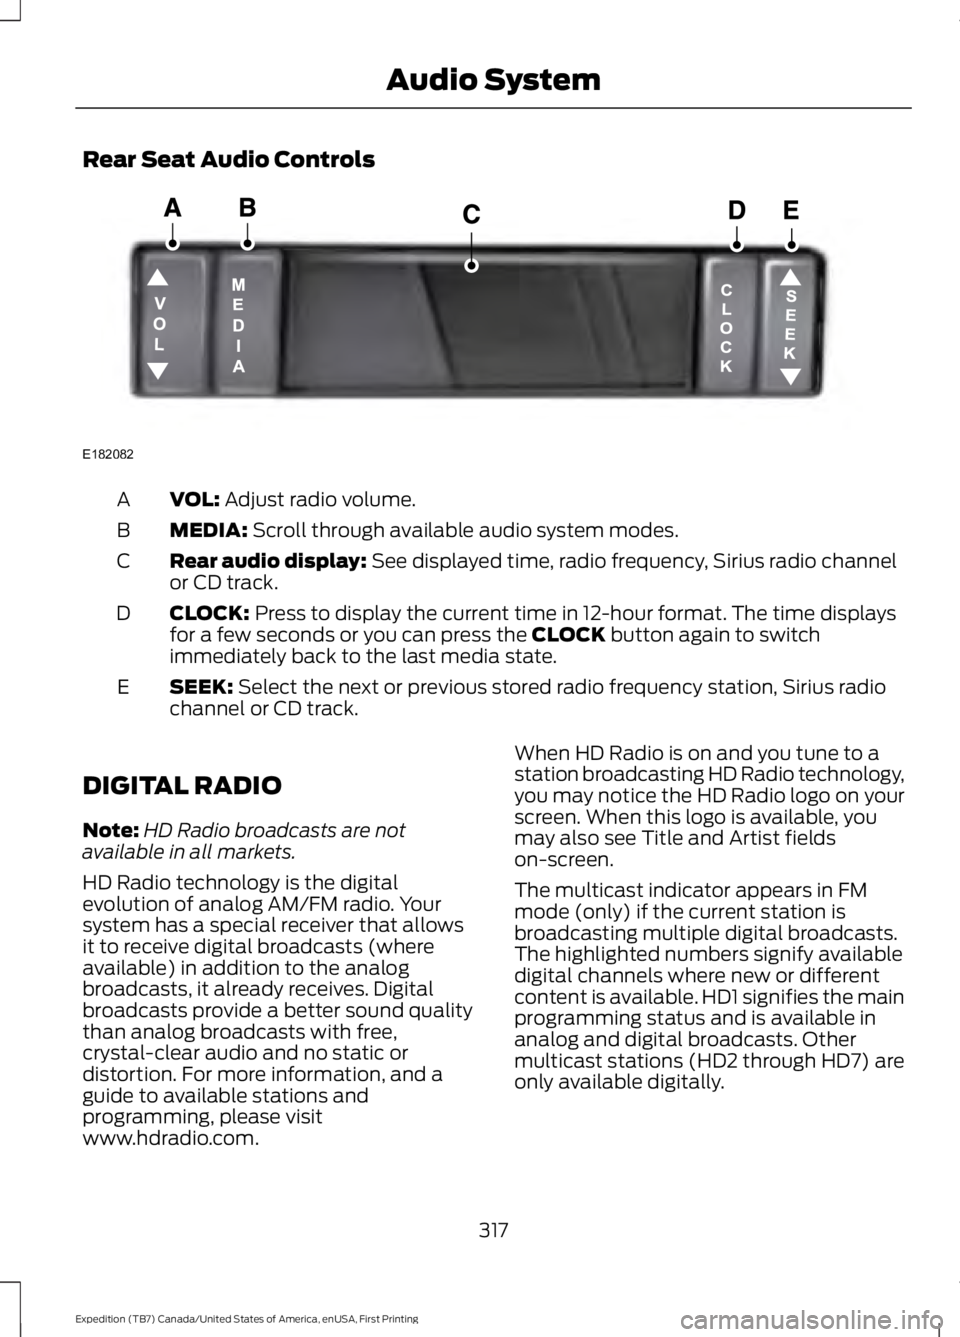
Rear Seat Audio Controls
VOL: Adjust radio volume.A
MEDIA: Scroll through available audio system modes.B
Rear audio display: See displayed time, radio frequency, Sirius radio channelor CD track.C
CLOCK: Press to display the current time in 12-hour format. The time displaysfor a few seconds or you can press the CLOCK button again to switchimmediately back to the last media state.
D
SEEK: Select the next or previous stored radio frequency station, Sirius radiochannel or CD track.E
DIGITAL RADIO
Note:HD Radio broadcasts are notavailable in all markets.
HD Radio technology is the digitalevolution of analog AM/FM radio. Yoursystem has a special receiver that allowsit to receive digital broadcasts (whereavailable) in addition to the analogbroadcasts, it already receives. Digitalbroadcasts provide a better sound qualitythan analog broadcasts with free,crystal-clear audio and no static ordistortion. For more information, and aguide to available stations andprogramming, please visitwww.hdradio.com.
When HD Radio is on and you tune to astation broadcasting HD Radio technology,you may notice the HD Radio logo on yourscreen. When this logo is available, youmay also see Title and Artist fieldson-screen.
The multicast indicator appears in FMmode (only) if the current station isbroadcasting multiple digital broadcasts.The highlighted numbers signify availabledigital channels where new or differentcontent is available. HD1 signifies the mainprogramming status and is available inanalog and digital broadcasts. Othermulticast stations (HD2 through HD7) areonly available digitally.
317
Expedition (TB7) Canada/United States of America, enUSA, First Printing
Audio SystemE182082
Page:
< prev 1-8 9-16 17-24