2016 FIAT TIPO 5DOORS STATION WAGON lock
[x] Cancel search: lockPage 64 of 240

In the event of an imminent collision the
system may intervene by braking the
vehicle to prevent the crash or reduce
its effects.
When the system detects the risk of
collision, it gives the driver acoustic and
visual signals through specific
messages on the instrument panel
display. The signals are intended to
allow the driver to react promptly, in
order to prevent or reduce the effects of
a potential accident.
If the system does not detect any
action by the driver, it can intervene by
braking automatically to attenuate the
potential accident (automatic braking). If
the system detects that the driver is
pressing the brake pedal, but this is not
deemed sufficient, the system may
intervene in order to improve the
reaction of the braking system,therefore reducing vehicle speed further
(additional assistance during braking).
Versions equipped with Start&Stop
system: at the end of the automatic
braking, the Start&Stop system will
activate as described in paragraph
"Start&Stop system" of the "Starting
and driving" chapter.
Versions with manual gearbox:at
the end of the automatic braking the
engine may stall and turn off, unless the
driver presses the clutch pedal.
IMPORTANT After the car is stopped,
the brake callipers may be locked for
about 2 seconds for safety reasons.
Make sure you press the brake pedal if
the vehicle moves slightly forwards.
Engagement/disengagement
The Full Brake Control can be
deactivated (and subsequently
reactivated) through the instrument
panel Menu.
With theUconnect™ 5"or7" HD
system, some Menu items are shown
and managed on the display of the
latter and not on the instrument panel
display (refer to the dedicated
Multimedia chapter or to the
supplement available online).
The system can be deactivated even
with the ignition device at MAR.
IMPORTANT The system status can be
changed with vehicle at a standstill only.
The Full Brake Control can be set by
selecting one of the 3 Menu options:
System active: the system (if active),
in addition to the visual and acoustic
warnings, can provide automatic
braking and additional assistance
during braking, if the driver does not
brake hard enough in the event of a
potential impact with the vehicle in
front;
System partially active: the system (if
active), does not give the visual and
acoustic warnings, but can provide
automatic braking and additional
assistance during braking, if the driver
does not brake hard enough in the
event of a potential impact with the
vehicle in front;
System deactivated: the system
does not give visual and acoustic
warnings, limited braking, automatic
braking or additional assistance during
braking. The system will therefore
provide no indication of a possible
accident.
Activation/deactivation
If the Full Brake Control system has
been correctly activated from the Menu,
it will be active each time the engine is
started.
53P2000076-000-000
62
SAFETY
Page 70 of 240

OCCUPANT
PROTECTION
SYSTEMS
Some of the most important safety
equipment of the vehicle comprise the
following protection systems:
seat belts;
SBR (Seat Belt Reminder) system;
head restraints;
child restraint systems;
Front air bags, side air bags and
drop down air bags (where provided).
Read the information given the following
pages with the utmost care. It is of
fundamental importance that the
protection systems are used in the
correct way to guarantee the maximum
possible safety level for the driver and
the passengers.
For the description of the head restraint
adjustment see the "Head restraints"
paragraph in the "Knowing your vehicle"
chapter.
SEAT BELTS
All vehicle seats are equipped with seat
belts with three anchor points and a
retractor.
The retractor mechanism operates
locking the belt in the event of sharp
braking or strong deceleration due to
an impact. This allows the belt strap to
slide freely and to adapt to the body of
the occupant. In the event of an
accident, the belt will lock reducing the
risk of impact inside the passenger
compartment and of being projected
outside the vehicle.
The driver is responsible for respecting,
and ensuring that all the other
occupants of the vehicle also respect,
the local laws in force in relation to the
use of the seat belts.
Always fasten the seat belts before
setting off.
USING THE SEAT BELTS
The seat belt should be worn keeping
the chest straight and rested against
the backrest.
To fasten the seat belts, hold the tab 1
fig. 59 and insert it into the buckle 2,
until it clicks into place.On removal of the belt, if it jams, let it
rewind for a short stretch, then pull it
out again without jerking.
To unfasten the seat belts, press button
3fig. 59 and guide the seat belt with
your hand while it is rewinding, to
prevent it from twisting.
68) 69)
The retractor may lock when the vehicle
is parked on a steep slope: this is
perfectly normal. Furthermore, the reel
mechanism locks the belt if it is pulled
sharply or in the event of sudden
braking, collisions and high-speed
bends.
Once seated, put on the rear seat belts
as shown in fig. 60.
5906056J0004EM
68
SAFETY
Page 71 of 240
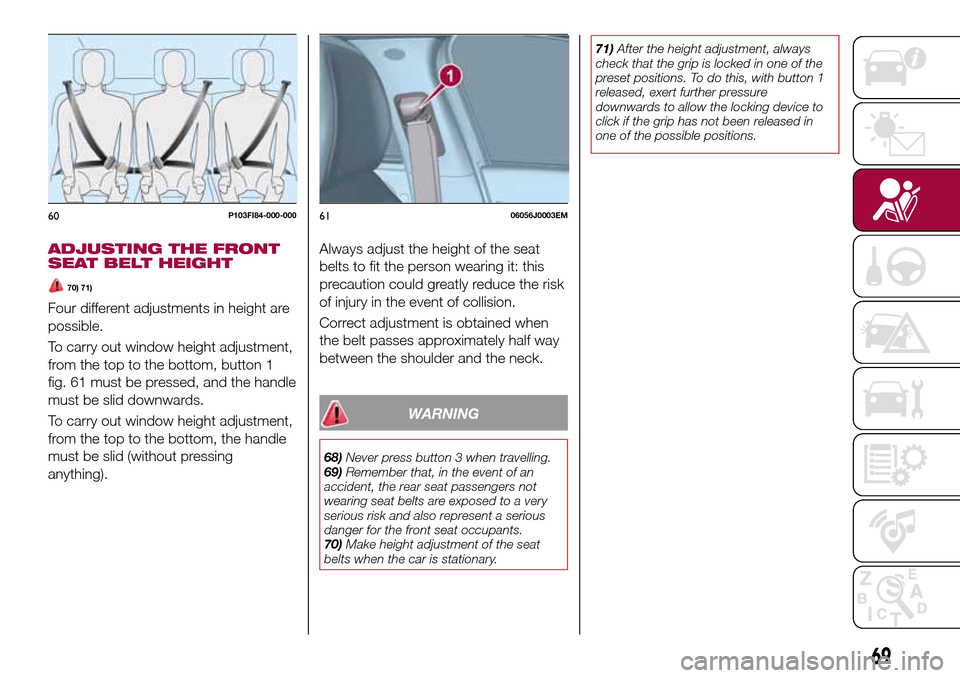
ADJUSTING THE FRONT
SEAT BELT HEIGHT
70) 71)
Four different adjustments in height are
possible.
To carry out window height adjustment,
from the top to the bottom, button 1
fig. 61 must be pressed, and the handle
must be slid downwards.
To carry out window height adjustment,
from the top to the bottom, the handle
must be slid (without pressing
anything).Always adjust the height of the seat
belts to fit the person wearing it: this
precaution could greatly reduce the risk
of injury in the event of collision.
Correct adjustment is obtained when
the belt passes approximately half way
between the shoulder and the neck.
WARNING
68)Never press button 3 when travelling.
69)Remember that, in the event of an
accident, the rear seat passengers not
wearing seat belts are exposed to a very
serious risk and also represent a serious
danger for the front seat occupants.
70)Make height adjustment of the seat
belts when the car is stationary.71)After the height adjustment, always
check that the grip is locked in one of the
preset positions. To do this, with button 1
released, exert further pressure
downwards to allow the locking device to
click if the grip has not been released in
one of the possible positions.
60P103FI84-000-0006106056J0003EM
69
Page 97 of 240

PARKING THE
VEHICLE
Always remove the ignition key when
leaving the car.
When parking and leaving the car,
proceed as follows:
Engage a gear (1st gear if parked
uphill or reverse if facing downhill) and
leave the wheels turned.
stop the engine and engage the
handbrake.
Block the wheels with a wedge or a
stone if the car is parked on a steep
slope.
IMPORTANT NEVER leave the vehicle
with the gearbox in neutral
PARKING BRAKE
107) 108)
To engage the handbrake, pull lever 1
fig. 82 upwards until the car is secured.
The
warning light will come on in
the instrument panel.
To disengage it, raise lever 1 slightly,
hold down button 2 and lower the lever,
checking that the warning light
on
the instrument panel switches off.
WARNING
107)Never leave children unattended in
the car. Always remove the key from the
ignition when leaving the car and take it
with you.
108)For cars equipped with a front
armrest, lift it up to ensure that it does not
interfere with the action of the handbrake.
USING THE
TRANSMISSION
109)
32)
To engage the gears, press the clutch
pedal fully and put the gear lever into
the required position (the diagram for
gear engagement is shown on the knob
).
To engage 6
thgear (if present), operate
the lever by pressing it towards the right
in order to avoid engaging 4
thgear by
mistake. The same applies to the shift
from 6
thto 5thgear.
1.3 Multijet 95 HP versions:To
engage reverse gear R from neutral,
press the clutch pedal and
simultaneously move the lever to the
right and then backwards.
8207046J0001EM
8307056J0001EM
95
Page 116 of 240

REFUELLING
PROCEDURE
"Capless Fuel" is a device at the
opening for the fuel tank which opens
and recloses automatically when the
fuel supply gun is introduced/removed.
The "Capless Fuel" device is provided
with an inhibitor which prevents
refuelling with incorrect fuel.
Opening the flap
To refuel proceed as follows:
unlock flap 1 fig. 98 by pressing on
the specified point and then open it;
introduce the dispenser in the filler
and refuel;
after refuelling, before removing the
dispenser, wait for at least 10 seconds
in order for the fuel to flow inside the
tank;
then remove the dispenser from the
filler and close flap 1.
The flap is provided with a dust cover
gaiter 2 which prevents deposits of
impurities and dust at the end of the
filler when the flap is closed.Emergency refuelling
If there is no fuel in the vehicle or the
supply circuit is completely empty,
proceed as follows to reintroduce fuel
to the tank:
open the boot and take adaptor 3
fig. 99, located in the tool box or in the
Fix&Go kit container (according to the
versions);
open flap 1 fig. 98, as described
previously;
introduce the adaptor in the filler as
shown and refuel;
after refuelling, remove the adapter
and close the flap;
finally refit the adaptor in the luggage
compartment.
9807206J0001EM
9907206J0002EM
114
STARTING AND DRIVING
Page 120 of 240

TYPES OF BULBS
The vehicle is equipped with the following bulbs
Glass bulbs (type 1): they are press-fitted. Pull to extract.
Bayonet-type bulbs (type 2): to remove them from their holder,
press the bulb and turn it anticlockwise, then extract it.
Halogen bulbs (type 3): to remove the bulb, pull the connector and
extract it.
Halogen bulbs (type 4): to remove the bulb, turn it anticlockwise.
118
IN AN EMERGENCY
Page 122 of 240
REPLACING AN
EXTERNAL BULB
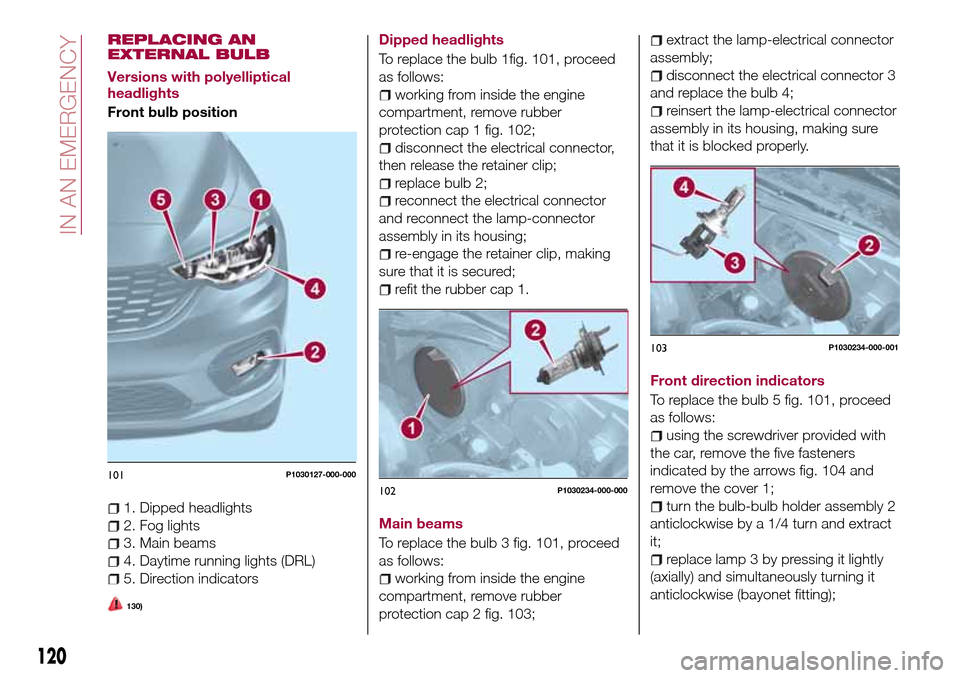
Versions with polyelliptical
headlights
Front bulb position
1. Dipped headlights
2. Fog lights
3. Main beams
4. Daytime running lights (DRL)
5. Direction indicators
130)
Dipped headlights
To replace the bulb 1fig. 101, proceed
as follows:
working from inside the engine
compartment, remove rubber
protection cap 1 fig. 102;
disconnect the electrical connector,
then release the retainer clip;
replace bulb 2;
reconnect the electrical connector
and reconnect the lamp-connector
assembly in its housing;
re-engage the retainer clip, making
sure that it is secured;
refit the rubber cap 1.
Main beams
To replace the bulb 3 fig. 101, proceed
as follows:
working from inside the engine
compartment, remove rubber
protection cap 2 fig. 103;
extract the lamp-electrical connector
assembly;
disconnect the electrical connector 3
and replace the bulb 4;
reinsert the lamp-electrical connector
assembly in its housing, making sure
that it is blocked properly.
Front direction indicators
To replace the bulb 5 fig. 101, proceed
as follows:
using the screwdriver provided with
the car, remove the five fasteners
indicated by the arrows fig. 104 and
remove the cover 1;
turn the bulb-bulb holder assembly 2
anticlockwise by a 1/4 turn and extract
it;
replace lamp 3 by pressing it lightly
(axially) and simultaneously turning it
anticlockwise (bayonet fitting);
101P1030127-000-000
102P1030234-000-000
103P1030234-000-001
120
IN AN EMERGENCY
Page 123 of 240
reinsert the bulb-bulb holder
assembly in its housing, then turn the
assembly 2 clockwise, making sure that
it is blocked.
Front fog lights
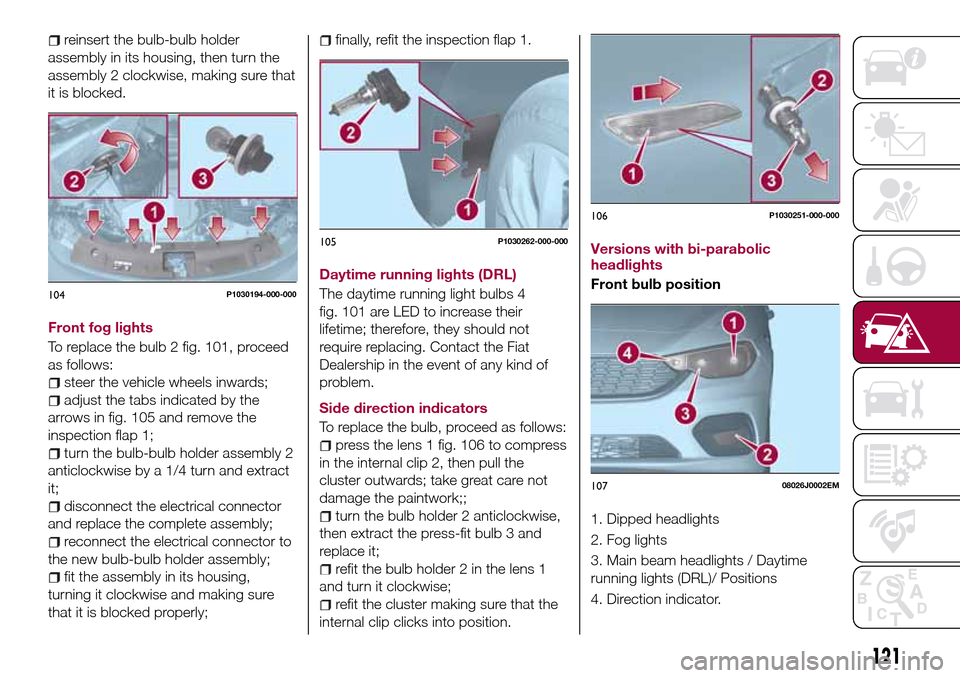
To replace the bulb 2 fig. 101, proceed
as follows:
steer the vehicle wheels inwards;
adjust the tabs indicated by the
arrows in fig. 105 and remove the
inspection flap 1;
turn the bulb-bulb holder assembly 2
anticlockwise by a 1/4 turn and extract
it;
disconnect the electrical connector
and replace the complete assembly;
reconnect the electrical connector to
the new bulb-bulb holder assembly;
fit the assembly in its housing,
turning it clockwise and making sure
that it is blocked properly;
finally, refit the inspection flap 1.
Daytime running lights (DRL)
The daytime running light bulbs 4
fig. 101 are LED to increase their
lifetime; therefore, they should not
require replacing. Contact the Fiat
Dealership in the event of any kind of
problem.
Side direction indicators
To replace the bulb, proceed as follows:
press the lens 1 fig. 106 to compress
in the internal clip 2, then pull the
cluster outwards; take great care not
damage the paintwork;;
turn the bulb holder 2 anticlockwise,
then extract the press-fit bulb 3 and
replace it;
refit the bulb holder 2 in the lens 1
and turn it clockwise;
refit the cluster making sure that the
internal clip clicks into position.Versions with bi-parabolic
headlights
Front bulb position
1. Dipped headlights
2. Fog lights
3. Main beam headlights / Daytime
running lights (DRL)/ Positions
4. Direction indicator.
104P1030194-000-000
105P1030262-000-000
106P1030251-000-000
10708026J0002EM
121