2016 FIAT 500L LIVING height
[x] Cancel search: heightPage 13 of 240
SEATS
7) 9)2) 3)
FRONT SEATS
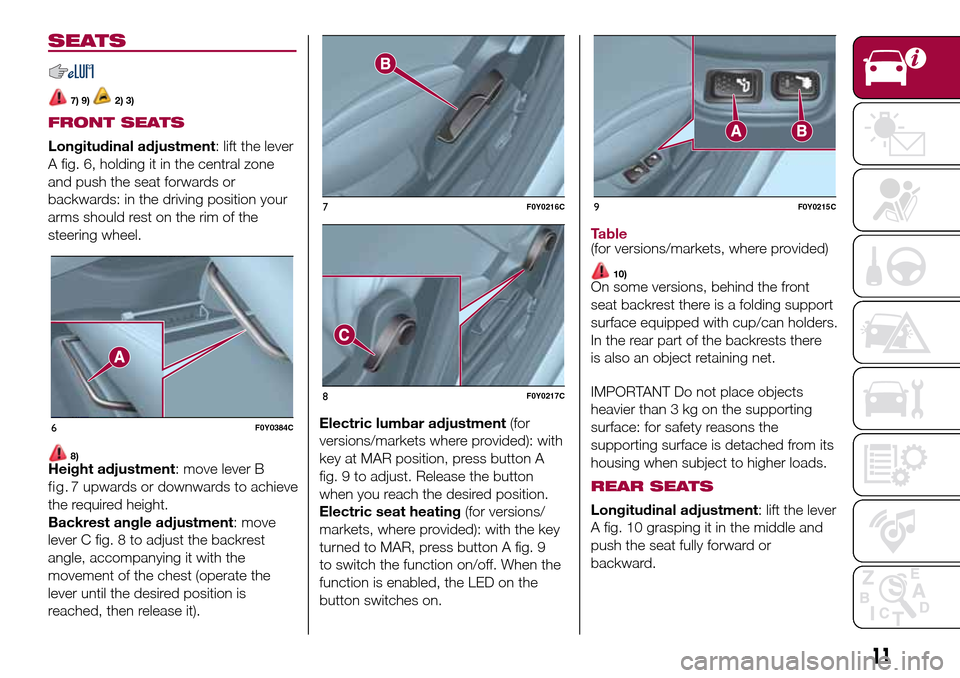
Longitudinal adjustment: lift the lever
A fig. 6, holding it in the central zone
and push the seat forwards or
backwards: in the driving position your
arms should rest on the rim of the
steering wheel.
8)Height adjustment: move lever B
the required height.
Backrest angle adjustment: move
lever C fig. 8 to adjust the backrest
angle, accompanying it with the
movement of the chest (operate the
lever until the desired position is
reached, then release it).Electric lumbar adjustment(for
versions/markets where provided): with
key at MAR position, press button A
fig. 9 to adjust. Release the button
when you reach the desired position.
Electric seat heating(for versions/
markets, where provided): with the key
turned to MAR, press button A fig. 9
to switch the function on/off. When the
function is enabled, the LED on the
button switches on.
Table(for versions/markets, where provided)
10)On some versions, behind the front
seat backrest there is a folding support
surface equipped with cup/can holders.
In the rear part of the backrests there
is also an object retaining net.
IMPORTANT Do not place objects
heavier than 3 kg on the supporting
surface: for safety reasons the
supporting surface is detached from its
housing when subject to higher loads.
REAR SEATS
Longitudinal adjustment: lift the lever
A fig. 10 grasping it in the middle and
push the seat fully forward or
backward.
6F0Y0384C
7F0Y0216C
8F0Y0217C
9F0Y0215C
11
fig. 7upwards or downwards to achieve
Page 16 of 240
REMOVAL
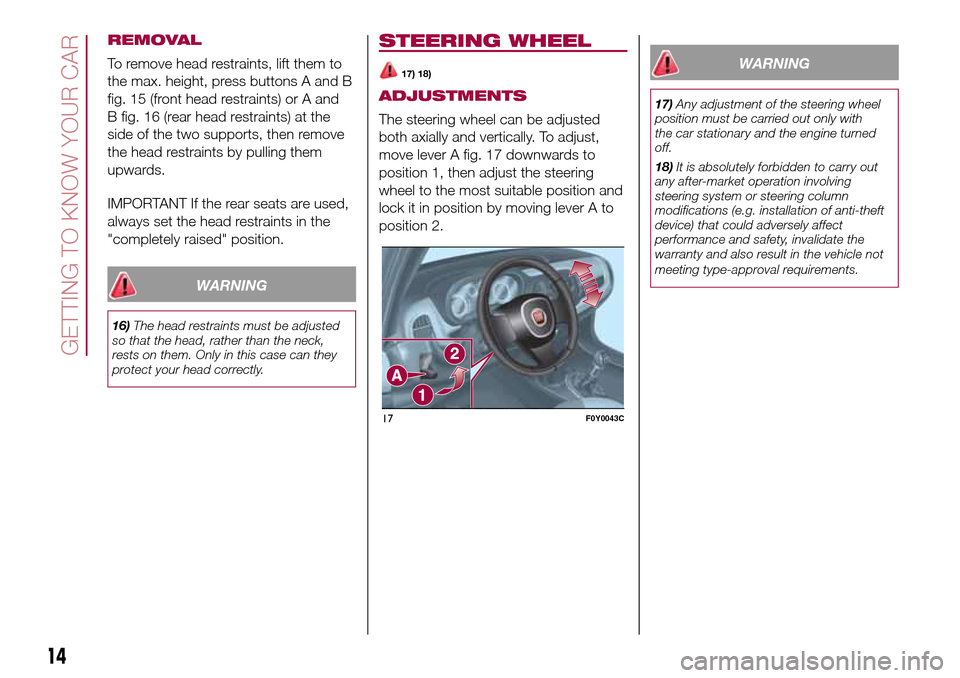
To remove head restraints, lift them to
the max. height, press buttons A and B
fig. 15 (front head restraints) or A and
B fig. 16 (rear head restraints) at the
side of the two supports, then remove
the head restraints by pulling them
upwards.
IMPORTANT If the rear seats are used,
always set the head restraints in the
"completely raised" position.
WARNING
16)The head restraints must be adjusted
so that the head, rather than the neck,
rests on them. Only in this case can they
protect your head correctly.
STEERING WHEEL
17) 18)
ADJUSTMENTS
The steering wheel can be adjusted
both axially and vertically. To adjust,
move lever A fig. 17 downwards to
position 1, then adjust the steering
wheel to the most suitable position and
lock it in position by moving lever A to
position 2.
WARNING
17)Any adjustment of the steering wheel
position must be carried out only with
the car stationary and the engine turned
off.
18)It is absolutely forbidden to carry out
any after-market operation involving
steering system or steering column
modifications (e.g. installation of anti-theft
device) that could adversely affect
performance and safety, invalidate the
warranty and also result in the vehicle not
meeting type-approval requirements.
17F0Y0043C
14
GETTING TO KNOW YOUR CAR
Page 32 of 240
CLOSING
Grip the handle located inside the
tailgate and lower the latter, pressing
next to the lock until it clicks.
IMPORTANT Before closing the
luggage compartment make sure that
you have the keys since the luggage
compartment is automatically locked.
LUGGAGE
COMPARTMENT
INITIALISATION
IMPORTANT If the battery is
disconnected or the protection fuse
blows, the luggage compartment
opening/closing mechanism must be
reinitialised as follows:
❒close all the doors and the luggage
compartment;
❒press the
button on the remote
control;
❒press the
button on the remote
control.
"CARGO MAGIC SPACE"(for versions/markets, where provided)
14)The adjustable load platform "Cargo
Magic Space" can be positioned on
three different height levels:
❒Position 0 (platform completely
lowered);❒Position 1 (platform at threshold
level);
❒Position 2 (platform completely
raised).
Load platform tilting
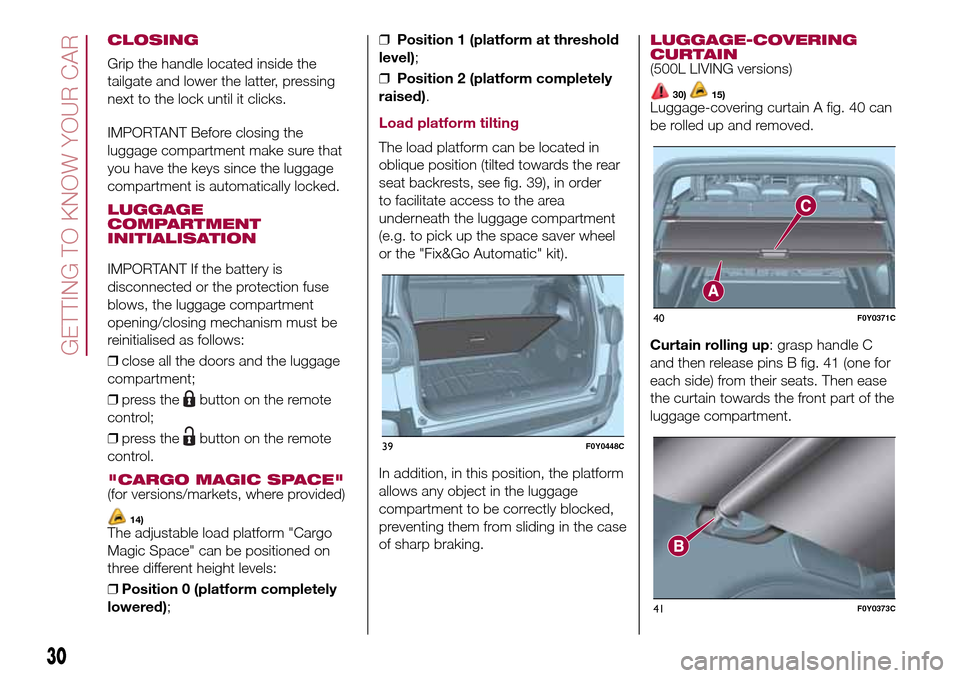
The load platform can be located in
oblique position (tilted towards the rear
seat backrests, see fig. 39), in order
to facilitate access to the area
underneath the luggage compartment
(e.g. to pick up the space saver wheel
or the "Fix&Go Automatic" kit).
In addition, in this position, the platform
allows any object in the luggage
compartment to be correctly blocked,
preventing them from sliding in the case
of sharp braking.
LUGGAGE-COVERING
CURTAIN
(500L LIVING versions)
30)15)Luggage-covering curtain A fig. 40 can
be rolled up and removed.
Curtain rolling up: grasp handle C
and then release pins B fig. 41 (one for
each side) from their seats. Then ease
the curtain towards the front part of the
luggage compartment.
39F0Y0448C
40F0Y0371C
41F0Y0373C
30
GETTING TO KNOW YOUR CAR
Page 73 of 240
37)Sensor operation may also be
compromised by the presence of dust,
condensation, dirt or ice on the
windscreen, by traffic conditions (e.g.
vehicles that are driving not aligned with
yours, vehicles driving in a transverse
or opposite way on the same lane, bend
with a small radius of curvature), by road
surface conditions and by driving
conditions (e.g. off-road driving). Make sure
the windscreen is always clean. Use
specific detergents and clean cloths to
avoid scratching the windscreen. The
sensor operation may also be limited or
absent in some driving, traffic and road
surface conditions.
38)Projecting loads on the roof of the
vehicle may interfere with the correct
operation of the sensor. Before starting
make sure the load is correctly positioned,
in order not to cover the sensor operating
range.
39)If the windscreen must be replaced
due to scratches, chipping or breakage,
contact exclusively a Fiat Dealership.
Do not replace the windscreen on your
own, risk of malfunction! It is advisable to
replace the windscreen if it is damaged
in the area of the laser sensor.
40)Do not tamper with nor operate on the
laser sensor. Do not close the openings
in the aesthetic cover located under the
interior rear view mirror. In the event of
a sensor failure, contact a Fiat Dealership.
41)If you are driving on roads close to
trees with protruding branches it is
advisable to deactivate the system to
prevent the branches at the height of the
bonnet or the windscreen from interfering
with the system.42)Do not cover the operating range of the
sensor with stickers or other objects. Also
pay attention to other objects on the
bonnet (e.g. a layer of snow) and make
sure they do not interfere with the light
emitted by the laser.
43)If a trailer or a vehicle is towed, the
system must be deactivated with the
display Setup Menu.
44)If the system signals a pressure
decrease on a specific tyre, it is
recommended to check the pressure on all
four tyres.
45)iTPMS does not relieve the driver from
the obligation to check the tyre pressure
every month; it is not to be considered
a system to replace maintenance or a
safety system.
46)The iTPMS cannot indicate sudden tyre
pressure drops (for example when a tyre
bursts). In this case, stop the vehicle,
braking with caution and avoiding abrupt
steering.
47)The iTPMS only warns that the tyre
pressure is low: it is not able to inflate
them.
48)Insufficient tyre inflation increases fuel
consumption, reduces the tread duration
and may affect the capacity to drive safely.
49)Tyre pressure must be checked with
tyres cold. Should it become necessary for
whatever reason to check pressure with
warm tyres, do not reduce pressure even
though it is higher than the prescribed
value, but repeat the check when tyres are
cold.OCCUPANT
PROTECTION
SYSTEMS
The most important safety equipment
of the vehicle comprise the following
protection systems:
❒seat belts;
❒SBR (Seat Belt Reminder) system;
❒head restraints;
❒child restraint systems;
❒front airbags and side bags.
Read the information given the
following pages with the utmost care. It
is of fundamental importance that the
protection systems are used in the
correct way to guarantee the maximum
possible safety level for the driver and
the passengers.
For the description of the head restraint
adjustment see paragraph "Head
restraints" in chapter "Knowing your
vehicle".
71
Page 78 of 240
CHILD PROTECTION
SYSTEMS
CARRYING CHILDREN
SAFELY
75) 76) 77) 78) 79) 80) 81)
For optimal protection in the event of an
impact, all occupants must be seated
and wearing adequate restraint
systems, including newborn and other
children! This prescription is
compulsory in all EC countries
according to EC Directive 2003/20/EC.
Children below the height of 1.50
metres and until 12 years, must be
protected with suitable restraint
systems and be seated on the rear
seats.
Statistics on accidents indicate that the
rear seats give a better performance
when protecting children safety.
Compared with an adult, a child's head
is larger and heavier in proportion to
their body and the child's muscular and
bone structures are not fully developed.
Therefore, correct restraint systems
other than adult seat belts are
necessary to reduce as much as
possible the risk of injuries in the event
of an accident, braking or sudden
manoeuvre.Children must be seated safely and
comfortably. Depending on the
characteristics of the child restraint
systems used, you are advised to keep
children in rearward facing child
restraint systems for as long as
possible (at least until 3–4 years old),
since this is the most protected position
in the event of an impact.
The choice of the most suitable child
restraint system depends on the weight
and size of the child. It is recommended
to always choose the restraint system
most suitable for the child; for this
reason always refer to the Owner
Handbook provided with the child
restraint system, to be sure that it is of
the right type for the children it is
intended for.
In Europe the characteristics of child
restraint systems are ruled by the
regulation ECE-R44, dividing them into
five weight groups:
Group Weight range
Group0 upto10kg
Group 0+ up to 13 kg
Group 1 9–18 kg
Group 2 15–25 kg
Group 3 22-36 kg
All restraint devices must bear the
certification data, together with the
control mark, on a label solidly fixed to
the child restraint system which must
never be removed.
Lineaccessori MOPAR
®includes child
restraint systems for each weight
group. These devices are
recommended having been specifically
designed for Fiat vehicles.
500L PRO versions
IMPORTANT For this outfit the highway
code does NOT allow to carry children
regardless of the retaining system:
child restraint systems, universal ISOFIX
child restraint systems, seat belts.
This limitation is extended to the front
seats as well.
FITTING A CHILD
RESTRAINT SYSTEM
WITH SEAT BELTS
The Universal child restraint systems
installed with the seat belts only are
type-approved on the basis of the ECE
R44 standard and are divided into
various weight groups.
IMPORTANT The figures are indicative
and provided for assembly purposes
only. Fit the child restraint system
according to the instructions, which
must be included.
76
SAFETY
Page 79 of 240
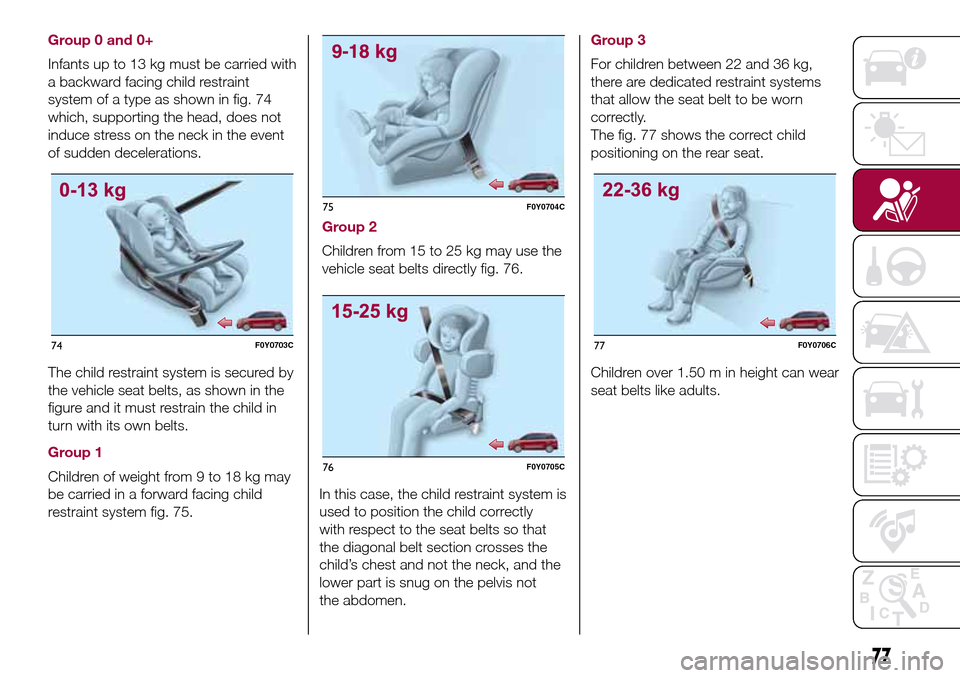
Group 0 and 0+
Infants up to 13 kg must be carried with
a backward facing child restraint
system of a type as shown in fig. 74
which, supporting the head, does not
induce stress on the neck in the event
of sudden decelerations.
The child restraint system is secured by
the vehicle seat belts, as shown in the
figure and it must restrain the child in
turn with its own belts.
Group 1
Children of weight from 9 to 18 kg may
be carried in a forward facing child
restraint system fig. 75.
Group 2
Children from 15 to 25 kg may use the
vehicle seat belts directly fig. 76.
In this case, the child restraint system is
used to position the child correctly
with respect to the seat belts so that
the diagonal belt section crosses the
child’s chest and not the neck, and the
lower part is snug on the pelvis not
the abdomen.
Group 3
For children between 22 and 36 kg,
there are dedicated restraint systems
that allow the seat belt to be worn
correctly.
The fig. 77 shows the correct child
positioning on the rear seat.
Children over 1.50 m in height can wear
seat belts like adults.
74F0Y0703C
75F0Y0704C
76F0Y0705C
77F0Y0706C
77
Page 176 of 240
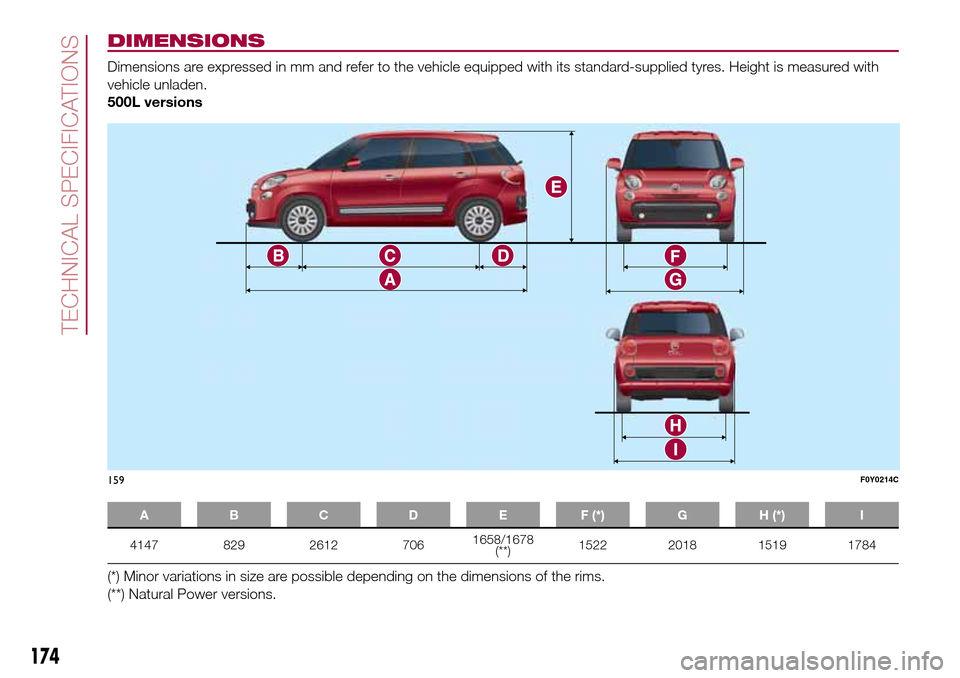
DIMENSIONS
Dimensions are expressed in mm and refer to the vehicle equipped with its standard-supplied tyres. Height is measured with
vehicle unladen.
500L versions
A B C D E F (*) G H (*) I
4147 829 2612 7061658/1678
(**)1522 2018 1519 1784
(*) Minor variations in size are possible depending on the dimensions of the rims.
(**) Natural Power versions.
159F0Y0214C
174
TECHNICAL SPECIFICATIONS