2016 FIAT 500E change time
[x] Cancel search: change timePage 4 of 132

WELCOME FROM FIAT
Congratulations on selecting your new FIAT 500e.Be assured that your 500e represents
an elegant marriage of technology and Italian styling that is as good for the environment
as is fun to drive!
Your new 500e has characteristics to enhance the driver's control under some driving
conditions.These are to assist the driver and are never a substitute for attentive driving.
They can never take the driver's place.Always drive carefully.
Your new vehicle has many features for the comfort and convenience of you and your
passengers.Some of these should not be used when driving because they take your eyes
from the road or your attention from driving.Never text while driving or take your eyes
more than momentarily off the road.
This guide illustrates and describes the operation of features and equipment that are ei-
ther standard or optional on this vehicle.This guide may also include a description of fea-
tures and equipment that are no longer available or were not ordered on this vehicle.
Please disregard any features and equipment described in this guide that are not available
on this vehicle.FCA US LLC reserves the right to make changes in design and specifica-
tions and/or make additions to or improvements to its products without imposing any
obligation upon itself to install them on products previously manufactured.
This User Guide has been prepared to help you quickly become acquainted with the im-
portant features of your vehicle.It contains most things you will need to operate and
maintain the vehicle, including emergency information.
The DVD includes a computer application containing detailed owner's information which
can be viewed on a personal computer or MAC computer.The multimedia DVD also
includes videos which can be played on any standard DVD player.Additional DVD opera-
tional information is located on the back of the DVD sleeve.
For complete owner information, refer to your Owner's Manual on the DVD in the
owner’s kit provided at the time of new vehicle purchase.For your convenience, the in-
formation contained on the DVD may also be printed and saved for future reference.
We are committed to protecting our environment and natural resources.By converting
from paper to electronic delivery for the majority of the user information for your ve-
hicle, together we greatly reduce the demand for tree-based products and lessen the
stress on our environment.
INTRODUCTION/WELCOME
2
Page 17 of 132

•During the internal self test the unit turns on one Charge Level Indicator LED every
1.5 seconds until all the Charge Level Indicator LED's are illuminated.
AC LEDFault Indicator
LEDCharge Level Indicator LED's Time
• • •ooo
1.5 sec
• • ••oo3.0 sec
• • •••o4.5 sec
• • ••••6.0 sec
•If the self test is successful the AC LED, the Fault Indicator LED and the four Charge
Level LED's will turn solid green.
•The EVSE LED's will be used to indicate the vehicle's connection status if no faults are
found during the self test.
AC LEDFault Indicator
LEDCharge Level Indicator LED's
•• ••••
•After the EVSE is connected to the vehicle's charge inlet the EVSE will continue to
illuminate all LED's green.
•Once the vehicle begins charging the EVSE Charge level LED's will illuminate in order
from left to right, then shut off.This pattern will repeat as long as the EVSE remains
connected to AC power and the battery is charging.
•The LED's are illuminated and turn off at the rate of one change per second.
AC LEDFault Indicator
LEDCharge Level Indicator LED's Time
• • •ooo
1.0 sec
• • ••oo2.0 sec
• • •••o3.0 sec
• • ••••4.0 sec
NOTE:
Refer to the Level 1 User Manual for any additional information on its use or operation.
CAUTION!
Do not bend or damage the Level 1 EVSE terminals as this could cause the EVSE to
become inoperative and/or illuminate the fault LED.
GETTING STARTED
15
Page 43 of 132

Turn Signals
Push the multifunction lever upward to signal a right turn or downward to signal a left
turn.The corresponding indicator in the instrument cluster will blink to indicate the op-
eration of the turn signal.
NOTE:
The indicators will automatically turn off when the turn has been completed and the
steering wheel is returned to a straight position.
Lane Change Assist
Tap the lever up or down once, without moving beyond the detent, and the turn signal
(right or left) will flash three times then automatically turn off.
Follow Me Home/Headlight Delay
When this feature is selected the driver can choose to have the headlights remain on for
a preset period of time.
Activation
Remove the key or turn the ignition to the OFF/LOCK position, and pull the multifunc-
tion lever toward the steering wheel, within two minutes.Each time the lever is pulled,
the activation of the lights will be extended by 30 seconds.The activation of the lights
can be extended to a maximum of 210 seconds.
Deactivation
Pull the multifunction lever toward the steering wheel and hold it for more than two
seconds.
Interior Lights
The interior light switches are located in the overhead console.The interior lights can be
set to three different positions (Off/Left Position, Center Position, On/Right Position).
Using the switch on the left overhead, push the switch to the right from its center posi-
tion and the lights are always on.Push the switch to the left from its center position and
the lights are always off.Leave the switch in the center position, and the lights are turned
on and off when the doors are opened or closed.The switch on the right side of the
overhead console controls the map or reading function of the lights.Push the switch to
the right to turn on the right light and push the switch to the left to turn on the left
light.
CAUTION!
Before getting out of the vehicle be sure that the switch is in the center position or
that the lights are off to avoid draining the battery.
OPERATING YOUR VEHICLE
41
Page 79 of 132

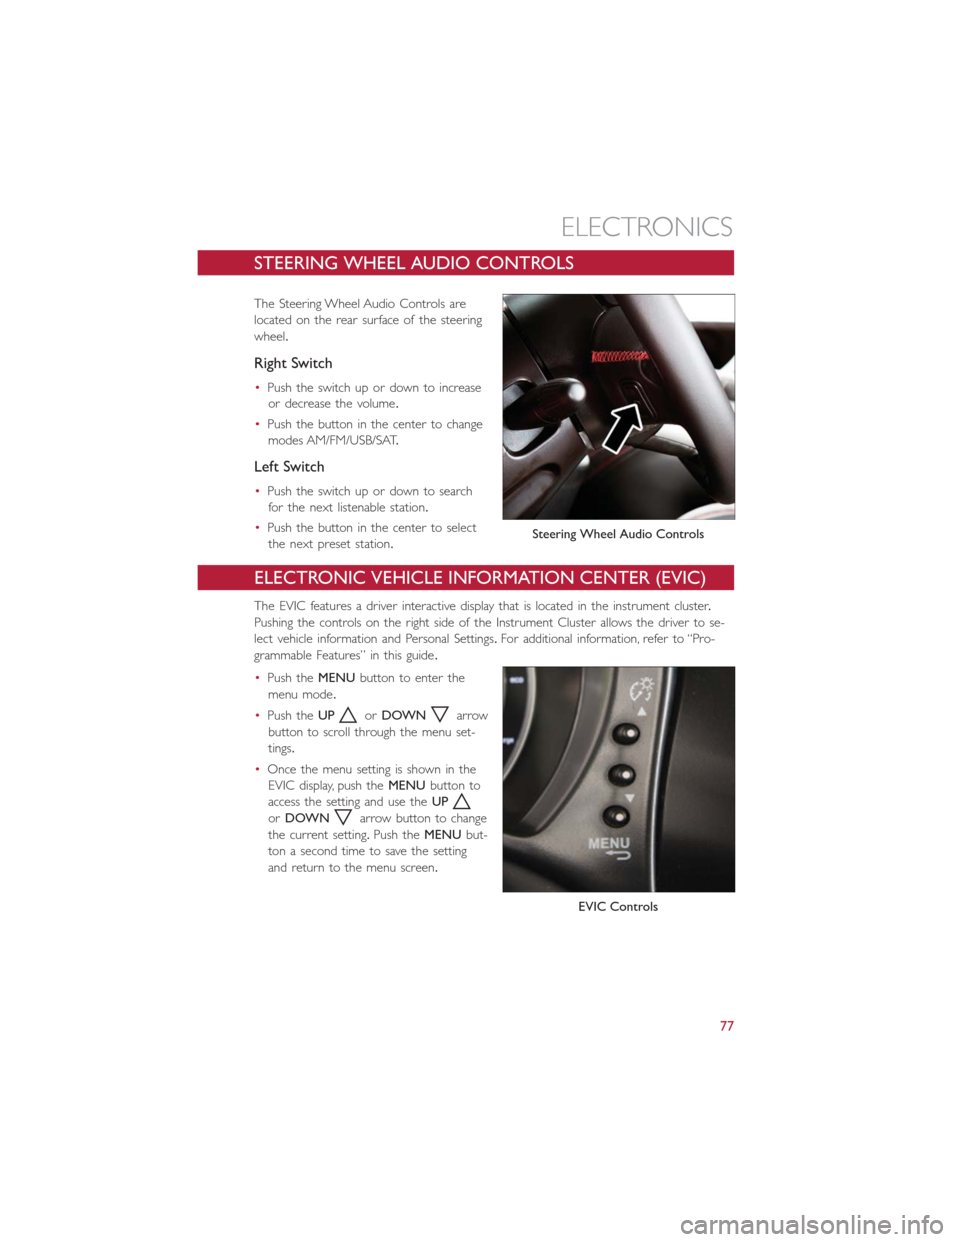
STEERING WHEEL AUDIO CONTROLS
The Steering Wheel Audio Controls are
located on the rear surface of the steering
wheel.
Right Switch
•Push the switch up or down to increase
or decrease the volume.
•Push the button in the center to change
modes AM/FM/USB/SAT.
Left Switch
•Push the switch up or down to search
for the next listenable station.
•Push the button in the center to select
the next preset station.
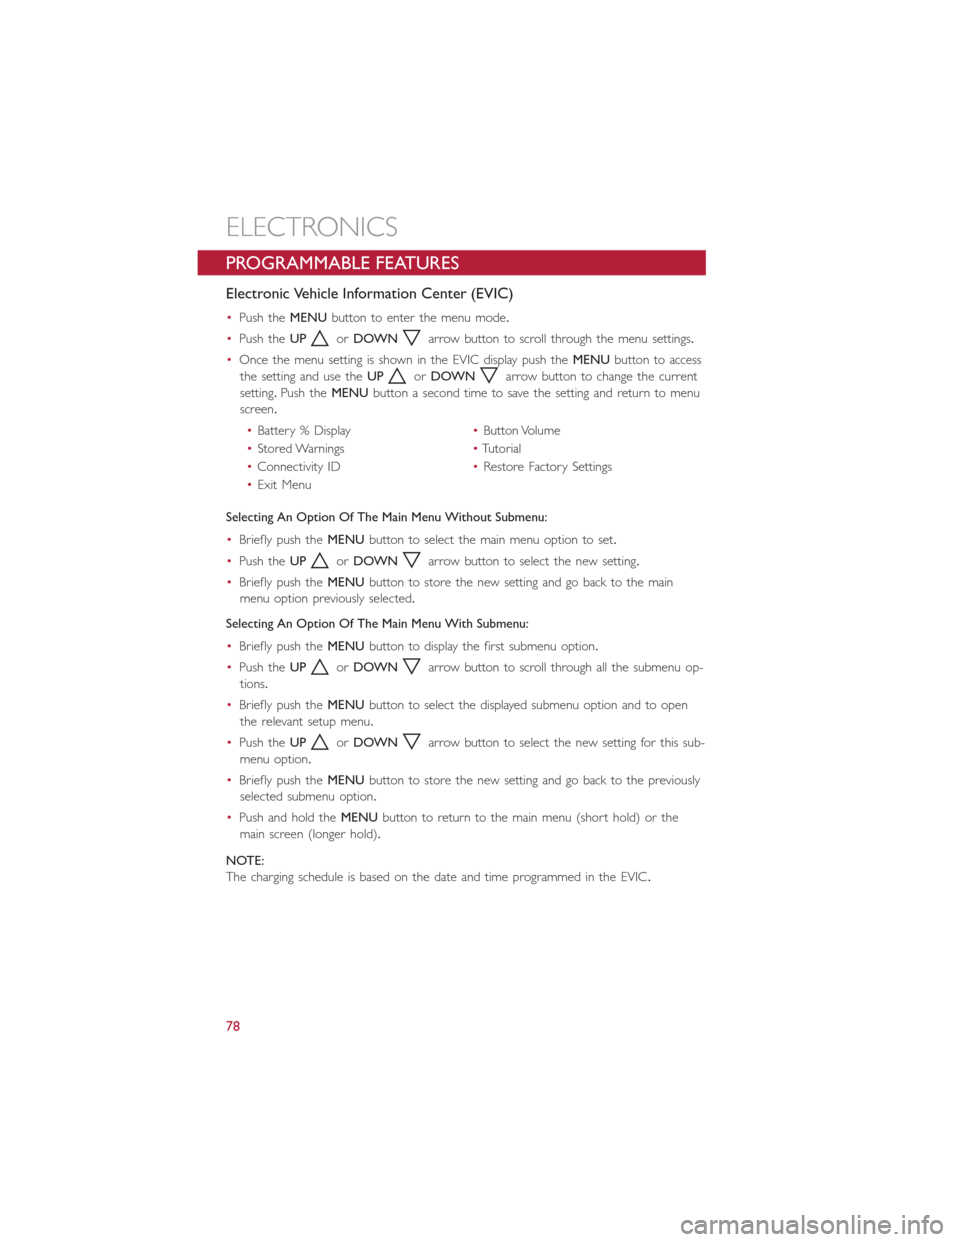
ELECTRONIC VEHICLE INFORMATION CENTER (EVIC)
The EVIC features a driver interactive display that is located in the instrument cluster.
Pushing the controls on the right side of the Instrument Cluster allows the driver to se-
lect vehicle information and Personal Settings.For additional information, refer to “Pro-
grammable Features” in this guide.
•Push theMENUbutton to enter the
menu mode.
•Push theUP
orDOWNarrow
button to scroll through the menu set-
tings.
•Once the menu setting is shown in the
EVIC display, push theMENUbutton to
access the setting and use theUP
orDOWNarrow button to change
the current setting.Push theMENUbut-
ton a second time to save the setting
and return to the menu screen.
Steering Wheel Audio Controls
EVIC Controls
ELECTRONICS
77
Page 80 of 132

PROGRAMMABLE FEATURES
Electronic Vehicle Information Center (EVIC)
•Push theMENUbutton to enter the menu mode.
•Push theUP
orDOWNarrow button to scroll through the menu settings.
•Once the menu setting is shown in the EVIC display push theMENUbutton to access
the setting and use theUP
orDOWNarrow button to change the current
setting.Push theMENUbutton a second time to save the setting and return to menu
screen.
•Battery % Display•Button Volume
•Stored Warnings•Tutorial
•Connectivity ID•Restore Factory Settings
•Exit Menu
Selecting An Option Of The Main Menu Without Submenu:
•Briefly push theMENUbutton to select the main menu option to set.
•Push theUP
orDOWNarrow button to select the new setting.
•Briefly push theMENUbutton to store the new setting and go back to the main
menu option previously selected.
Selecting An Option Of The Main Menu With Submenu:
•Briefly push theMENUbutton to display the first submenu option.
•Push theUP
orDOWNarrow button to scroll through all the submenu op-
tions.
•Briefly push theMENUbutton to select the displayed submenu option and to open
the relevant setup menu.
•Push theUP
orDOWNarrow button to select the new setting for this sub-
menu option.
•Briefly push theMENUbutton to store the new setting and go back to the previously
selected submenu option.
•Push and hold theMENUbutton to return to the main menu (short hold) or the
main screen (longer hold).
NOTE:
The charging schedule is based on the date and time programmed in the EVIC.
ELECTRONICS
78
Page 85 of 132

ROADSIDE ASSISTANCE
•If your FIAT 500e requires jump start assistance, tire service, lockout service or towing
due to a defect covered under the Basic Limited Warranty, dial toll-free
1-888-242-6342.See your Warranty booklet for further details.
•Provide your name, vehicle identification number and license plate number.
•Provide your location, including telephone number, from which you are calling.
•Briefly describe the nature of the problem and answer a few simple questions.
•You will be given the name of the service provider and an estimated time of arrival.If
you feel you are in an “unsafe situation”, please let us know.With your consent, we will
contact local police or safety authorities.
WARNING AND INDICATOR LIGHTS
IMPORTANT:The warning / indicator lights switch on in the instrument panel together
with a dedicated message and/or acoustic signal when applicable.These indications are
indicative and precautionary and as such must not be considered as exhaustive and/or
alternative to the information contained in the Owner’s Manual, which you are advised to
read carefully in all cases.Always refer to the information in this chapter in the event of a
failure indication.
All active telltales will display first if applicable.The system check menu may appear differ-
ent based upon equipment options and current vehicle status.
This guide illustrates and describes the operation of warning and indicator telltales that
are either standard or optional based on the vehicle build.FCA reserves the right to
make changes in design and specifications and/or make additions to or improvements to
its products without imposing any obligation upon itself to install them on products previ-
ously manufactured.
Instrument Cluster Warning Lights
– Electric Vehicle System Warning Light
This indicator will illuminate when there is a malfunction in the Electric Vehicle System.If
the EVS malfunction light comes on while driving or charging see your authorized dealer
as soon as possible.
– Regenerative Brake System Warning Light
If the light turns on and remains on while driving, it suggests that there is a potential
problem with the Regenerative Brake System (RBS) and the need for system service.See
your authorized dealer as soon as possible.
WHAT TO DO IN EMERGENCIES
83
Page 89 of 132

NOTE:
Tire pressures change by approximately 1 psi (7 kPa) per 12° F (7° C) of air tempera-
ture change.Keep this in mind when checking tire pressure inside a garage, especially in
the Winter.Example: If garage temperature is 68°F (20°C) and the outside temperature
is 32°F (0°C), then the cold tire inflation pressure should be increased by 3 psi (21 kPa),
which equals 1 psi (7 kPa) for every 12°F (7°C) for this outside temperature condition.
CAUTION!
The TPMS has been optimized for the original equipment tires and wheels.TPMS pres-
sures and warning have been established for the tire size equipped on your vehicle.
Undesirable system operation or sensor damage may result when using replacement
equipment that is not of the same size, type, and/or style.Aftermarket wheels can cause
sensor damage.Do not use tire sealant from a can, or balance beads if your vehicle is
equipped with a TPMS, as damage to the sensors may result.
– Electronic Stability Control (ESC) Activation / Malfunction Indicator Light
The “ESC Activation/Malfunction Indicator Light” in the instrument cluster will come on
for four seconds when the ignition switch is turned to the ON/RUN position.If the “ESC
Activation/Malfunction Indicator Light” comes on continuously with the engine running, a
malfunction has been detected in the ESC system.If this light remains on, see your au-
thorized dealer as soon as possible to have the problem diagnosed and corrected.
NOTE:
•The “ESC Off Indicator Light” and the “ESC Activation/Malfunction Indicator Light”
come on momentarily each time the ignition switch is turned to ON/RUN.
•Each time the ignition is turned to ON/RUN, the ESC system will be ON even if it
was turned off previously.
•ESC Activation/Malfunction Light can blink during a ESC or TC intervention.
WHAT TO DO IN EMERGENCIES
87