2016 FIAT 500E first
[x] Cancel search: firstPage 62 of 132

PRE-DEFINED VOICE TEXT REPLY RESPONSES
Ye s.Stuck in Traffic.See you later.
No.Start without me.I’ll be Late.
Okay.Where are you?
I will be
late.
Call me.Are you there yet?
I’ll call you later.I need directions.
See you in
minutes.
I’m on my way.
Can’t talk right now.
I’m lost.Thanks.
NOTE:
Voice texting reply and voice texting features require a compatible mobile device enabled
with Bluetooth Message Access Profile (MAP).iPhone and some other smartphones do
not currently support Bluetooth MAP.Visit UconnectPhone.com for system and device
compatibility.
Want to dictate a personal message? You must first register with Uconnect Access (U.S.
residents only) to take advantage of a new, cloud-based Voice Texting service, an enhance-
ment to Voice Text Reply.
USB/AUX CONTROL
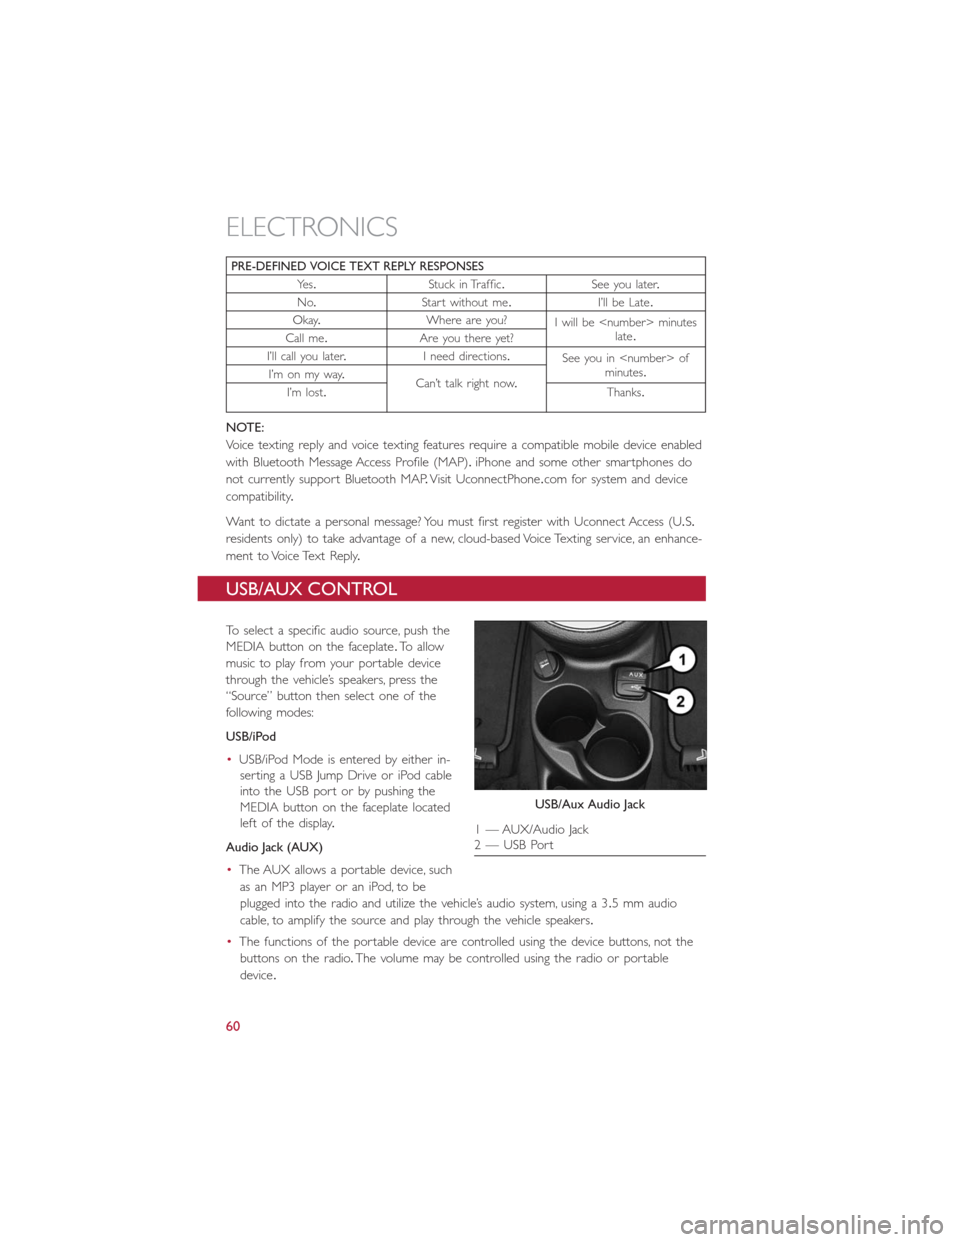
To select a specific audio source, push the
MEDIA button on the faceplate.To allow
music to play from your portable device
through the vehicle’s speakers, press the
“Source” button then select one of the
following modes:
USB/iPod
•USB/iPod Mode is entered by either in-
serting a USB Jump Drive or iPod cable
into the USB port or by pushing the
MEDIA button on the faceplate located
left of the display.
Audio Jack (AUX)
•The AUX allows a portable device, such
as an MP3 player or an iPod, to be
plugged into the radio and utilize the vehicle’s audio system, using a 3.5 mm audio
cable, to amplify the source and play through the vehicle speakers.
•The functions of the portable device are controlled using the device buttons, not the
buttons on the radio.The volume may be controlled using the radio or portable
device.
USB/Aux Audio Jack
1 — AUX/Audio Jack
2 — USB Port
ELECTRONICS
60
Page 64 of 132

Get Started
1.VisitUconnectPhone.comto check mobile device and feature compatibility and to
find phone pairing instructions.
2.Reduce background noise.Wind and passenger conversations are examples of noise
that may impact recognition.
3.Speak clearly at a normal pace and volume while facing straight ahead.The micro-
phone is positioned on the rearview mirror and aimed at the driver.
4.Each time you give a Voice Command, you must first press either the VR or Phone
button, wait untilafterthe beep, then say your Voice Command.
5.You can interrupt the help message or system prompts by pressing the VR or Phone
button and saying a Voice Command from current category.
NOTE:
All you need to control your Uconnect system with your voice are the buttons on your
steering wheel.
Uconnect VR/Phone Buttons
1 — Push To Mute
2 — Push To Initiate Or To Answer A Phone Call, Send Or Receive A Text
3 — Push To End Call
4 — Push For Voice Recognition (VR)
ELECTRONICS
62
Page 71 of 132

NOTE:
•The Uconnect Phone requires a mobile phone equipped with the Bluetooth Hands-
Free Profile, Version 1.0 or higher.
•Most mobile phones/devices are compatible with the Uconnect system, however some
mobile phones/devices may not be equipped with all of the required features to utilize
all of the Uconnect system features.
•For Uconnect Customer Care:
•U.S.residents visit UconnectPhone.com or call 1-877-855-8400.
•Canadian Residents visit UconnectPhone.com or call, 1-800-465-2001 (English) or
1-800-387-9983 (French).
Pairing (Wirelessly Connecting) Your Mobile Phone To The Uconnect
System
Mobile phone pairing is the process of establishing a wireless connection between a cellu-
lar phone and the Uconnect system.
NOTE:
•To use the Uconnect Phone feature, you first must determine if your mobile phone
and software are compatible with the Uconnect system.Please visit
UconnectPhone.com for complete mobile phone compatibility information.
•Mobile phone pairing is not available while the vehicle is in motion.
•A maximum of 10 mobile phones can be paired to the Uconnect system.
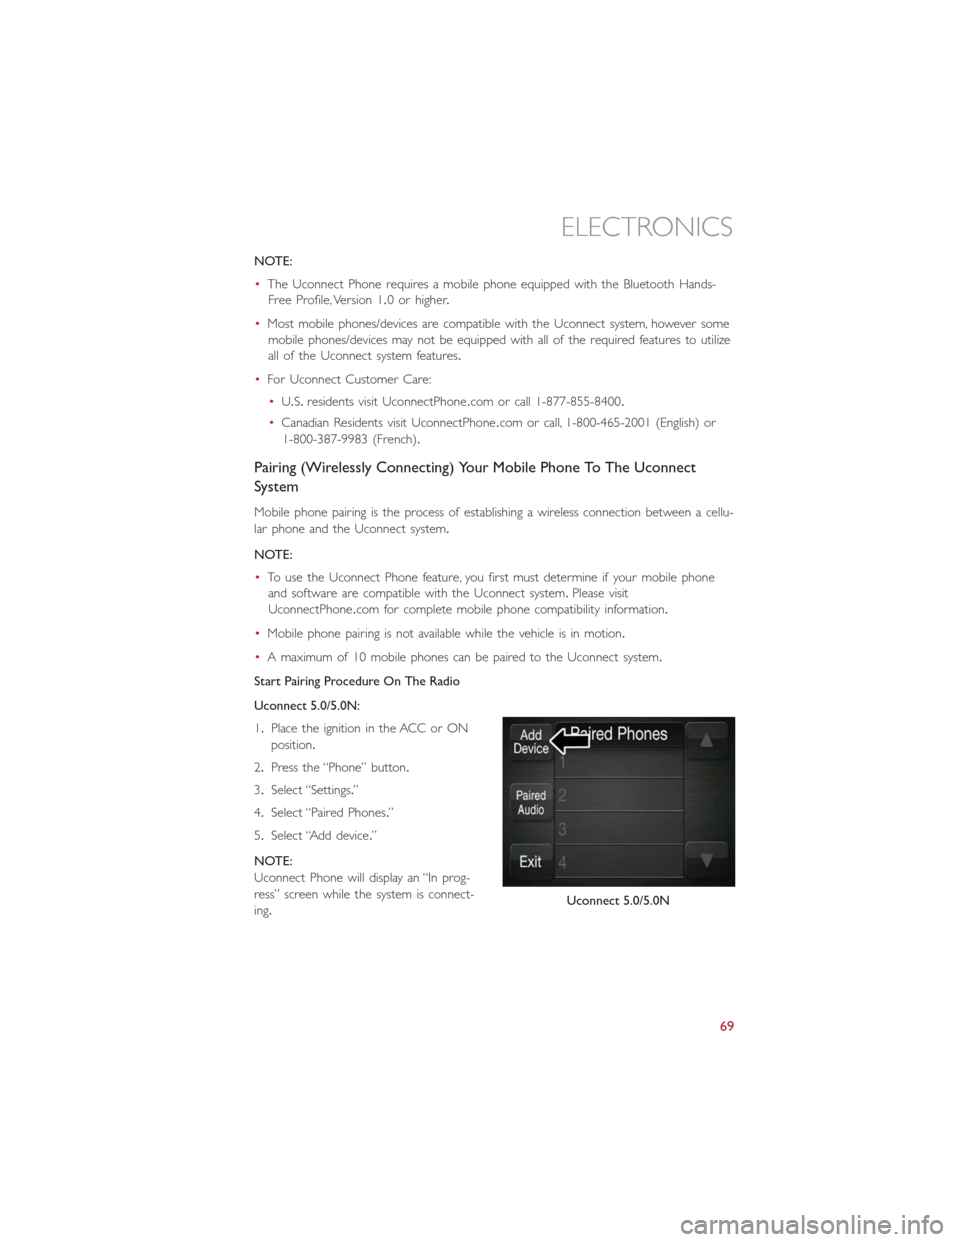
Start Pairing Procedure On The Radio
Uconnect 5.0/5.0N:
1.Place the ignition in the ACC or ON
position.
2.Press the “Phone” button.
3.Select “Settings.”
4.Select “Paired Phones.”
5.Select “Add device.”
NOTE:
Uconnect Phone will display an “In prog-
ress” screen while the system is connect-
ing.
Uconnect 5.0/5.0N
ELECTRONICS
69
Page 80 of 132

PROGRAMMABLE FEATURES
Electronic Vehicle Information Center (EVIC)
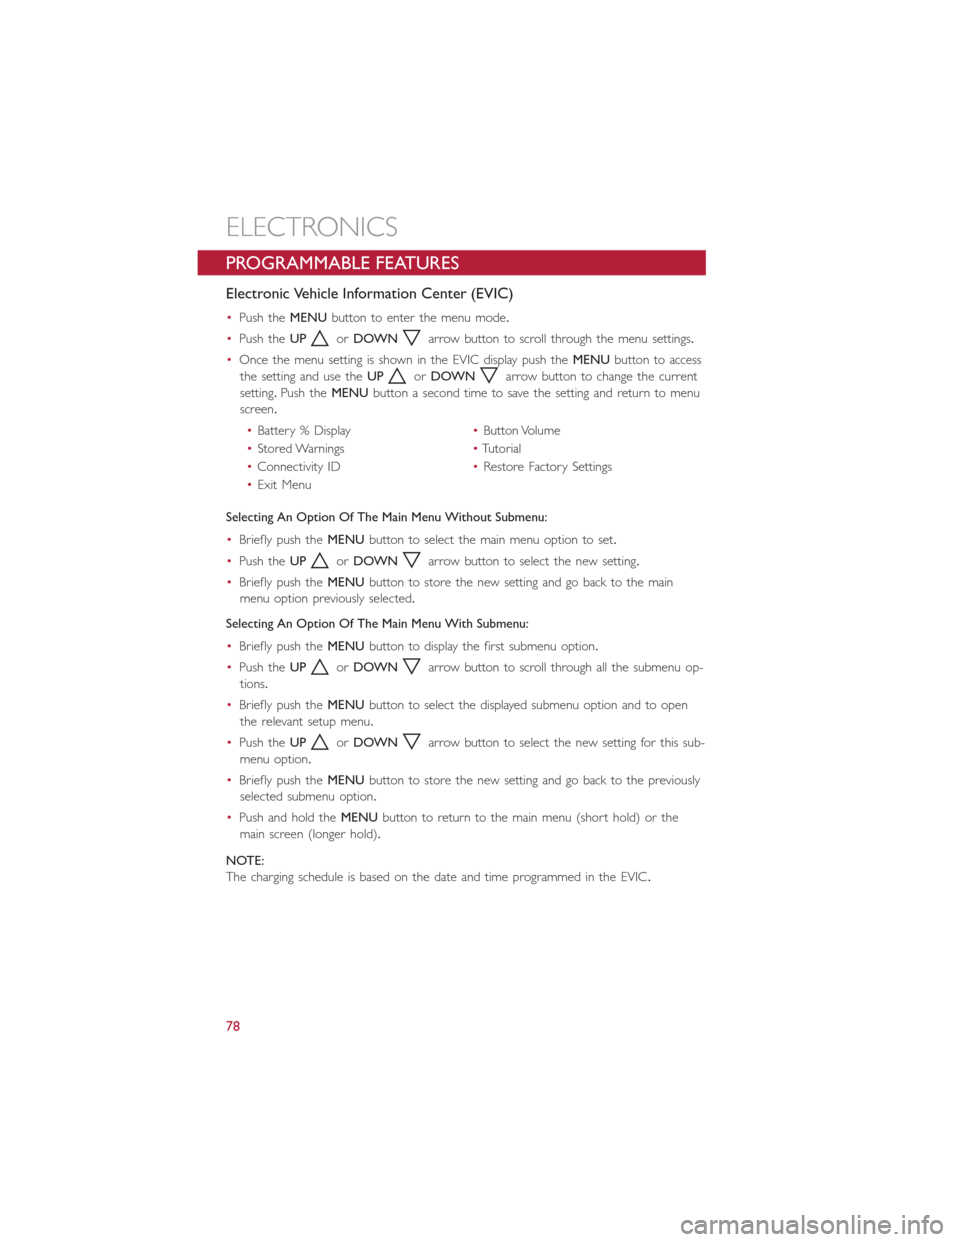
•Push theMENUbutton to enter the menu mode.
•Push theUP
orDOWNarrow button to scroll through the menu settings.
•Once the menu setting is shown in the EVIC display push theMENUbutton to access
the setting and use theUP
orDOWNarrow button to change the current
setting.Push theMENUbutton a second time to save the setting and return to menu
screen.
•Battery % Display•Button Volume
•Stored Warnings•Tutorial
•Connectivity ID•Restore Factory Settings
•Exit Menu
Selecting An Option Of The Main Menu Without Submenu:
•Briefly push theMENUbutton to select the main menu option to set.
•Push theUP
orDOWNarrow button to select the new setting.
•Briefly push theMENUbutton to store the new setting and go back to the main
menu option previously selected.
Selecting An Option Of The Main Menu With Submenu:
•Briefly push theMENUbutton to display the first submenu option.
•Push theUP
orDOWNarrow button to scroll through all the submenu op-
tions.
•Briefly push theMENUbutton to select the displayed submenu option and to open
the relevant setup menu.
•Push theUP
orDOWNarrow button to select the new setting for this sub-
menu option.
•Briefly push theMENUbutton to store the new setting and go back to the previously
selected submenu option.
•Push and hold theMENUbutton to return to the main menu (short hold) or the
main screen (longer hold).
NOTE:
The charging schedule is based on the date and time programmed in the EVIC.
ELECTRONICS
78
Page 85 of 132

ROADSIDE ASSISTANCE
•If your FIAT 500e requires jump start assistance, tire service, lockout service or towing
due to a defect covered under the Basic Limited Warranty, dial toll-free
1-888-242-6342.See your Warranty booklet for further details.
•Provide your name, vehicle identification number and license plate number.
•Provide your location, including telephone number, from which you are calling.
•Briefly describe the nature of the problem and answer a few simple questions.
•You will be given the name of the service provider and an estimated time of arrival.If
you feel you are in an “unsafe situation”, please let us know.With your consent, we will
contact local police or safety authorities.
WARNING AND INDICATOR LIGHTS
IMPORTANT:The warning / indicator lights switch on in the instrument panel together
with a dedicated message and/or acoustic signal when applicable.These indications are
indicative and precautionary and as such must not be considered as exhaustive and/or
alternative to the information contained in the Owner’s Manual, which you are advised to
read carefully in all cases.Always refer to the information in this chapter in the event of a
failure indication.
All active telltales will display first if applicable.The system check menu may appear differ-
ent based upon equipment options and current vehicle status.
This guide illustrates and describes the operation of warning and indicator telltales that
are either standard or optional based on the vehicle build.FCA reserves the right to
make changes in design and specifications and/or make additions to or improvements to
its products without imposing any obligation upon itself to install them on products previ-
ously manufactured.
Instrument Cluster Warning Lights
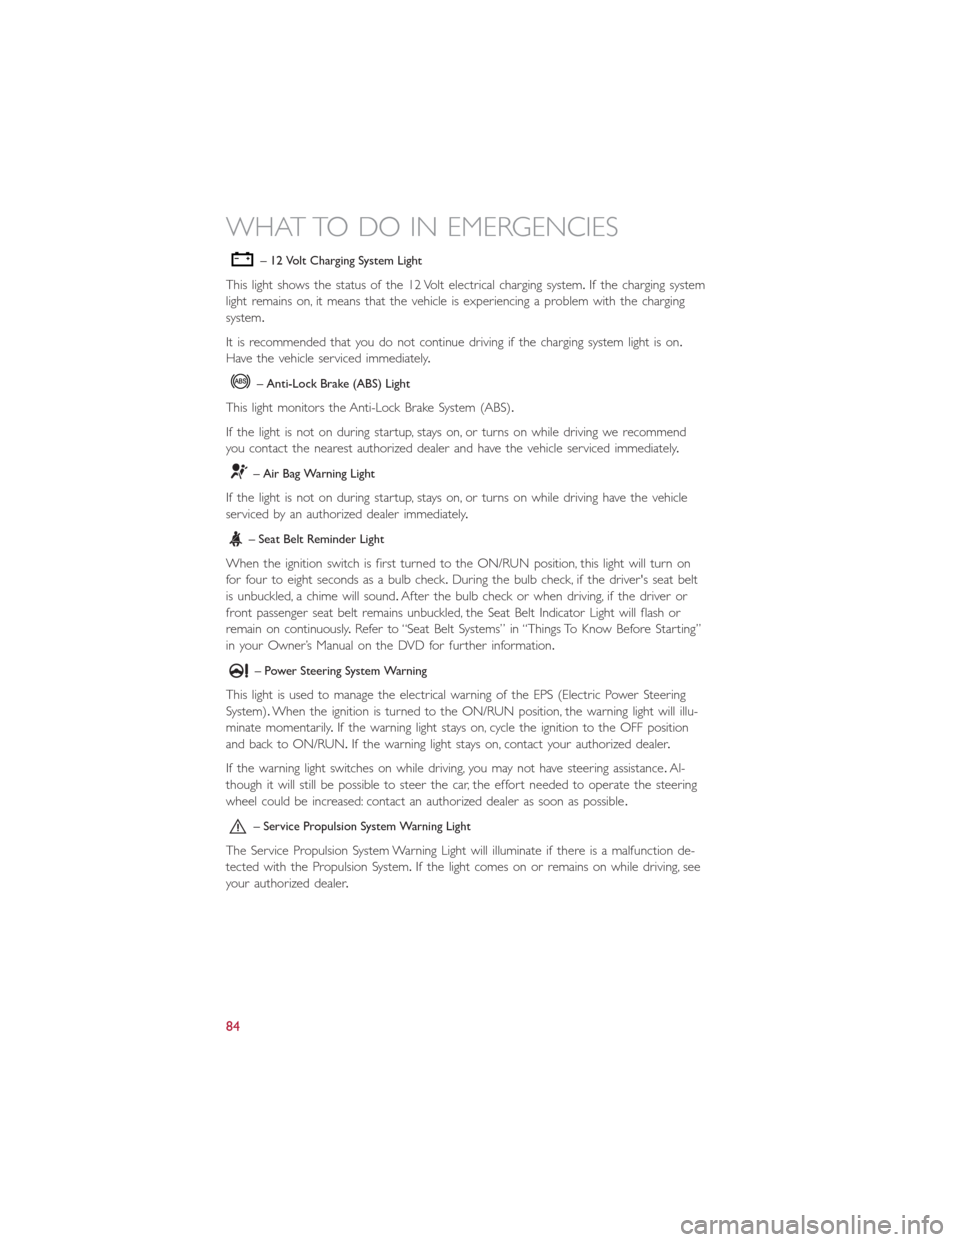
– Electric Vehicle System Warning Light
This indicator will illuminate when there is a malfunction in the Electric Vehicle System.If
the EVS malfunction light comes on while driving or charging see your authorized dealer
as soon as possible.
– Regenerative Brake System Warning Light
If the light turns on and remains on while driving, it suggests that there is a potential
problem with the Regenerative Brake System (RBS) and the need for system service.See
your authorized dealer as soon as possible.
WHAT TO DO IN EMERGENCIES
83
Page 86 of 132

– 12 Volt Charging System Light
This light shows the status of the 12 Volt electrical charging system.If the charging system
light remains on, it means that the vehicle is experiencing a problem with the charging
system.
It is recommended that you do not continue driving if the charging system light is on.
Have the vehicle serviced immediately.
– Anti-Lock Brake (ABS) Light
This light monitors the Anti-Lock Brake System (ABS).
If the light is not on during startup, stays on, or turns on while driving we recommend
you contact the nearest authorized dealer and have the vehicle serviced immediately.
– Air Bag Warning Light
If the light is not on during startup, stays on, or turns on while driving have the vehicle
serviced by an authorized dealer immediately.
– Seat Belt Reminder Light
When the ignition switch is first turned to the ON/RUN position, this light will turn on
for four to eight seconds as a bulb check.During the bulb check, if the driver's seat belt
is unbuckled, a chime will sound.After the bulb check or when driving, if the driver or
front passenger seat belt remains unbuckled, the Seat Belt Indicator Light will flash or
remain on continuously.Refer to “Seat Belt Systems” in “Things To Know Before Starting”
in your Owner’s Manual on the DVD for further information.
– Power Steering System Warning
This light is used to manage the electrical warning of the EPS (Electric Power Steering
System).When the ignition is turned to the ON/RUN position, the warning light will illu-
minate momentarily.If the warning light stays on, cycle the ignition to the OFF position
and back to ON/RUN.If the warning light stays on, contact your authorized dealer.
If the warning light switches on while driving, you may not have steering assistance.Al-
though it will still be possible to steer the car, the effort needed to operate the steering
wheel could be increased: contact an authorized dealer as soon as possible.
– Service Propulsion System Warning Light
The Service Propulsion System Warning Light will illuminate if there is a malfunction de-
tected with the Propulsion System.If the light comes on or remains on while driving, see
your authorized dealer.
WHAT TO DO IN EMERGENCIES
84
Page 90 of 132

INSTRUMENT CLUSTER INDICATOR LIGHTS
– Turn Signal Indicator
The arrows will flash with the exterior turn signals when the turn signal lever is oper-
ated.
NOTE:
If either indicator flashes at a rapid rate, check for a defective outside light bulb.
– High Beam Indicator
Indicates that headlights are on high beam.
– Vehicle Security Light
This light will flash rapidly for approximately 15 seconds when the vehicle security alarm
is arming.The light will flash at a slower speed continuously after the alarm is set.The
security light will also come on for about three seconds when the ignition is first turned
on.
– Electronic Speed Control SET Indicator
This indicator will illuminate when the cruising speed has been set.
– Front Fog Light Indicator
This indicator will illuminate when the front fog lights are on.
– Park/Headlight ON Indicator
This indicator will illuminate when the park lights or headlights are turned on.
– Electronic Stability Control (ESC) OFF Indicator Light
This light indicates the ESC system has been turned off by the driver.
WHAT TO DO IN EMERGENCIES
88
Page 109 of 132

MAINTENANCE PROCEDURES
For information on the maintenance procedures for your vehicle, please refer to “Mainte-
nance Procedures” in “Maintaining Your Vehicle” in your Owner’s Manual or applicable
supplement on the DVD for further details.
MAINTENANCE SCHEDULE
Once A Month Or Before A Trip:
•Check windshield washer fluid level
•Check the tire inflation pressures and look for unusual wear or damage
•Check the fluid levels of the coolant reservoirs and brake master cylinder
•Check function of all interior and exterior lights
Required Maintenance Intervals
Refer to the maintenance schedules on the following page for the required maintenance
intervals.
At Every Service Interval:
•Rotate the tires.Rotate at the first sign of irregular wear.
•
Inspect brake pads, shoes, rotors, drums, and hoses.
•
Inspect battery cooling system protection and hoses.
•
Check and adjust hand brake.
Maintenance Chart
Refer to the Maintenance Schedules on the following pages for the required maintenance
intervals.
MAINTAINING YOUR VEHICLE
107