Page 62 of 132

PRE-DEFINED VOICE TEXT REPLY RESPONSES
Ye s.Stuck in Traffic.See you later.
No.Start without me.I’ll be Late.
Okay.Where are you?
I will be minutes
late.
Call me.Are you there yet?
I’ll call you later.I need directions.
See you in of
minutes.
I’m on my way.
Can’t talk right now.
I’m lost.Thanks.
NOTE:
Voice texting reply and voice texting features require a compatible mobile device enabled
with Bluetooth Message Access Profile (MAP).iPhone and some other smartphones do
not currently support Bluetooth MAP.Visit UconnectPhone.com for system and device
compatibility.
Want to dictate a personal message? You must first register with Uconnect Access (U.S.
residents only) to take advantage of a new, cloud-based Voice Texting service, an enhance-
ment to Voice Text Reply.
USB/AUX CONTROL
To select a specific audio source, push the
MEDIA button on the faceplate.To allow
music to play from your portable device
through the vehicle’s speakers, press the
“Source” button then select one of the
following modes:
USB/iPod
•USB/iPod Mode is entered by either in-
serting a USB Jump Drive or iPod cable
into the USB port or by pushing the
MEDIA button on the faceplate located
left of the display.
Audio Jack (AUX)
•The AUX allows a portable device, such
as an MP3 player or an iPod, to be
plugged into the radio and utilize the vehicle’s audio system, using a 3.5 mm audio
cable, to amplify the source and play through the vehicle speakers.
•The functions of the portable device are controlled using the device buttons, not the
buttons on the radio.The volume may be controlled using the radio or portable
device.
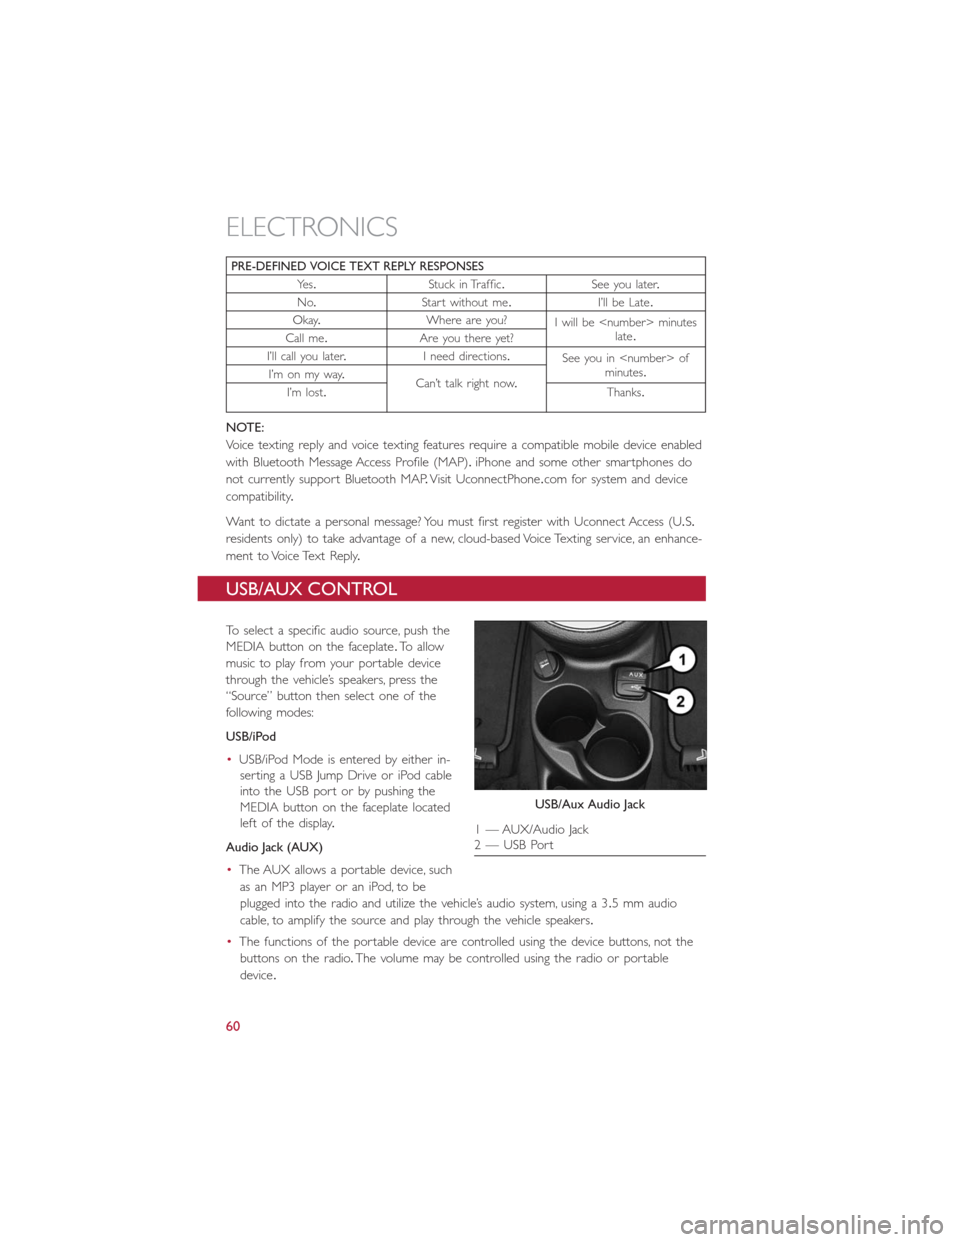
USB/Aux Audio Jack
1 — AUX/Audio Jack
2 — USB Port
ELECTRONICS
60
Page 63 of 132
UCONNECT 5.0 VOICE RECOGNITION QUICK TIPS
Introducing Uconnect
Start using Uconnect Voice Recognition with these helpful quick tips.It provides the key
Voice Commands and tips you need to know to control your Uconnect 5.0 system.
Key features:
•Five-inch Color Touchscreen Display with AM/FM/USB/Bluetooth
•Bluetooth with integrated voice control
Uconnect 5.0 Radio
ELECTRONICS
61
Page 67 of 132
Media
Push the VR button.After the beep, say one of the following commands and follow
the prompts to switch your media source or choose an artist.
•Change sourceto Bluetooth
•Change sourceto iPod
•Change sourceto USB
•Play artistBeethoven;Play albumGreatest Hits;Play songMoonlight Sonata;Play genre
Classical
TIP
Press the Browse button on the touchscreen to see all of the music on your iPod or
USB device.Your Voice Command must matchexactlyhow the artist, album, song and
genre information is displayed.
Uconnect offers connections via USB, SD, Bluetooth and auxiliary ports (If Equipped).
Voice operation is only available for connected USB and iPod devices.
Uconnect 5.0 Media
ELECTRONICS
65
Page 71 of 132

NOTE:
•The Uconnect Phone requires a mobile phone equipped with the Bluetooth Hands-
Free Profile, Version 1.0 or higher.
•Most mobile phones/devices are compatible with the Uconnect system, however some
mobile phones/devices may not be equipped with all of the required features to utilize
all of the Uconnect system features.
•For Uconnect Customer Care:
•U.S.residents visit UconnectPhone.com or call 1-877-855-8400.
•Canadian Residents visit UconnectPhone.com or call, 1-800-465-2001 (English) or
1-800-387-9983 (French).
Pairing (Wirelessly Connecting) Your Mobile Phone To The Uconnect
System
Mobile phone pairing is the process of establishing a wireless connection between a cellu-
lar phone and the Uconnect system.
NOTE:
•To use the Uconnect Phone feature, you first must determine if your mobile phone
and software are compatible with the Uconnect system.Please visit
UconnectPhone.com for complete mobile phone compatibility information.
•Mobile phone pairing is not available while the vehicle is in motion.
•A maximum of 10 mobile phones can be paired to the Uconnect system.
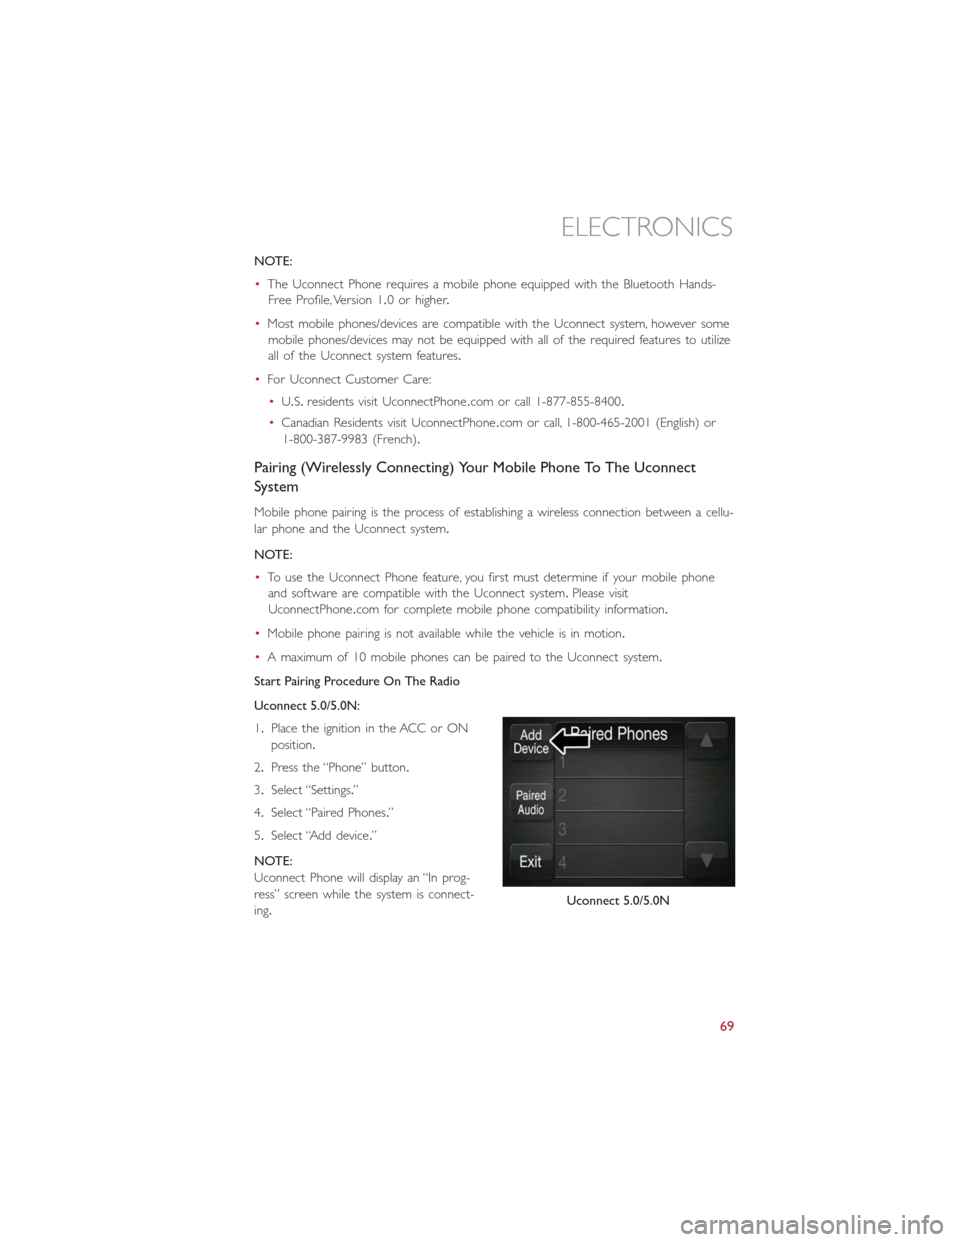
Start Pairing Procedure On The Radio
Uconnect 5.0/5.0N:
1.Place the ignition in the ACC or ON
position.
2.Press the “Phone” button.
3.Select “Settings.”
4.Select “Paired Phones.”
5.Select “Add device.”
NOTE:
Uconnect Phone will display an “In prog-
ress” screen while the system is connect-
ing.
Uconnect 5.0/5.0N
ELECTRONICS
69
Page 79 of 132

STEERING WHEEL AUDIO CONTROLS
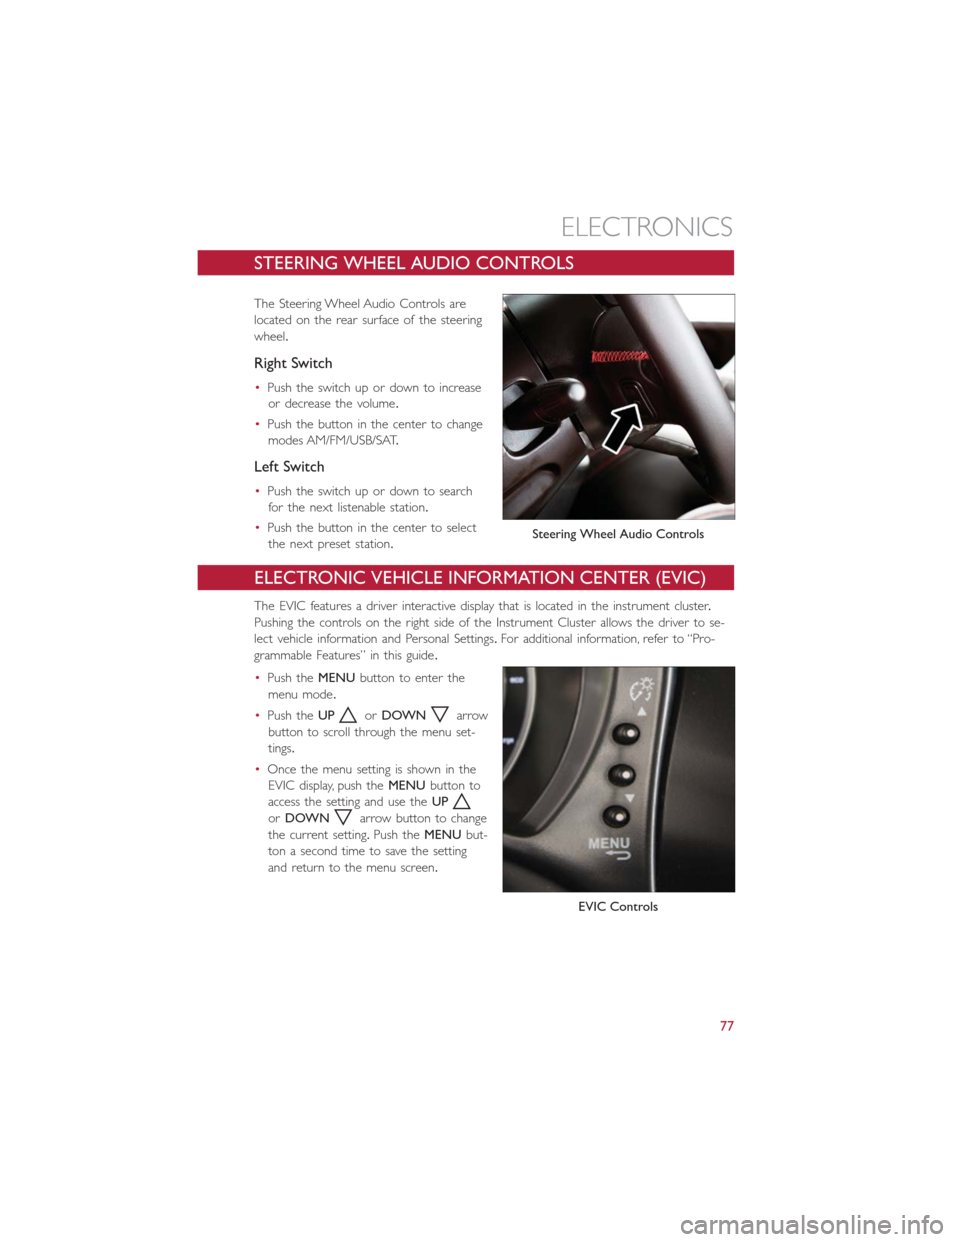
The Steering Wheel Audio Controls are
located on the rear surface of the steering
wheel.
Right Switch
•Push the switch up or down to increase
or decrease the volume.
•Push the button in the center to change
modes AM/FM/USB/SAT.
Left Switch
•Push the switch up or down to search
for the next listenable station.
•Push the button in the center to select
the next preset station.
ELECTRONIC VEHICLE INFORMATION CENTER (EVIC)
The EVIC features a driver interactive display that is located in the instrument cluster.
Pushing the controls on the right side of the Instrument Cluster allows the driver to se-
lect vehicle information and Personal Settings.For additional information, refer to “Pro-
grammable Features” in this guide.
•Push theMENUbutton to enter the
menu mode.
•Push theUP
orDOWNarrow
button to scroll through the menu set-
tings.
•Once the menu setting is shown in the
EVIC display, push theMENUbutton to
access the setting and use theUP
orDOWNarrow button to change
the current setting.Push theMENUbut-
ton a second time to save the setting
and return to the menu screen.
Steering Wheel Audio Controls
EVIC Controls
ELECTRONICS
77
Page 80 of 132

PROGRAMMABLE FEATURES
Electronic Vehicle Information Center (EVIC)
•Push theMENUbutton to enter the menu mode.
•Push theUP
orDOWNarrow button to scroll through the menu settings.
•Once the menu setting is shown in the EVIC display push theMENUbutton to access
the setting and use theUP
orDOWNarrow button to change the current
setting.Push theMENUbutton a second time to save the setting and return to menu
screen.
•Battery % Display•Button Volume
•Stored Warnings•Tutorial
•Connectivity ID•Restore Factory Settings
•Exit Menu
Selecting An Option Of The Main Menu Without Submenu:
•Briefly push theMENUbutton to select the main menu option to set.
•Push theUP
orDOWNarrow button to select the new setting.
•Briefly push theMENUbutton to store the new setting and go back to the main
menu option previously selected.
Selecting An Option Of The Main Menu With Submenu:
•Briefly push theMENUbutton to display the first submenu option.
•Push theUP
orDOWNarrow button to scroll through all the submenu op-
tions.
•Briefly push theMENUbutton to select the displayed submenu option and to open
the relevant setup menu.
•Push theUP
orDOWNarrow button to select the new setting for this sub-
menu option.
•Briefly push theMENUbutton to store the new setting and go back to the previously
selected submenu option.
•Push and hold theMENUbutton to return to the main menu (short hold) or the
main screen (longer hold).
NOTE:
The charging schedule is based on the date and time programmed in the EVIC.
ELECTRONICS
78
Page 81 of 132
Uconnect Customer Programmable Features
The Uconnect system allows you to access Customer Programmable feature settings.
To change a setting:
1.Push the SETTINGS
button located on the right side of the display.
2.Select a programmable feature you would like to adjust.
3.Make your selection highlighting the button.
Depending on the vehicles options, the following feature settings are available:
•Display•Audio
•Clock & Date•Phone/Bluetooth
•Safety/Assistance•SiriusXM Setup
•Lights•Voice
•Doors & Locks•Restore Settings
•Engine Off Options•Units
•Clear Personal Data•Charging Schedule
TRIP BUTTON
The Trip button is located on the end of
the wiper lever to the right of the steering
column.The trip button can be used to
display and reset the following functions:
•Motor Power (Kilowatts)
•Trip A
•Trip B
•Tire Pressure
•Short push (less than 1 second) to dis-
play different functions.
•Long push (more than 1 second) to re-
set and start a new trip.
Trip Button
ELECTRONICS
79
Page 82 of 132
New Trip
•A new trip can be reset or restarted by:
•“Manual” resetting by the user, by pushing the Trip button
•“Automatically” resetting, when the “Trip distance” reaches 999.9 miles or when the
“Travel time” reaches 29 (29 hours and 59 minutes)
Start Of Trip Procedure
•With the ignition key on, push and hold the TRIP button for over one second to reset
Trip A or Trip B.
Exit Trip
•The Trip function is over when all the values have been displayed or by pushing the
TRIP button until exit.
•Menu button does not exit the Trip.
POWER OUTLET
For added convenience there is a standard 12 Volt (13 Amp) power outlet located in the
floor console.
Power Outlet
ELECTRONICS
80