Page 434 of 707
 and the default password is 0000.To set the password, activate the DVD Setup Menu and
follow these additional instructions:
•
Using")
The default rating is Level 8 (play all discs without a
password) and the default password is 0000.To set the password, activate the DVD Setup Menu and
follow these additional instructions:
•
Using the remote control Left and Right cursor but-
tons, select the Rating tab.
• Highlight �Change Password�, and then push the
remote control’s ENTER/OK button.
• Enter the current password. Select a digit, use the
remote control Up and Down cursor buttons to set the
value for the current digit, and then push the remote
control’s Right cursor button to select the next digit.
Repeat this digit selection sequence for all four digits.
• After the four-digit password is entered, push the
remote control’s ENTER/OK button. If the password
is correct, the set password screen is displayed.
• Using the remote control’s Up and Down cursor
buttons to set the value for the current digit and the
remote control’s Right cursor button to select digits,
enter the new password.
DVD Password Entry
432 UNDERSTANDING YOUR INSTRUMENT PANEL
Page 435 of 707
•After the four-digit password is entered, push the remote
control’s ENTER/OK button to accept the change.To set the rating, activate the DVD Setup Menu and
follow these additional instructions:
• Using the remote control’s Left and Right cursor
buttons, select the Rating tab.
• Highlight �Change Rating�, and then push the remote
control’s ENTER/OK button.
• Enter the current password. Select a digit, use the
remote control’s Up and Down cursor buttons to set
the value for the current digit, and then push the
remote control’s Right cursor button to select the next
digit. Repeat this digit selection sequence for all four
digits.
• After the four-digit password is entered, push the
remote control’s ENTER/OK button. If the password
is correct, the Rating Level menu is displayed.
DVD Player Level Menu
4
UNDERSTANDING YOUR INSTRUMENT PANEL 433
Page 437 of 707
 ENCODE VIDEO IN COMPLIANCE
WITH THE VC-1 STANDARD (�VC-1 VIDEO�)
AN")
•THIS PRODUCT IS LICENSED UNDER THE VC-1
PATENT PORTFOLIO LICENSE FOR THE PER-
SONAL AND NON-COMMERCIAL USE OF A CON-
SUMER TO (i) ENCODE VIDEO IN COMPLIANCE
WITH THE VC-1 STANDARD (�VC-1 VIDEO�)
AND/OR (ii) DECODE VC-1 VIDEO THAT WAS
ENCODED BY A CONSUMER ENGAGED IN A PER-
SONAL AND NON-COMMERCIAL ACTIVITY
AND/OR WAS OBTAINED FROM A VIDEO PRO-
VIDER LICENSED TO PROVIDE VC-1 VIDEO. NO
LICENSE IS GRANTED OR SHALL BE IMPLIED FOR
ANY OTHER USE. ADDITIONAL INFORMATION
MAY BE OBTAINED FROM MPEG LA, L.L.C. SEE
HTTP://WWW.MPEGLA.COM.
Patents
Cinavia Notice
This product uses Cinavia technology to limit the use of
unauthorized copies of some commercially-produced film and videos and their soundtracks. When a prohib-
ited use of an unauthorized copy is detected, a message
will be displayed and playback or copying will be
interrupted. More information about Cinavia technology
is provided at the Cinavia Online Consumer Information
Center at http://www.cinavia.com. To request additional
information about Cinavia by mail, send a postcard with
your mailing address to: Cinavia Consumer Information
Center, P.O. Box 86851, San Diego, CA, 92138, USA.
This product incorporates proprietary technology under
license from Verance Corporation and is protected by
U.S. Patent 7,369,677 and other U.S. and worldwide
patents issued and pending as well as copyright and
trade secret protection for certain aspects of such tech-
nology. Cinavia is a trademark of Verance Corporation.
Copyright 2004-2010 Verance Corporation. All rights
reserved by Verance. Reverse engineering or disassembly
is prohibited.
4
UNDERSTANDING YOUR INSTRUMENT PANEL 435
Page 451 of 707
 Button
Push and release to change the current Air Conditioning
(A/C) setting, the indicator illuminates when A/C is ON.
Performing this function will cause the ATC to switch")
1. Air Conditioning (A/C) Button
Push and release to change the current Air Conditioning
(A/C) setting, the indicator illuminates when A/C is ON.
Performing this function will cause the ATC to switch
into manual mode.
2. Blower Control Display
This display shows the current Blower speed selection.
3. Left Front Seat Occupant Temperature Display
This display shows the temperature setting for the left
front seat occupant.
4. Mode Display
This display shows the current Mode selection (Panel,
Bi-Level, Floor, Mix).5. Rear Temperature Control Display
This display shows the current Rear Temperature Control
settings.
6. Front Auto Indicator
This indicates when the system is in Front Auto mode.
7. Auto Indicator
This indicates when the system is in Auto mode.
8. Right Front Seat Occupant Temperature Display
This display shows the temperature setting for the right
front seat occupant.
9. Front Defrost Button
Push and release to change the current setting, the indica-
tor illuminates when ON. Performing this function will
cause the ATC to switch into manual mode. The blower
will engage immediately if the Defrost mode is selected.
4
UNDERSTANDING YOUR INSTRUMENT PANEL 449
Page 453 of 707

16. Blower Control
There are seven blower speeds, the blower speed in-
creases as you move the control to the right from the
lowest blower setting. Performing this function will
cause the ATC to switch into manual mode.
17. Mode Control Button
Push and release to select between Modes (Panel, Bi-
Level, Floor, Mix). Performing this function will cause the
ATC to switch into manual mode.
18. Recirculation Control Button
Push and release to change the current setting, the
indicator illuminates when ON.
19. SYNC Button
Push and release to control the temperature setting for all
three zones from the driver temperature control.20. Driver Temperature Control Up/Down Button
Provides the driver with independent temperature con-
trol. Push the top button for warmer temperatures or the
lower button for cooler temperature settings.
Automatic Temperature Control (ATC)
Automatic Operation
1. Push the AUTO button on the front ATC Panel and the
words Front Auto will illuminate in the front ATC
display, along with two temperatures for the driver
and front passenger. The system will then automati-
cally regulate the amount of airflow.
2. Next, adjust the temperature you would like the system to maintain, by adjusting the driver, passenger,
and rear temperatures. Once the desired temperature
is displayed, the system will achieve and automati-
cally maintain that comfort level.4
UNDERSTANDING YOUR INSTRUMENT PANEL 451
Page 454 of 707

3. When the system is set up for your comfort level, it isnot necessary to change the settings. You will experi-
ence the greatest efficiency by simply allowing the
system to function automatically.
NOTE:
• It is not necessary to move the temperature settings.
The system automatically adjusts the temperature,
mode and fan speed to provide comfort as quickly as
possible.
• The temperature can be displayed in English or Metric
units by selecting the “Display Units of Measure in”
customer-programmable feature. Refer to the “Elec-
tronic Vehicle Information Center (EVIC) — Customer-
Programmable Features” in this Section. To provide you with maximum comfort in the automatic
mode, during cold start-ups, the blower fan will remain
on low until the engine warms up. The fan will engage
immediately if the Defrost mode is selected, or by chang-
ing the front blower knob setting.
Manual Operation Override
This system offers a full complement of manual override
features. The AUTO symbol in the front ATC display will
be turned off when the system is being used in the
manual mode.
NOTE:
The system will not automatically sense the
presence of fog, mist or ice on the windshield. DEFROST
mode must be manually selected to clear the windshield
and side glass.
452 UNDERSTANDING YOUR INSTRUMENT PANEL
Page 455 of 707

The Air Conditioning (A/C) button allows the operator
to manually activate or deactivate the air conditioning
system. When in A/C mode with the ATC set to a cool
temperature, de")
Air Conditioning (A/C)
The Air Conditioning (A/C) button allows the operator
to manually activate or deactivate the air conditioning
system. When in A/C mode with the ATC set to a cool
temperature, dehumidified air flows through the air
outlets. If Economy mode is desired, push the A/C
button to turn off the A/C mode in the ATC display and
deactivate the A/C system.
NOTE:
•If the system is in Mix or Defrost Mode, the A/C can
be turned off, but the A/C system shall remain active
to prevent fogging of the windows.
• If not operating in AUTO mode, the system will not
automatically sense the presence of fog, mist or ice on
the windshield. DEFROST mode must be manually
selected to clear the windshield and side glass. •
If fog or mist appears on the windshield or side glass,
select Defrost mode and adjust blower speed if
needed.
Controlling The Rear Climate Controls From The
Front ATC Panel
The Three-Zone ATC system allows for adjustment of the
rear climate controls from the front ATC panel.
To change the rear system settings:
• Push �REAR� button to change control to rear control
mode, Rear display (below) will appear. Control func-
tions now operate rear system.4
UNDERSTANDING YOUR INSTRUMENT PANEL 453
Page 456 of 707
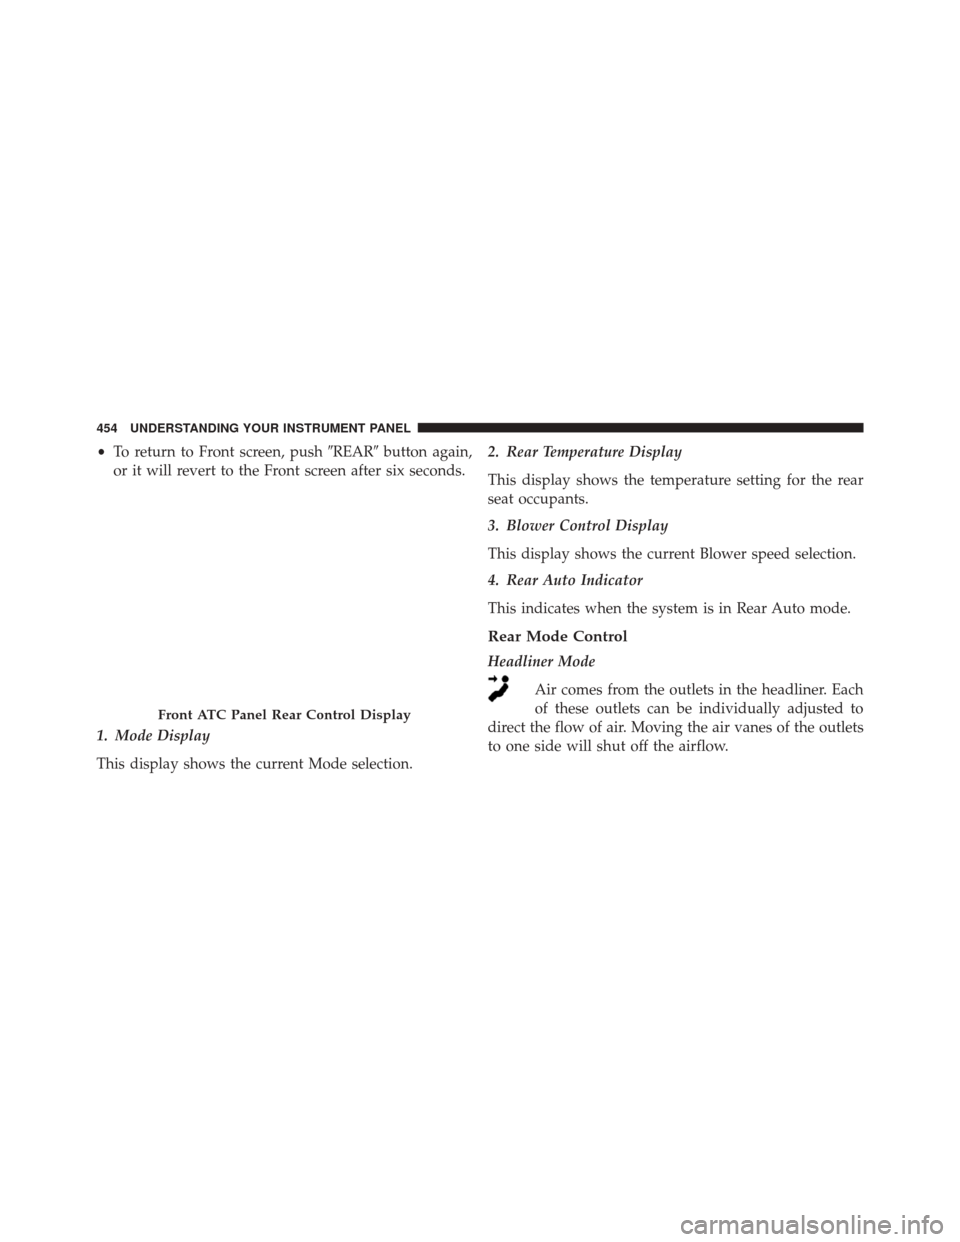
•To return to Front screen, push �REAR�button again,
or it will revert to the Front screen after six seconds.
1. Mode Display
This display shows the current Mode selection. 2. Rear Temperature Display
This display shows the temperature setting for the rear
seat occupants.
3. Blower Control Display
This display shows the current Blower speed selection.
4. Rear Auto Indicator
This indicates when the system is in Rear Auto mode.
Rear Mode Control
Headliner Mode
Air comes from the outlets in the headliner. Each
of these outlets can be individually adjusted to
direct the flow of air. Moving the air vanes of the outlets
to one side will shut off the airflow.
Front ATC Panel Rear Control Display
454 UNDERSTANDING YOUR INSTRUMENT PANEL