2016 CHEVROLET SUBURBAN change time
[x] Cancel search: change timePage 188 of 453
Chevrolet Tahoe/Suburban Owner Manual (GMNA-Localizing-U.S./Canada/
Mexico-9159366) - 2016 - crc - 5/19/15
Lighting 187
Lights On with Wipers
If the windshield wipers are
activated in daylight with the engine
on, and the exterior lamp control is
in AUTO, the headlamps, parking
lamps, and other exterior lamps
come on. The transition time for the
lamps coming on varies based on
wiper speed. When the wipers are
not operating, these lamps turn off.
Move the exterior lamp control to
O
or;to disable this feature.
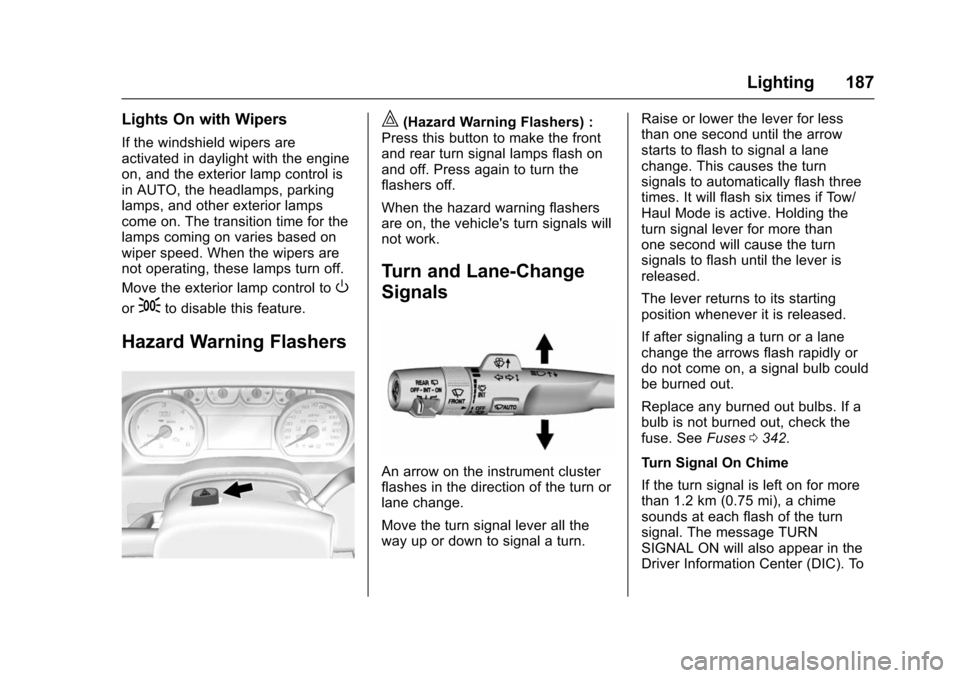
Hazard Warning Flashers
|(Hazard Warning Flashers) :
Press this button to make the front
and rear turn signal lamps flash on
and off. Press again to turn the
flashers off.
When the hazard warning flashers
are on, the vehicle's turn signals will
not work.
Turn and Lane-Change
Signals
An arrow on the instrument cluster
flashes in the direction of the turn or
lane change.
Move the turn signal lever all the
way up or down to signal a turn. Raise or lower the lever for less
than one second until the arrow
starts to flash to signal a lane
change. This causes the turn
signals to automatically flash three
times. It will flash six times if Tow/
Haul Mode is active. Holding the
turn signal lever for more than
one second will cause the turn
signals to flash until the lever is
released.
The lever returns to its starting
position whenever it is released.
If after signaling a turn or a lane
change the arrows flash rapidly or
do not come on, a signal bulb could
be burned out.
Replace any burned out bulbs. If a
bulb is not burned out, check the
fuse. See
Fuses0342.
Turn Signal On Chime
If the turn signal is left on for more
than 1.2 km (0.75 mi), a chime
sounds at each flash of the turn
signal. The message TURN
SIGNAL ON will also appear in the
Driver Information Center (DIC). To
Page 191 of 453
Chevrolet Tahoe/Suburban Owner Manual (GMNA-Localizing-U.S./Canada/
Mexico-9159366) - 2016 - crc - 5/19/15
190 Lighting
Lighting Features
Entry Lighting
Some exterior lamps and the interior
lamps turn on briefly at night, or in
areas with limited lighting, when
K
is pressed on the Remote Keyless
Entry (RKE) transmitter. When a
door is opened, the interior lamps
come on if the dome lamp control is
in the DOOR position. After about
30 seconds the exterior lamps turn
off. Entry lighting can be disabled
manually by changing the ignition
out of the OFF position, or by
pressing the RKE transmitter
Q
button.
This feature can be changed. See
“Vehicle Locator Lights”under
Vehicle Personalization 0173.
Exit Lighting
Some exterior lamps and interior
lamps come on when the key is
removed from the ignition. The
exterior and interior lamps remain
on for a set amount of time, then
automatically turn off. If equipped with Keyless Access,
the exterior lamps automatically turn
on when the driver
’s door is opened
after the ignition is turned to OFF.
The interior lights turn on when the
ignition is turned to OFF.
The exterior lamps turn off
immediately by turning the exterior
lamp control off.
This feature can be changed. See
Vehicle Personalization 0173.
Battery Load
Management
The vehicle has Electric Power
Management (EPM), which
estimates the battery's temperature
and state of charge. It then adjusts
the voltage for best performance
and extended life of the battery.
When the battery's state of charge
is low, the voltage is raised slightly
to quickly bring the charge back up.
When the state of charge is high,
the voltage is lowered slightly to
prevent overcharging. The voltmeter
gauge or the voltage display on the
Driver Information Center (DIC), if equipped, may show the voltage
moving up or down. This is normal.
If there is a problem, an alert will be
displayed.
The battery can be discharged at
idle if the electrical loads are very
high. This is true for all vehicles.
This is because the generator
(alternator) may not be spinning fast
enough at idle to produce all the
power that is needed for very high
electrical loads.
A high electrical load occurs when
several of the following are on, such
as: headlamps, high beams, fog
lamps, rear window defogger,
climate control fan at high speed,
heated seats, engine cooling fans,
trailer loads, and loads plugged into
accessory power outlets.
EPM works to prevent excessive
discharge of the battery. It does this
by balancing the generator's output
and the vehicle's electrical needs.
It can increase engine idle speed to
generate more power, whenever
needed. It can temporarily reduce
the power demands of some
accessories.
Page 197 of 453

Chevrolet Tahoe/Suburban Owner Manual (GMNA-Localizing-U.S./Canada/
Mexico-9159366) - 2016 - crc - 5/19/15
196 Infotainment System
current track will start from
the beginning. Press
lto
seek the next track.
. AM, FM, or SiriusXM (If
Equipped): Press
gorl
to seek to the previous or
next strong station.
. CD (If Equipped): Press
and hold
gto quickly
reverse through a track.
Release the button to return
to playing speed. Press and
hold
lto fast forward
through a track. Release
the button to return to
playing speed.
10. RADIO .Press to change the audio
source between AM, FM,
or SiriusXM, if equipped.
11. MEDIA .Press to change the audio
source between CD, USB,
and AUX.
12.
O(Power/Volume)
. Press to turn the audio on. .
Press and hold to turn it off.
. When on, press to mute the
system. Press again to
unmute.
. Turn to increase or
decrease the volume.
Home Page
Home Page Features
The infotainment system displays a
Home Page that makes it easy to
access all of the applications. Turn
the MENU knob to highlight feature
icons. Press the MENU knob to
access the feature’s options.
Various functions are disabled when
the vehicle is moving.
AUDIO : Select the AUDIO screen
icon to display the active source
page. The sources available are
AM, FM, SiriusXM
®(if equipped),
CD, USB/iPod, and AUX. See
AM-FM Radio 0198, Satellite Radio
0 200, CD Player 0202, and
Auxiliary Jack 0207. PHONE :
Select the PHONE screen
icon to display the Phone main
page. See “Bluetooth Overview” in
Bluetooth (Overview) 0208 or
Bluetooth (Infotainment Controls -
Base Radio) 0209 orBluetooth
(Voice Recognition - Base Radio)
0 213.
NAV (Navigation, If Equipped) :
Select the NAV screen icon to
display the OnStar Turn-by-Turn
Navigation. See “OnStar Overview”
in OnStar, if equipped.
SETTINGS : Select the SETTINGS
screen icon to display the Settings
main page. See “Setting Radio
Preferences” following.
Setting Radio Preferences
Select the SETTINGS screen icon
to display the Settings menu and
the following may display:
Time :SeeClock 0132.
Language (Current Language) :
This will set the display language in
the radio and instrument cluster.
Select to display a list of languages.
Select BACK to go back to the
previous menu.
Page 211 of 453
Chevrolet Tahoe/Suburban Owner Manual (GMNA-Localizing-U.S./Canada/
Mexico-9159366) - 2016 - crc - 5/19/15
210 Infotainment System
phone is not connected, calls can
be made using OnStar Hands-Free
Calling, if available. SeeOnStar
Overview 0431, if equipped.
Pairing Information
. Up to five cell phones can be
paired to the Bluetooth system.
. The pairing process is disabled
when the vehicle is moving.
. Pairing only needs to be
completed once per phone,
unless the pairing information on
the cell phone changes or the
cell phone is deleted from the
system.
. Only one paired cell phone can
be connected to the Bluetooth
system at a time.
. If multiple paired cell phones are
within range of the system, the
system connects to the first
available paired cell phone in the
order that they were newly
paired to the system. To connect
to a different paired phone, see
“Connecting to a Different
Phone” later in this section. Pairing a Phone or Device
1. From the Home Page, turn the MENU knob to access the
PHONE screen button, then
press the MENU knob to select
the PHONE screen button. If a
device has been previously
paired, the main Phone menu
will be shown. If no devices
have been paired, Step 2 can
be skipped.
2. Turn the MENU knob and press to select Manage
Phones.
3. Press the button just below the PAIR screen button. A four-digit
Personal Identification Number
(PIN) appears on the display.
The PIN is used in Step 5.
4. Start the pairing process on the cell phone to be paired to the
vehicle. See your cell phone
manufacturer's user guide for
information on this process.
5. Locate the device named “Your
Vehicle” in the list on the cell
phone. Follow the instructions
on the cell phone to enter the PIN provided in Step 3. If a six
digit code is shown on the
phone and the vehicle screen,
confirm the codes are the
same. The system recognizes
the new connected phone after
the pairing process is
complete.
6. If the phone prompts to accept connection or allow phone
book download, select Always
Accept and Allow. The phone
book may not be available if
not accepted.
7. Repeat Steps 1–6 to pair additional phones or devices.
Listing All Paired and Connected
Phones 1. To list all paired devices, from the Home Page turn the MENU
knob, then press to select the
PHONE screen button.
2. Turn the MENU knob and press to select Manage
Phones.
Page 217 of 453
Chevrolet Tahoe/Suburban Owner Manual (GMNA-Localizing-U.S./Canada/
Mexico-9159366) - 2016 - crc - 5/19/15
216 Infotainment System
Making a Call
Calls can be made using the
following commands.
Dial or Call :The dial or call
command can be used
interchangeably to dial a phone
number or a stored name tag.
Digit Dial : This command allows a
phone number to be dialed by
entering the digits one at a time.
Re-dial : This command is used to
dial the last number used on the cell
phone.
Using the “Dial”or“Call”
Command
1. Press
g. The system responds
“Ready,” followed by a tone.
2. Say “Dial”or“Call.”
3. Say the entire number without pausing or say the name tag.
Once connected, the person called
will be heard through the audio
speakers. Calling 911 Emergency (U.S. and
Canada)
1. Press
g. The system responds
“Ready,” followed by a tone.
2. Say “Dial”or“Call.”
3. Say “911.”
4. Say “Dial”or“Call.”
Calling 066 Emergency (Mexico)
1. Press
g. The system responds
“Ready,” followed by a tone.
2. Say “Dial”or“Call.”
3. Say “066.”
4. Say “Dial”or“Call.”
Using the “Digit Dial” Command
The digit dial command allows a
phone number to be dialed by
entering the digits one at a time.
After each digit is entered, the
system repeats back the digit it
heard followed by a tone.
If an unwanted number is
recognized by the system, say
“Correction” at any time to clear the
last number. To hear all of the numbers
recognized by the system, say
“Verify”
at any time.
1. Press
g. The system responds
“Ready,” followed by a tone.
2. Say “Digit Dial.”
3. Say each digit, one at a time. After each digit is entered, the
system repeats back the digit it
heard followed by a tone. After
the last digit has been entered,
say “Dial.”
Once connected, the person called
will be heard through the audio
speakers.
Using the “Re-dial”Command
1. Press
g. The system responds
“Ready,” followed by a tone.
2. After the tone, say “Re-dial.”
The system dials the last
number called from the
connected cell phone.
Once connected, the person called
will be heard through the audio
speakers.
Page 220 of 453
Chevrolet Tahoe/Suburban Owner Manual (GMNA-Localizing-U.S./Canada/
Mexico-9159366) - 2016 - crc - 5/19/15
Infotainment System 219
Fees and Taxes: Subscription fee,
taxes, one time activation fee, and
other fees may apply. Subscription
fee is consumer only. All fees and
programming subject to change.
Subscriptions subject to Customer
Agreement available at
www.siriusxm.com. SiriusXM
®
service only available in the
48 contiguous United States and
Canada.
In Canada: Some deterioration of
service may occur in extreme
northern latitudes. This is beyond
the control of SiriusXM
®Satellite
Radio. It is prohibited to copy, decompile,
disassemble, reverse engineer,
hack, manipulate, or otherwise
make available any technology or
software incorporated in receivers
compatible with the SiriusXM
®
Satellite Radio System or that
support the SiriusXM website, the
Online Service or any of its content.
Furthermore, the AMBER voice
compression software included in
this product is protected by
intellectual property rights including
patent rights, copyrights, and trade
secrets of Digital Voice
Systems, Inc.
General Requirements:
1. A License Agreement from SiriusXM is required for any
product that incorporates
SiriusXM Technology and/or for
use of any of the SiriusXM
marks to be manufactured,
distributed, or marketed in the
SiriusXM service Area. 2. For products to be distributed,
marketed, and/or sold in
Canada, a separate agreement
is required with Canadian
Satellite Radio Inc. (operating
as SiriusXM Canada).Bluetooth
The Bluetooth word mark and logos
are owned by the Bluetooth SIG,
Inc. and andy use of such marks by
General Motors is under license.
Other trademarks and trade names
are those of their respective owners.
Page 222 of 453

Chevrolet Tahoe/Suburban Owner Manual (GMNA-Localizing-U.S./Canada/
Mexico-9159366) - 2016 - crc - 5/19/15
Climate Controls 221
Front Climate Controls
Automatic Operation
The system automatically controls
the fan speed, air delivery, air
conditioning, and recirculation in
order to heat or cool the vehicle to
the desired temperature.
When the indicator light is on, the
system is in full automatic operation.
If the air delivery mode or fan
setting is manually adjusted, the
auto indicator turns off and the
selected settings are displayed.
To place the system in
automatic mode:1. Press AUTO.
2. Set the driver and passenger temperature.
To find your comfort setting,
start with 22 °C (72 °F) and
allow the system time to
stabilize. Then adjust the
temperature as needed for best
comfort. To improve fuel efficiency and to
cool the vehicle faster, recirculation
may be automatically selected in
warm weather.
The recirculation light will not come
on when automatically controlled.
Press
@to manually select
recirculation; press it again to select
outside air.
Do not cover the solar sensor on the
top of the instrument panel near the
windshield. This sensor regulates
air temperature based on sun load.
See “Sensors” later in this section.
Manual Operation
O(On/Off) : Press to turn the
climate control system on or off.
Outside air still enters the vehicle,
and is directed to the floor. This
direction can be changed by
pressing the air delivery mode.
9(Fan Control) : Turn clockwise
or counterclockwise to increase or
decrease the fan speed.
Press AUTO to return to automatic
operation. Driver and Passenger
Temperature Control :
The
temperature can be adjusted
separately for the driver and
passenger.
Turn the knob clockwise or
counterclockwise to increase or
decrease the driver or passenger
temperature setting.
SYNC (Synchronized
Temperature) : Press to link the
passenger and rear climate
temperature settings to the driver
setting. The SYNC indicator light will
turn on. When the passenger or rear
climate settings are adjusted, the
SYNC indicator light turns off.
Air Delivery Mode Control : Press
Y,\,[, or-to change the
direction of the airflow. An indicator
light comes on in the selected mode
button.
Changing the mode cancels the
automatic operation and the system
goes into manual mode. Press
AUTO to return to automatic
operation.
Page 245 of 453
Chevrolet Tahoe/Suburban Owner Manual (GMNA-Localizing-U.S./Canada/
Mexico-9159366) - 2016 - crc - 5/20/15
244 Driving and Operating
Warning (Continued)
.Do not leave a seat
folded down unless you
need to.
There is also important loading
information for off-road driving in
this manual. See “Loading Your
Vehicle for Off-Road Driving”
under Off-Road Driving 0231.
Starting and
Operating
New Vehicle Break-In
Caution
The vehicle does not need an
elaborate break-in. But it will
perform better in the long run if
you follow these guidelines:
. Keep the vehicle speed at
88 km/h (55 mph) or less for
the first 805 km (500 mi).
. Do not drive at any one
constant speed, fast or slow,
for the first 805 km (500 mi).
Do not make full-throttle
starts. Avoid downshifting to
brake or slow the vehicle.
. Avoid making hard stops for
the first 322 km (200 mi) or
so. During this time the new
brake linings are not yet
broken in. Hard stops with
new linings can mean
(Continued)
Caution (Continued)
premature wear and earlier
replacement. Follow this
breaking-in guideline every
time you get new brake
linings.
. Do not tow a trailer during
break-in. See Trailer Towing
0 299 for the trailer towing
capabilities of the vehicle
and more information.
Following break-in, engine speed
and load can be gradually
increased.
Adjustable Throttle and
Brake Pedal
If equipped, the position of the
throttle and brake pedals can be
changed.
The pedals can only be adjusted
when the vehicle is in P (Park).