2016 CHEVROLET MALIBU LIMITED stop start
[x] Cancel search: stop startPage 23 of 360

Chevrolet Malibu Limited Owner Manual (GMNA-Localizing-U.S/Canada-
9086425) - 2016 - crc - 7/30/15
22 In Brief
Open/Close :Press and hold the
front or rear of the switch (1) to open
or close the sunroof. The sunshade
automatically opens with the
sunroof, but must be closed
manually.
Express Open/Close : Press and
release the front or rear of the
switch (1) to express-open or
express-close the sunroof.
Vent/Close : Press and hold the
rear of the switch (2) to vent the
sunroof. Press and hold the front of
the switch to close. The sunroof cannot be opened or
closed if the vehicle has an
electrical failure.
Anti-Pinch Feature
If an object is in the path of the
sunroof when it is closing, the
anti-pinch feature detects the object
and stops the sunroof from closing
at the point of the obstruction. The
sunroof then returns to the full-open
position.
See
Sunroof 046.
Performance and
Maintenance
Traction Control/
Electronic Stability
Control
The traction control system limits
wheel spin. The system turns on
automatically every time the vehicle
is started.
The StabiliTrak system assists with
directional control of the vehicle in
difficult driving conditions. The
system turns on automatically every
time the vehicle is started.
.
To turn off traction control, press
and release the TCS/StabiliTrak
button
gon the center stack.i
illuminates in the instrument
cluster.
. Press and release the TCS/
StabiliTrak button again to turn
on traction control.
. To turn off both traction control
and StabiliTrak, press and hold
the TCS/StabiliTrak button
gon
Page 24 of 360

Chevrolet Malibu Limited Owner Manual (GMNA-Localizing-U.S/Canada-
9086425) - 2016 - crc - 7/30/15
In Brief 23
the center stack, untiliandg
illuminate in the instrument
cluster.
. Press and release the TCS/
StabiliTrak button again to turn
on both systems.
See Traction Control/Electronic
Stability Control 0202.
Tire Pressure Monitor
This vehicle may have a Tire
Pressure Monitor System (TPMS).
The low tire pressure warning light
alerts to a significant loss in
pressure of one of the vehicle's
tires. If the warning light comes on,
stop as soon as possible and inflate
the tires to the recommended
pressure shown on the Tire and Loading Information label. See
Vehicle Load Limits
0183. The
warning light will remain on until the
tire pressure is corrected.
The low tire pressure warning light
may come on in cool weather when
the vehicle is first started, and then
turn off as the vehicle is driven. This
may be an early indicator that the
tire pressures are getting low and
the tires need to be inflated to the
proper pressure.
The TPMS does not replace normal
monthly tire maintenance. Maintain
the correct tire pressures.
See Tire Pressure Monitor System
0 269.
Engine Oil Life System
The engine oil life system calculates
engine oil life based on vehicle use
and displays the CHANGE ENGINE
OIL SOON message when it is time
to change the engine oil and filter.
The oil life system should be reset
to 100% only following an oil
change. Resetting the Oil Life System
1. Turn the ignition to ON/RUN with the engine off.
2. Press the DIC MENU button on the turn signal lever to enter
the Vehicle Information Menu.
Use the thumbwheel to scroll
through the menu items until
you reach REMAINING
OIL LIFE.
3. Press the SET/CLR button to reset the oil life at 100%.
4. Turn the ignition to LOCK/OFF.
See Engine Oil Life System 0232.
Driving for Better Fuel
Economy
Driving habits can affect fuel
mileage. Here are some driving tips
to get the best fuel economy
possible.
.
Avoid fast starts and accelerate
smoothly.
. Brake gradually and avoid
abrupt stops.
Page 32 of 360
Chevrolet Malibu Limited Owner Manual (GMNA-Localizing-U.S/Canada-
9086425) - 2016 - crc - 7/31/15
Keys, Doors, and Windows 31
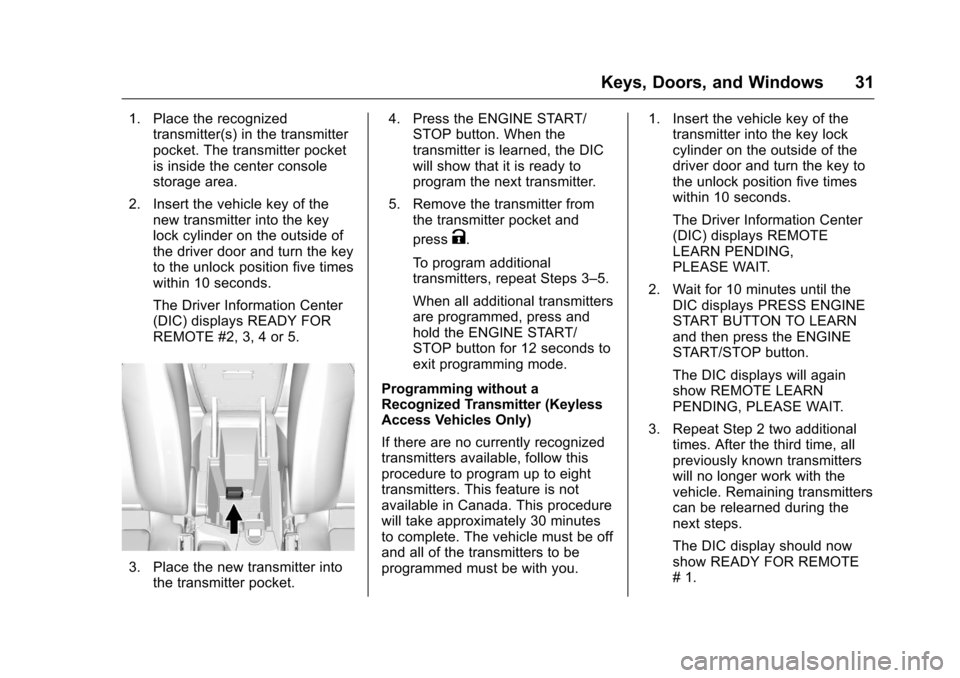
1. Place the recognizedtransmitter(s) in the transmitter
pocket. The transmitter pocket
is inside the center console
storage area.
2. Insert the vehicle key of the new transmitter into the key
lock cylinder on the outside of
the driver door and turn the key
to the unlock position five times
within 10 seconds.
The Driver Information Center
(DIC) displays READY FOR
REMOTE #2, 3, 4 or 5.
3. Place the new transmitter intothe transmitter pocket. 4. Press the ENGINE START/
STOP button. When the
transmitter is learned, the DIC
will show that it is ready to
program the next transmitter.
5. Remove the transmitter from the transmitter pocket and
press
K.
To program additional
transmitters, repeat Steps 3–5.
When all additional transmitters
are programmed, press and
hold the ENGINE START/
STOP button for 12 seconds to
exit programming mode.
Programming without a
Recognized Transmitter (Keyless
Access Vehicles Only)
If there are no currently recognized
transmitters available, follow this
procedure to program up to eight
transmitters. This feature is not
available in Canada. This procedure
will take approximately 30 minutes
to complete. The vehicle must be off
and all of the transmitters to be
programmed must be with you. 1. Insert the vehicle key of the
transmitter into the key lock
cylinder on the outside of the
driver door and turn the key to
the unlock position five times
within 10 seconds.
The Driver Information Center
(DIC) displays REMOTE
LEARN PENDING,
PLEASE WAIT.
2. Wait for 10 minutes until the DIC displays PRESS ENGINE
START BUTTON TO LEARN
and then press the ENGINE
START/STOP button.
The DIC displays will again
show REMOTE LEARN
PENDING, PLEASE WAIT.
3. Repeat Step 2 two additional times. After the third time, all
previously known transmitters
will no longer work with the
vehicle. Remaining transmitters
can be relearned during the
next steps.
The DIC display should now
show READY FOR REMOTE
# 1.
Page 33 of 360
Chevrolet Malibu Limited Owner Manual (GMNA-Localizing-U.S/Canada-
9086425) - 2016 - crc - 7/31/15
32 Keys, Doors, and Windows
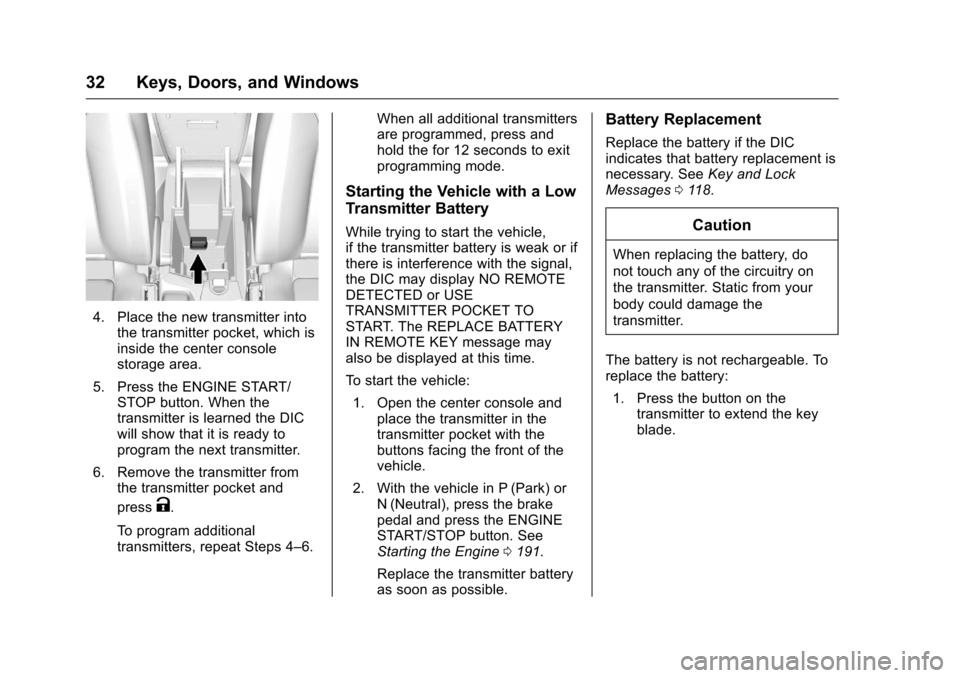
4. Place the new transmitter intothe transmitter pocket, which is
inside the center console
storage area.
5. Press the ENGINE START/ STOP button. When the
transmitter is learned the DIC
will show that it is ready to
program the next transmitter.
6. Remove the transmitter from the transmitter pocket and
press
K.
To program additional
transmitters, repeat Steps 4–6. When all additional transmitters
are programmed, press and
hold the for 12 seconds to exit
programming mode.
Starting the Vehicle with a Low
Transmitter Battery
While trying to start the vehicle,
if the transmitter battery is weak or if
there is interference with the signal,
the DIC may display NO REMOTE
DETECTED or USE
TRANSMITTER POCKET TO
START. The REPLACE BATTERY
IN REMOTE KEY message may
also be displayed at this time.
To start the vehicle:
1. Open the center console and place the transmitter in the
transmitter pocket with the
buttons facing the front of the
vehicle.
2. With the vehicle in P (Park) or N (Neutral), press the brake
pedal and press the ENGINE
START/STOP button. See
Starting the Engine 0191.
Replace the transmitter battery
as soon as possible.
Battery Replacement
Replace the battery if the DIC
indicates that battery replacement is
necessary. See Key and Lock
Messages 0118.
Caution
When replacing the battery, do
not touch any of the circuitry on
the transmitter. Static from your
body could damage the
transmitter.
The battery is not rechargeable. To
replace the battery: 1. Press the button on the transmitter to extend the key
blade.
Page 45 of 360
Chevrolet Malibu Limited Owner Manual (GMNA-Localizing-U.S/Canada-
9086425) - 2016 - crc - 7/31/15
44 Keys, Doors, and Windows
pulsing sound when either rear
window is down and the front
windows are up. To reduce the
sound, open either a front window
or the sunroof, if equipped.
Power Windows
{Warning
Children could be seriously
injured or killed if caught in the
path of a closing window. Never
leave keys in a vehicle with
children. When there are children
in the rear seat, use the window
lockout button to prevent
operation of the windows. See
Keys025.
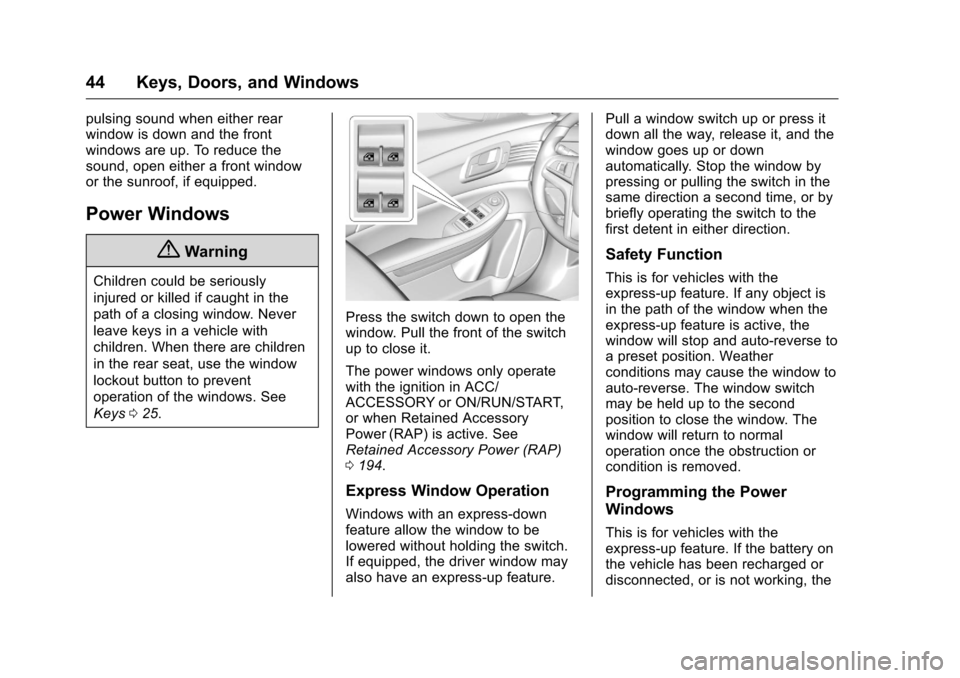
Press the switch down to open the
window. Pull the front of the switch
up to close it.
The power windows only operate
with the ignition in ACC/
ACCESSORY or ON/RUN/START,
or when Retained Accessory
Power (RAP) is active. See
Retained Accessory Power (RAP)
0194.
Express Window Operation
Windows with an express-down
feature allow the window to be
lowered without holding the switch.
If equipped, the driver window may
also have an express-up feature. Pull a window switch up or press it
down all the way, release it, and the
window goes up or down
automatically. Stop the window by
pressing or pulling the switch in the
same direction a second time, or by
briefly operating the switch to the
first detent in either direction.
Safety Function
This is for vehicles with the
express-up feature. If any object is
in the path of the window when the
express-up feature is active, the
window will stop and auto-reverse to
a preset position. Weather
conditions may cause the window to
auto-reverse. The window switch
may be held up to the second
position to close the window. The
window will return to normal
operation once the obstruction or
condition is removed.
Programming the Power
Windows
This is for vehicles with the
express-up feature. If the battery on
the vehicle has been recharged or
disconnected, or is not working, the
Page 53 of 360
Chevrolet Malibu Limited Owner Manual (GMNA-Localizing-U.S/Canada-
9086425) - 2016 - crc - 7/30/15
52 Seats and Restraints
Memory Seats
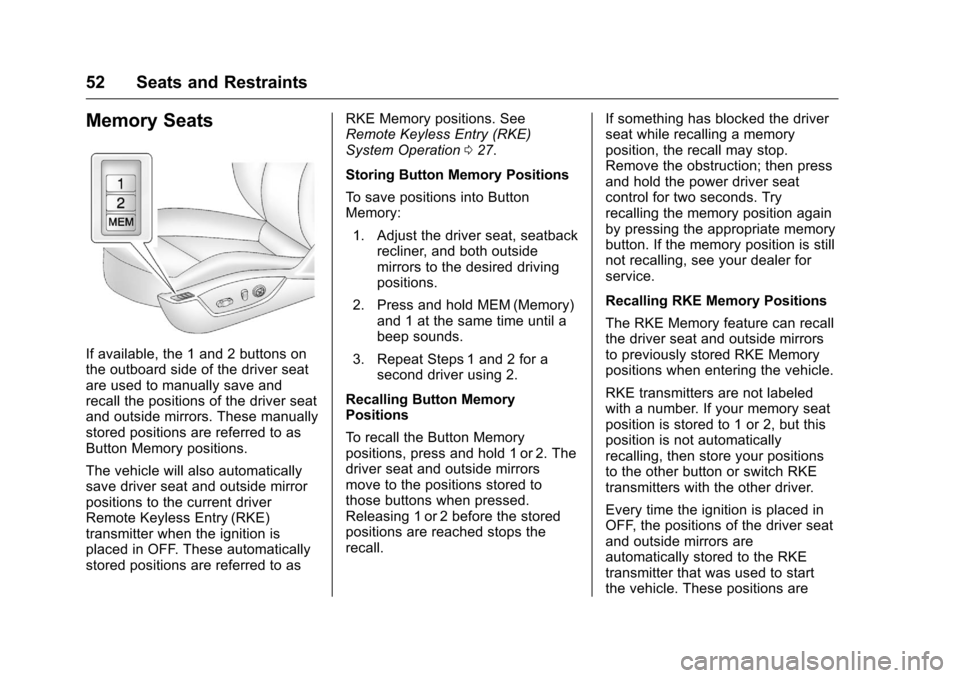
If available, the 1 and 2 buttons on
the outboard side of the driver seat
are used to manually save and
recall the positions of the driver seat
and outside mirrors. These manually
stored positions are referred to as
Button Memory positions.
The vehicle will also automatically
save driver seat and outside mirror
positions to the current driver
Remote Keyless Entry (RKE)
transmitter when the ignition is
placed in OFF. These automatically
stored positions are referred to asRKE Memory positions. See
Remote Keyless Entry (RKE)
System Operation
027.
Storing Button Memory Positions
To save positions into Button
Memory: 1. Adjust the driver seat, seatback recliner, and both outside
mirrors to the desired driving
positions.
2. Press and hold MEM (Memory) and 1 at the same time until a
beep sounds.
3. Repeat Steps 1 and 2 for a second driver using 2.
Recalling Button Memory
Positions
To recall the Button Memory
positions, press and hold 1 or 2. The
driver seat and outside mirrors
move to the positions stored to
those buttons when pressed.
Releasing 1 or 2 before the stored
positions are reached stops the
recall. If something has blocked the driver
seat while recalling a memory
position, the recall may stop.
Remove the obstruction; then press
and hold the power driver seat
control for two seconds. Try
recalling the memory position again
by pressing the appropriate memory
button. If the memory position is still
not recalling, see your dealer for
service.
Recalling RKE Memory Positions
The RKE Memory feature can recall
the driver seat and outside mirrors
to previously stored RKE Memory
positions when entering the vehicle.
RKE transmitters are not labeled
with a number. If your memory seat
position is stored to 1 or 2, but this
position is not automatically
recalling, then store your positions
to the other button or switch RKE
transmitters with the other driver.
Every time the ignition is placed in
OFF, the positions of the driver seat
and outside mirrors are
automatically stored to the RKE
transmitter that was used to start
the vehicle. These positions are
Page 56 of 360
Chevrolet Malibu Limited Owner Manual (GMNA-Localizing-U.S/Canada-
9086425) - 2016 - crc - 7/30/15
Seats and Restraints 55
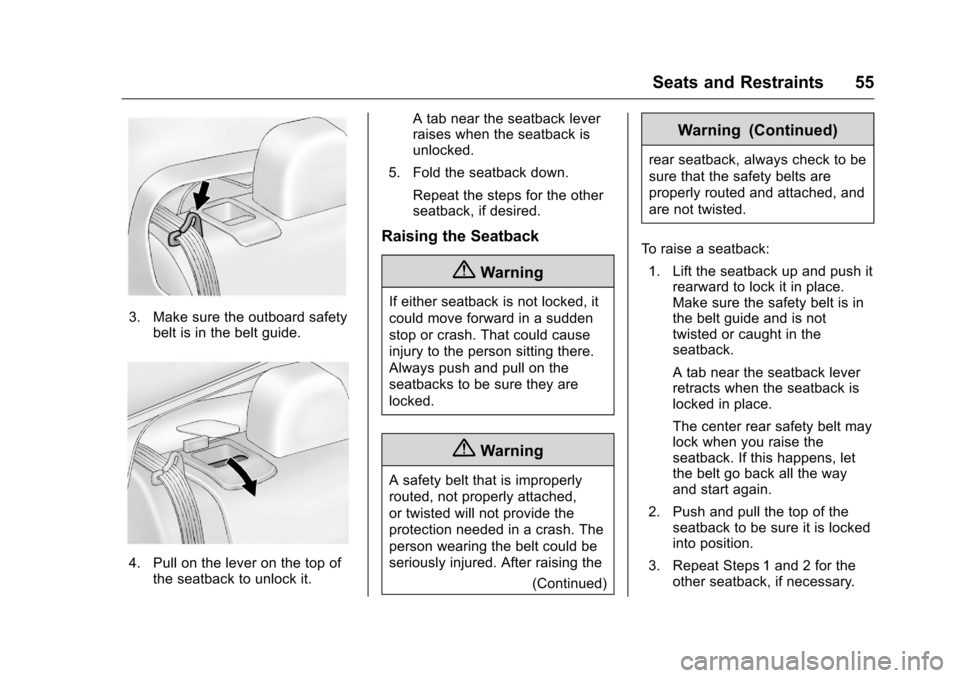
3. Make sure the outboard safetybelt is in the belt guide.
4. Pull on the lever on the top ofthe seatback to unlock it. A tab near the seatback lever
raises when the seatback is
unlocked.
5. Fold the seatback down. Repeat the steps for the other
seatback, if desired.
Raising the Seatback
{Warning
If either seatback is not locked, it
could move forward in a sudden
stop or crash. That could cause
injury to the person sitting there.
Always push and pull on the
seatbacks to be sure they are
locked.
{Warning
A safety belt that is improperly
routed, not properly attached,
or twisted will not provide the
protection needed in a crash. The
person wearing the belt could be
seriously injured. After raising the (Continued)
Warning (Continued)
rear seatback, always check to be
sure that the safety belts are
properly routed and attached, and
are not twisted.
To raise a seatback: 1. Lift the seatback up and push it rearward to lock it in place.
Make sure the safety belt is in
the belt guide and is not
twisted or caught in the
seatback.
A tab near the seatback lever
retracts when the seatback is
locked in place.
The center rear safety belt may
lock when you raise the
seatback. If this happens, let
the belt go back all the way
and start again.
2. Push and pull the top of the seatback to be sure it is locked
into position.
3. Repeat Steps 1 and 2 for the other seatback, if necessary.
Page 59 of 360

Chevrolet Malibu Limited Owner Manual (GMNA-Localizing-U.S/Canada-
9086425) - 2016 - crc - 7/30/15
58 Seats and Restraints
pelvic bones and you would be
less likely to slide under the lap
belt. If you slid under it, the belt
would apply force on your
abdomen. This could cause
serious or even fatal injuries.
. Wear the shoulder belt over the
shoulder and across the chest.
These parts of the body are best
able to take belt restraining
forces. The shoulder belt locks if
there is a sudden stop or crash.
{Warning
You can be seriously injured,
or even killed, by not wearing
your safety belt properly.
. Never allow the lap or
shoulder belt to become
loose or twisted.
. Never wear the shoulder
belt under both arms or
behind your back.
. Never route the lap or
shoulder belt over an
armrest.
Lap-Shoulder Belt
All seating positions in the vehicle
have a lap-shoulder belt.
The following instructions explain
how to wear a lap-shoulder belt
properly.
1. Adjust the seat, if the seat is adjustable, so you can sit up
straight. To see how, see
“Seats” in the Index.
2. Pick up the latch plate and pull
the belt across you. Do not let
it get twisted. The lap-shoulder belt may lock
if you pull the belt across you
very quickly. If this happens, let
the belt go back slightly to
unlock it. Then pull the belt
across you more slowly.
If the shoulder portion of a
passenger belt is pulled out all
the way, the child restraint
locking feature may be
engaged. If this happens, let
the belt go back all the way
and start again.
If the webbing locks in the latch
plate before it reaches the
buckle, tilt the latch plate flat to
unlock.