2016 BMW M4 ad blue
[x] Cancel search: ad bluePage 21 of 228

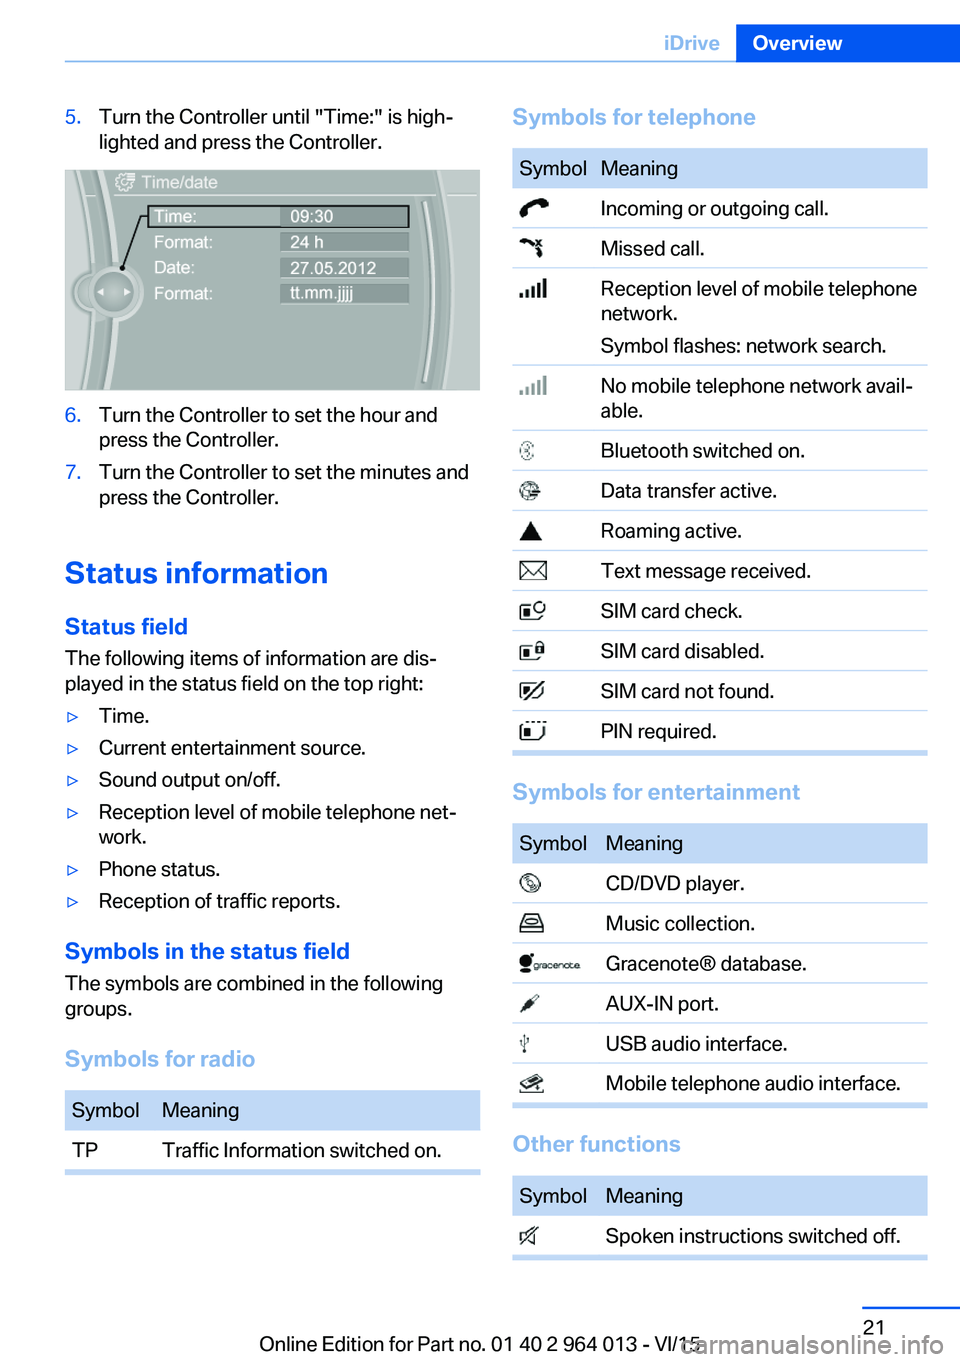
5.Turn the Controller until "Time:" is high‐
lighted and press the Controller.6.Turn the Controller to set the hour and
press the Controller.7.Turn the Controller to set the minutes and
press the Controller.
Status information
Status field The following items of information are dis‐
played in the status field on the top right:
▷Time.▷Current entertainment source.▷Sound output on/off.▷Reception level of mobile telephone net‐
work.▷Phone status.▷Reception of traffic reports.
Symbols in the status field
The symbols are combined in the following
groups.
Symbols for radio
SymbolMeaningTPTraffic Information switched on.Symbols for telephoneSymbolMeaning Incoming or outgoing call. Missed call. Reception level of mobile telephone
network.
Symbol flashes: network search. No mobile telephone network avail‐
able. Bluetooth switched on. Data transfer active. Roaming active. Text message received. SIM card check. SIM card disabled. SIM card not found. PIN required.
Symbols for entertainment
SymbolMeaning CD/DVD player. Music collection. Gracenote® database. AUX-IN port. USB audio interface. Mobile telephone audio interface.
Other functions
SymbolMeaning Spoken instructions switched off.Seite 21iDriveOverview21
Online Edition for Part no. 01 40 2 964 013 - VI/15
Page 82 of 228

▷Wheel without TPM electronics is fitted:
have the vehicle checked by a Service
Partner or a qualified specialist workshop if
necessary.▷Malfunction: have the system checked by a
Service Partner or a qualified specialist
workshop.
For more information, see Tyre Pressure Moni‐
tor, see page 107.
Steering system Steering system faulty.
Have steering system checked by a
Service Centre or a qualified specialist
workshop.
Engine functions Have vehicle checked by a Service
Centre or a qualified specialist work‐
shop.
For further information see socket for on-
board diagnosis, see page 192.
Lane departure warning System is switched on and warns you
under certain conditions if you leave a
detected lane without indicating first.
For further information see Lane Departure
Warning, see page 115.
Manual speed limiter Illuminating: the system is switched on.
Flashing: set speed limit exceeded. An
acoustic signal may sound.
Reduce speed or deactivate system.
Rear fog lights Rear fog lights are switched on.
For further information see rear fog lights, see
page 102.
Green lights Turn indicator Turn signal is switched on.If the indicator light flashes more rap‐
idly than usual, a turn signal light has
failed.
For further information see turn indicator, see
page 70.
Side lights, driving lights Side lights or driving lights are
switched on.
For further information see side lights/
low-beam headlights, low-beam headlight
control, see page 98.
High-beam assistance High-beam assistance is switched on.
High-beam headlights are switched on
and off automatically depending on the
traffic situation.
For further information see high beam assis‐
tance, see page 100.
Cruise Control The system is switched on. The speed
set using the control functions on the
steering wheel is maintained.
Blue lights
High-beam headlights High-beam headlights are switched on.
For further information see high-beam
headlights, see page 70.Seite 82ControlsDisplays82
Online Edition for Part no. 01 40 2 964 013 - VI/15
Page 99 of 228

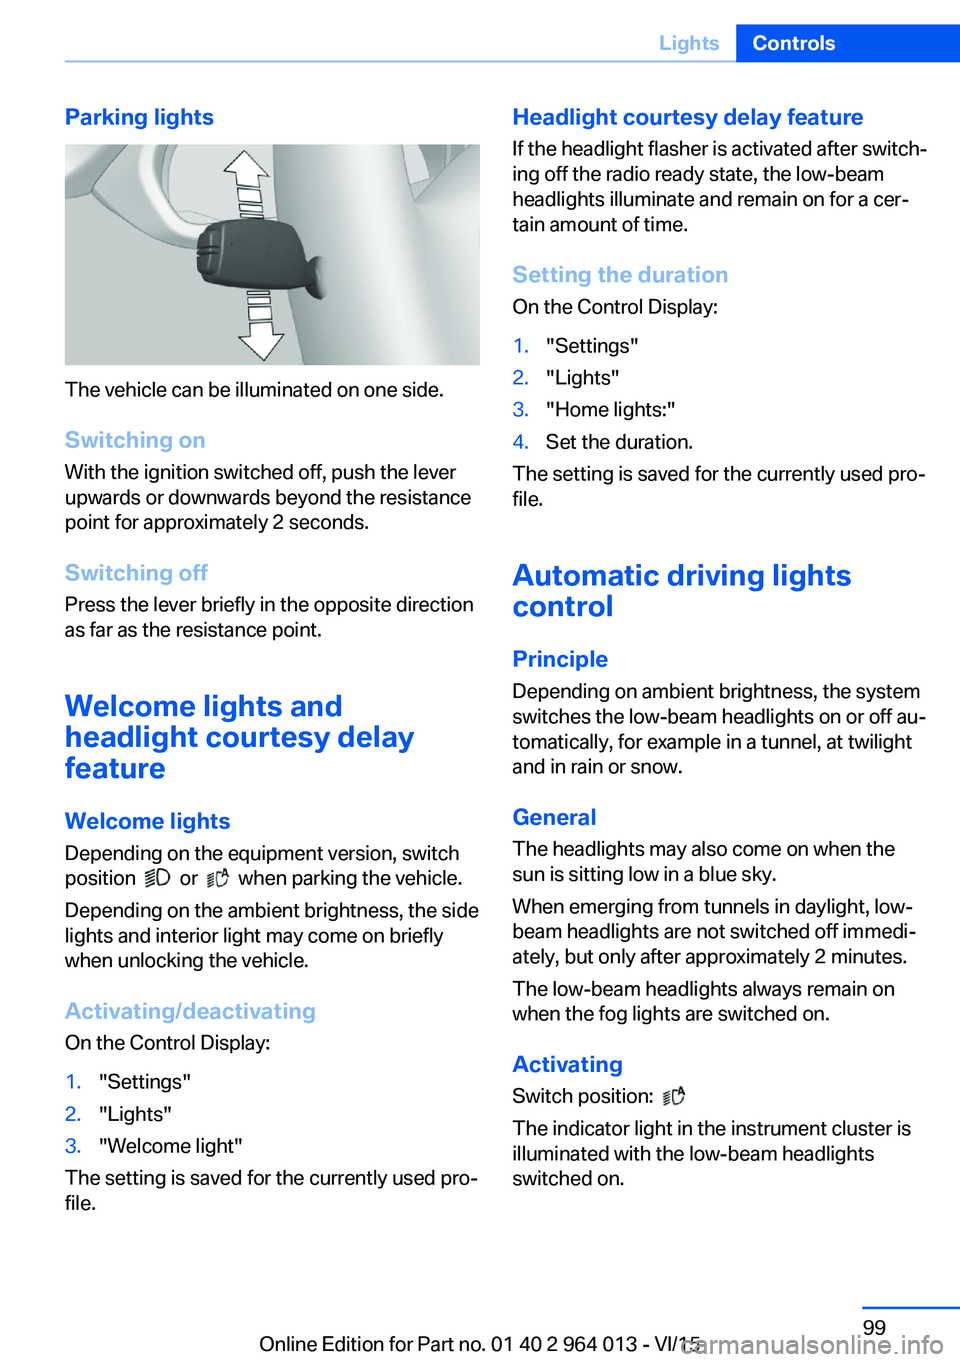
Parking lights
The vehicle can be illuminated on one side.
Switching on With the ignition switched off, push the lever
upwards or downwards beyond the resistance
point for approximately 2 seconds.
Switching off Press the lever briefly in the opposite direction
as far as the resistance point.
Welcome lights and
headlight courtesy delay
feature
Welcome lights Depending on the equipment version, switch
position
or when parking the vehicle.
Depending on the ambient brightness, the side
lights and interior light may come on briefly
when unlocking the vehicle.
Activating/deactivating
On the Control Display:
1."Settings"2."Lights"3."Welcome light"
The setting is saved for the currently used pro‐
file.
Headlight courtesy delay feature
If the headlight flasher is activated after switch‐
ing off the radio ready state, the low-beam
headlights illuminate and remain on for a cer‐
tain amount of time.
Setting the duration
On the Control Display:1."Settings"2."Lights"3."Home lights:"4.Set the duration.
The setting is saved for the currently used pro‐
file.
Automatic driving lightscontrol
Principle Depending on ambient brightness, the system
switches the low-beam headlights on or off au‐
tomatically, for example in a tunnel, at twilight
and in rain or snow.
General The headlights may also come on when the
sun is sitting low in a blue sky.
When emerging from tunnels in daylight, low-
beam headlights are not switched off immedi‐
ately, but only after approximately 2 minutes.
The low-beam headlights always remain on
when the fog lights are switched on.
Activating Switch position:
The indicator light in the instrument cluster is
illuminated with the low-beam headlights
switched on.
Seite 99LightsControls99
Online Edition for Part no. 01 40 2 964 013 - VI/15
Page 101 of 228

Activating1.Depending on equipment, turn the light
switch to position
or .
2.Press the button on the turn indicator
lever, arrow.
The indicator light in the instrument
cluster is illuminated.
When the low-beam headlights are on, the
beam is dipped and returned to full beam auto‐
matically.
The system responds to light from oncoming
traffic and traffic driving ahead of you, and to
adequate lighting, for example in built-up
areas.
The blue indicator light in the instru‐
ment cluster illuminates if the high
beam is switched on by the system.
Depending on the version of the system instal‐
led in the vehicle, the high-beam lights may
not be switched off for oncoming vehicles, but
only the areas which dazzle the oncoming ve‐
hicles are faded out. In this case, the blue indi‐
cator light continues to illuminate.
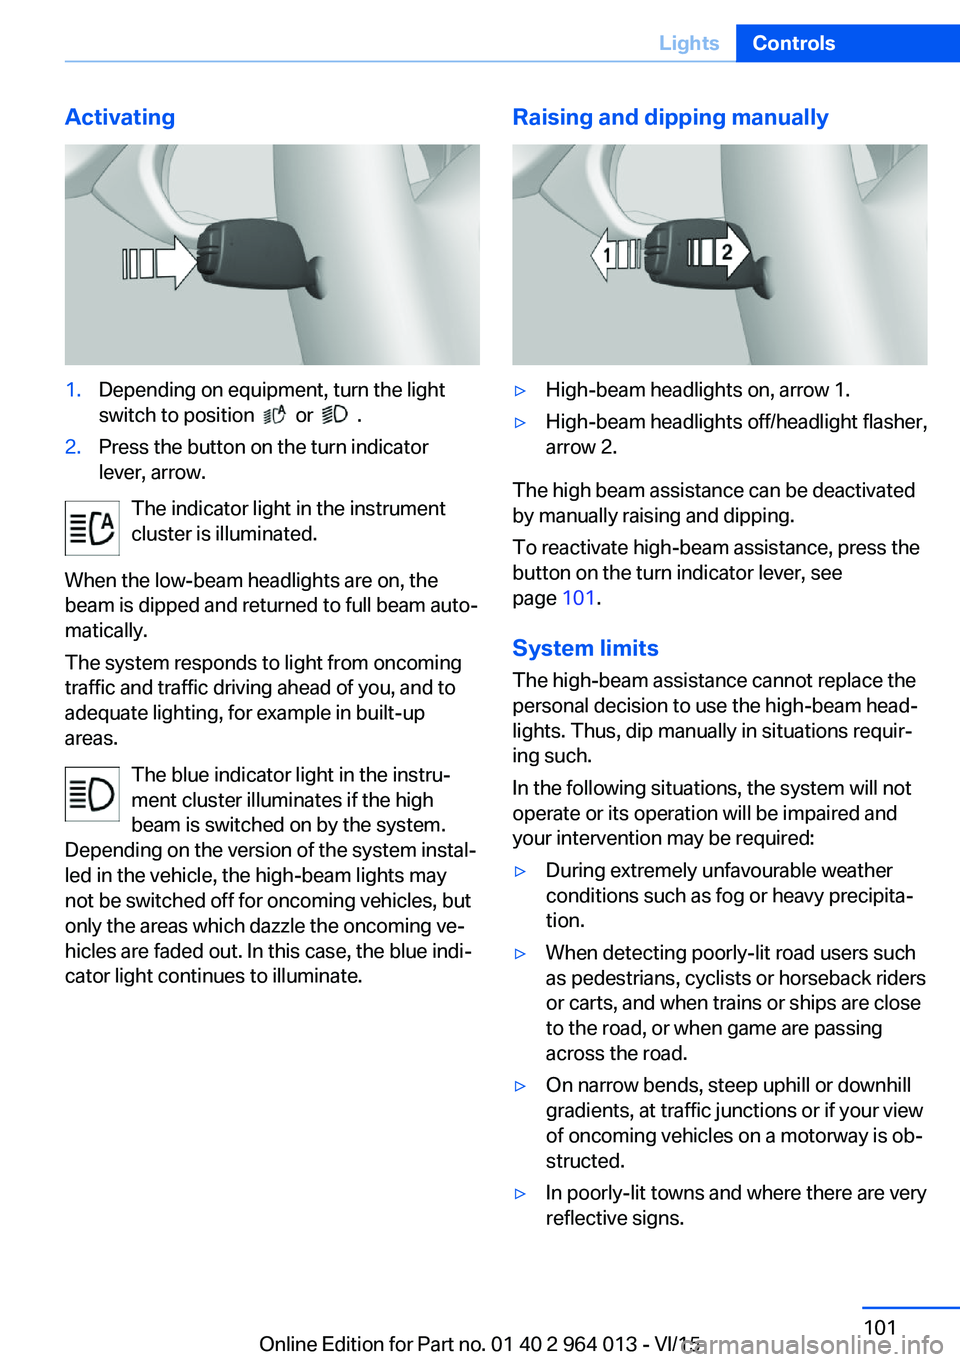
Raising and dipping manually▷High-beam headlights on, arrow 1.▷High-beam headlights off/headlight flasher,
arrow 2.
The high beam assistance can be deactivated
by manually raising and dipping.
To reactivate high-beam assistance, press the
button on the turn indicator lever, see
page 101.
System limits
The high-beam assistance cannot replace the
personal decision to use the high-beam head‐
lights. Thus, dip manually in situations requir‐
ing such.
In the following situations, the system will not
operate or its operation will be impaired and
your intervention may be required:
▷During extremely unfavourable weather
conditions such as fog or heavy precipita‐
tion.▷When detecting poorly-lit road users such
as pedestrians, cyclists or horseback riders
or carts, and when trains or ships are close
to the road, or when game are passing
across the road.▷On narrow bends, steep uphill or downhill
gradients, at traffic junctions or if your view
of oncoming vehicles on a motorway is ob‐
structed.▷In poorly-lit towns and where there are very
reflective signs.Seite 101LightsControls101
Online Edition for Part no. 01 40 2 964 013 - VI/15
Page 147 of 228

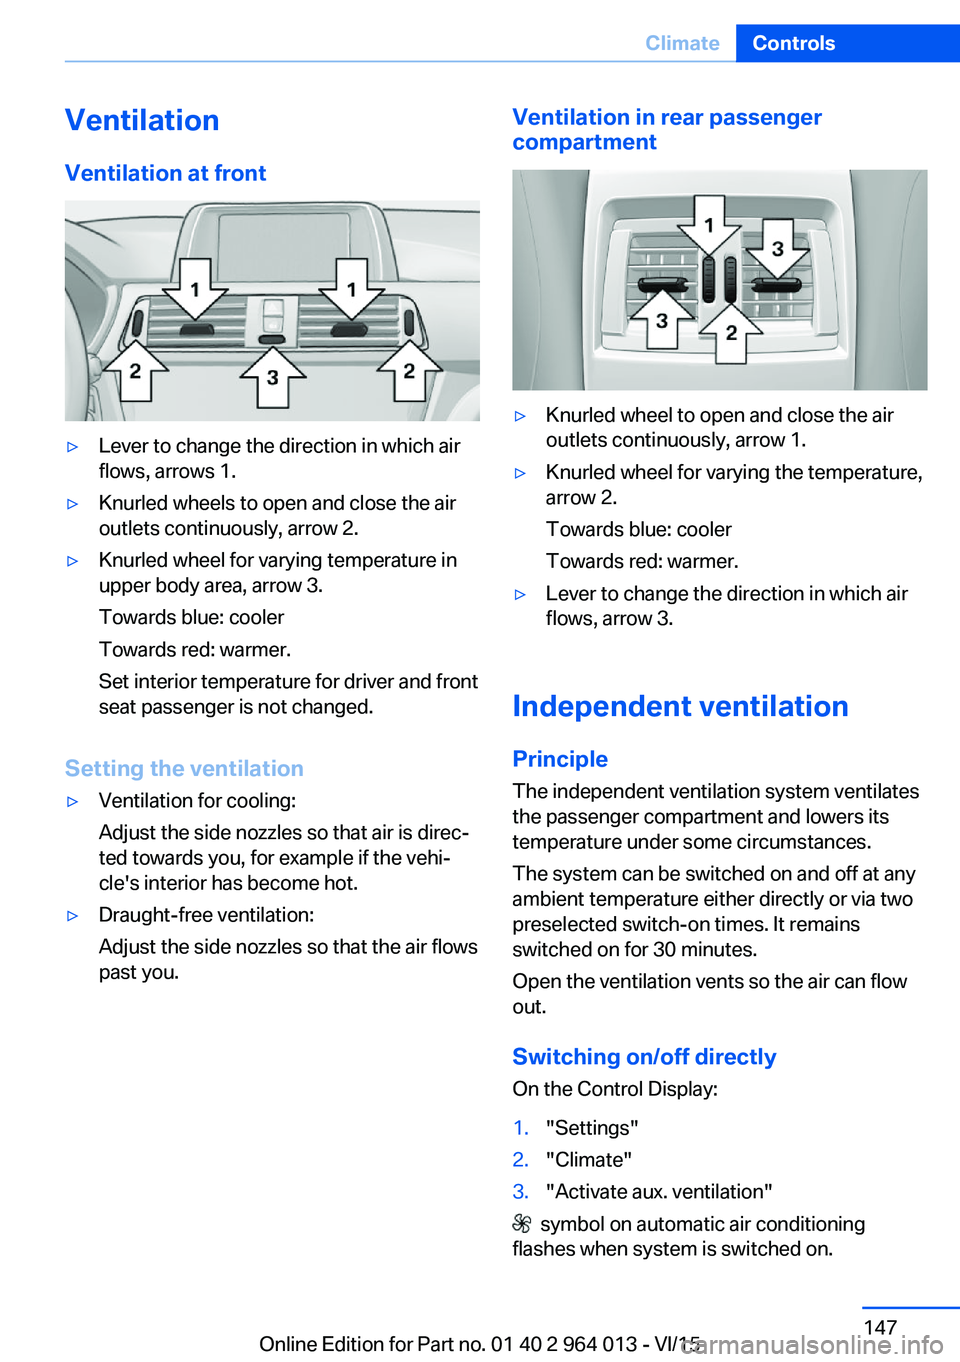
VentilationVentilation at front▷Lever to change the direction in which air
flows, arrows 1.▷Knurled wheels to open and close the air
outlets continuously, arrow 2.▷Knurled wheel for varying temperature in
upper body area, arrow 3.
Towards blue: cooler
Towards red: warmer.
Set interior temperature for driver and front
seat passenger is not changed.
Setting the ventilation
▷Ventilation for cooling:
Adjust the side nozzles so that air is direc‐
ted towards you, for example if the vehi‐
cle's interior has become hot.▷Draught-free ventilation:
Adjust the side nozzles so that the air flows
past you.Ventilation in rear passenger
compartment▷Knurled wheel to open and close the air
outlets continuously, arrow 1.▷Knurled wheel for varying the temperature,
arrow 2.
Towards blue: cooler
Towards red: warmer.▷Lever to change the direction in which air
flows, arrow 3.
Independent ventilation
Principle The independent ventilation system ventilates
the passenger compartment and lowers its
temperature under some circumstances.
The system can be switched on and off at any
ambient temperature either directly or via two
preselected switch-on times. It remains
switched on for 30 minutes.
Open the ventilation vents so the air can flow
out.
Switching on/off directly
On the Control Display:
1."Settings"2."Climate"3."Activate aux. ventilation"
symbol on automatic air conditioning
flashes when system is switched on.
Seite 147ClimateControls147
Online Edition for Part no. 01 40 2 964 013 - VI/15