2016 AUDI RS7 SPORTBACK buttons
[x] Cancel search: buttonsPage 11 of 282

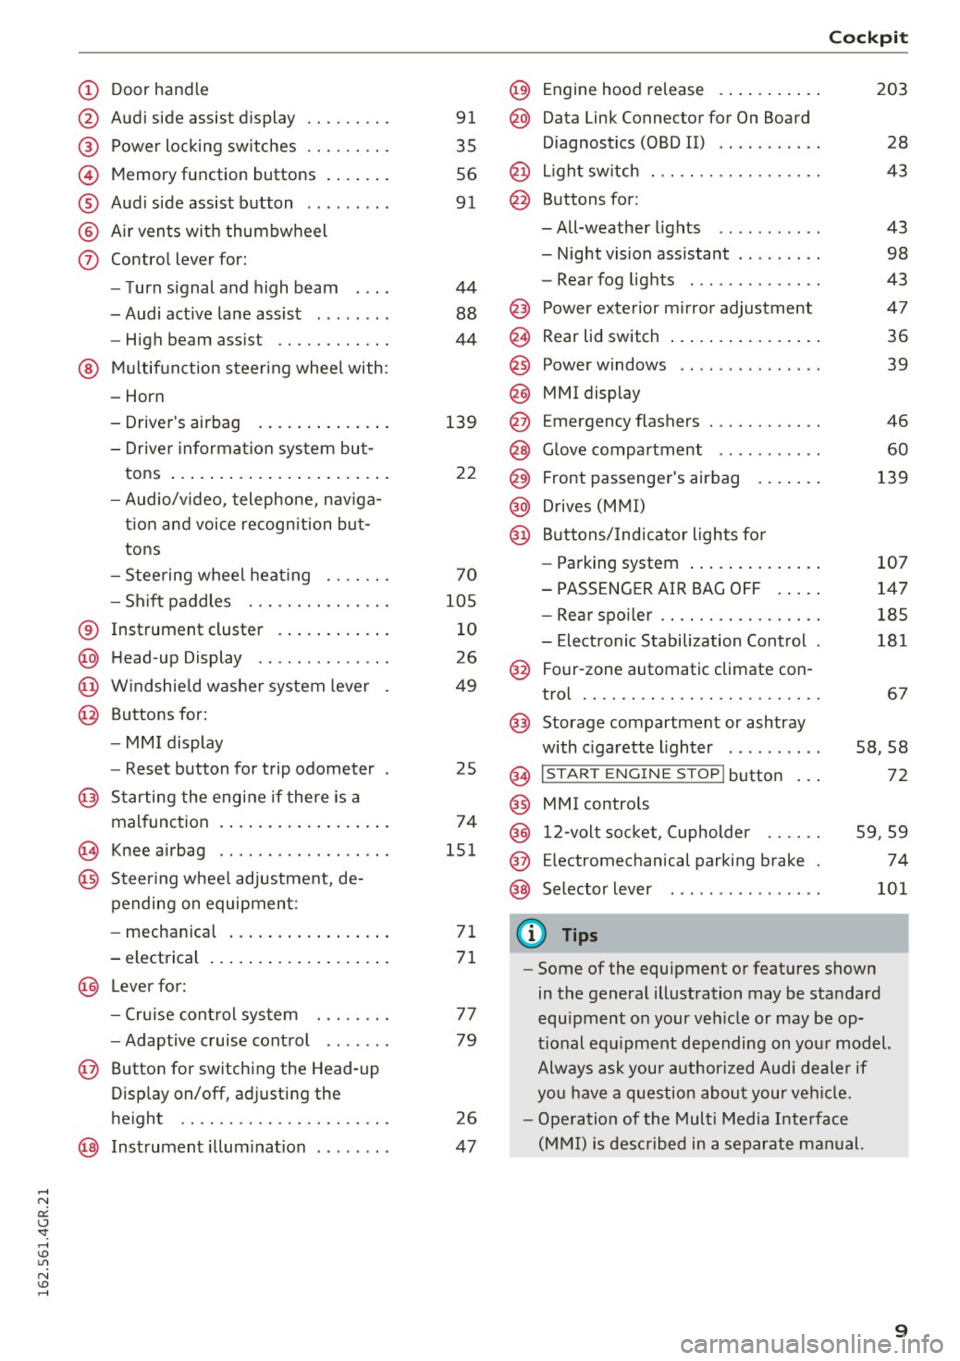
(!) Door handle
@
®
©
®
®
(j)
Audi side assist display
Power locking switches ...... .. .
Memory function buttons ...... .
Audi side assist button .. .. ... . .
Air vents with thumbwheel
Control lever for:
- Turn signal and high beam
- Audi active lane assist . .. ... . .
- High beam assist ......... .. .
@ Multifunction steering wheel with:
- Horn
- Driver's airbag
- Driver information system but-
tons ...................... .
- Audio/video, telephone, naviga
tion and voice recognition but
tons
- Steering wheel heating ...... .
- Shift paddles ............ .. .
® Instrument cluster ........... .
@ Head-up Display ............ . .
@ Windshield washer system lever
@ Buttons for:
- MMI display
- Reset button for trip odometer
@ Starting the engine if there is a
malfunction ................. .
~ Knee airbag .. ............. .. .
@ Steering wheel adjustment, de
pending on equipment:
- mechanical ................ .
- electrical
@ Lever for :
- Cruise control system ... .. .. .
- Adaptive cruise control ...... .
@ Button for switching the Head-up
Display on/off, adjusting the
height .. .. ............... .. .
@ Instrument illumination ....... .
91
35
56
91
44
88
44
139
22
70
105
10
26
49
25
74
151
71
71
77
79
26
47
@) Engine hood release .......... .
@ Data Link Connector for On Board
Diagnostics (OBD II) .... ...... .
@ Light switch . .. .............. .
@ Buttons for :
-All-weather lights - Night vision assistant .. ...... .
- Rear fog lights ............. .
@ Power exterior mirror adjustment
@ Rear lid switch ............... .
@
@
@ Power windows
MMI display
E mergency flashers
@ Glove compartment .......... .
@ Front passenger's airbag ...... .
@ Drives (MMI)
@ Buttons/Indicator lights for
- Parking system ............. .
- PASSENGER AIR BAG OFF .... .
- Rear spoiler .. .............. .
- Electronic Stabilization Control .
@ Four-zone automatic climate con-
trol .... .... .. .............. .
@) Storage compartment or ashtray
with cigarette lighter ......... .
@ I ST AR T ENGINE ST OP ! button
@ MMI controls
@
@
@ 12-volt socket, (upholder
E lectromechanical parking brake
Selector lever
(D Tips
Cockpit
203
28
43
43
98
43
47
36
39
46
60
139
107
147
185
181
67
58,58
72
59 ,59
74
101
- Some of the equipment or features shown
in the general illustration may be standard
equipment on your vehicle or may be op
tional equipment depending on your model.
Always ask your authorized Audi dealer if
you have a question about your vehicle.
- Operation of the Multi Media Interface
(MMI) is described in a separate manual.
9
Page 25 of 282

-Always reduce your speed and drive with
special care in cold weather cond itions when
the chance of encountering icy road surfaces
increases.
(D Tips
- If the vehicle is stat iona ry, o r if you are driv
i ng at a very low speed, the temperature
s hown in the d isp lay m ight be slightly high
er t han the actual outside temperature. T his
i s caused by t he heat be ing radiated from
t h e eng ine.
- You can select the u nits used for temp era
ture, speed and othe r measureme nts in the
MM I.
- Fo r info rmation o n the a udio/video and nav
i ga tion* func tions, re fer to the s epa ra te
M MI owner's manual.
Operation
The driver information system is operated using
the buttons on the multifunc tion steering wheel.
F ig. 6 M ultifunct io n steering wheel: operating the driver
info rmation system
Fig. 7 In strume nt cluste r: o penin g the vehicle funct ions
menu
Instruments and indicator lights
Operating
.,. Switch t he igni tion on.
.,. To switch be twee n the tabs, p ress the rocker
sw itch
(D to the left o r right¢ fig. 6 .
.,. To access additiona l information below or
above, t urn the th umbwheel @down or up .
.,. To confirm a selection, p ress the thumbwheel
@.
.,. To open the submenu for an ac tive tab , press
the button [ii@.
.,. To sele ct a func tion p rogrammed to a steering
wheel button *, p re ss the butto n @ .
Opening the Vehicle functions
.,. Select the first tab with the rocker sw itch (D .
.,. Press the~ button @. The Vehicle functions
menu is disp layed ¢ fig. 7.
.,. To sele ct a men u it em, turn an d press the
t humbwhee l@ .
Resetting values to zero
.,. In the Vehicle functions menu, select On
board computer or Efficiency program .
.,. You ca n now se lec t b etw een the long-term
memory an d short- term memory .
.,. To reset the val ue s in a m emo ry, pres s and hold
the t humbwheel @for one se cond.
Assigning a function to a programmable
steering wheel button*
.,. Sele ct the I CAR ! fun ction butt on> (Car) *Sy s
tem s
contro l butto n > Vehicle settings > Steer
ing wheel button programming .
The la st fun ction sele cte d di spla ys w hen yo u
swi tch the ig nition on.
On-board computer
Fi g. 8 Instrument cluster: fuel consu mptio n display
23
Page 35 of 282

unlocked to give access to the vehicle
occupants from the outside.
- If the power locking system should ma l
function, you can lock the driver's door us ing the mechanical key¢
page 36.
- If the power locking system should fail, you
can still open the fuel tank flap in an emer
gency ¢
page 201.
- You are well advised not to keep valuables
inside an unattended vehicle, visible or not.
Even a properly locked vehicle cannot pro
vide the security of a safe.
- If the LED in the upper edge of the driver's
door panel comes on for about 30 seconds
after the vehicle is locked, there is a mal
function in the power locking or the anti
theft warning system. Have the malfunction
corrected by an authorized Audi dealership
or qualified repair facility.
Setting central locking
In the Infotainment system, you can set which
doors the central locking system will unlock .
.. Select: the ICARI function button > (Car)* Sys
tems control button > Vehicle settings > Cen
tral locking*.
Door unlocking -
You can decide if All doors or
only the
Driver should unlock . The luggage com
partment lid also unlocks when
All is selected . If
you select
Driver in a vehicle with a convenience
key*, only the door whose handle you pull will un
lock.
If you select Driver, all the doors and luggage
compartment lid will unlock if you press the~
button on the remote control master key twice.
Disable tailgate handle -If you select On, the
luggage compartment lid handle is locked . In
this case the luggage compartment lid can be opened with the
! ""'I button on the master key or
with the
l=I button* in the driver's door. In
vehicles with a convenience key*, you can still
open the luggage compartment lid using the
handle if an authorized master key is near the
proximity sensor* .
Opening and closing
Fold mirrors when locking* -If you select On,
the exterior rearview mirrors fold in automatical
ly when you press the~ button on the remote
control master key or touch the sensor* in the
handle.
Lock when driving -If you select On, the vehicle
locks automatically when driving. All of the doors
and the luggage compartment lid lock.
Tone when locking -if you select On, a tone will
sound when you lock the vehicle.
Locking and unlocking the vehicle with the
remote control
Fig. 22 Remote con trol: fu nct io n buttons
Either the driver's door only or the entire vehicle
will unlock when the unlock button
m (@ ) is
pressed once, depending on the settings in the
MMI ¢page33.
"'Press button CD(@ ) to unlock the vehicle
¢fig. 22.
.. Press button G'.l (@ ) to lock the vehicle ¢ & in
General description on page 32.
.,. Press button C:5 (@ ) briefly to unlock the rear
lid .
• Push the red
!PANIC I button( @) to activate the
panic function . The horn sounds and the turn
signals flash . Push the red
I PANIC I button again
to deactivate the panic function.
If the vehicle is unlocked and no door, the rear lid
or the hood is opened within 60 seconds, the ve
hicle locks itself again automatically. This feature
prevents the vehicle from being accidentally left
unlocked over a long period of time. ..,.
33
Page 41 of 282

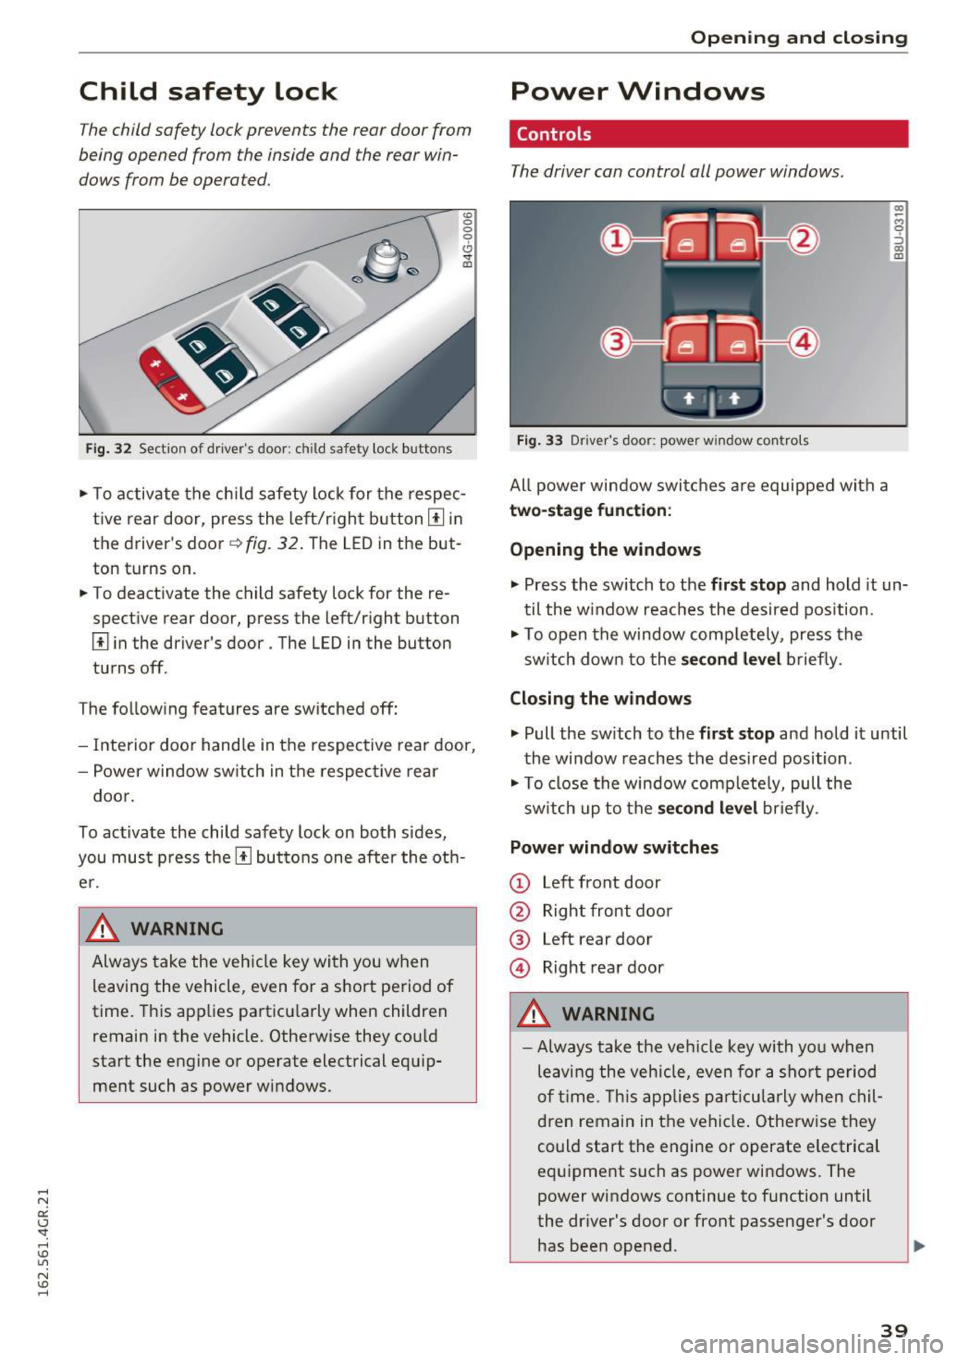
Child safety lock
The child safety lock prevents the rear door from
being opened from the inside and the rear win
dows from be operated.
Fi g. 32 Section of d river's doo r: ch ild safety lock buttons
"' 0
0
0
0 ,,. !II
"'T o activate the ch ild safety lock for the respec
t ive rear door, press the le ft/r igh t button
III in
the driver's door~
fig. 32 . The LED in the but
ton turns on.
"' To deact ivate the child safety lock for the re
spect ive rear door, press the left/r ight button
III i n the driver's door . The LED in the button
tu rns off.
T he fo llow ing features are switched
off:
- Interior doo r hand le in t he respec tive rear door,
- Power w ind ow sw itch in t he respec tive rear
doo r.
To activate the child safe ty lock on both sides,
you mu st press the
III bu ttons one after the ot h
e r.
A WARNING ~
Alw ays take the veh icle key wi th you w hen
leaving the vehicle, even for
a s hort pe riod of
time . This app lies pa rt icu la rly when children
remain in the ve hicle. Otherw ise they co uld
sta rt the engine o r ope rate electrical equ ip
ment such as power wi ndows .
Open ing and closing
Power Windows
Controls
The driver can control all power windows .
Fig. 33 Driver 's door: power w indow co ntro ls
All powe r window swi tches are equipped with a
two-stage function :
Opening the windows
(0 ~ M 0 :::, (0 m
"' Press the switch to t he first stop and hold it un
t il the w indow reaches the desired position.
"' To op en the window comp letely, press the
sw itch dow n to the
second level briefly .
Closing the windows
"' Pull the sw itch to the first stop and hold it until
the window reaches the desired position .
"' To close the window com plete ly, pull the
sw itch up to the
second level briefly .
Power window switches
CD Left front door
@ Right front doo r
® Left rear door
@ Right rear door
A WARNING
=
- Always take the ve hicl e key with yo u when
le av in g the vehicle, even for a sh ort p eriod
o f time . T his app lies par tic ula rly whe n chil
d ren remain in t he ve hicl e. Otherwise they
could start the engine or operate e lectrical
equ ipment such as powe r windows . The
power wi ndows continue to f unction until
the dr iver's door or front passenge r's door
has bee n opened .
-
39
Page 43 of 282

@ Opening/sliding (ver sion 2 )
• To open the sunroof completely , press the
switch back to just before the second level.
• To close the sunroof comp letely, press the
switch forward briefly to the second level¢
A_.
• To select an intermediate position, press/pull
the switch forward/back to the first level until
the desired position is reached .
T he sun shade can be opened and closed by hand
when the roof is closed. The sun shade opens au
tomatically when the roof is opened.
You can still operate the sliding/tilting sunroof
for about 10 minutes after the ignition is switch
ed off. The switch is deactivated once the driver's
or front passenger 's door is opened.
A WARNING
Pay careful attention when closing the slid
ing/tilting sunroof - otherwise serious injury
cou ld result! Always take the ign ition key with
you when leaving the vehicle .
0 Note
Always close your sliding/tilting sunroof when
leaving your veh icle. Sudden ra in can cause
damage to the interior eq uipment of your ve
hicle, particularly the electronic equ ipment.
a) Tips
- For information on convenie nce opening, re
fer to¢
page 40.
- The sunroof will only open down to -20 °C
(-4 °F) .
Sunroof power emergency closing
I f the sunroof detects an object in its path when
it is clos ing, it w il l open again automatically. In
this case, you can close the roof w ith the power
emergency closing function.
• Wi thin five seconds after the sunroof opens au
tomat ically, pull the switch until the roof
closes.
I f you let go of the sw itch early, the sunroof will
open again.
Op enin g an d clos ing
Garage door opener
(Homelink)
Description
Applies to: vehicles with garage door opener (Home link)
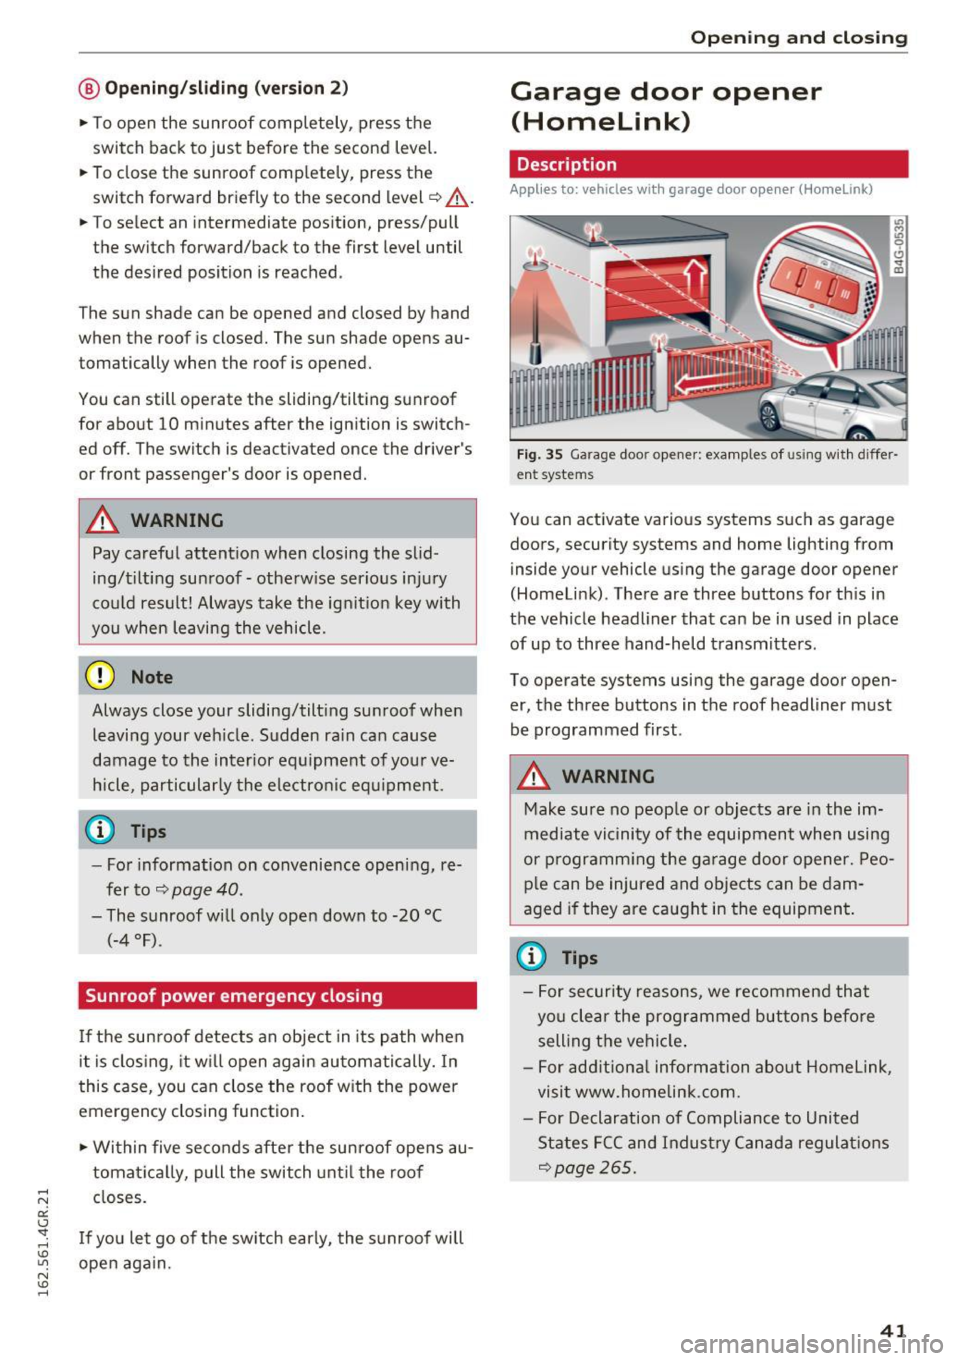
F ig. 35 Garage door opener: examples of using w it h differ
en t systems
You can activate various systems such as garage
doors, security systems and home lighting from
inside your vehicle using the garage door opener
(Homelink) . There are three buttons for th is in
the vehicle headliner that can be in used in place
of up to three hand-held transmitters .
To operate systems using the garage door open er, the three buttons in the roof headliner must
be programmed first.
A WARNING
-Make sure no peop le or objects are in the im-
mediate vicinity of the equipment when using
or p rogramm ing the ga rage door opener. Peo
p le can be injured and objects can be dam
aged if they are caught in the equipment.
(¼} Tips
- For security reasons, we recommend that
you clear the programmed buttons befo re
selling the vehicle .
- For add itiona l information about Homelink,
visit www.homelink.com.
- For Declaration of Compliance to United
States FCC and Indust ry Canada regulations
¢page 265.
4 1
Page 44 of 282

Opening and clo sin g
Programming buttons
Applies to: vehicles with garage door opener (Homelink)
Fig. 36 Headlin er: co ntro ls
You can program both fixed code and rolling code
systems using this procedure .
P rog ramming /reprog ramming button s
• Switch the ignition on.
• Press and hold the button in the headliner that
you wou ld like to progr am for at leas t 10 sec
onds. Or
• Select :
~ IC~A~ R~ I funct ion button> ( C ar )* Sy stem s
contro l button > Vehicle sett ing s > Gar age
door opener > Pr ogram garag e do or op en er.
• Fo llow the instruc tions in the Infota inment sys
tem.
Del eting button prog ramming
The programmed buttons cannot be deleted ind i
vidually, they must be de leted all at once . Repro
gram the buttons if necessary.
• Select : the
ICARI function button > (Car )* Sys
t e ms
control button > Vehicle settings > Ga
rage doo r opener
> Cl ea r program settings >
Ye s.
Displ aying the version /statu s/country code
• Select :
IC AR I fun ction button > (Ca r)* Sy st ems
control button > Vehicl e sett ing s > Garag e
door open er > Ver sion information .
(D Tips
The garage door opener may need to be synchronized w ith the system motor after the
programming . Follow the manufacturer's in
st ructions for doing th is.
42
Operation
Applies to: vehicles with garage door opener (Home link)
Requirements : the button in the roof head liner
mus t be programmed ~
page 42 and the vehicle
must be w ithin range of the system, such as the
garage door.
• Press the button to open the garage door. The
L E D @ ¢
page 42, fig. 36 blinks or turns on .
• Press the button again to open the garage
door.
(D Tips
To ope n or close the garage door, do not
press the button longer ten seconds or the
garage door opener will switch to p rogram
ming mode .
Page 58 of 282

Sea ts and stor age
Rear head restraints
Applies to: ve hicles w ith adj ustable head restra ints
/
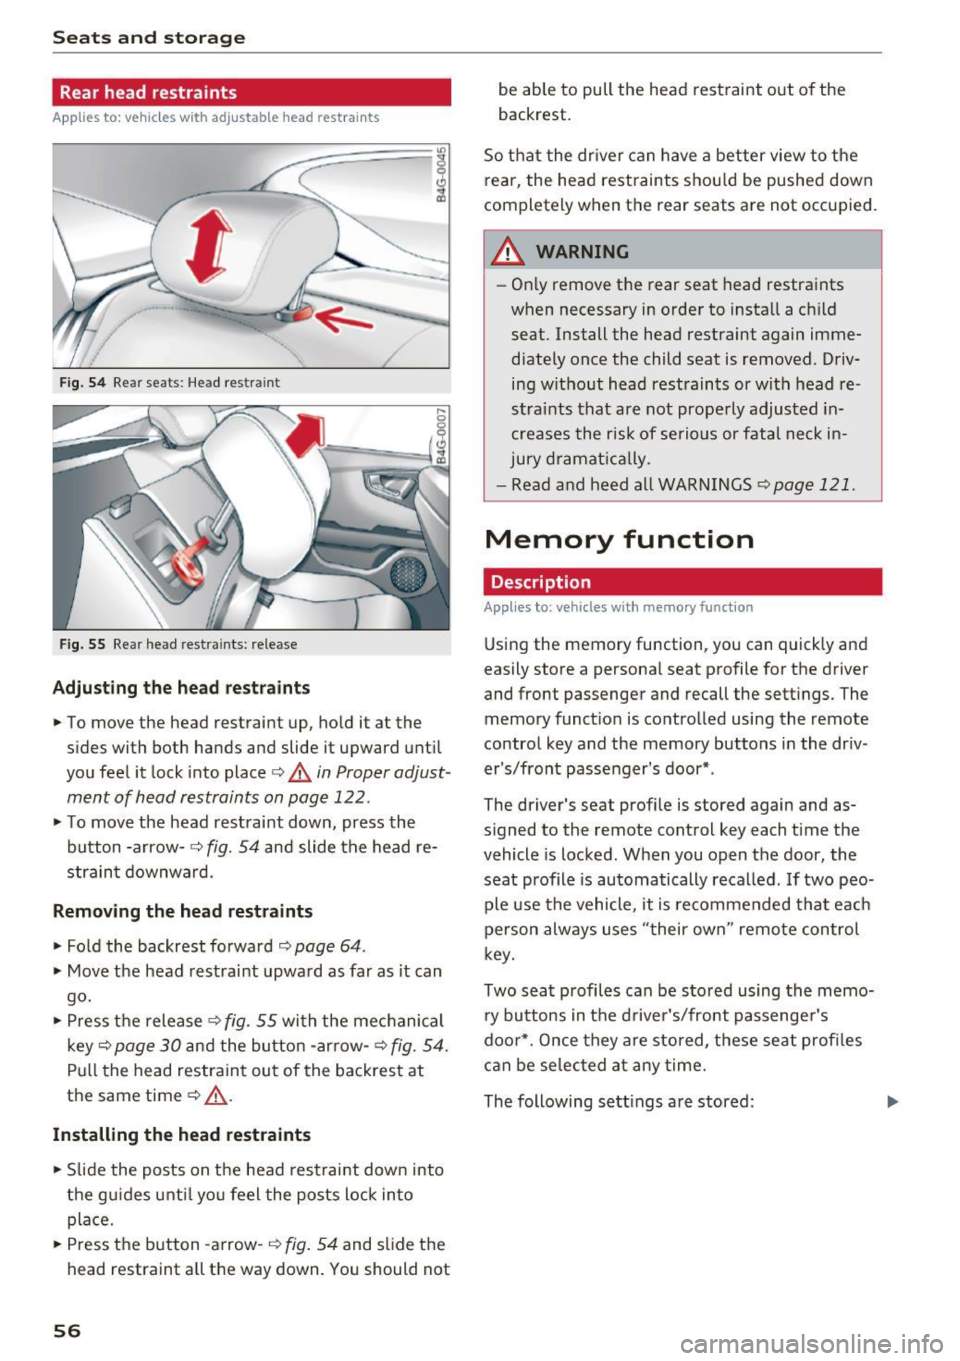
Fig. 54 Re ar seats: Head res train t
Fig . 5 5 Re ar head rest ra in ts: re lease
Adjust ing th e he ad rest raints
• To move the head restraint up, ho ld i t a t the
s ides with both hands and slide it upward unt il
you feel it lock into place
c::> A in Proper adjust
ment of head restraints on page 122.
• To move the head rest raint down, press the
button -arrow -
c::> fig. 54 and slide the head re
strain t downward .
Removing the head restraints
• Fold the backrest forward o page 64 .
• Move the head restrai nt upwa rd as far as it can
go.
• Press the release
c::> fig . 55 with the mechanical
key
c::> page 30 and the button -arrow-c::> fig . 54.
Pull the head restraint out of the backrest at
the same time
o .&_ .
Installing the head rest ra ints
• Slide the posts on t he head restraint down into
the gu ides unti l yo u feel the posts lock in to
place.
• Press the button -a rrow-
c::> fig. 54 and slide the
head restraint all the way down. You should not
56
be able to pull the head restraint out o f the
backrest.
So that the dr ive r can have a better view to the
rear, the head rest raints shou ld be pushed down
completely when the rear seats are not occupied .
A WARNING
-On ly remove the rear seat head restraints
when necessary in order to install a ch ild
seat . Install the head restraint again imme
diately once the child seat is removed . Driv
ing without head restraints or with head re
stra ints that are not prope rly adjusted in
creases the risk of serio us or fata l neck in
jury d ramat ica lly .
- Read and heed all WARN INGS
<=> page 121.
Memory function
Description
Applies to : vehicles wi th memo ry function
Using the memory function, you can quick ly and
easily store a personal seat profile for the dr iver
and front passenger and recall the sett ings. The
memory funct io n is co ntrolled using the remote
control key and the memory buttons in the dr iv
er's/front passenger's door* .
-
The driver' s seat prof ile is sto red aga in and as
s igned to the remote control key each time the
vehicle is locked . When you open the door, the
seat profile is automatically recalled .
If two peo
ple use the vehicle , it is recommended that eac h
person always uses "t heir own" remote control
k ey.
Two sea t profiles can be stored using the memo
ry bu ttons in the d rive r's/front passenge r's
doo r*. Once they are stored, these seat profi les
can be selec ted at any time.
The following sett ings are stored :
Page 59 of 282

Remote Memory button control key
Driver D river Front
passen-ger
Seat X X X
Steering wheel* X X
Both
exterior X X
mirrors*
Remote control key
Applies to: vehicles with memory function
The driver's seat profile can be assigned to the
remote control key when the vehicle is locked.
• Select: the ICARI function button > (Car)* Sys
tems
control button > Vehicle settings > Driv
er's seat
> Remote control key > On .
(D Tips
If you do not wish to have the seat profile for
another driver assigned to the remote control
key, switch the memory function off in the In
fotainment system or using the IOFFI button
r:::;,pag e 57.
Memory buttons
Applies to: vehicles with memory function
Fig. S6 Driver 's door: memory function buttons
The memory buttons are located in the driver's/
front passenger's door*.
Switching the memory function on/off
• Press the IOFFI button to switch the memory
function on/off. The
LED in the button turns on
Seats and storage
when the memory function is off . Seat profiles
are neither stored nor recalled.
Storing a seat profile
• Press thelSETI button. When the word SET
lights up, the memory is ready to store set
tings .
• Now press a memory button briefly.
A tone
confirms that the settings were stored.
Accessing a seat profile
• If the driver's door is open and the ignition is
sw itched off, press the memo ry button.
.. If the driver's door is closed or the ignition is
switched on, press and hold the memory but
ton until the seat adjustment is complete .
A WARNING
-For safety reasons, the seat setting can only
be recalled when the vehicle is stationary,
otherwise the re is a risk of an accident.
- If necessary, you can stop the recall process
by press ing the IOFFI button or any memory
button.
Adjusting the front passenger's seat in the
Infotainment system
Applies to: vehicles with memory function
The driver can move the front passenger's seat
into various positions.
Adjusting the front passenger's seat from
the driver's seat
• Select: the I CAR I funct ion button > (Car) * Sys
tems
contro l button > Vehicle settings > Seats
> Front passenger's seat > Adjust seat posi
tion .
• You can now adjust the front passenger's seat
using the driver's seat buttons
r:::;, page 53,
fig.
so.
Align with driver's seat
• To transfer the settings from the driver's seat
to the front passenger's seat, select: the I CAR I
fu nction button
> (Car)* Systems control but
ton >
Vehicle settings> Seats > Front passeng-
er 's seat > Align with driver 's seat. ..,.
57