2016 AUDI A6 outside temperature
[x] Cancel search: outside temperaturePage 12 of 294

Instruments and indicator lights
Instruments and indicator Lights
Instruments
Instrument cluster overview
The instrument cluster is the central information center for the driver.
Fig. 3 Instrument cluster overv iew
(D Engine coolant temperature gauge
@ Tachometer .... .. .. ..... .... .
- with status indicator
OFF .... .
-with status indicator READY .. .
@ Turn signals .... ........... .. .
© Display with
- Driver information system .... .
- Indicator lights ............ .
® Tachometer 10
11
74
79
45
23
11
@ Fuel
level . . . . . . . . . . . . . . . . . . . . 11
a) Tips
The instrument illumination for the needles
and dials turns on when the ignition is turned
on and the lights are turned off. The illumina
t ion fo r the dials reduces automatically and
eventua lly turns off as brightness outside in
creases . This function reminds the driver to
turn the headlights on at the appropriate
time.
Engine coolant temperature gauge
The engine coo lant gauge (D Q page 10, fig. 3
only works when the ign ition is on. To prevent
10
damage to your engine, please note the follow
ing important points:
Engine cold
If only the LEDs at the bottom of the gauge turn
on, the engine has not reached operating tem
perature yet. Avoid high engine speeds, heavy en
gine loads and heavy throttle applications.
Normal temperature
The engine has reached its operating tempera
ture once the LEDs up to the center of the gauge
turn on under normal driving conditions. The
LEDs higher up may turn on when the engine is
under heavy load or the exterior temperature is
high . Th is is no need to worry as long as the.
warning light in the instrument cluster does not
ill uminate .
If the LEDs in the upper area of the
display and the indicator light. in the instru
ment cluster display turn on, the coolant temper
atu re is too high
Qpage 15.
A WARNING
-Always observe the warning in <9page 216,
before opening the hood and checking the
engine coolant level.
Page 13 of 294

-Never open the engine hood if you see or
hear steam, or if you see engine coolant
dripping from the engine compartment. You
could burn yourself. Let the engine cool off
first until you can no longer see or hear steam or coolant escap ing .
Q) Note
-Mounting additional lights or accessories in
front of the air inlets reduces the cooling ef
fect of the radiator. At h igh outside temper
atures or h igh engine load, the engine cou ld
ove rheat.
- The front spoiler has been designed to prop
erly distribute the cooling air when the veh i
cle is moving.
If the spoiler is damaged, this
could red uce the cooling effect and the en
gine could then overheat . Ask your author
ized Audi dealer for assistance.
Tachometer
The tachometer displays the engine speed in rev
olutions per minute (RPM).
You shou ld shift to the next lowest gear when
the speed is below 1500 RPM. The beginning of
the red zone in the tachometer indicates the maximum permissib le engine speed for all gears
once the engine has been broken in and when it is
warmed up to operating temperature. Before reaching the red zone, you should shift into the
next h igher gear, choose the Dor S selector lever
position, or remove your foot from the accelera
tor pedal.
CD Note
The tachometer needle© c::> page 10, fig. 3
should only be in the red zone br iefly: other
w ise, this increases the risk of e ngine dam-
age. The location where the red zo ne begins
varies depend ing on the eng ine.
@, For the sake of the environment
Upshifting early helps you to save fuel and re
duce operating noise.
In strum ents an d ind ic a to r ligh ts
Fuel level
The fue l gauge only works when the ignition is
on.
If t h e fue l level drops below 2.6 gallons (10
lite rs), the bottom LED turns red and the indica
tor light
t]J turns on c::> page 21. The bottom
LED blinks red when the fue l level is very low.
T he possible range based on the c urrent fue l lev
el is shown in tab@c::>
page 23, fig . 4 .
Fo r the tank capacity in your veh icle, refer to the
T echn ica l Data c::>
page 2 71.
CD Note
Never drive until the tank is completely emp
ty. The irregu la r supply of fuel that resu lts
from that can cause t he engine to m isfire. Un
combusted f uel w ill then en ter the exha ust
system . This can cause ove rheating and dam
age to the catalytic converter.
Indicator lights
Description
T he ind icator lights in the instrument cluster
blink or turn on. They i ndicate functions o r mal
funct ions c::>
.&,.
Messages may appear with some ind icator lights.
A war ning s ignal will sound at the same time.
T he ind icator lights and messages in the ce nte r
of the disp lays may be replaced by other displays.
T o s how them again, select the tab for indicator
li gh ts and messages using the m ultifunction
steering wheel c::>
page 23. If there are several
malfunctions, you can display them one at a time
us ing the thumbwheel.
Some indicators lights in the display can t urn on
in several colors.
A WARNING
- Fai lure to heed wa rning lights and other im
portant vehicle information may result in
serious personal injury or vehicle damage.
- Whenever stalled or stopped for repair,
move the vehicle a safe d istance off the
road, stop the engine, and turn on the
emergency flasher c::>
page 47.
11
Page 22 of 294

Instruments and indicator lights
USA models the warning light l'iJ comes on to
gether with the warning light
1111. Both sets of
brake pads on an axle must always be replaced at
the same time.
.,&. WARNING
Driving with bad brakes can cause a collision
and serious personal injury .
- If the warning light
l'iJ and the warning
light
11111> with the message Brake pads!
comes on in the instrument cluster display,
immediately contact your authorized Audi
dealer or qualified workshop to have all
brake pads checked or replaced if necessary.
EPC Electronic power control
App lies to veh icles: w ith gaso li ne engine
This warning/indicator light monitors the elec
tronic power control .
The~ warning/indicator light (Electronic Power
Control) illuminates when you switch the ignition
on as a function check.
(D Tips
If this warning/indicator light illuminates
while you are driving, then there is a malfunc
tion in the engine electronics. Have the mal
function corrected as soon as possible by your
authorized Audi dealer or qualified repair fa
cility.
W Glow plug system
App lies to veh icles: w ith d iesel e ngi ne
The control light illuminates when the glow plug
system is active.
If the IJ indicator light illuminates, the glow
plug system is active . You should start the engine
immediately after the indicator light switches
off. The indicator light only illuminates for ap
proximately 1 second if the engine is warm or if
the outside temperature is above 46 QF (8 QC).
l) •= USA mo del s only
20
(D Tips
- If the glow plug indicator light illuminates
while driving, there is an engine control
malfunction. The engine should be checked
immediately .
- If the indicator light does not illuminate at
all when switching the ignition on, there
may be a malfunction in the glow plug sys
tem . The engine should be checked .
o Malfunction Indicator Lamp (MIL)
The Malfunction Indicator Lamp (MIL) is part of
the On-Board Diagnostic (OBD II) system. The
symbol
¢'4 lights up when the ignition is switch
ed on and will turn off after the engine has start
ed and has settled at a constant idle speed. This
indicates that the MIL is working properly.
The warning light illuminates when there is a
malfunction in the engine electronic system.
Contact your authorized Audi dealer and have the
malfunction corrected.
An improperly closed fuel filler cap may also
cause the MIL light to illuminate
~ page 210.
For more information ~ page 28.
· ~ Diesel particulate filter
Applies to veh icles : wi th diese l eng ine a nd diese l part iculate
filter
II Particulate filter: System fault See owner's
manual
The diesel particulate filter requires regenera
tion. To support the filter's self-cleaning func
tion:
Drive for approximately 15 minutes with these
lector lever in the S position at a minimum speed
of 37 mph (60 km/h) and an engine speed of ap proximately 2,000 RPM. The temperature in
crease that will result from this can burn off the
soot in the filter. The symbol will switch off when
the cleaning is successful. .,.
Page 23 of 294

.... N
0 <.J 'SI:
If the indicator light does not turn off, drive im
mediately to an authorized Audi dea ler or author
ized Audi Service Fac ility to have the malfunction
corrected.
_&. WARNING
Always adapt your speed to the current
weather, road and traffic conditions . You
should never disobey traffic laws in order to
follow driving recommendations.
(D Tips
For additional information on the diesel par
ticulate filter, refer to
c:> page 196.
! 7l Engine speed limitation
A ppl ies to vehicles: with e ngin e s pee d l imitat ion
(II Engine speed maximum XXXX RPM
The engine speed is automatically limited to the
speed d isplayed in the instrument cluster. This
protects the engine from overheating.
The engine speed limitation deactivates once the
engine is no longer in the critical temperature range and you have released the accelerator ped
al.
If the engine speed limitation was activated by
an engine control malfunction, the~ indicator
light also turns on . Make sure that the speed
does not go above the speed d isplayed . Drive to
an author ized Audi dealer or authorized Audi
Service Facility immediately to have the malfunc
tion corrected.
<&,... Engine oil sensor
• Oil level! Sensor defective
If the symbol illuminates, contact your author
iz ed Audi dealer and have the oil sensor inspect
ed. Until you have this done, check the oil leve l
each time you refuel just to be on the safe side
<=>page 220.
f Engine warm-up request
~ n Please warm up engine
M v:, ....
Instruments and indicator lights
Fuel has entered the engine oil, either from low
outside temperatures or frequent short drives.
Drive until the eng ine is warm so that the fuel in
the engine oil will evaporate. Avoid high engine
speeds, full accelerating and heavy engine loads
when doing this .
Eli) Fuel tank system
IIJ Please refuel
If the indicator light turns on for the first time
and the message appears, there are about 2.6
gallons (10 liters) of fuel left in the tank .
D Fuel tank system malfunction! Contact deal
er
There is a ma lfunction in the fuel tank system.
Drive to an authorized Audi dealer or authorized
Audi Service Facility immediate ly to have the
malfunction corrected.
(D Tips
More information on refueling is available on
page
c:> page 210.
<9 Washer fluid level
g, rj iJlease refill washer fluid
Fill the washer fluid fo r the windsh ie ld washer
system and the headlight washer system* when
the ignition is switched off
c:> page 229.
• Windshield wipers
m Windshield wiper defective
There is a ma lfunction w ith the windshield wip
ers .
Drive to an author ized Audi dealer or authorized
Audi Se rvice Facility immediate ly to have the
malfunction corrected.
~/0$ Defective light bulb warning
If the S:$ ind icator light turns on, a light has
failed. The message indicates the location of the
light. If the
BB indicator light also turns on, then
a rear fog light has failed. The position of the ..,.
21
Page 25 of 294

.... N
0 CJ '
Driver information
system
Overview
Fig. 4 Driver information system in the instrumen t cl uster
Fig. 5 Display : example of the information line
The driver information system contains informa
tion @ that is displayed on tabs@¢ fig.
4. The
following content is possible depending on vehi
cle equipment:
@
®
Tab Content
1 Vehicle function s:
On-board computer ¢page 24
Efficiency program*¢ page 25
Digital speedomete r
Cruise control*¢ page
82
Adaptive cruise control and braking
guard* ¢page
84
Audi active lane assist*¢ page 93
Display darkened
Instruments and indicator lights
@ ®
Tab Content
2 Indicator lights and messages
Warn ing when a door, the hood or the
rear lid is not closed
Service interval display ¢ page
26
Speed warning system ¢ page 81
3 Night vision assistant*¢ page 103
4 Audio/video
s Telephone*
6 Nav igation*
The second and third tabs are only visible if at
least one indicator light or message is shown or if
that system is switched on.
The status line © is located in the bottom part of
the display¢ fig.
4. It displays the exterior tem
perature, time, selector lever position, tripod
ometer and odometer.
For some vehicle functions, you can access the
trip information from the temporary memory
¢ page 25 in the line (D ¢ fig. 5.
_& WARNING
--Never rely exclusively on the outside tem
perature display to determine if a road sur
face is icy or not. Keep in mind that road
surfaces, especially bridges and overpasses,
could be ice covered and slippery even at an
outside temperat ure above 41 °F (+S °C).
- Always remember, even if the "snowflake"
symbol (ice warning) does not appear in the
d isp lay, black ice could be on the road.
- Always reduce your speed and drive with specia l care in co ld weather conditions when
the chance of encountering icy road surfaces
increases .
(0 Tips
- If the vehicle is stationary, or if you are driv
ing at a very low speed, the temperature
shown in the display might be slightly high
er than the actual outside temperature . This
is caused by the heat being radiated from
the engine . .,..
23
Page 47 of 294
.... N
0 CJ '
-In cool or damp weather, the inside of the
headlights, turn signals and tai l lights can
fog over due to the temperature difference
between the inside and outside. They will
clear short ly after switching them on. This
does not affect the service life of the light
i ng.
Turn signals and high beam lever
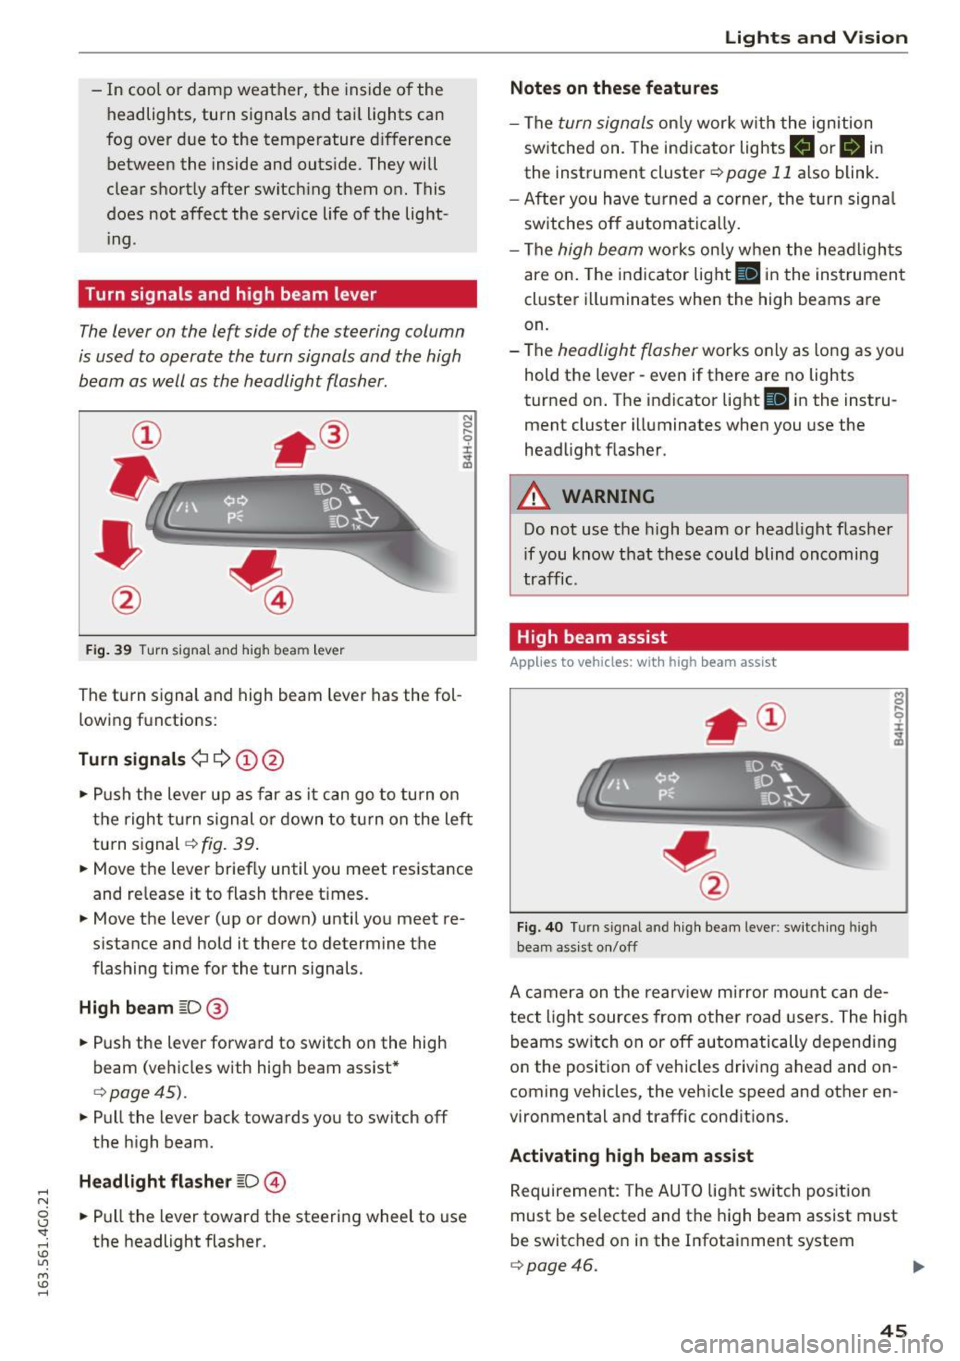
The lever on the left side of the steering column
is used to operate the turn signals and the high
beam as well as the headlight flasher.
F ig . 39 Turn signal and high beam lever
The turn s ignal and high beam lever has the fol
lowing fu nctions:
Turn signals¢¢ (!)@
N
0
..... 0
~ IJl
• Push the lever up as far as it can go to turn on
the right turn s ignal or down to turn on the left
turn signal¢
fig. 39 .
• Move the lever brief ly until you meet resistance
and re lease it to flash three times.
• Move the lever (up or down) until you meet re
s istan ce and hold it there to determine the
flashing time for the turn signals.
High beam ~D@
• Push the lever forward to switch on the high
beam (vehicles with high beam assist*
¢ page45).
• Pull the lever back towards you to switch off
the high beam .
Headlight flasher ~D@
• Pull the lever toward the steering wheel to use
the headlight flasher .
Lights and V ision
Notes on these features
-The turn signals only work w ith the ignition
sw itched on. The indicator lights
B or B in
the instrument cluster¢ page 11 also blink.
- After you have turned a corner , the turn signa l
switches off automatically.
- The
high beam works on ly when the headlights
are on. The indicator light
II in the instrument
cluster illuminates when the high beams are
on.
- The
headlight flasher works only as long as yo u
hold the lever -even if there are no lights
turned on. The indicator light
Iii in the instru
ment cluster illuminates when you use the
headlight flasher .
A WARNING
-Do not use the high beam or headlight flasher
i f you know that these could blind oncoming
traffic.
High beam assist
Applies to veh icles: w ith high beam assist
Fig. 40 Turn signal and high beam lever: switching high
beam assist on/off
A camera on the rearview mirror mount can de
tect light sources from other road users. The high
beams switch on or off automatically depending
on the posit ion of vehicles driving ahead and on
coming vehicles, the vehicle speed and other en
vironmental and traffic conditions.
Activating high beam assist
Requirement: The AUTO light switch position
must be selected and the high beam assist must
be switched o n in the Infotainment system
¢page 46.
45
Page 50 of 294

Lights and Vision
.. To increase or reduce the brightness, turn the
knob and press it.
The interior lighting turns on when you switch
the headlights on while the ignition is on .
(i)} Tips
The setting is a utomat ica lly stored and as
signed to the remo te control key th at is in
use.
Instrument illumination
The brightness of the illumination for the instru
ments, display and head-up display* con be ad
justed .
Fig . 44 Inst rument illuminat ion
.. Press the knob to release it.
.. Turn the knob toward" -" o r"+" to reduce or in
c rease the brightness .
" Press th e knob again to re turn it to its original
pos ition.
(D Tips
The instr um ent ill umination for th e need les
a n d dia ls tur ns on when the igni tio n is tur ned
on and t he lights are turned off. The i llumina
t ion for t he dia ls reduces automatically and
eventua lly tu rns off as brightness outside in
creases . T hi s function reminds the drive r to
turn the headlights on at the appropriate
time.
48
Vision
Adjusting the exterior mirrors
Fig. 45 Driver's door: kno b for the ex terio r mirrors
Turn the knob to the desired position :
Q/P -Adjusting the left/right exterior mirror.
Move the knob in the des ired dir ect ion .
Qill -Hea ting the mirror glass depend ing on the
outside temperature .
8 -Folding exterior m irro rs*. I n the I nfota in
ment system , you can se lect if the m irro rs fo ld in
automat ica lly when you lock the vehicle
~ page 33.
Front passenger 's exterior mirror tilt
function*
To help you see the curb when backing into a
par king space, the surface of the m irror tilts
s light ly . For this to happen, the knob must be in
the position for the front passenger's outside
mirror.
You can adjust the tilted mirror s urface by tu rn
i ng the knob in the desired directio n. When you
move out of reverse and i nto anot her gea r, the
new m irror position is stored and assigned to the
key you are using.
The m irror goes back into its or ig inal pos ition
once you drive forward faster than 9 mp h (15
km/h) or switch the ignition off.
A WARNING
Curved (i .e. convex) m irror surfaces increase
your f ield of view. Remember that ve hicles or
o ther objects will appear sma ller and farther
away than when s een in a flat m irro r. If yo u
Page 70 of 294

Warm and cold
Three-zone climate control
Operating
Applies to vehicles: w ith three zo ne cl imate contro l
Fig. 74 T hree-zone climate co ntrol: contro ls
P ress the buttons to tur n the func tions on or off.
The dial adj usts t he temperatu re and the blower.
The LED in a button will light up when the func
tion is sw itche d on.
IAUTO I Switching automatic mode on
Automatic mode ma inta ins a constant tempera
ture inside the vehicle . Air tempe rature, airflow
and a ir distribution are controlled automatically.
Adjusting the temperature
The temperatu re can be adjusted individually fo r
the dr iver and front passenger us ing t he dials
(D
and @.
Adjust ing the blower 8f?
Using the dial@, you can manually adjust the
amount of air generated by the blower to suit
your preferences. To have the blowe r regu lated
automatically, p ress the
IAUTO ! button.
~. ~ .~ Adjusting air distribution
You can manually select the vents where the air
will flow. To have the air distribution regulated
automatically, press the
IAUTO! button.
l""" I Switch ing recirculation m ode on/off
In recirculation mode, the air inside the vehicle is
circulated and filtered. This prevents the unfil-
68
tered air outs ide the ve hicle from entering the
vehicle interior. We recommend sw itching recir
cu lation mode on when driving through a tu nnel
or when sitting in traffic ~.&. .
The
! AUTO I button or I@ FRONT ! button switches
recircu lation mode off .
IOFFI Switching the climat e control system
on /off
The !OFF ! button switches the climate con trol
system on or off.
It a lso switches on when you
press the b lower control. Airflow from outside is
blocked when the climate control system is
switched off.
IA/Cl Switching cooling mode on/off
The air is not coo led and humidity is not removed
whe n coo ling mode is switched off . This can
cause fog on the windows. The cooling mode
switches off automatically when there are cold
outside temperatures.
l«w FRONT I Switching the defr oster on /off
The w indshield and side w indows a re defrosted
or cleared of condensation as quick ly as poss ible .
The maximum amount of air flows mainly from
the vents below the windshield. Recircu lation .,.