2016 Acura RDX remote control
[x] Cancel search: remote controlPage 2 of 81

TABLE OF
CONTENTS
INDEX
VISUAL INDEX
VOICE COMMAND INDEX
SAFETY
INFORMATION
CLIENT
INFORMATION
INSTRUMENT PANEL
SPECIFICATIONS
VEHICLE
CONTROLS
MAINTENANCE
AUDIO AND
CONNECTIVITY
HANDLING THE UNEXPECTED
BLUETOOTH®
HANDSFREELINK®
DRIVING
ACURALINK®
NAVIGATION
Devices That Emit Radio Waves
The following products and systems on your vehicle emit radio waves when in
operation:
• AcuraLink®
• Audio system
• Blind spot information system
• Bluetooth® Audio
• Bluetooth® HandsFreeLink®
• Collision Mitigation Braking
System™ (CMBS™) •
HomeLink® Universal Transceiver
• Immobilizer system
• Remote engine starter
• Remote transmitter
• Keyless Access System
• Tire Pressure Monitoring System
DISCLOSURES
Event Data Recorders
This vehicle is equipped with an event data recorder (EDR). The main purpose
of an EDR is to record, in certain crash or near crash-like situations, such as an air
bag deployment or hitting a road obstacle, data that will assist in understanding
how a vehicle’s systems performed. The EDR is designed to record data related
to vehicle dynamics and safety systems for a short period of time, typically
30 seconds or less. The EDR in this vehicle is designed to record such data as:
• How various systems in your vehicle were operating;
• Whether or not the driver and passenger safety belts were buckled/
fastened;
• How far (if at all) the driver was depressing the accelerator and/or brake
pedal; and,
• How fast the vehicle was traveling.
These data can help provide a better understanding of the circumstances in which
crashes and injuries occur. NOTE: EDR data are recorded by your vehicle only if a
non-trivial crash situation occurs; no data are recorded by the EDR under normal
driving conditions and no personal data (e.g., name, gender, age, and crash
location) are recorded. However, other parties, such as law enforcement, could
combine the EDR data with the type of personally identifying data routinely
acquired during a crash investigation.
To read data recorded by an EDR, special equipment is required, and access to
the vehicle or the EDR is needed. In addition to the vehicle manufacturer, other
parties such as law enforcement that have the special equipment can read the
information if they have access to the vehicle or the EDR.
The data belong to the vehicle owner and may not be accessed by anyone else
except as legally required or with the permission of the vehicle owner.
Service Diagnostic Recorders This vehicle is equipped with service-related devices that record information
about powertrain performance. The data can be used to verify emissions law
requirements and/or help technicians diagnose and solve service problems. It
may also be combined with data from other sources for research purposes, but it
remains confidential.
Each of the above complies with the appropriate requirements or the required
standards of FCC (Federal Communications Commission) and Industry Canada,
described below:
As required by
the FCC:
This device complies with Part 15 of the FCC rules. Operation is subject to the
following two conditions: (1) This device may not cause harmful interference, and
(2) this device must accept any interference received, including interference that
may cause undesired operation.
Changes or modifications not expressly approved by the party responsible for
compliance could void the user’s authority to operate the equipment.
As required by Industry Canada:
This device complies with Industry Canada Standard RSS-Gen/210/251/310.
Operation is subject to the following two conditions: (1) this device may not
cause interference, and (2) this device must accept any interference, including
interference that may cause undesired operation of the device.
California Perchlorate Contamination Prevention Act
The airbags, seat belt tensioners, and CR-type batteries in this vehicle may
contain perchlorate materials—special handling may apply. See www.dtsc.ca.gov/
hazardouswaste/perchlorate/ for more information.
California Proposition 65 WarningWARNING: This product contains or emits chemicals known to the state of
California to cause cancer and birth defects or other reproductive harm.
Page 3 of 81

TABLE OF
CONTENTS
INDEX
VISUAL INDEX
VOICE COMMAND INDEX
SAFETY
INFORMATION
CLIENT
INFORMATION
INSTRUMENT PANEL
SPECIFICATIONS
VEHICLE
CONTROLS
MAINTENANCE
AUDIO AND
CONNECTIVITY
HANDLING THE UNEXPECTED
BLUETOOTH®
HANDSFREELINK®
DRIVING
ACURALINK®
NAVIGATION
This Owner’s Guide is intended to help you quickly get acquainted with your
2016 Acura RDX. It provides basic information and instructions on technology and
convenience features, as well as emergency procedures and how to get assistance.
This guide is for vehicles sold in the United States and Canada. It covers all RDX
models, so you may find descriptions of features and equipment that are not in
your vehicle.
Images throughout this guide are from U.S. vehicles and represent features and
equipment that are available on some, but not all, models. Images shown in this
guide should be considered examples and used for demonstration purposes only.
This guide is not intended to be a substitute for the Owner’s Manual. The Owner
Information CD enclosed in your glove box kit includes the Owner’s Manual,
Navigation Manual, and vehicle and tire warranties in electronic format. This
information can be viewed on a computer (PC or Mac platform) and saved or
printed for your reference. In addition, you can visit owners.acura.com (U.S.) or
myacura.ca (Canada) to view the complete and most current information.
If you are the first registered owner of your vehicle, you may request a
complimentary printed copy of the Owner’s Manual, Navigation Manual, or Vehicle
Warranty within the first six months of vehicle purchase. To request a copy, visit
owners.acura.com and create or log in to your account. In Canada, please request a
copy from your Acura dealer.
American Honda Motor Company strives to be proactive in protecting our
environment and natural resources. By using electronic delivery for a considerable
portion of the information typically found in a vehicle owner’s manual, we are
further reducing our impact on the environment.
Acura Total Luxury Care Roadside Assistance
Your Acura TLC Roadside Assistance representative is here to help you 24 hours
a day, 7 days a week. Under your 4-year/50,000-mile (80,000 km) warranty, the
following benefits are available:
• Towing services—full cost of towing to the closest Acura dealer
• Roadside assistance—jump starting, fuel delivery, lockout, and flat tire
• Trip planning—detailed trip routing, emergency services, and more
Call (800) 594-8500 (U.S.) or (800) 565-7587 (Canada)
Acura Client Relations Your authorized Acura dealer should be able to answer any questions you have
about your vehicle. However, if you are dissatisfied with the information you
receive, you can call Acura Client Relations (see page 145).
Call (800) 382-2238 (U.S.) or (888) 922-8729 (Canada)
INTRODUCTION TABLE OF CONTENTS
*if equipped
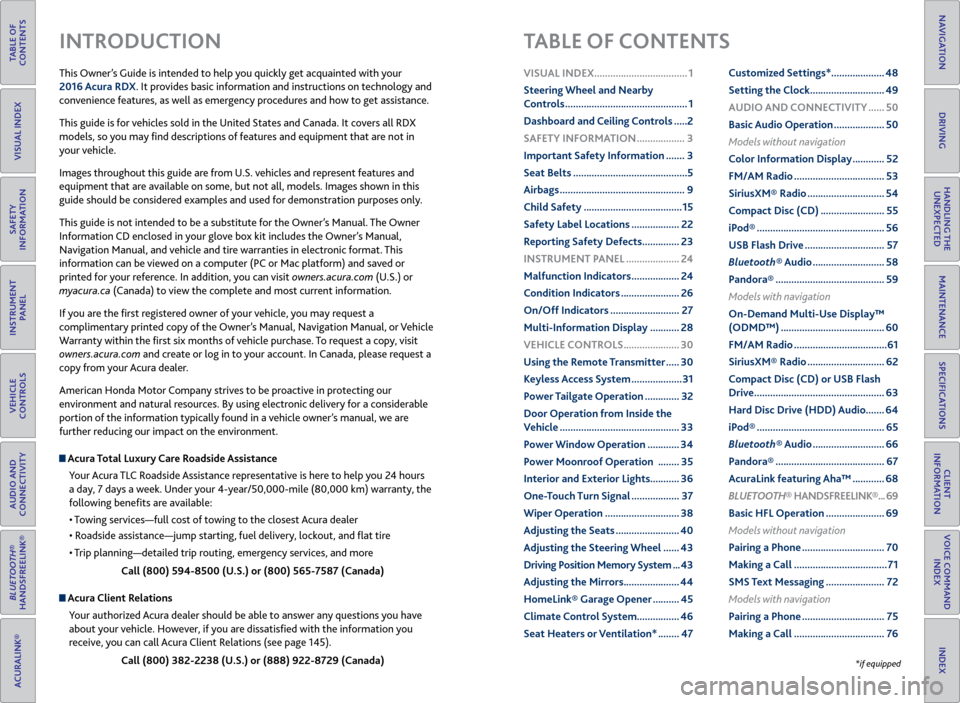
VISUAL INDEX ................................... 1
Steering Wheel and Nearby
Controls .............................................. 1
Dashboard and Ceiling Controls ..... 2
SAFETY INFORMATION .................. 3
Important Safety Information ....... 3
Seat Belts ........................................... 5
Airbags ............................................... 9
Child Safety ..................................... 15
Safety Label Locations .................. 22
Reporting Safety Defects .............. 23
INSTRUMENT P ANEL .................... 24
Malfunction Indicators .................. 24
Condition Indicators ...................... 26
On/Off Indicators .......................... 27
Multi-Information Display ........... 28
VEHICLE CONTROLS ..................... 30
Using the Remote Transmitter ..... 30
Keyless Access System ................... 31
Power Tailgate Operation ............. 32
Door Operation from Inside the
Vehicle ............................................. 33
Power Window Operation ............ 34
Power Moonroof Operation ........35
Interior and Exterior Lights ...........36
One-Touch Turn Signal .................. 37
Wiper Operation ............................ 38
Adjusting the Seats ........................ 40
Adjusting the Steering Wheel ...... 43
Driving Position Memory System ... 43
Adjusting the Mirrors .....................44
HomeLink® Garage Opener .......... 45
Climate Control System ................46
Seat Heaters or Ventilation* ........ 47Customized Settings*
....................48
Setting the Clock ............................ 49
AUDIO AND CONNECTIVITY ...... 50
Basic Audio Operation ................... 50
Models without navigation
Color Information Display ............ 52
FM/AM Radio .................................. 53
SiriusXM® Radio ............................. 54
Compact Disc (CD) ........................ 55
iPod® ................................................ 56
USB Flash Drive .............................. 57
Bluetooth® Audio ........................... 58
Pandora® ......................................... 59
Models with navigation
On-Demand Multi-Use Display™
(ODMD™) ....................................... 60
FM/AM Radio ................................... 61
SiriusXM® Radio ............................. 62
Compact Disc (CD) or USB Flash
Drive ................................................. 63
Hard Disc Drive (HDD) Audio....... 64
iPod® ................................................ 65
Bluetooth® Audio ........................... 66
Pandora® ......................................... 67
AcuraLink featuring Aha™ ............ 68
BLUETOOTH® HANDSFREELINK ® ... 69
Basic HFL Operation ...................... 69
Models without navigation
Pairing a Phone ............................... 70
Making a Call ................................... 71
SMS Text Messaging ...................... 72
Models with navigation
Pairing a Phone ............................... 75
Making a Call .................................. 76
Page 4 of 81

| 1
VISUAL INDEX
INDEX
VOICE COMMAND
INDEX
CLIENT
INFORMATION
SPECIFICATIONS
MAINTENANCE
HANDLING THE UNEXPECTED
DRIVING
NAVIGATION
TABLE OF
CONTENTS
VISUAL INDEX
SAFETY
INFORMATION
INSTRUMENT PANEL
VEHICLE
CONTROLS
AUDIO AND
CONNECTIVITY
BLUETOOTH®
HANDSFREELINK®
ACURALINK®
1 Lights/turn signals p. 36, p. 37
2 Wipers/washers p. 38
3 Cruise control*/Adaptive Cruise
Control (ACC)* buttons
p. 101, p. 102
4 Horn
5 Bluetooth® HandsFreeLink®/voice
recognition buttons
p. 69, p. 73, p. 83
6 Audio controls p. 51
7 Paddle shifters p. 99
8 Instrument panel p. 24
Multi-information display p. 28
9 ENGINE START/STOP button
p. 97
10 Vehicle Stability Assist (VSA®) OFF
button p. 109
Lane Departure Warning (LDW)
button* p. 104
Collision Mitigation Braking
System™ (CMBS™) OFF button*
p. 107
Parking sensor system button*
p. 109
Power tailgate button p. 32
11 INFO (p/q) buttons p. 28
SEL/RESET button p. 28
Distance (ACC) button* p. 102
Lane Keeping Assist System (LKAS)
button* p. 105
VISUAL INDEX
Quickly locate items in the vehicle’s interior.
*if equipped
Steering Wheel and Nearby Controls
*if equipped
1
3495
782
11106
SMS Text Messaging and E-Mail ... 79
Siri™ Eyes Free ............................... 80
A CURALINK
®* ................................. 81
AcuraLink Messages ....................... 81
Subscription Features .................... 82
NAVIGATION* ............................... 83
Basic Navigation Operation ......... 83
Entering a Destination .................. 86
Routing ............................................ 88
DRIVING .......................................... 90
Before Driving ................................. 90
Maximum Load Limit ..................... 92
Towing a Trailer .............................. 94
Remote Engine Start* .................... 96
Starting to Drive ............................. 97
Shifting ............................................ 98
Braking ........................................... 100
Cruise Control* ............................. 101
Adaptive Cruise Control (ACC)* ... 102
Lane Departure Warning (LDW)* ... 104
Lane Keeping Assist System
(LKAS)* .......................................... 105
Blind Spot Information (BSI)* .... 106
Collision Mitigation Braking
System™ (CMBS™)* ................... 107
Vehicle Stability Assist (VSA®), aka
Electronic Stability Control (ESC)
System ........................................... 109
Parking Sensor System* .............. 109
Multi-View Rear Camera .............. 110
Rear Cross Traffic Monitor* ......... 111
Refueling ........................................ 112
HANDLING THE UNEXPECTED ...113
Keyless Access Remote Battery
Strength .......................................... 113Shift Lever Does Not Move .........
113
Jump Starting ................................. 114
Overheating ................................... 115
Emergency Engine Stop ................ 116
Emergency Towing ........................ 116
Tire Pressure Monitoring System
(TPMS) ............................................ 117
Tire Repair Kit* .............................. 119
Changing a Flat Tire ..................... 120
Fuse Locations .............................. 123
MAINTENANCE ............................ 126
Safety Precautions ....................... 126
Maintenance Minder™ ................. 127
Under the Hood ............................ 129
Engine Oil ...................................... 130
Engine Coolant ............................. 132
Window Washer Fluid ................. 133
Brake Fluid ..................................... 133
Checking the Battery ................... 133
Changing Wiper Blades ............... 134
Tire Information ........................... 136
Tire Labeling .................................. 139
DOT Tire Quality Grading ........... 140
Testing of Readiness Codes ........ 142
SPECIFICATIONS ......................... 143
CLIENT INFORMATION .............. 144
Frequently Asked Questions/
Troubleshooting ........................... 144
Contact Us .................................... 145
Acura Total Luxury Care Roadside
Assistance ..................................... 146
Warranty Coverages .................... 146
V OICE COMMAND INDEX ......... 147
INDEX ............................................ 153
Page 17 of 81

26 || 27
INSTRUMENT P
ANEL
INSTRUMENT P ANEL
TABLE OF
CONTENTS
INDEX
VISUAL INDEX
VOICE COMMAND INDEX
SAFETY
INFORMATION
CLIENT
INFORMATION
INSTRUMENT PANEL
SPECIFICATIONS
VEHICLE
CONTROLS
MAINTENANCE
AUDIO AND
CONNECTIVITY
HANDLING THE UNEXPECTED
BLUETOOTH®
HANDSFREELINK®
DRIVING
ACURALINK®
NAVIGATION
Condition Indicators
These indicators may require you to perform an action.
Parking brake
Release the parking brake before driving. You will hear a beep if you drive
with it not fully released.
Seat belt reminder
Make sure seat belts are fastened for you and all passengers. The indicator
blinks and beeps sound continuously if you or your front passenger has not
fastened your seat belts when you begin driving. If the indicator remains on
after seat belts are fastened, see your dealer.
Low fuel
Refuel as soon as possible. If the indicator blinks, there is a problem with
the fuel gauge. See your dealer.
Door/tailgate open*
Close any open doors or the tailgate. A beep sounds if any doors or the
tailgate is opened while driving.
Low tire pressure
Stop in a safe place, check tire pressures, and inflate tire(s) if necessary.
System message
When a condition or malfunction indicator comes on, a message also
appears on the multi-information display. Check the display for more
information.
Immobilizer
Your remote transmitter cannot be recognized by the vehicle. If the
indicator blinks, you may not be able to start the engine. Turn the vehicle
off and then on again. If it continues to blink, there may be a problem with
the system. See your dealer.
Canada U.S.
*if equipped
*if equipped
On/Off Indicators
These indicators remind you when an item is on or off.
VSA off
VSA engaged (blinks)
CRUISE MAIN on*
CRUISE CONTROL on*
Turn signals/hazards on
Exterior lights on Fog lights on*
High beams on
BSI off*
ACC on*
LKAS on*
CMBS™ off*
Page 19 of 81

30 || 31
VEHICLE CONTROLS
VEHICLE CONTROLS
TABLE OF
CONTENTS
INDEX
VISUAL INDEX
VOICE COMMAND INDEX
SAFETY
INFORMATION
CLIENT
INFORMATION
INSTRUMENT PANEL
SPECIFICATIONS
VEHICLE
CONTROLS
MAINTENANCE
AUDIO AND
CONNECTIVITY
HANDLING THE UNEXPECTED
BLUETOOTH®
HANDSFREELINK®
DRIVING
ACURALINK®
NAVIGATION
Learn about the various controls necessary for operating and driving the vehicle.
Using the Remote Transmitter
Lock or unlock the doors and tailgate.
VEHICLE CONTROLS
Leaving the keyless access remote in the vehicle can result in theft or accidental
movement of the vehicle. Always take the key with you whenever you leave the
vehicle unattended.
NOTICE
HOLD
Unlock button: Press once
to unlock the driver’s door.
Press again to unlock all
doors and the tailgate.
Release button (front or
back of key): Slide to release
the built-in key for valet use.
Power tailgate button:
Press to unlock and open the
power tailgate. Press again
to close it. Lock button: Press to lock
the doors and tailgate. Press
again for audible verification.
Panic button: Press to sound
the alarm for 30 seconds.
Press again to cancel.
ENGINE HOLD button*:
After pressing the Lock
button once, press and
hold to remotely start the
engine (see page 96). LED indicators*: Check
door lock or engine status
(see page 96).
Keyless Access System
When you carry the remote transmitter (for example, in a pocket or purse) and it
is outside the vehicle and within range (about 32 inches or 80 cm), you can lock or
unlock the doors and tailgate without handling the transmitter.
Unlocking/Locking the
Doors
To unlock: Grab either front door handle when the
vehicle is off.
To lock: Press the door lock button on either front
door handle when the vehicle is off. If the remote
transmitter is inside the vehicle, the doors will not
lock.
Unlocking/Locking the Tailgate
To unlock: Press and hold the tailgate release
button under the tailgate handle to unlock the
tailgate and all doors. The vehicle can be on or off.
To lock: Press the tailgate lock button to lock the
tailgate and all doors. If the remote transmitter is
inside the vehicle, the tailgate and doors will not
lock.
Tailgate release
button
Lock button
Door lock
button
Page 25 of 81

42 || 43
VEHICLE CONTROLS
VEHICLE CONTROLS
TABLE OF
CONTENTS
INDEX
VISUAL INDEX
VOICE COMMAND INDEX
SAFETY
INFORMATION
CLIENT
INFORMATION
INSTRUMENT PANEL
SPECIFICATIONS
VEHICLE
CONTROLS
MAINTENANCE
AUDIO AND
CONNECTIVITY
HANDLING THE UNEXPECTED
BLUETOOTH®
HANDSFREELINK®
DRIVING
ACURALINK®
NAVIGATION
Failure to reinstall, or correctly reinstall, the head restraints can result in
severe injury during a crash.
Always replace the head restraints before driving.
WARNING
Pull
Lever
Unlock
Lock
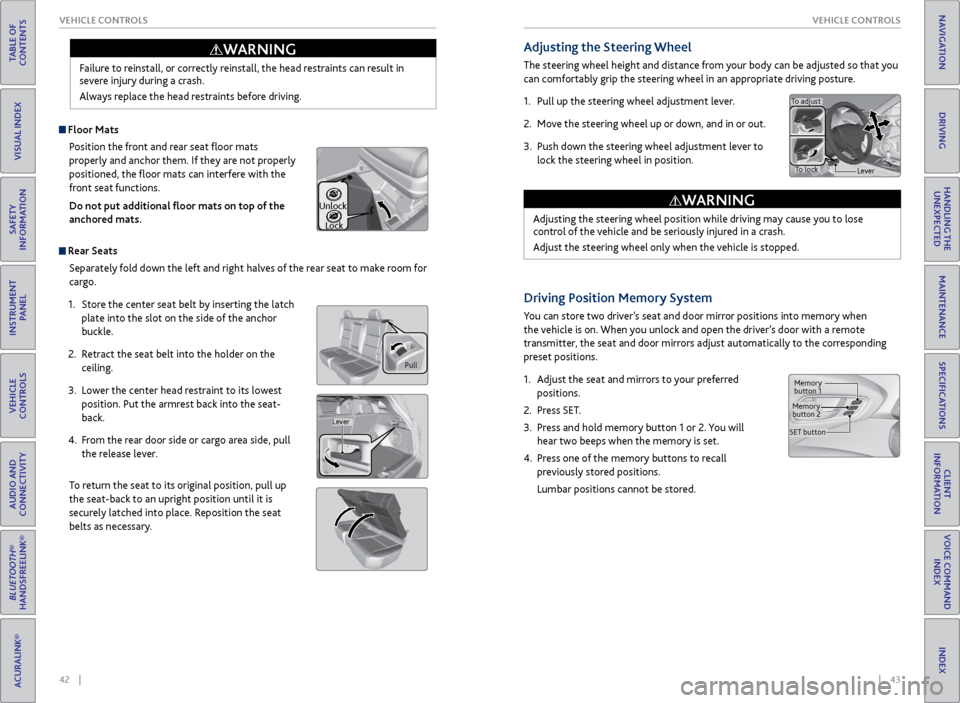
Adjusting the Steering Wheel
The steering wheel height and distance from your body can be adjusted so that you
can comfortably grip the steering wheel in an appropriate driving posture.
1. Pull up the steering wheel adjustment lever.
2. Move the steering wheel up or down, and in or out.
3. Push down the steering wheel adjustment lever to
lock the steering wheel in position.
Adjusting the steering wheel position while driving may cause you to lose
control of the vehicle and be seriously injured in a crash.
Adjust the steering wheel only when the vehicle is stopped.
WARNING
To adjust
To lock Lever
Driving Position Memory System
You can store two driver’s seat and door mirror positions into memory when
the vehicle is on. When you unlock and open the driver’s door with a remote
transmitter, the seat and door mirrors adjust automatically to the corresponding
preset positions.
1. Adjust the seat and mirrors to your preferred
positions.
2. Press SET.
3. Press and hold memory button 1 or 2. You will
hear two beeps when the memory is set.
4. Press one of the memory buttons to recall
previously stored positions.
Lumbar positions cannot be stored.
Memory
button 1
Memory
button 2
SET button
Floor Mats Position the front and rear seat floor mats
properly and anchor them. If they are not properly
positioned, the floor mats can interfere with the
front seat functions.
Do not put additional floor mats on top of the
anchored mats.
Rear Seats
Separately fold down the left and right halves of the rear seat to make room for
cargo.
1. Store the center seat belt by inserting the latch
plate into the slot on the side of the anchor
buckle.
2. Retract the seat belt into the holder on the
ceiling.
3. Lower the center head restraint to its lowest
position. Put the armrest back into the seat-
back.
4. From the rear door side or cargo area side, pull
the release lever.
To return the seat to its original position, pull up
the seat-back to an upright position until it is
securely latched into place. Reposition the seat
belts as necessary.
Page 26 of 81

44 || 45
VEHICLE CONTROLS
VEHICLE CONTROLS
TABLE OF
CONTENTS
INDEX
VISUAL INDEX
VOICE COMMAND INDEX
SAFETY
INFORMATION
CLIENT
INFORMATION
INSTRUMENT PANEL
SPECIFICATIONS
VEHICLE
CONTROLS
MAINTENANCE
AUDIO AND
CONNECTIVITY
HANDLING THE UNEXPECTED
BLUETOOTH®
HANDSFREELINK®
DRIVING
ACURALINK®
NAVIGATION
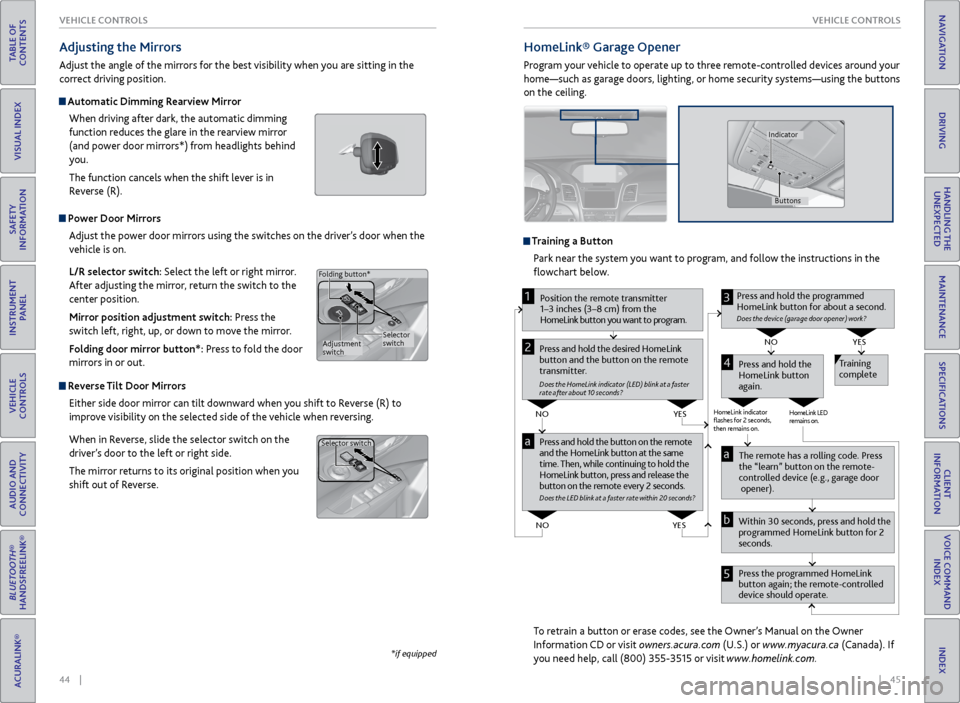
Power Door Mirrors
Adjust the power door mirrors using the switches on the driver’s door when the
vehicle is on.
L/R selector switch: Select the left or right mirror.
After adjusting the mirror, return the switch to the
center position.
Mirror position adjustment switch: Press the
switch left, right, up, or down to move the mirror.
Folding door mirror button*: Press to fold the door
mirrors in or out.
Reverse Tilt Door Mirrors
Either side door mirror can tilt downward when you shift to Reverse (R) to
improve visibility on the selected side of the vehicle when reversing.
When in Reverse, slide the selector switch on the
driver’s door to the left or right side.
The mirror returns to its original position when you
shift out of Reverse.
Adjusting the Mirrors
Adjust the angle of the mirrors for the best visibility when you are sitting in the
correct driving position.
Automatic Dimming Rearview Mirror
When driving after dark, the automatic dimming
function reduces the glare in the rearview mirror
(and power door mirrors*) from headlights behind
you.
The function cancels when the shift lever is in
Reverse (R).
*if equipped
Selector
switch
Adjustment
switch
Folding button*
Selector switch
HomeLink®
Garage Opener
Program your vehicle to operate up to three remote-controlled devices around your
home—such as garage doors, lighting, or home security systems—using the buttons
on the ceiling.
Training a Button
Park near the system you want to program, and follow the instructions in the
flowchart below.
To retrain a button or erase codes, see the Owner’s Manual on the Owner
Information CD or visit owners.acura.com (U.S.) or www.myacura.ca (Canada). If
you need help, call (800) 355-3515 or visit www.homelink.com.
Press and hold the button on the r emote
and the HomeLink button at the same
time. Then, while continuing to hold the
HomeLink button, pr ess and release the
button on the r emote every 2 seconds.
Does the LED blink at a f ast er ra te within 20 seconds ?
Press and hold the
HomeLink button
again. T
raining
complete
YES
NO
HomeLink indicator
�ashes for 2 seconds,
then r emains on. HomeLink LED
r
emains on.YES
NO
YES
NO
P osition the remote transmitter
1–3 inches (3–8 cm) from the
HomeLink button you want to program.1
Press and hold the desir ed HomeLink
button and the button on the r emote
transmitter .
Does the HomeLink indicat or (LED) blink at a f ast er
rate after about 10 seconds ?
2
a
The remote has a r olling code. Pr ess
the “learn” button on the r emote-
contr olled device (e.g., garage door
opener).
Pr ess the pr ogrammed HomeLink
button again; the remote-contr olled
device should operate.
Within 30 seconds, pr
ess and hold the
pr ogrammed HomeLink button for 2
seconds.a
Pr ess and hold the programmed
HomeLink button for about a second.
Does the devic e (garage door opener) work?
3
b
4
5
Buttons
Indicator
Page 28 of 81

48 || 49
VEHICLE CONTROLS
VEHICLE CONTROLS
TABLE OF
CONTENTS
INDEX
VISUAL INDEX
VOICE COMMAND INDEX
SAFETY
INFORMATION
CLIENT
INFORMATION
INSTRUMENT PANEL
SPECIFICATIONS
VEHICLE
CONTROLS
MAINTENANCE
AUDIO AND
CONNECTIVITY
HANDLING THE UNEXPECTED
BLUETOOTH®
HANDSFREELINK®
DRIVING
ACURALINK®
NAVIGATION
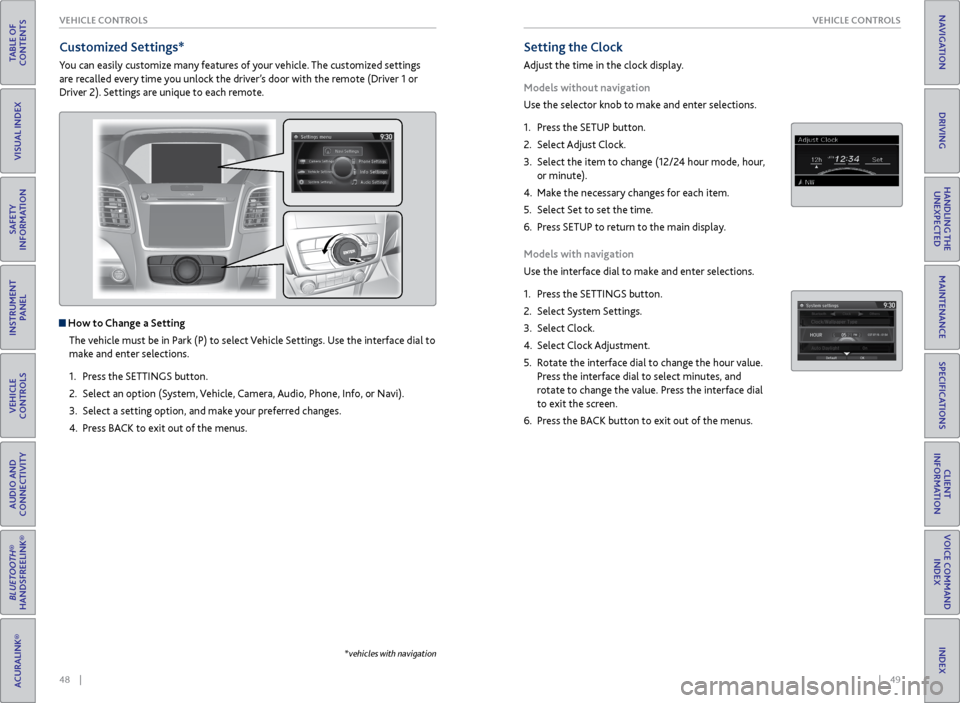
Setting the Clock
Adjust the time in the clock display.
Models without navigation
Use the selector knob to make and enter selections.
1. Press the SETUP button.
2. Select Adjust Clock.
3. Select the item to change (12/24 hour mode, hour,
or minute).
4. Make the necessary changes for each item.
5. Select Set to set the time.
6. Press SETUP to return to the main display.
Models with navigation
Use the interface dial to make and enter selections.
1. Press the SETTINGS button.
2. Select System Settings.
3. Select Clock.
4. Select Clock Adjustment.
5. Rotate the interface dial to change the hour value.
Press the interface dial to select minutes, and
rotate to change the value. Press the interface dial
to exit the screen.
6. Press the BACK button to exit out of the menus.
Customized Settings*
You can easily customize many features of your vehicle. The customized settings
are recalled every time you unlock the driver’s door with the remote (Driver 1 or
Driver 2). Settings are unique to each remote.
How to Change a Setting
The vehicle must be in Park (P) to select Vehicle Settings. Use the interface dial to
make and enter selections.
1. Press the SETTINGS button.
2. Select an option (System, Vehicle, Camera, Audio, Phone, Info, or Navi).
3. Select a setting option, and make your preferred changes.
4. Press BACK to exit out of the menus.
*vehicles with navigation