Page 189 of 557
188
uuInterior Lights/Interior Convenience Items uInterior Convenience Items
Controls
Interior Convenience Items
Press the button to open the glove box. You
can lock the glove box with the built-in key.
■Removable shelf
The shelf in the glove box is detachable. To
remove it, disengage the tabs.
The removed shelf can be stored upside down
in the glove box.
■Glove Box1 Glove Box
3WARNING
An open glove box can cause serious injury
to your passenger in a crash, even if the
passenger is wearing the seat belt.
Always keep the glove box closed while
driving.
Glove Box
To Lock
Shelf
Tabs
16 ACURA MDX-31TZ56200.book 188 ページ 2015年3月4日 水曜日 午後2時59分
Page 195 of 557

uuInterior Lights/Interior Convenience Items uInterior Convenience Items
194
Controls
■Accessory power socket (cargo area)
Open the cover to use it.
The AC power outlet can be used when the engine is running. Open the cover to use it. Plug in the appliance
slightly, turn it 90° clockwise, then push it all
the way.
■AC Power Outlet*1AC Power Outlet*
NOTICE
Do not use the AC power outlet for electric
appliances that require hi gh initial peak wattage,
such as cathode-ray tube type televisions,
refrigerators, electric pumps, etc. It is not suitable for
devices that process precis e data, such as medical
equipment, and that require an extremely stable
power supply, such as microcomputer-controlled
electric blankets, touc h sensor lamps, etc.
The AC power outlet is desi gned to supply power for
up to 115 volt appliances that are rated 150 watts or
less.
Continued use of any elec tric appliance/device
exceeding these ratings may result in damage to the
appliance/device.
* Not available on all models
16 ACURA MDX-31TZ56200.book 194 ページ 2015年3月4日 水曜日 午後2時59分
Page 202 of 557
Continued201
uuClimate Control System uUsing Automatic Climate Control
Controls
In addition to the button/sw itch controls, you can operate the climate control system
from the On Demand Multi-Use DisplayTM touch screen.
■Operating from the On Demand Multi-Use DisplayTM1 Using Automatic Climate Control
When you unlock the doors with your remote, the
driver’s ID ( Driver 1 or Driver 2) is detected, and the
climate control settings are turned to the respective
mode automatically when you set the power mode to
ON.
You can store two customized climate control
settings to the system and recall them from the On
Demand Multi-Use Display
TM.
2 Shortcuts P. 206
On Demand Multi-Use DisplayTM
A/C (Air Conditioning) and
SYNC (Synchronized) Icon
Driver’s Side
Temperature
Control Icon Recirculation/
Fresh Air mode
Icon
Fan Control Icon Passenger’s Side
Temperature
Control Icon
Shortcuts
Icon
16 ACURA MDX-31TZ56200.book 201 ページ 2015年3月4日 水曜日 午後2時59分
Page 209 of 557

208
uuClimate Control System uRear Climate Control System
Controls
Rear Climate Control System
Use the system when the engine is running.
1. Select REAR.
2. Select AUTO.
u The rear system changes to AUTO mode.
3. Adjust the rear passenger’s compartment temperature using the temperature
bar.
4. Select the ON/OFF to cancel.
u When the turned back on, the system returns to your last selection.
■Using the Rear Climate Control System From the Front Panel1Rear Climate Control System
If any icons on the touch screen are pressed while
using the rear climate control system in AUTO, the
function of the icon that was pressed will take
priority.
Rear Lock: Appears on the front panel. When
selected, it disables the rear panel control.
LOCK: Appears on the rear c ontrol panel while the
rear lock is on.
If the rear lock is on while in SYNC mode, the rear
control panel is disabled. LOCK SYNC appears on the
rear control panel.
On Demand Multi-Use DisplayTM
3 /4 (Temperature
Control) Icon
Fan Speed Level IndicatorsON/OFF
Icon
AUTO Icon
Rear Lock Icon
Vent Mode Icon
16 ACURA MDX-31TZ56200.book 208 ページ 2015年3月4日 水曜日 午後2時59分
Page 212 of 557
211
uuClimate Control System uRear Climate Control System
Controls
Use the system when the engine is running
1. Press the AUTO button.
2. Adjust the interior temperature usi ng the rear temperature control button.
3. To turn off the rear climate control system, press button.
■Using the Rear Climate Control System From the Rear Panel1Using the Rear Climate Control System From the Rear Panel
When the Rear Lock icon on the front control panel
is off, the temperature of the rear passenger
compartment can be cont rolled independently.
Rear floor
ventsRear console
vents and
floor vents Rear console
vents
/
(Fan Control)
Buttons
(On/Off) Button
Rear Temperature
Control Buttons
AUTO Button
16 ACURA MDX-31TZ56200.book 211 ページ 2015年3月4日 水曜日 午後2時59分
Page 219 of 557

218
Features
Audio System Basic Operation
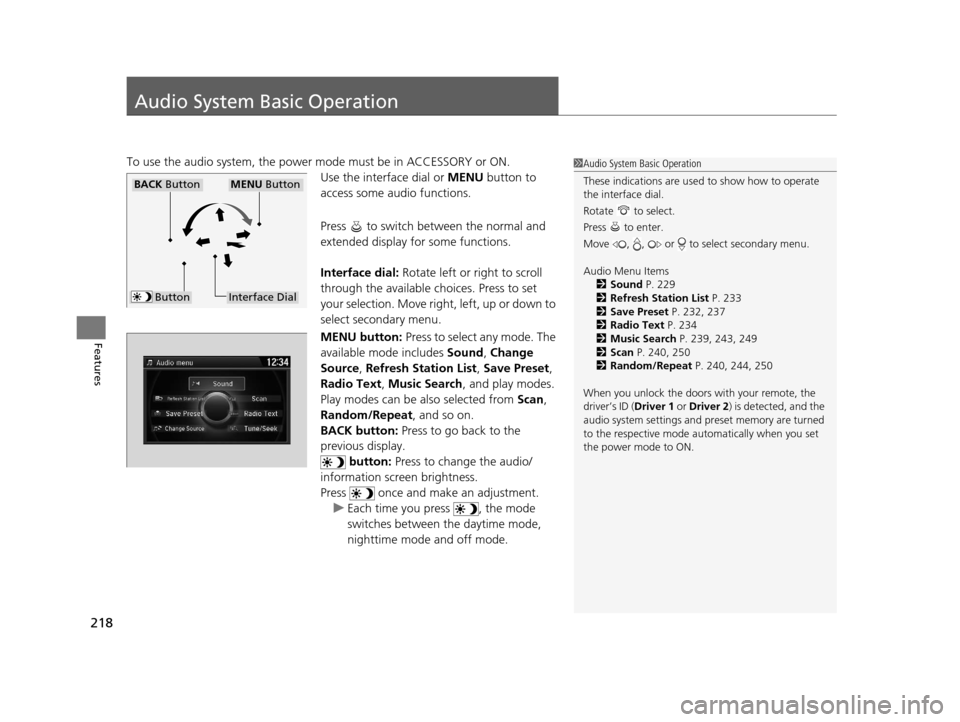
To use the audio system, the power mode must be in ACCESSORY or ON.
Use the interface dial or MENU button to
access some audio functions.
Press to switch between the normal and
extended display fo r some functions.
Interface dial: Rotate left or right to scroll
through the available choices. Press to set
your selection. Move right, left, up or down to
select secondary menu.
MENU button: Press to select any mode. The
available mode includes Sound, Change
Source , Refresh Station List , Save Preset ,
Radio Text, Music Search , and play modes.
Play modes can be also selected from Scan,
Random/Repeat , and so on.
BACK button: Press to go back to the
previous display.
button: Press to change the audio/
information screen brightness.
Press once and make an adjustment. u Each time you press , the mode
switches between the daytime mode,
nighttime mode and off mode.1Audio System Basic Operation
These indications are used to show how to operate
the interface dial.
Rotate to select.
Press to enter.
Move , , or to select secondary menu.
Audio Menu Items 2 Sound P. 229
2 Refresh Station List P. 233
2 Save Preset P. 232, 237
2 Radio Text P. 234
2 Music Search P. 239, 243, 249
2 Scan P. 240, 250
2 Random/Repeat P. 240, 244, 250
When you unlock the doors with your remote, the
driver’s ID ( Driver 1 or Driver 2) is detected, and the
audio system settings and pr eset memory are turned
to the respective mode automatically when you set
the power mode to ON.
Interface Dial
MENU ButtonBACK Button
Button
16 ACURA MDX-31TZ56200.book 218 ページ 2015年3月4日 水曜日 午後2時59分
Page 227 of 557

226
uuAudio System Basic Operation uAudio/Information Screen
Features
■Audio
Shows the current audio information.
■Phone
Shows the HFL information.
2 Bluetooth ® HandsFreeLink® P. 284
■Info
Shows the Trip Computer or Clock/Wallpaper and other information. Rotate
to select an item, then press .
■Trip computer (Current Drive)
Shows the range, and instant and average fu el economy of the current trip, as well
as the average fuel economy from your last trip.
■Trip computer (History of Trip A)
Shows the range, average fuel economy an d distances traveled for the current trip,
as well as the average fuel economy and distances traveled during the last three
driving cycles.
Each time you reset the trip meter A, the information on the display updates. The
history of the previous th ree driving cycles is kept.
■Deleting the history manually
1. Move on the History of Trip A screen to select Delete History, then press .
2. A confirmation message appears on the screen. Rotate to select Yes, then
press .
■Clock/Wallpaper
Shows a clock screen or an image you import.
16 ACURA MDX-31TZ56200.book 226 ページ 2015年3月4日 水曜日 午後2時59分
Page 228 of 557

Continued227
uuAudio System Basic Operation uAudio/Information Screen
Features
You can change, store, and delete the wa llpaper on the audio/information screen.
■Import wallpaper
You can import up to three images, one at a time, for wallpaper from a USB flash
drive.
1.Connect the USB flash drive to the USB
port.
2 USB Port P. 215
2.Press the SETTINGS button.
3. Rotate to select System Settings, then
press .
u Repeat the procedure to select Clock,
Clock/Wallpaper Type .
4. Move to select Wallpaper.
u The screen will change to the wallpaper
list.
5. Move to select Add New, then press .
6. Rotate to select a desired picture.
u The preview is displayed on the left side
on the screen.
7. Press .
u The confirmation message will appear.
Then the display will return to the
wallpaper list.
■Wallpaper Setup1Wallpaper Setup
•When importing wallpaper files, the image must be
in the USB flash drive’s root directory.
Images in a folder cannot be imported.
•The file name must be fewer than 64 characters.•The file format of the im age that can be imported
is BMP (bmp) or JPEG (jpg).
•The individual file size limit is 2 MB.•The maximum image size is 1,680 x 936 pixels. If
the image size is less than 420 x 234 pixels, the
image is displayed in the middle of the screen with
the extra area appearing in black.
•Up to 50 files can be selected.
•If the USB flash drive doe s not have any pictures,
the No files detected message appears.
16 ACURA MDX-31TZ56200.book 227 ページ 2015年3月4日 水曜日 午後2時59分