Page 153 of 174
8-61
8
3. Turn the key to “ ” (on) and turn on the elec- trical circuits to check if the devices operate.
4. If the fuse immediately blows again, have a Yamaha dealer check the electrical system.
EBU27444Replacing a headlight bulbIf a headlight bulb burns out, replace it as follows.1. Remove the cover at the rear of the headlight by pulling it off.
2. Remove the headlight bulb cover.
Specified fuses:
Main fuse:40.0 A
Headlight fuse: 10.0 A
Ignition fuse: 10.0 A
Four-wheel-drive motor fuse: 10.0 A
Signaling system fuse: 5.0 A
Auxiliary DC jack fuse: 10.0 A
Radiator fan motor fuse: 20.0 A
Fuel injection system fuse: 15.0 A
EPS fuse: YFM550PF 40.0 A
YFM550PHF 40.0 A1. Cover at the rear of the headlight
U2LB61E0.book Page 61 Friday, February 21, 2014 3:03 PM
Page 154 of 174
8-62
83. Disconnect the headlight coupler. 4. Unhook the headlight bulb holder, and then
remove the burnt-out bulb.
5. Place a new headlight bulb into position, and then secure it with the bulb holder. NOTICE:
Do not touch the glass part of the head-
light bulb to keep it free from oil, otherwise
the transparency of the glass, the luminos-
ity of the bulb, and the bulb life will be ad-
versely affected. Thoroughly clean off any
dirt and fingerprints on the headlight bulb
using a cloth moistened with alcohol or
thinner.
[ECB00652]
1. Headlight bulb cover
1. Headlight coupler
1. Headlight bulb holder
2. Headlight bulb
U2LB61E0.book Page 62 Friday, February 21, 2014 3:03 PM
Page 155 of 174
8-63
8
6. Connect the headlight coupler.
7. Install the headlight bulb cover.
NOTICE:
Make sure the headlight bulb cover is se-
curely fitted and seated properly.
[ECB01081]
8. Install the cover at the rear of the headlight.
9. Adjust the headlight beam if necessary.EBU25552Adjusting a headlight beamNOTICEECB00691It is advisable to have a Yamaha dealer make
this adjustment.
To raise a headlight beam, turn the headlight
beam adjusting screw in direction (a).
To lower a headlight beam, turn the adjusting
screw in direction (b).EBU25643Replacing the tail/brake light bulbIf the tail/brake light bulb burns out, replace it as
follows. 1. Remove panel H. (See page 8-10.)
2. Remove the tail/brake light bulb holder (to- gether with the bulb) by turning it counter-
clockwise.
1. Do not touch the glass part of the bulb.
1. Headlight beam adjusting screw
U2LB61E0.book Page 63 Friday, February 21, 2014 3:03 PM
Page 156 of 174
8-64
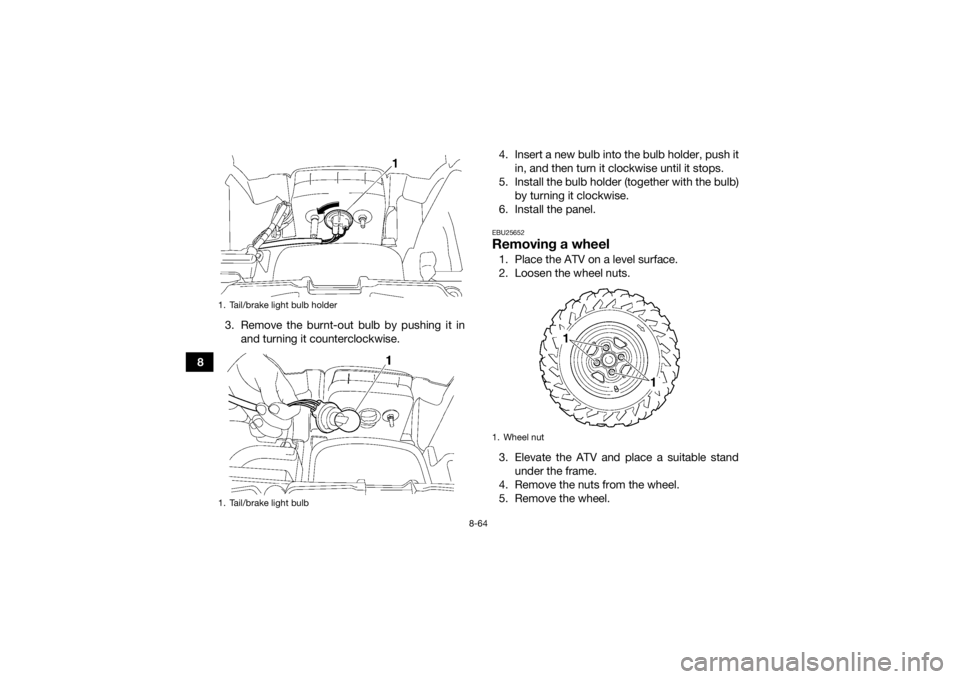
83. Remove the burnt-out bulb by pushing it in
and turning it counterclockwise. 4. Insert a new bulb into the bulb holder, push it
in, and then turn it clockwise until it stops.
5. Install the bulb holder (together with the bulb) by turning it clockwise.
6. Install the panel.
EBU25652Removing a wheel1. Place the ATV on a level surface.
2. Loosen the wheel nuts.
3. Elevate the ATV and place a suitable stand under the frame.
4. Remove the nuts from the wheel.
5. Remove the wheel.
1. Tail/brake light bulb holder
1. Tail/brake light bulb
1. Wheel nut
U2LB61E0.book Page 64 Friday, February 21, 2014 3:03 PM
Page 157 of 174
8-65
8
EBU25702Installing a wheel1. Place the ATV on a level surface.
2. Install the wheel and the nuts.TIPThe arrow mark on the tire must point to-
ward the rotating direction of the wheel.
Tapered nuts are used for both the front and
rear wheels. Install the nuts with their tapered
side towards the wheel.
3. Lower the ATV to the ground.
4. Tighten the wheel nuts to the specified
torques.
1. Arrow mark
1
1. Tapered nutTightening torques:Front wheel nut:55 Nm (5.5 m·kgf, 40 ft·lbf)
Rear wheel nut: 55 Nm (5.5 m·kgf, 40 ft·lbf)
U2LB61E0.book Page 65 Friday, February 21, 2014 3:03 PM
Page 158 of 174

8-66
8
EBU25741TroubleshootingAlthough Yamaha ATVs receive a thorough in-
spection before shipment from the factory, trouble
may occur during operation. Any problem in the
fuel, compression, or ignition systems, for exam-
ple, can cause poor starting and loss of power.
The following troubleshooting charts represent
quick and easy procedures for checking these vi-
tal systems yourself. However, should your ATV
require any repair, take it to a Yamaha dealer,
whose skilled technicians have the necessary
tools, experience, and know-how to service the
ATV properly.
Use only genuine Yamaha replacement parts. Im-
itation parts may look like Yamaha parts, but they
are often inferior, have a shorter service life and
can lead to expensive repair bills.
WARNING
EWB02281Do not smoke when checking the fuel system.
Fuel can ignite or explode, causing severe inju-
ry or property damage. Make sure there are no
open flames or sparks in the area, including pi-
lot lights from water heaters or furnaces. U2LB61E0.book Page 66 Friday, February 21, 2014 3:03 PM
Page 159 of 174

8-67
8
EBU27695Troubleshooting chartsStarting problems or poor engine performance
Check the fuel level in
the fuel tank.1. Fuel
There is enough fuel.There is no fuel.
Check the battery.
Supply fuel.
The engine does not start.
Check the battery.
Operate the electric starter.4. Compression
There is compression.
There is no compression.
The engine does not start.
Have a Yamaha dealer check the ATV.
Remove the spark plug
and check the electrodes.3. Ignition
Wipe off with a dry cloth and correct the
spark plug gap, or replace the spark plug. Have a Yamaha dealer check the ATV.
The engine does not start.
Check the compression.
DryWet
Operate the electric starter.
Have a Yamaha dealer check the ATV.
The engine does not start.
Check the ignition.
Operate the electric starter.2. Battery
The engine turns over
quickly.
The engine turns over
slowly.
The battery is good.Check the battery lead connections,
and have a Yamaha dealer charge
the battery if necessary.
U2LB61E0.book Page 67 Friday, February 21, 2014 3:03 PM
Page 160 of 174
8-68
8Engine overheating
WARNING
EWB02291Wait for the engine and radiator to cool before removing the radiator cap. You could be burned by
hot fluid and steam blown out under pressure. Always put a thick rag over the cap when opening.
Allow any remaining pressure to escape before completely removing the cap. TIPIf coolant is not available, tap water can be temporarily used instead, provided that it is changed to the
recommended coolant as soon as possible. Wait until the
engine has cooled.
Check the coolant level in the
reservoir and radiator.
The coolant level
is OK.The coolant level is low.
Check the cooling system
for leakage.
Have a Yamaha dealer check
and repair the cooling system.Add coolant. (See TIP.)
Start the engine. If the engine overheats again, have a
Yamaha dealer check and repair the cooling system.
There is
leakage.
There is
no leakage.
U2LB61E0.book Page 68 Friday, February 21, 2014 3:03 PM