Page 184 of 223

182Vehicle careTread depth
Check tread depth at regular
intervals.
Tyres should be replaced for safety
reasons at a tread depth of 2-3 mm
(4 mm for winter tyres).
For safety reasons it is recommended that the tread depth of the tyres on
one axle should not vary by more than
2 mm.
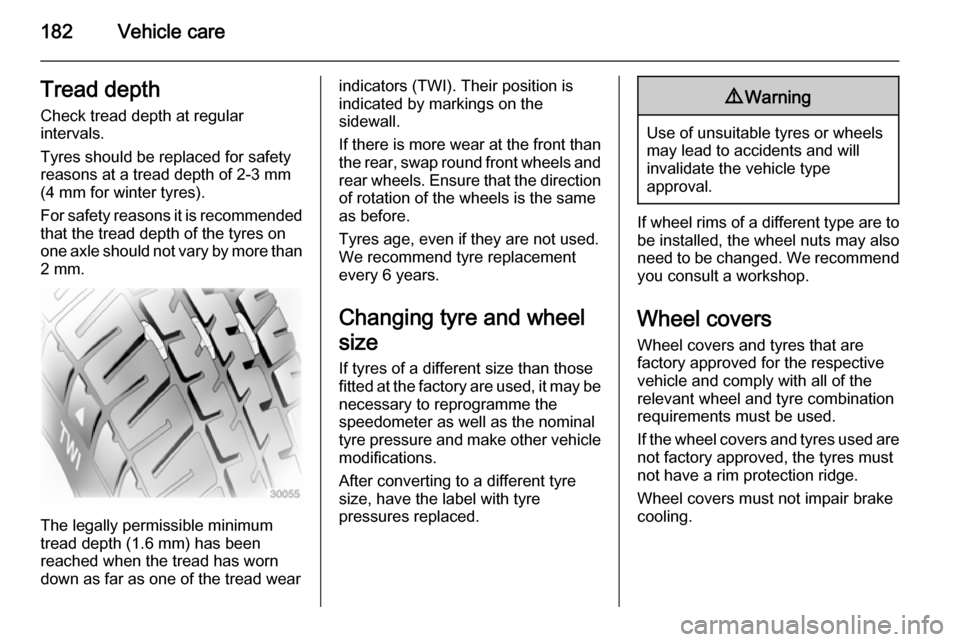
The legally permissible minimum
tread depth (1.6 mm) has been
reached when the tread has worn
down as far as one of the tread wear
indicators (TWI). Their position is
indicated by markings on the
sidewall.
If there is more wear at the front than
the rear, swap round front wheels and rear wheels. Ensure that the direction
of rotation of the wheels is the same
as before.
Tyres age, even if they are not used.
We recommend tyre replacement
every 6 years.
Changing tyre and wheel
size
If tyres of a different size than those
fitted at the factory are used, it may be necessary to reprogramme the
speedometer as well as the nominal tyre pressure and make other vehicle modifications.
After converting to a different tyre
size, have the label with tyre
pressures replaced.9 Warning
Use of unsuitable tyres or wheels
may lead to accidents and will
invalidate the vehicle type
approval.
If wheel rims of a different type are to
be installed, the wheel nuts may also
need to be changed. We recommend you consult a workshop.
Wheel covers Wheel covers and tyres that are
factory approved for the respective
vehicle and comply with all of the
relevant wheel and tyre combination
requirements must be used.
If the wheel covers and tyres used are
not factory approved, the tyres must
not have a rim protection ridge.
Wheel covers must not impair brake
cooling.
Page 185 of 223

Vehicle care1839Warning
Use of unsuitable tyres or wheel
covers could lead to sudden
pressure loss and thereby
accidents.
Tyre chains
Tyre chains are only permitted on the
front wheels.
They must be fitted to the tyres
symmetrically in order to achieve a
concentric fit.
Always use fine mesh chains that add no more than 15 mm to the tyre tread
and the inboard sides (including chain lock).9 Warning
Damage may lead to tyre blowout.
Tyre chains are permitted only on
16 inch wheels. We recommend you consult a workshop.
If the use of tyre chains is required
after suffering a flat front tyre, fit the
temporary spare wheel on the rear
axle and transfer one of the rear
wheels to the front axle.
General
The use of tyre chains is not permitted on the temporary spare wheel.
Tyre repair kit
Minor damage to the tyre tread or
sidewall can be repaired with the tyre
repair kit.
Do not remove foreign bodies from
the tyres.
Tyre damage exceeding 4 mm or that
is at the tyre's sidewall near the rim
cannot be repaired with the tyre repair kit.
In vehicles with a tyre repair kit, there may not be a jack and vehicle tool kit.
Vehicle tools 3 175.
Temporary spare wheel 3 189.9 Warning
Do not drive faster than 50 mph.
Do not use for a lengthy period.
Steering and handling may be
affected.
If you have a flat tyre:
Apply the electrical parking brake
3 137 and engage first gear, reverse
gear or P.
The tyre repair kit is in a storage
compartment below the floor cover in the load compartment.
To remove the tyre repair kit, open the
tailgate.
Page 186 of 223

184Vehicle care
Pull the floor cover handle upwards
3 69.
Vehicle tools 3 175.Caution
Do not allow objects to protrude
above the top of the rear floor
storage compartment, to avoid
damage to the storage area and
the load compartment floor.
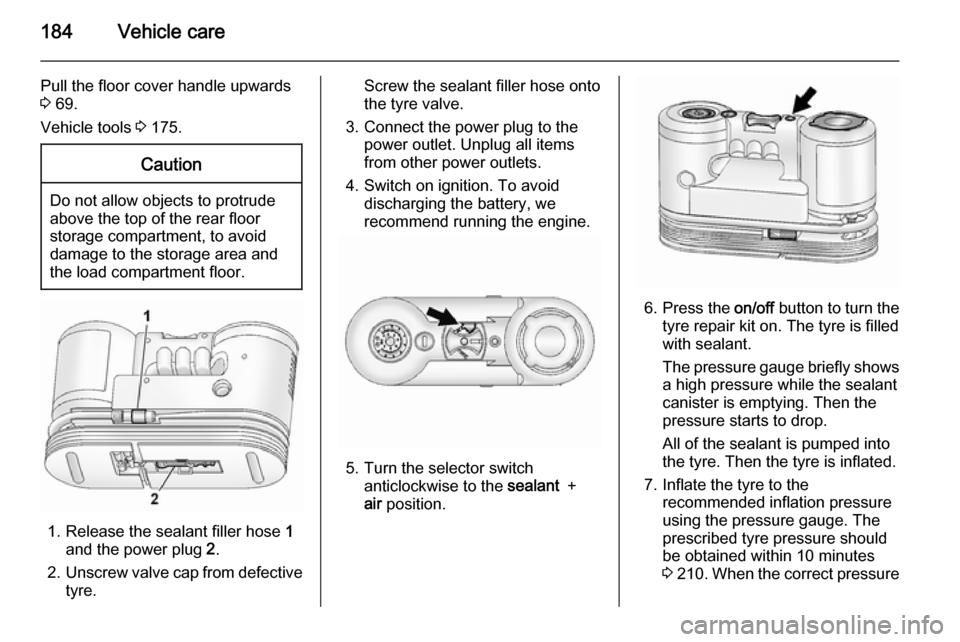
1. Release the sealant filler hose 1
and the power plug 2.
2. Unscrew valve cap from defective
tyre.
Screw the sealant filler hose onto
the tyre valve.
3. Connect the power plug to the power outlet. Unplug all items
from other power outlets.
4. Switch on ignition. To avoid discharging the battery, werecommend running the engine.
5. Turn the selector switch anticlockwise to the sealant +
air position.
6. Press the on/off button to turn the
tyre repair kit on. The tyre is filled
with sealant.
The pressure gauge briefly shows a high pressure while the sealant
canister is emptying. Then the
pressure starts to drop.
All of the sealant is pumped into
the tyre. Then the tyre is inflated.
7. Inflate the tyre to the recommended inflation pressure
using the pressure gauge. The
prescribed tyre pressure should
be obtained within 10 minutes
3 210 . When the correct pressure
Page 187 of 223

Vehicle care185
is obtained, switch off thecompressor.
If the prescribed tyre pressure is
not obtained within 10 minutes,
remove the tyre repair kit. Move
the vehicle one tyre rotation.
Reattach the tyre repair kit and
continue the filling procedure for
10 minutes. If the prescribed tyre
pressure is still not obtained, the
tyre is too badly damaged. Seek
the assistance of a workshop.
Drain excess tyre pressure with
the button next to the pressure
gauge.
Do not run the compressor for
longer than 10 minutes.
8. Detach the tyre repair kit and replace the tyre valve cap.
9. Remove any excess sealant using a cloth.
10. Take the label indicating maximum permitted speed from
the sealant canister and affix in
the driver's field of view.
11. Continue driving immediately so that sealant is evenly distributed
in the tyre. After driving approx.
6 miles (but no more than
10 minutes) stop and check tyre
pressure.
If the tyre pressure has fallen
slightly, set it to the correct value.
Repeat the procedure until there
is no more loss of pressure.
If the tyre pressure has fallen by
more than 10 psi, the vehicle must
not be driven. Seek the
assistance of a workshop.
12. To adjust tyre pressure, screw compressor air hose (arrowed)
directly onto tyre valve.
Page 190 of 223

188Vehicle care
5. Attach wheel wrench to eye ofthreaded rod and rotate wrench
clockwise to raise vehicle.
If this is not the case, carefully
lower the vehicle immediately and
reposition the jack. Raise the
vehicle until the wheel is just clear of the ground.
6. Unscrew wheel nuts completely and wipe clean with a cloth.
Do not grease the threads. Put
wheel nuts somewhere where the threads will not be soiled.
7. Change the wheel. Notes on spare wheel 3 189.
8. Screw on the wheel nuts and
tighten slightly by hand by turning
clockwise until wheel is held
against the hub.
9. Rotate wrench anticlockwise and lower vehicle to the ground.
10. Install the wheel wrench ensuring that it locates securely and tighten
each wheel nut in a crosswise
sequence. Tightening torque is
140 Nm.
11. Stow the replaced wheel 3 189
and the vehicle tools 3 175.
12. Check the tyre pressure of the installed tyre as soon as possible.
Have the defective tyre renewed and
replace temporary spare wheel with a
full specification wheel without delay.
Jacking position for lifting platform
Rear arm position of the lifting
platform centrically under the recess
of the sill.
Page 197 of 223

Vehicle care195
When cleaning with a high-pressure
jet cleaner, ensure a minimum
distance of 30 cm when working
around the tailgate to prevent
unintended unlocking.
Thoroughly rinse and leather-off the
vehicle. Rinse leather frequently. Use
separate leathers for painted and
glass surfaces: remnants of wax on
the windows will impair vision.
Exterior lights Headlight and other light covers are
made of plastic. Do not use any
abrasive or caustic agents, do not use
an ice scraper, and do not clean them dry.
Polishing and waxing
Wax the vehicle regularly (at the
latest when water no longer beads).
Otherwise, the paintwork will dry out.
Polishing is necessary only if the paint
has become dull or if solid deposits
have become attached to it.
Paintwork polish with silicone forms a
protective film, making waxing
unnecessary.Plastic body parts must not be treated with wax or polishing agents.
Windows and windscreen wiper blades
Use a soft lint-free cloth or chamois
leather together with window cleaner and insect remover.
When cleaning the rear window,
make sure the heating element inside
is not damaged.
For mechanical removal of ice, use a
sharp-edged ice scraper. Press the
scraper firmly against the glass so
that no dirt can get under it and
scratch the glass.
Clean smearing wiper blades with a
soft cloth and window cleaner.
Sunroof
Never clean with solvents or abrasive
agents, fuels, aggressive media
(e.g. paint cleaner, acetone-
containing solutions etc.), acidic or
highly alkaline media or abrasive
pads. Do not apply wax or polishing
agents to the sunroof.Wheels and tyres
Do not use high-pressure jet
cleaners.
Clean rims with a pH-neutral wheel
cleaner.
Rims are painted and can be treated
with the same agents as the body.
Paintwork damage
Rectify minor paintwork damage with
a touch-up pen before rust forms.
Have more extensive damage or rust areas repaired by a workshop.
Underbody Some areas of the vehicle underbody
have a PVC undercoating while other critical areas have a durable
protective wax coating.
After the underbody is washed, check
the underbody and have it waxed if
necessary.
Bitumen/rubber materials could
damage the PVC coating. Have
underbody work carried out by a
workshop.
Page 212 of 223
210Technical dataTyre pressuresUp to full loadUp to full load ECOTrailer towingEngineTyresfrontrearfrontrearfrontrear[kPa/bar]
([psi])[kPa/bar]
([psi])[kPa/bar]
([psi])[kPa/bar]
([psi])[kPa/bar]
([psi])[kPa/bar]
([psi])All215/70 R 16 5)
,
235/65 R 17,
235/55 R 18,
235/50 R 19240/2.4 (35)240/2.4 (35)260/2.6 (38)260/2.6 (38)240/2.4 (35)280/2.8 (41)T 155/90 R 16 6)
(Temporary spare)420/4.2 (60)420/4.2 (60)––420/4.2 (60)420/4.2 (60)5) Spare wheel or winter tyres.
6) Spare wheel only.
Page 216 of 223
214Customer informationRadio Frequency
Identification (RFID)
RFID technology is used in some vehicles for functions such as tyre
pressure monitoring and ignition
system security. It is also used in
connection with conveniences such
as radio remote controls for door
locking/unlocking and starting, and in- vehicle transmitters for garage door
openers. RFID technology in
Vauxhall vehicles does not use or
record personal information or link
with any other Vauxhall system
containing personal information.