Page 137 of 223
 areinflated to the correct pressure
3 210 and are suitable for the
prevailing road conditions. For
optimum system performance, the
vehicle")
Driving and operating135
Ensure tyres (including the spare) areinflated to the correct pressure
3 210 and are suitable for the
prevailing road conditions. For
optimum system performance, the
vehicle's tyres should not have
varying degrees of wear.
If control indicator B flashes in the
instrument cluster during driving, All-
wheel drive is temporarily disabled. If
B flashes continuously, there is a fault
in the system; seek the assistance of
a workshop.
All-wheel drive control indicator B
3 86.
On-road driving
The increased traction of All-wheel
drive vehicles offers greater driving
control in adverse road conditions,
particularly heavy snow and ice.
However, All-wheel drive vehicles are not "skid-proof" and do not decrease
stopping distances.
All-wheel drive vehicles have a higher
centre of gravity than conventional vehicles. Always approach curves at
an appropriate driving speed. Do notattempt to go as fast through turns as
you might in a conventional vehicle.
Strong crosswinds can affect the normal steering of the vehicle. Drive
slower under strong crosswind
conditions.
Off-road driving ■ Avoid protruding objects (such as rocks or tree stumps) that may
damage the underbody and tyres of your vehicle.
■ Test the brakes after operating in mud, to clear excess mud from the
braking surfaces.
■ Grip the steering wheel when travelling over rough terrain.
Terrain conditions can cause rapid
and unexpected movement in the
steering.
The ground clearance, ramp angle,
angle of approach and departure and
wading depth need to be considered, especially in hilly conditions and
when wading, to prevent the vehicle
becoming stuck and possibly
damaged.
Vehicle dimensions 3 207.Towing the vehicle 3 192.
Driving through water
Do not exceed the maximum wading
depth 3 207.
Check the depth of water: choose the
lowest entry and departure angles
before entering. Maintain a steady
engine speed, to help prevent water
from entering the exhaust system, but
do not exceed 3 mph, to avoid
splashing the water.
Drive with the flow wherever possible,
not against it. If you have to drive
against the flow, try to drive at an
angle to it, so that the leading corner
of the vehicle will help deflect water
from the engine compartment. Avoid
splashing the water - if the ignition
system becomes wet, the engine may
stall.
Avoid water entering the air intake
system. If water enters the air intake
system, engine seizure with severe
costly damage may result.
Test the brakes after leaving the
water - wet brakes are less effective
than dry ones. Perform the service
Page 138 of 223

136Driving and operating
operations for wading , involving
checks for water contamination, at
the earliest opportunity.
Service checks after wading
Check for the ingress of water into the following:
■ Brake fluid reservoir
■ Air cleaner element
■ Engine
■ Transmission
■ Axles
■ Interior of vehicle
Renew any lubricating oil or hydraulic
fluid that has a milky appearance,
indicating contamination with water.
Cleaning
Clean the vehicle thoroughly and as
soon as possible after driving off-
road.
Do not let mud remain dry on any part
of the vehicle as it becomes abrasive and can damage paint, glass, seals,
bearings and brake components. If
left to build up, mud can seriously
affect the airflow through and overmechanical components and cause
localised overheating and failure of
parts, especially in the engine
compartment.
Ensure the radiator core and the area
between the radiator and intercooler/
oil cooler (where installed) is cleaned, to maintain proper cooling air flow.
Check the radiator and cooler cores
for blockage (sand, silt etc.).
Check the tyre treads.
Clean and check the mechanical
parts of the vehicle, particularly the
following areas:
■ Driveshafts, including sealing bellows
■ Front brake calipers, pads and discs
■ Front suspension
■ Clutch fork sealing bellows
■ Rear brake calipers, pads and discs
■ Rear suspension
■ Fuel tank and underguard
■ Breathers, axles and fuel tank
■ Load sensing valve■ Transfer box and underguard
■ Engine oil pan and underguard
Observe the following: ■ Do not spray high-pressure water directly at the vehicle seals
■ The wheels must be removed to clean all mud and stones from the
brake calipers and to check brake
pad wear
■ The areas on the upper side of the underguards must be cleared of
stones, to prevent damage to the
engine oil pan and the fuel tank
Page 139 of 223

Driving and operating137Brakes
The brake system comprises two
independent brake circuits.
If a brake circuit fails, the vehicle can
still be braked using the other brake
circuit. However, braking effect is
achieved only when the brake pedal
is depressed firmly. Considerably
more force is needed for this. The
braking distance is extended. Seek the assistance of a workshop before
continuing your journey.
When the engine is not running, the
support of the brake servo unit
disappears once the brake pedal has
been depressed once or twice.
Braking effect is not reduced, but
braking requires significantly greater
force. It is especially important to bear this in mind when being towed.
Control indicator R 3 85.
Antilock brake system
Antilock brake system (ABS)
prevents the wheels from locking.ABS starts to regulate brake pressure as soon as a wheel shows a tendency to lock. The vehicle remains
steerable, even during hard braking.
ABS control is made apparent
through a pulse in the brake pedal
and the noise of the regulation
process.
For optimum braking, keep the brake
pedal fully depressed throughout the
braking process, despite the fact that
the pedal is pulsating. Do not reduce
the pressure on the pedal.
After starting off, the system performs a self-test which may be audible.
Control indicator u 3 86.
Fault9 Warning
If there is a fault in the ABS, the
wheels may be liable to lock due
to braking that is heavier than
normal. The advantages of ABS are no longer available. During
hard braking, the vehicle can nolonger be steered and may
swerve.
You can continue driving, provided
you drive with care and anticipation.
Have the cause of the fault remedied
by a workshop.
Parking brake Electrical parking brake
Page 140 of 223

138Driving and operating
Applying when vehicle is stationary
Pull switch m, the electrical parking
brake operates automatically with
adequate force. For maximum force,
e.g. parking with a trailer or on
inclines, pull switch m twice.
The electrical parking brake can
always be activated, even if the
ignition is off.
Do not operate electrical parking
brake system too often without
engine running as this will discharge
the battery.
Before leaving the vehicle, check the
electrical parking brake status.
Control indicator m 3 86.
Releasing
Switch on ignition. Keep foot brake
depressed and then push switch m.
If the foot brake is not depressed
when attempting to release electrical
parking brake, a warning chime will
sound and control indicator -
illuminates in the instrument cluster
3 90.Drive away function
With the engine running, selecting a
forward gear (manual transmission)
or engaging D (automatic
transmission) and then depressing the accelerator pedal automatically
releases the electrical parking brake.
This is not possible when the switch
m is pulled at the same time.
This function also helps driving away
on inclines.
Aggressive drive away may reduce
life time of wear parts.
Dynamic braking when vehicle is
moving
When the vehicle is moving and the
switch m is kept pulled, a warning
chime will sound and the electrical
parking brake system will decelerate
the vehicle, but will not apply
statically.
As soon as the switch m is released,
dynamic braking will be stopped.Fault
Failure mode of electrical parking
brake is indicated by control indicator
j 3 86.
In the event of a fault, to apply
electrical parking brake: pull and hold the switch m for a few seconds. If
control indicator m illuminates,
electrical parking brake has been applied successfully.
To release electrical parking brake:
push and hold the switch m for a few
seconds. If control indicator m
extinguishes, electrical parking brake
has been released successfully.
If control indicator m flashes:
electrical parking brake is not fully
applied or released. When m is
continuously flashing, with ignition switched on depress brake pedal,
release electrical parking brake and
retry applying.
If m continues to flash, do not drive
the vehicle. If necessary, place
wedge blocks or equivalent in front of and behind wheels to prevent vehicle
Page 141 of 223

Driving and operating139
movement. Seek the assistance of a
workshop to have the cause of the
fault remedied.
Brake assist
If the brake pedal is depressed
quickly and forcefully, maximum
brake force is automatically applied
(full braking).
Maintain steady pressure on the
brake pedal for as long as full braking
is required. Maximum brake force is
automatically reduced when the
brake pedal is released.
Hill start assist
The system helps prevent unintended movement when driving away on
inclines.
When releasing the foot brake after
stopping on an incline, the brakes
remain on for a further 2 seconds. The brakes release automatically as soon
as the vehicle begins to accelerate.Ride control systems
Electronic Stability Control
Electronic Stability Control (ESC)
improves driving stability when
necessary, regardless of the type of
road surface or tyre grip. It also
prevents the drive wheels from
spinning.
As soon as the vehicle starts to
swerve (understeer/oversteer),
engine output is reduced and the
wheels are braked individually. This
considerably improves the driving
stability of the vehicle on slippery road
surfaces.
ESC is operational as soon as control indicators b and t extinguish in the
instrument cluster after switching on the ignition.
When ESC is active b flashes 3 87.9 Warning
Do not let this special safety
feature tempt you into taking risks
when driving.
Adapt speed to the road
conditions.
Deactivation
With ESC active, if wheels are
slipping on wet, snowy or icy roads,
engine speed may not increase when
accelerator pedal is depressed. The
vehicle may not move.
Page 142 of 223

140Driving and operating
Switch off ESC function, to allow
engine rpm to increase, by pressing
button t briefly. Control indicator t
illuminates in the instrument cluster.
ESC is reactivated by pressing button
t again. The control indicator
extinguishes.
Control indicator t 3 88.
Hydraulic brake assist
When the ESC function comes into
action and recognises any
emergency situation requiring hard
braking, it automatically delivers
increased braking pressure to the
wheels.
Active rollover protection If the vehicle moves in an unstable
manner, this function helps the
vehicle maintain normal stability.
Trailer stability assist
If the system detects snaking
movements, engine power is reduced
and the vehicle/trailer combination is
selectively braked until the snaking
ceases. While system is working keep steering wheel as still as possible.Descent control system
The Descent control system (DCS)
allows the vehicle to travel at a low
speed without depressing the foot
brake. The vehicle will automatically
decelerate to a low speed and remain
at that speed when the system is
activated. Some noise or vibration
from the brake system may be
apparent when the system is active.Caution
Use only when descending steep
grades while driving off-road. Do
not use when driving on normal
road surfaces. Unnecessary
usage of the DCS function, such
as while driving on normal roads,
may damage the brake system
and the ESC function.
Activation
At speeds below approx. 30 mph,
press button u. The green control
indicator u flashes in the instrument
cluster, to show DCS is in operation.
DCS will not activate at speeds above 30 mph, even if the button is pressed.
Deactivation
Press button u again. The green
control indicator u extinguishes.
Depressing the foot brake or
accelerator will also cause the system to be deactivated.
Page 143 of 223
 of frictio")
Driving and operating141
FaultThe yellow control indicator u flashes
to indicate that the system is not ready for conditions to operate, due to the high temperature (approx.
350 - 400 °C) of friction material,
through severe or repeated braking. It
will extinguish when the temperature
drops below 350 °C.
The yellow control indicator u
illuminates when there is a
malfunction in the system, due to the
extremely high temperature
(over 400 °C) of friction material,
through severe or repeated braking. It will extinguish when the temperaturedrops below 350 °C. These
temperatures may differ according to
vehicle conditions or outside
conditions.
Flashing or illumination of the yellow
control indicator u reminds the driver
that the friction material needs to cool
down: drive the vehicle without
braking as much as possible. If the
control indicator does not extinguish,
have the cause of the fault remedied
by a workshop.DSC control indicators u 3 87.
Automatic level control The rear level of the vehicle is
automatically adjusted to the load
conditions while driving. Suspension
and ground clearance are increased,
which improves driving conditions.
The automatic level control is
activated after the vehicle has been
driven for some distance, depending
on the vehicle load and the road
conditions.
Do not use full payload in the event of
a fault. Have the cause of the fault
remedied by a workshop.
Headlight range adjustment 3 107.Driver assistance
systems9 Warning
Driver assistance systems are
developed to support the driver
and not to replace the driver's
attention.
The driver accepts full
responsibility when driving the
vehicle.
When using driver assistance
systems, always take care
regarding the current traffic
situation.
Cruise control
The cruise control can store and
maintain speeds above 25 mph.
Deviations from the stored speeds
may occur when driving uphill or
downhill.
For safety reasons the cruise control
cannot be activated until the foot
brake has been operated once.
Page 144 of 223

142Driving and operating
Do not use the cruise control if it is notadvisable to maintain a constant
speed.
With automatic transmission, only
activate cruise control in automatic
mode.
Control indicator m 3 91.
Activation
Press the e button; control
indicator m illuminates yellow in the
instrument cluster. Accelerate to the
desired speed, press the - SET button
and release it. The current speed is
stored and maintained. Control
indicator m illuminates green.
Accelerator pedal can be released.
Vehicle speed can be increased by depressing the accelerator pedal.
When the accelerator pedal is
released, the previously stored speed
is resumed.
Increase speed
With cruise control active, press and
hold the + RES button or tap the
+ RES button repeatedly: speed
increases continuously or in small
increments.
Alternatively accelerate to the desired speed and store by pressing the- SET button.
Reduce speed
With cruise control active, press and
hold the - SET button or tap the
- SET button repeatedly: speed
decreases continuously or in small
increments.Deactivation
Press the e button; control
indicator m extinguishes and the
vehicle slowly decelerates.
Automatic deactivation: ■ vehicle speed below approx. 25 mph,
■ the brake pedal is depressed,
■ the clutch pedal is depressed,
■ selector lever in N,
■ the Electronic Stability Control is operating.
Resume stored speed
Press the + RES button at a speed
above 25 mph. The stored speed will be obtained.
Deleting the stored speed The stored speed will be deleted by
pressing the e button or
switching off the ignition.
 1
1 2
2 3
3 4
4 5
5 6
6 7
7 8
8 9
9 10
10 11
11 12
12 13
13 14
14 15
15 16
16 17
17 18
18 19
19 20
20 21
21 22
22 23
23 24
24 25
25 26
26 27
27 28
28 29
29 30
30 31
31 32
32 33
33 34
34 35
35 36
36 37
37 38
38 39
39 40
40 41
41 42
42 43
43 44
44 45
45 46
46 47
47 48
48 49
49 50
50 51
51 52
52 53
53 54
54 55
55 56
56 57
57 58
58 59
59 60
60 61
61 62
62 63
63 64
64 65
65 66
66 67
67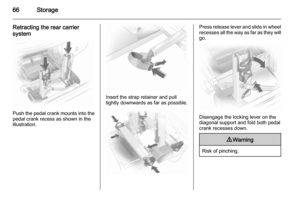 68
68 69
69 70
70 71
71 72
72 73
73 74
74 75
75 76
76 77
77 78
78 79
79 80
80 81
81 82
82 83
83 84
84 85
85 86
86 87
87 88
88 89
89 90
90 91
91 92
92 93
93 94
94 95
95 96
96 97
97 98
98 99
99 100
100 101
101 102
102 103
103 104
104 105
105 106
106 107
107 108
108 109
109 110
110 111
111 112
112 113
113 114
114 115
115 116
116 117
117 118
118 119
119 120
120 121
121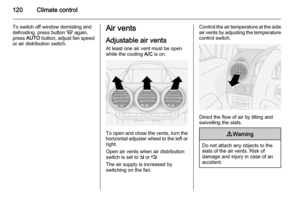 122
122 123
123 124
124 125
125 126
126 127
127 128
128 129
129 130
130 131
131 132
132 133
133 134
134 135
135 136
136 137
137 138
138 139
139 140
140 141
141 142
142 143
143 144
144 145
145 146
146 147
147 148
148 149
149 150
150 151
151 152
152 153
153 154
154 155
155 156
156 157
157 158
158 159
159 160
160 161
161 162
162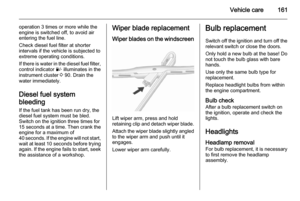 163
163 164
164 165
165 166
166 167
167 168
168 169
169 170
170 171
171 172
172 173
173 174
174 175
175 176
176 177
177 178
178 179
179 180
180 181
181 182
182 183
183 184
184 185
185 186
186 187
187 188
188 189
189 190
190 191
191 192
192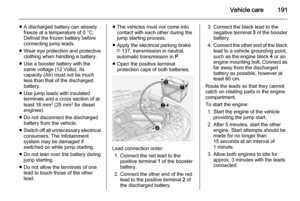 193
193 194
194 195
195 196
196 197
197 198
198 199
199 200
200 201
201 202
202 203
203 204
204 205
205 206
206 207
207 208
208 209
209 210
210 211
211 212
212 213
213 214
214 215
215 216
216 217
217 218
218 219
219 220
220 221
221 222
222