Page 9 of 19
 Stow the seat belt buckles.
(2) Stow the center head restraint.
(3) Hook the seat belt to the seat belt hangers.")
OVERVIEW
FEATURES/OPERATIONS
SAFETY AND EMERGENCY FEATURES
1415
FEATURES/OPERATIONS
(1) Stow the seat belt buckles.
(2) Stow the center head restraint.
(3) Hook the seat belt to the seat belt hangers.
(4) Fold down the outer head restraints.
(5) Fold the seats.
(6) Lift the seats sideward.
(7) Lock the seats.
(8) Install the seat hook covers on the seat hooks.
(1)
(5)
(3)
(2)
Seats-Tumbling third row seats
(4)
Push
(6)
Pull
(7)(8)Seat hook cover
Pull
Lights & turn signals
Turn signals
Headlights
High beam flasher
Low beam
Front fog lights
-Daytime Running Light system (DRL) Automatically turns on the headlights
at a
reduced intensity.
-Automatic light cut off system Automatically turns lights off after a delay of 30 seconds.
Front fog lights come on only when the headlights are on low beam.
Right turn
Lane change
Lane change Left turn
High beam
Auto
Headlights
Parking lights
Turn
Pull
Returning seats
(1)(2)
Returning seats
(1) Install the seat hook covers into the back of the seat cushions.
(2) Lower the seats to their original position.
Page 10 of 19

OVERVIEW
FEATURES/OPERATIONS
SAFETY AND EMERGENCY FEATURES
1617
Window wipers & washers
FEATURES/OPERATIONS
Back door
Pull
Unlock
The back door can be locked and unlocked using the entry function, wireless
remote control or door lock switch.
Raise
Windows-Power
Up
Down
Driver sideWindow lock
switch
Automatic operation Push the switch completely down or pull it completely up
and release to fully open or close. To stop window midway, lightly push the switch
in the opposite direction.
Window lock switch Deactivates all passenger windows. Driver’s window remains
operable.
Moonroof
Sliding operationTilting operation
OpenTilt
CloseClose
Recommended open position to
minimize wind noise.
Push once to open partway;
again to open completely.
Mirrors-Side
Linked mirror function when reversing The outside rearview mirrors
automatically angle downwards when vehicle is in reverse. Will only operate when
switch is in “L” or “R” position.
Use switch to adjust mirror
angle while in ACCESSORY
or IGNITION ON mode.
Front
Rear
Wash and wipe
Wipe
Interval wipe
Wash and wipe
Adjust sensor
sensitivity2
Pull to wash and wipe
Single wipe
Auto wipe
Slow
Fast
1 Intermittent windshield wiper frequency adjustment
Rotate to increase/decrease wipe frequency.
2 Rain-sensing windshield wiper Rotate to increase/decrease sensor sensitivity.
With intermittent wiper
(if equipped) With AUTO rain-sensing wiper
(if equipped)
Pull to wash and wipe
Single wipe
Interval wipe
Slow
Fast
Adjust
frequency
1
Adjust
Page 11 of 19
.
�")
OVERVIEWFEATURES/OPERATIONS
SAFETY AND EMERGENCY FEATURES
19
18
FEATURES/OPERATIONS
AudioiPod®/USB/AUX port
“ ”
Use to search within the
selected audio medium
(radio, CD, iPod
®, etc.).
“MODE”
Push to turn audio ON and to
select an audio mode. Push and
hold to turn audio system OFF.
Steering wheel switches
MODE
Volume
control
vv
Push to
turn ON/
OFF
Eject disc Mute/PauseDisc slotTurn to
search
selected
media (radio,
CD, DVD,
iPod
®, etc.)
Display
audio
control
screen
Display
audio
setup
screen
Function tabs:
Select media
mode
NOTE: For more information, refer to the Owner’s Manual or “Navigation System
Owner’s Manual.”
Seek station/
track/presets
or rewind/FF
Type A
iPod®/USB port
By connecting a USB-compatible portable audio device or USB memory to the
USB port, you can listen to music from the portable audio device or USB memory
through the vehicle’s speaker system.
AUX port
By inserting a mini plug into the AUX port, you can listen to music from a portable
audio device through the vehicle’s speaker system while in AUX mode.
1. Press the “Setup” button on the multimedia faceplate.
2. Touch “Bluetooth” on the display screen.
3. Touch “Add” on the display screen.
4. Go to your phone and access Settings - Bluetooth.
5. On your phone touch device to be paired.
6. Confirm the PIN. Touch “Ok” or “Pair”
Once you have connected the Bluetooth device, it is automatically connected
whenever the “POWER” switch is in the ACCESSORY or ON mode.
** For detailed pairing instructions, see your audio system owner’s manual.
Bluetooth Device Pairing**
Page 12 of 19

Temperature selector (right side)
Au")
OVERVIEW
FEATURES/OPERATIONS
SAFETY AND EMERGENCY FEATURES
21
20
FEATURES/OPERATIONS
Air Conditioning/HeatingRear Air Conditioning
Temperature selector (left side)
Temperature selector (right side)
Automatic climate control ON
NOTE: For more information, refer to the Owner’s manual or “Navigation System
Owner’s Manual.”
Front Air Conditioning
Driver side temperature display
Airflow controls (touch to change air outlets)
Passenger side temperature display
Rear AC control button (touch to display rear AC control screen)
Fan speed
Air Conditioning ON/OFF
“4-ZONE” button (touch to set the temperatures independently for driver,
front passenger and rear seats)
Windshield wiper de-icer (if equipped)
Temperature controls (driver side)
CLIMATE (push to display AC control screen)
Automatic climate control ON
Adjusting the temperature setting will cause the airflow vents, air intake and
fan to adjust automatically.
Climate control OFF
Windshield airflow/defogger (fresh air only)
Outside rearview mirror/Rear window defogger
Micro dust and pollen removal mode ON/OFF
Rear Air Conditioning operation mode ON/OFF
Air intake control (switch between outside air and recirculated air mode)
Temperature controls (passenger side)
Type A
Seat heaters and ventilators
Front seats
Push knob to pop the controller out. Turn
clockwise for heater; counterclockwise
for airflow.
Push
OFF
Blows air from the seat
Turns the seat heater on
Fan speed
Airflow vent
Climate control OFF
Second seats
AUT O
TEMP
OFF TEMP
HI
LO
OFF
HI
LO
OFF
HI
LO
OFF
HI
LOLeft
second seatRight
second seat
Page 13 of 19
OVERVIEW
FEATURES/OPERATIONS
SAFETY AND EMERGENCY FEATURES
23
22
Crawl control
Crawl control allows travel on extremely rough off-road surfaces at a fixed low
speed without pressing the accelerator or brake pedal.
Refer to the Owner’s Manual for more details.
Speed selection switch
LoHi
Med
PushLo-MedMed-Hi
Speed modes
Cruise control (if equipped)
1 The set speed may also be cancelled by depressing the brake pedal.2 The set speed may be resumed once vehicle speed exceeds 25 mph.
Turning system ON/OFF
Functions
System ON/OFF
RES
SET
CANCE L
Increase speed
Decrease speed
Cancel1
Resume2
Set
FEATURES/OPERATIONS
Page 14 of 19

OVERVIEW
FEATURES/OPERATIONS
SAFETY AND EMERGENCY FEATURES
25
24
FEATURES/OPERATIONS
1 The set speed may also be cancelled by depressing the brake pedal.2 The set speed may be resumed once vehicle speed exceeds 25 mph.
System ON/OFF
Increase speed
Decrease speed
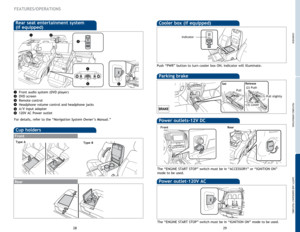
Garage door openers manufactured under license from HomeLink®* can be
programmed to operate garage doors, estate gates, security lighting, etc\
.
Refer to “Garage door opener,” Section 3-7 in the Owner’s Manual for more
details.
For programming assistance, contact HomeLink
® at 1-800-355-3515, or visit
http://www.homelink.com.
* HomeLink® is a registered trademark of Johnson Controls, Inc.
Garage door opener (HomeLink®)*
Cancel1
Resume2
Set
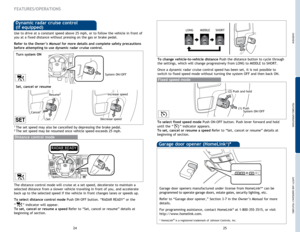
Use to drive at a constant speed above 25 mph, or to follow the vehicle in front of
you at a fixed distance without pressing on the gas or brake pedal.
Refer to the Owner’s Manual for more details and complete safety precautions
before attempting to use dynamic radar cruise control.
Distance control mode
The distance control mode will cruise at a set speed, decelerate to maintain a
selected distance from a slower vehicle traveling in front of you, and accelerate
back up to the selected speed if the vehicle in front changes lanes or speeds up.
To select distance control mode Push ON-OFF button. “RADAR READY” or the
“
” indicator will appear.
To set, cancel or resume a speed Refer to “Set, cancel or resume” details at
beginning of section.
Turn system ON
To change vehicle-to-vehicle distance Push the distance button to cycle through
the settings, which will change progressively from LONG to MIDDLE to SHORT.
Once a dynamic radar cruise control speed has been set, it is not possible to
switch to fixed speed mode without turning the system OFF and then back ON.
LONGMIDDLE SHORT
Set, cancel or resume
Fixed speed mode
To select fixed speed mode Push ON-OFF button. Push lever forward and hold
until the “
” indicator appears.
To set, cancel or resume a speed Refer to “Set, cancel or resume” details at
beginning of section.
(1) Push
System ON/OFF
(2) Push and hold
Dynamic radar cruise control
(if equipped)
Page 15 of 19
 Front tire angle")
OVERVIEW
FEATURES/OPERATIONS
SAFETY AND EMERGENCY FEATURES
27
26
FEATURES/OPERATIONS
Multi-Information Display
Push “DISP” to scroll through the following information screens:
(1) Front tire angle
(2) Miles left on remaining fuel
(3) Average gas mileage after refueling
(4) Current gas mileage
(5) Average gas mileage and Eco Driving Indicator Zone Display
(6) Average vehicle speed
(7) Speedometer
(8) Turn-by-turn navigation setting screen (vehicles with navigation system)
(9) Tire inflation pressure
(10) Display OFF
Bluetooth® technology allows dialing or receipt of calls without taking hands from
the steering wheel or using a cable to connect the telephone and the system.
Refer to “Hands-free system (for cellular phone),” Section 4 in the Navigation
System Owner’s Manual , for more information about phone connections and
compatibility.
MicrophoneDisplay
Type BType A
Steering wheel telephone switches
Start callStart call
End callEnd call
Voice
command
button
Voice
command
button
Door locks
LockUnlock
Telephone controls (Bluetooth®)
Up
Toward
driver
Down
NOTE: Do not attempt to adjust while the vehicle is in motion.
Tilt and telescopic steering wheel
Away
from
driver
Control switch
Page 16 of 19
OVERVIEW
FEATURES/OPERATIONS
SAFETY AND EMERGENCY FEATURES
29
28
FEATURES/OPERATIONS
Cup holders
Parking brake
(2) Push
SetRelease
(1) Pull slightly
(3) Lower
Pull
COOLBOX
PWR
Cooler box (if equipped)
Push “PWR” button to turn cooler box ON; indicator will illuminate.
Indicator
Front audio system (DVD player)
DVD screen
Remote control
Headphone volume control and headphone jacks
A/V input adapter
120V AC Power outlet
For details, refer to the “Navigation System Owner’s Manual .”
Rear
Front
Power outlets-12V DC
The “ENGINE START STOP” switch must be in “ACCESSORY” or “IGNITION ON”
mode to be used.
Power outlet-120V AC
The “ENGINE START STOP” switch must be in “IGNITION ON” mode to be used.
Front
Type A
Rear
Rear seat entertainment system
(if equipped)
Type B


 Push
SetRelease
(1) Pull slightly
(3) Lower
Pull
COOLBOX
PWR
Cooler box (if equipped")